height KIA SOUL EV 2019 Owners Manual
[x] Cancel search | Manufacturer: KIA, Model Year: 2019, Model line: SOUL EV, Model: KIA SOUL EV 2019Pages: 455, PDF Size: 15.52 MB
Page 81 of 455
Safety features of your vehicle
23
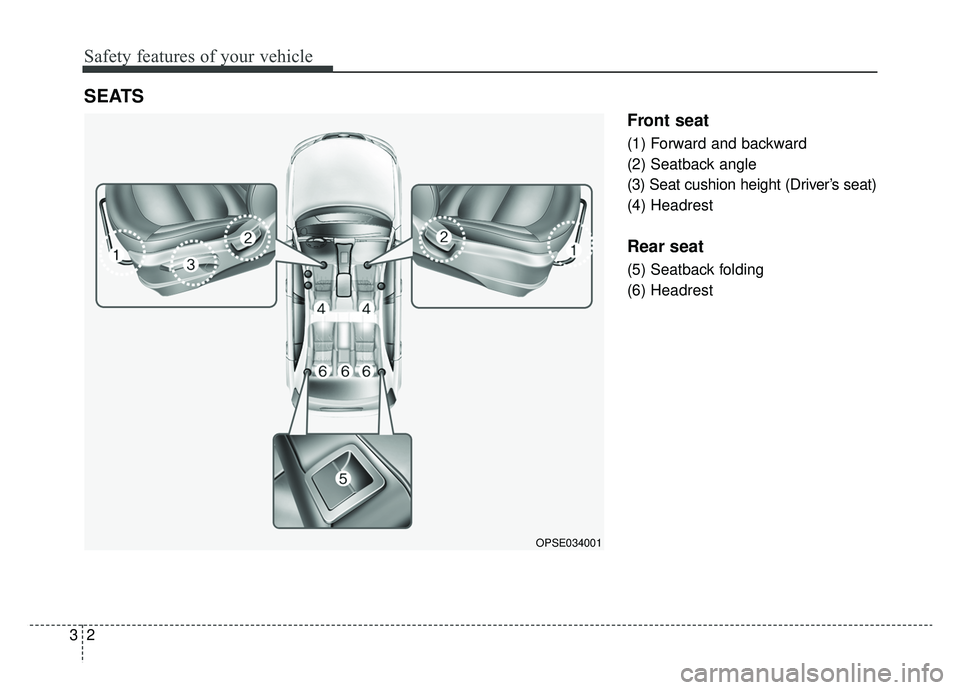
Front seat
(1) Forward and backward
(2) Seatback angle
(3) Seat cushion height (Driver’s seat)
(4) Headrest
Rear seat
(5) Seatback folding
(6) Headrest
SEATS
OPSE034001
Page 85 of 455
Safety features of your vehicle
63
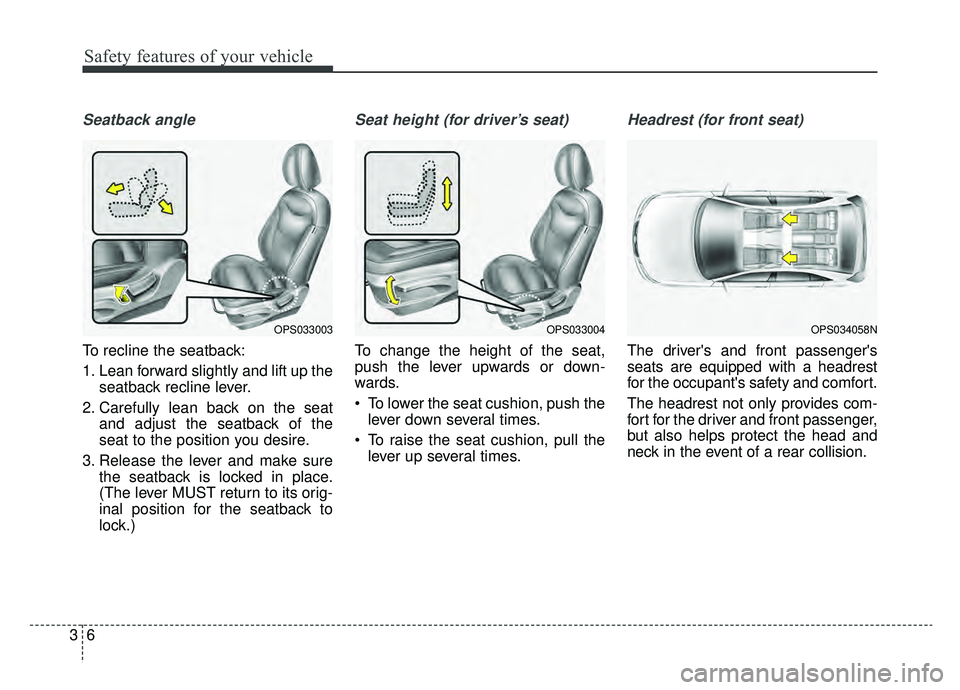
Seatback angle
To recline the seatback:
1. Lean forward slightly and lift up theseatback recline lever.
2. Carefully lean back on the seat and adjust the seatback of the
seat to the position you desire.
3. Release the lever and make sure the seatback is locked in place.
(The lever MUST return to its orig-
inal position for the seatback to
lock.)
Seat height (for driver’s seat)
To change the height of the seat,
push the lever upwards or down-
wards.
To lower the seat cushion, push thelever down several times.
To raise the seat cushion, pull the lever up several times.
Headrest (for front seat)
The driver's and front passenger's
seats are equipped with a headrest
for the occupant's safety and comfort.
The headrest not only provides com-
fort for the driver and front passenger,
but also helps protect the head and
neck in the event of a rear collision.
OPS033003OPS033004OPS034058N
Page 86 of 455
37
Safety features of your vehicle
For maximum effectiveness in case of
an accident, the headrest should be
adjusted so the middle of the headrest
is at the same height of the center of
gravity of an occupant's head.
Generally, the center of gravity of most
people's head is similar with the height
of the top of their eyes. Also, adjust the
headrest as close to your head as pos-
sible. For this reason, the use of a
cushion that holds the body away from
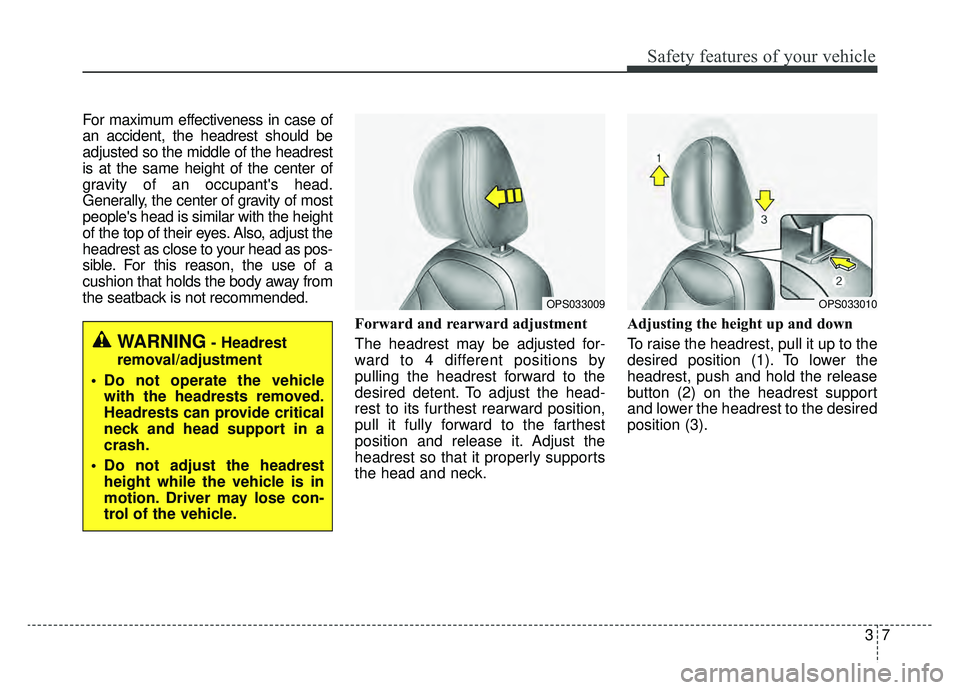
the seatback is not recommended.Forward and rearward adjustment
The headrest may be adjusted for-
ward to 4 different positions by
pulling the headrest forward to the
desired detent. To adjust the head-
rest to its furthest rearward position,
pull it fully forward to the farthest
position and release it. Adjust the
headrest so that it properly supports
the head and neck.Adjusting the height up and down
To raise the headrest, pull it up to the
desired position (1). To lower the
headrest, push and hold the release
button (2) on the headrest support
and lower the headrest to the desired
position (3).
WARNING- Headrest
removal/adjustment
Do not operate the vehicle with the headrests removed.
Headrests can provide critical
neck and head support in a
crash.
Do not adjust the headrest height while the vehicle is in
motion. Driver may lose con-
trol of the vehicle.
OPS033009OPS033010
Page 87 of 455
Safety features of your vehicle
83
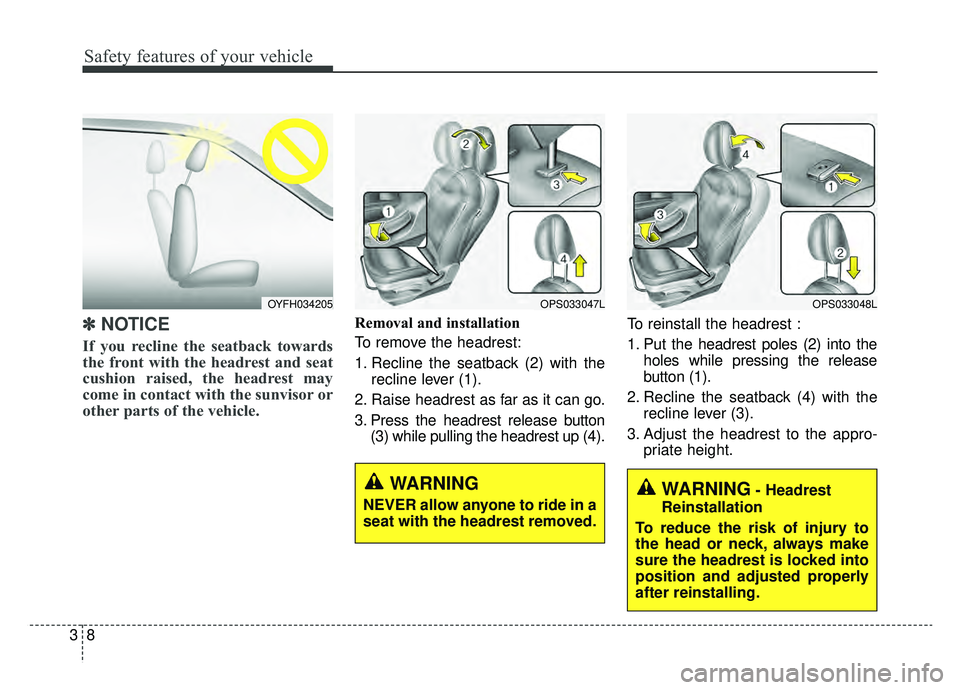
✽ ✽
NOTICE
If you recline the seatback towards
the front with the headrest and seat
cushion raised, the headrest may
come in contact with the sunvisor or
other parts of the vehicle.
Removal and installation
To remove the headrest:
1. Recline the seatback (2) with the
recline lever (1).
2. Raise headrest as far as it can go.
3. Press the headrest release button (3) while pulling the headrest up (4). To reinstall the headrest :
1. Put the headrest poles (2) into the
holes while pressing the release
button (1).
2. Recline the seatback (4) with the recline lever (3).
3. Adjust the headrest to the appro- priate height.
OYFH034205OPS033047L
WARNING
NEVER allow anyone to ride in a
seat with the headrest removed.
OPS033048L
WARNING- Headrest
Reinstallation
To reduce the risk of injury to
the head or neck, always make
sure the headrest is locked into
position and adjusted properly
after reinstalling.
Page 90 of 455
311
Safety features of your vehicle
For maximum effectiveness in case of
an accident, the headrest should be
adjusted so the middle of the head-
rest is at the same height as the cen-
ter of gravity of an occupant's head.
Generally, the center of gravity of
most people's head is similar with
the height of the top of their eyes.
Also adjust the headrest as close to
your head as possible. For this rea-
son, the use of a cushion that holds
the body away from the seatback is
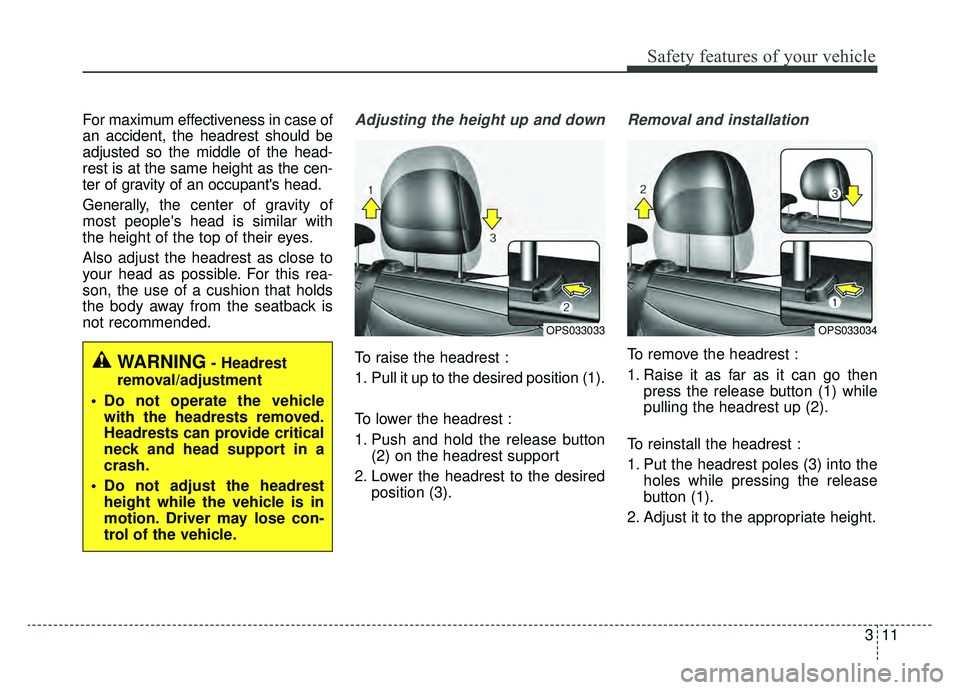
not recommended.Adjusting the height up and down
To raise the headrest :
1. Pull it up to the desired position (1).
To lower the headrest :
1. Push and hold the release button (2) on the headrest support
2. Lower the headrest to the desired position (3).
Removal and installation
To remove the headrest :
1. Raise it as far as it can go thenpress the release button (1) while
pulling the headrest up (2).
To reinstall the headrest :
1. Put the headrest poles (3) into the holes while pressing the release
button (1).
2. Adjust it to the appropriate height.WARNING- Headrest
removal/adjustment
Do not operate the vehicle with the headrests removed.
Headrests can provide critical
neck and head support in a
crash.
Do not adjust the headrest height while the vehicle is in
motion. Driver may lose con-
trol of the vehicle.
OPS033033OPS033034
Page 95 of 455
Safety features of your vehicle
16
3
Seat belt - Driver's 3-point system
with emergency locking retractor
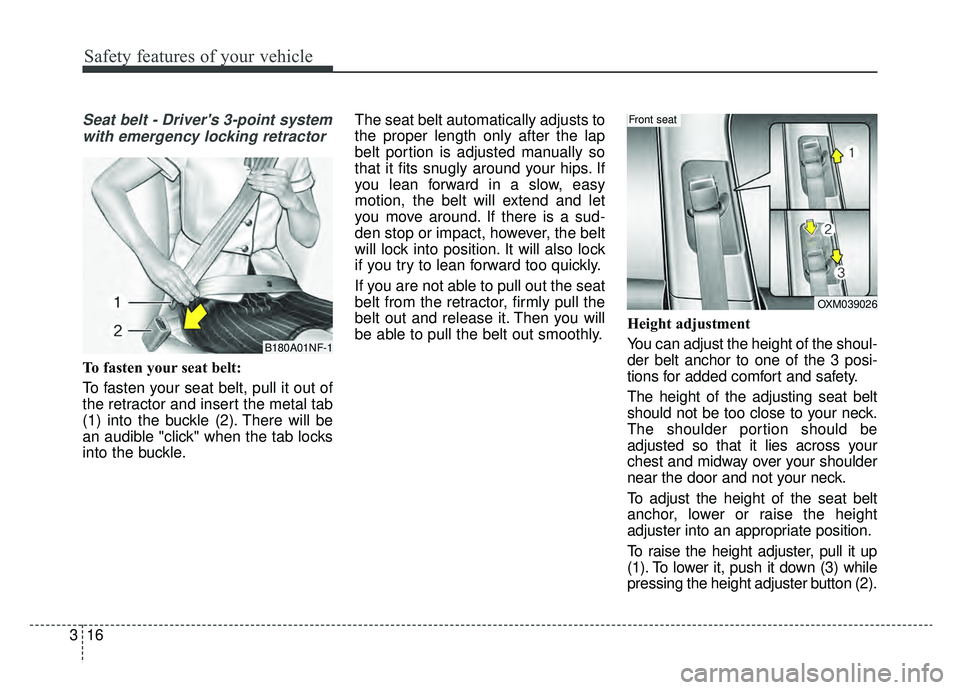
To fasten your seat belt:
To fasten your seat belt, pull it out of
the retractor and insert the metal tab
(1) into the buckle (2). There will be
an audible "click" when the tab locks
into the buckle. The seat belt automatically adjusts to
the proper length only after the lap
belt portion is adjusted manually so
that it fits snugly around your hips. If
you lean forward in a slow, easy
motion, the belt will extend and let
you move around. If there is a sud-
den stop or impact, however, the belt
will lock into position. It will also lock
if you try to lean forward too quickly.
If you are not able to pull out the seat
belt from the retractor, firmly pull the
belt out and release it. Then you will
be able to pull the belt out smoothly.
Height adjustment
You can adjust the height of the shoul-
der belt anchor to one of the 3 posi-
tions for added comfort and safety.
The height of the adjusting seat belt
should not be too close to your neck.
The shoulder portion should be
adjusted so that it lies across your
chest and midway over your shoulder
near the door and not your neck.
To adjust the height of the seat belt
anchor, lower or raise the height
adjuster into an appropriate position.
To raise the height adjuster, pull it up
(1). To lower it, push it down (3) while
pressing the height adjuster button (2).
B180A01NF-1
OXM039026
Front seat
Page 96 of 455
317
Safety features of your vehicle
Release the button to lock the
anchor into position. Try sliding the
height adjuster to make sure that it
has locked into position.
Improperly positioned seat belts can
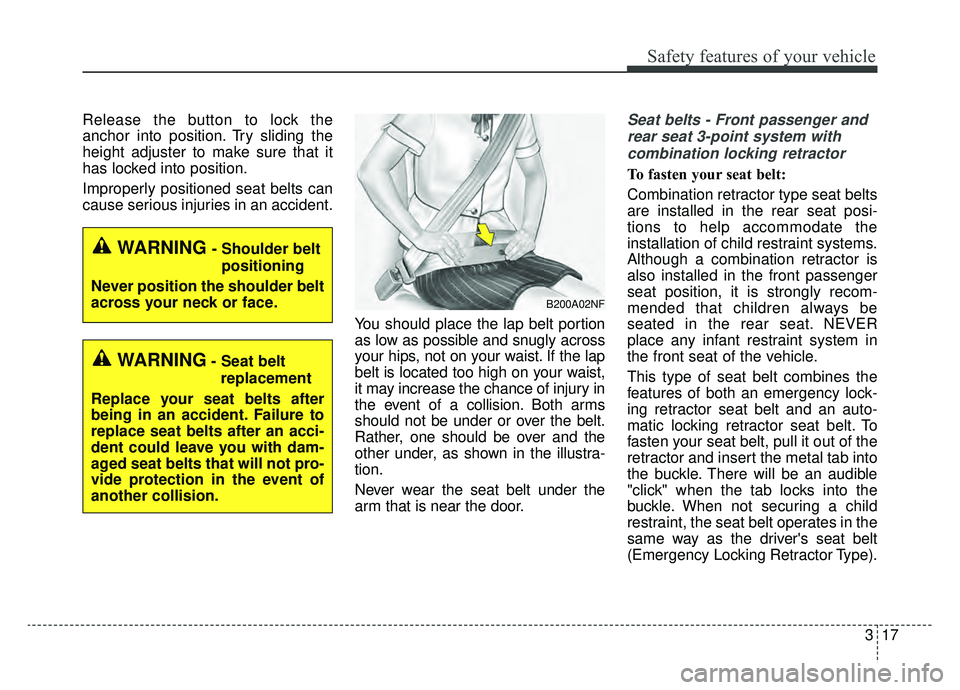
cause serious injuries in an accident.You should place the lap belt portion
as low as possible and snugly across
your hips, not on your waist. If the lap
belt is located too high on your waist,
it may increase the chance of injury in
the event of a collision. Both arms
should not be under or over the belt.
Rather, one should be over and the
other under, as shown in the illustra-
tion.
Never wear the seat belt under the
arm that is near the door.Seat belts - Front passenger and
rear seat 3-point system withcombination locking retractor
To fasten your seat belt:
Combination retractor type seat belts
are installed in the rear seat posi-
tions to help accommodate the
installation of child restraint systems.
Although a combination retractor is
also installed in the front passenger
seat position, it is strongly recom-
mended that children always be
seated in the rear seat. NEVER
place any infant restraint system in
the front seat of the vehicle.
This type of seat belt combines the
features of both an emergency lock-
ing retractor seat belt and an auto-
matic locking retractor seat belt. To
fasten your seat belt, pull it out of the
retractor and insert the metal tab into
the buckle. There will be an audible
"click" when the tab locks into the
buckle. When not securing a child
restraint, the seat belt operates in the
same way as the driver's seat belt
(Emergency Locking Retractor Type).
B200A02NF
WARNING- Shoulder belt positioning
Never position the shoulder belt
across your neck or face.
WARNING- Seat belt replacement
Replace your seat belts after
being in an accident. Failure to
replace seat belts after an acci-
dent could leave you with dam-
aged seat belts that will not pro-
vide protection in the event of
another collision.
Page 102 of 455
323
Safety features of your vehicle
✽ ✽NOTICE
Small children are best protected
from injury in an accident when
properly restrained in the rear seat
by a child restraint system that
meets the requirements of the
Federal Motor Vehicle Safety
Standards. Before buying any child
restraint system, make sure that it
has a label certifying that it meets
Federal Motor Vehicle Safety
Standard 213. The restraint must be
appropriate for your child's height
and weight. Check the label on the
child restraint for this information.
Refer to “Child restraint system” in
this section.
Larger children
Children who are too large for child
restraint systems should always
occupy the rear seat and use the
available lap/shoulder belts. The lap
portion should be fastened and
snugged on the hips and as low as
possible. Check if the belt fits period-
ically. A child's squirming could put
the belt out of position. Children are
given the most safety in the event of
an accident when they are restrained
by a proper restraint system in the
rear seat. If a larger child (over age
13) must be seated in the front seat,
the child should be securely
restrained by the available lap/shoul-
der belt and the seat should be
placed in the rearmost position.
Children age 13 and under should be
restrained securely in the rear seat.
NEVER place a child age 13 and
under in the front seat. NEVER place
a rear facing child seat in the front
seat of a vehicle. If the shoulder belt portion slightly
touches the child’s neck or face, try
placing the child closer to the center of
the vehicle. If the shoulder belt still
touches their face or neck, they need
to be returned to a child restraint sys-
tem.
WARNING- Small children
Do not allow small children to
ride in the vehicle without an
appropriate child restraint sys-
tem. If the shoulder belt comes
in contact with your child's neck
or face your child is too small to
ride in the vehicle. In a crash the
seat belt will inflict injury to your
child's neck, throat and face.
Page 106 of 455
327
Safety features of your vehicle
After an accident, have an author-
ized Kia dealer check the child
restraint system, seat belt, tether
anchor and lower anchor.
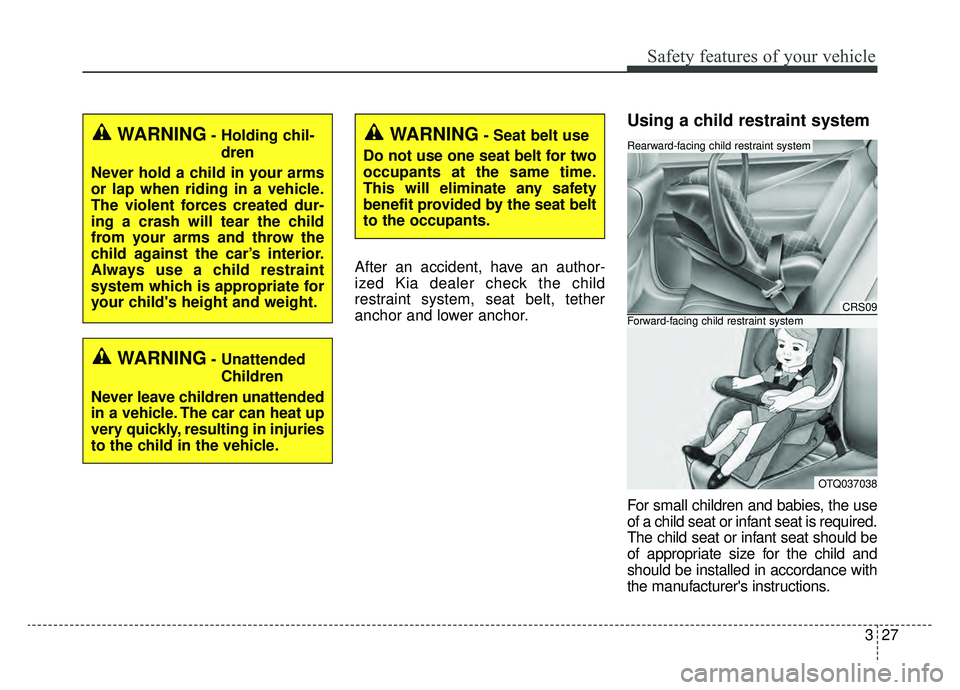
Using a child restraint system
For small children and babies, the use
of a child seat or infant seat is required.
The child seat or infant seat should be
of appropriate size for the child and
should be installed in accordance with
the manufacturer's instructions.
WARNING- Holding chil-dren
Never hold a child in your arms
or lap when riding in a vehicle.
The violent forces created dur-
ing a crash will tear the child
from your arms and throw the
child against the car’s interior.
Always use a child restraint
system which is appropriate for
your child's height and weight.
WARNING- Unattended Children
Never leave children unattended
in a vehicle. The car can heat up
very quickly, resulting in injuries
to the child in the vehicle.
WARNING- Seat belt use
Do not use one seat belt for two
occupants at the same time.
This will eliminate any safety
benefit provided by the seat belt
to the occupants.
CRS09
OTQ037038
Forward-facing child restraint system
Rearward-facing child restraint system
Page 137 of 455
Adding equipment to or modi-
fying your air bag-equipped
vehicle
If you modify your vehicle by changing
your vehicle's frame, bumper system,
front end or side sheet metal or ride
height, this may affect the operation of
your vehicle's air bag system.
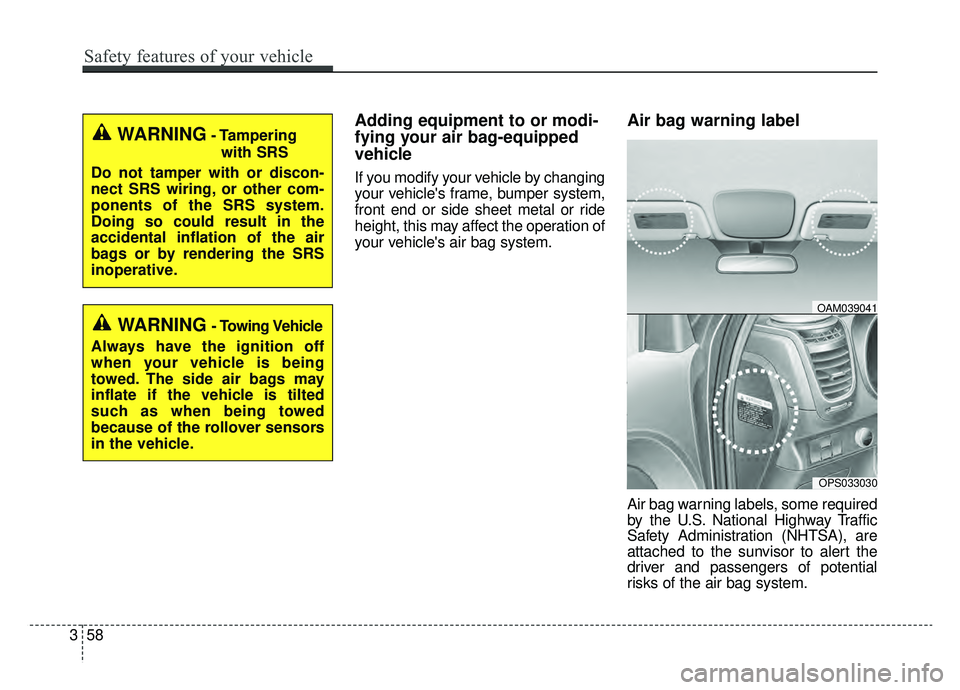
Air bag warning label
Air bag warning labels, some required
by the U.S. National Highway Traffic
Safety Administration (NHTSA), are
attached to the sunvisor to alert the
driver and passengers of potential
risks of the air bag system.
WARNING- Tamperingwith SRS
Do not tamper with or discon-
nect SRS wiring, or other com-
ponents of the SRS system.
Doing so could result in the
accidental inflation of the air
bags or by rendering the SRS
inoperative.
WARNING- Towing Vehicle
Always have the ignition off
when your vehicle is being
towed. The side air bags may
inflate if the vehicle is tilted
such as when being towed
because of the rollover sensors
in the vehicle.
OPS033030
OAM039041
358
Safety features of your vehicle