interior KIA Spectra 2008 2.G Owner's Manual
[x] Cancel search | Manufacturer: KIA, Model Year: 2008, Model line: Spectra, Model: KIA Spectra 2008 2.GPages: 298, PDF Size: 5.38 MB
Page 7 of 298
1
2
3
4
5
6
7
8
9
Interior overview / 2-2
Instrument panel overview / 2-3
Engine compartment / 2-4
Your vehicle at a glance
Page 8 of 298
Your vehicle at a glance
2 2
1
2
3
4
5
6
7
8
9
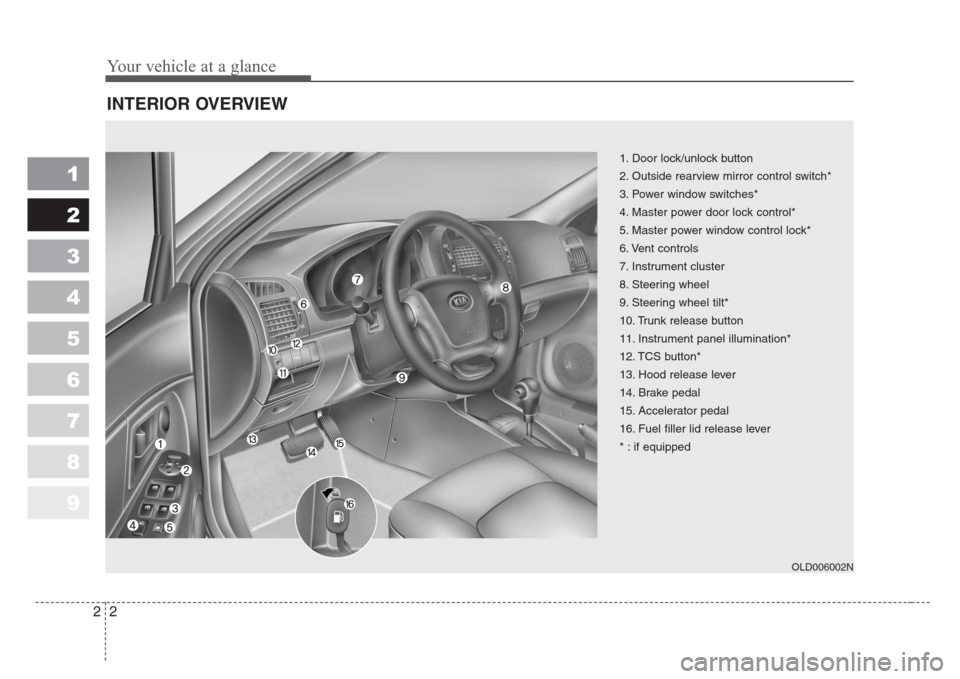
INTERIOR OVERVIEW
1. Door lock/unlock button
2. Outside rearview mirror control switch*
3. Power window switches*
4. Master power door lock control*
5. Master power window control lock*
6. Vent controls
7. Instrument cluster
8. Steering wheel
9. Steering wheel tilt*
10. Trunk release button
11. Instrument panel illumination*
12. TCS button*
13. Hood release lever
14. Brake pedal
15. Accelerator pedal
16. Fuel filler lid release lever
* : if equipped
OLD006002N
Page 11 of 298
1
2
3
4
5
6
7
8
9Keys / 3-2
Remote keyless entry / 3-3
Immobilizer system / 3-6
Door locks / 3-8
Windows / 3-13
Seat / 3-16
Safety belts / 3-27
Air bag - Advanced supplemental restraint
system / 3-50
Trunk / 3-76
Hood / 3-78
Fuel filler lid / 3-80
Mirrors / 3-83
Interior lights / 3-87
Storage compartment / 3-88
Interior features / 3-90
Sunroof / 3-94
Luggage net / 3-97
Antenna / 3-98
Audio system / 3-99
Knowing your vehicle
Page 93 of 298

383
1
2
3
4
5
6
7
8
9
Knowing your vehicle
Outside rearview mirror
Be sure to adjust mirror angles
before driving.
Your vehicle is equipped with both
left-hand and right-hand outside
rearview mirrors. The mirrors can
either be adjusted remotely with the
control levers or remote switch,
depending on the type your vehicle
has. The mirror heads can be folded
back to prevent damage when using
an automatic car wash or passing in
a narrow street.
MIRRORS
CAUTION
Do not scrape ice off the mirror
face; this may damage the sur-
face of the glass. If ice should
restrict movement of the mirror,
do not force the mirror for
adjustment. To remove ice, use
a deicer spray, or a sponge or
soft cloth with very warm water.
WARNING
• The right outside rearview
mirror is convex. Objects seen
in the mirror are closer than
they appear.
•Use your interior rearview mir-
ror or direct observation to
determine the actual distance
of following vehicles when
changing lanes.
Page 97 of 298
387
1
2
3
4
5
6
7
8
9
Knowing your vehicle
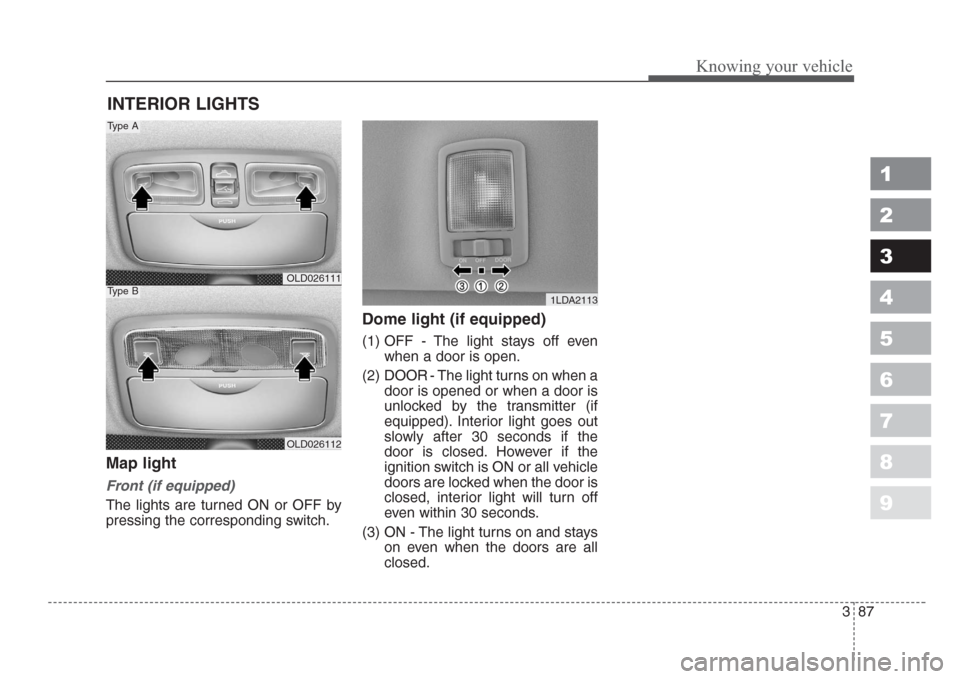
Map light
Front (if equipped)
The lights are turned ON or OFF by
pressing the corresponding switch.
Dome light (if equipped)
(1) OFF - The light stays off even
when a door is open.
(2) DOOR - The light turns on when a
door is opened or when a door is
unlocked by the transmitter (if
equipped). Interior light goes out
slowly after 30 seconds if the
door is closed. However if the
ignition switch is ON or all vehicle
doors are locked when the door is
closed, interior light will turn off
even within 30 seconds.
(3) ON - The light turns on and stays
on even when the doors are all
closed.
INTERIOR LIGHTS
1LDA2113
OLD026111
OLD026112
Type A
Type B
Page 100 of 298
Knowing your vehicle
90 3
1
2
3
4
5
6
7
8
9
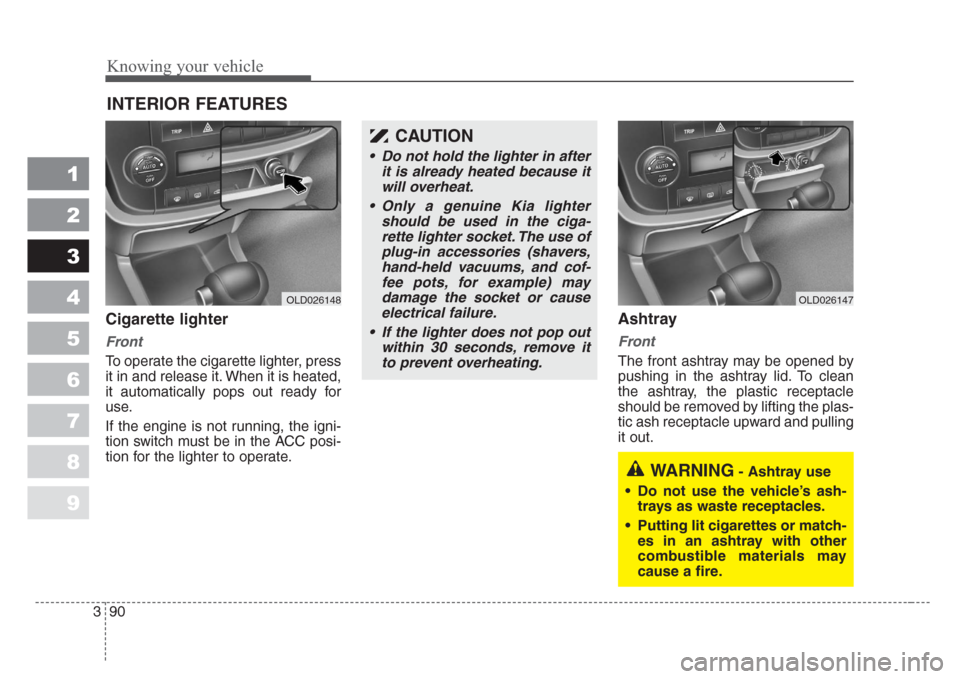
Cigarette lighter
Front
To operate the cigarette lighter, press
it in and release it. When it is heated,
it automatically pops out ready for
use.
If the engine is not running, the igni-
tion switch must be in the ACC posi-
tion for the lighter to operate.
Ashtray
Front
The front ashtray may be opened by
pushing in the ashtray lid. To clean
the ashtray, the plastic receptacle
should be removed by lifting the plas-
tic ash receptacle upward and pulling
it out.
INTERIOR FEATURES
WARNING- Ashtray use
• Do not use the vehicle’s ash-
trays as waste receptacles.
• Putting lit cigarettes or match-
es in an ashtray with other
combustible materials may
cause a fire.
OLD026148OLD026147
CAUTION
• Do not hold the lighter in after
it is already heated because it
will overheat.
• Only a genuine Kia lighter
should be used in the ciga-
rette lighter socket. The use of
plug-in accessories (shavers,
hand-held vacuums, and cof-
fee pots, for example) may
damage the socket or cause
electrical failure.
• If the lighter does not pop out
within 30 seconds, remove it
to prevent overheating.
Page 119 of 298
3 109
Knowing your vehicle
✽
NOTICE
• To assure proper operation of the
unit, keep the vehicle interior tem-
perature within a normal range by
using the vehicle's air conditioning
or heating system.
• When replacing the fuse, replace it
with a fuse having the correct
capacity.
• All stored bookmarks are all
erased when the car battery is dis-
connected or power to the vehicle
is lost. If this occurs, the book-
marks will have to be reset.
• This equipment is designed to be
used only in a 12 volt DC battery
system with negative ground.
• This unit is made of precision
parts. Do not attempt to disassem-
ble or adjust any parts.
• Do not expose this equipment
(including the speakers and CD)
to water or excessive moisture.
1
2
3
4
5
6
7
8
9
CAUTION
• Do not insert warped or poor
quality discs into the CD play-
er as damage to the unit may
occur.
• Do not insert anything like
coins into the player slot as
damage to the unit may occur.
• Do not place beverages close
to the audio system. The play-
back mechanism may be dam-
aged if you spill them.
• Do not strike or allow anything
to impact the audio system,
damage to the system mecha-
nisms could occur.
• Off-road or rough surface
driving may cause the com-
pact disc to skip. Do not use
the compact disc when driv-
ing in such conditions as
damage to the compact disc
face could occur.
(Continued)
(Continued)
• Do not attempt to grab or pull
the compact disc out while the
disc is being pulled into the
audio unit by the self-loading
mechanism. Damage to the
audio unit and compact disc
could occur.
• Avoid using recorded com-
pact discs in your audio unit.
Original compact discs are
recommended for best
results.
WARNING
When driving your vehicle, be
sure to keep the volume of the
unit set low enough to allow you
to hear sounds coming from the
outside.
Page 127 of 298
3 117
Knowing your vehicle
1
2
3
4
5
6
7
8
9
✽
NOTICE
• To assure proper operation of the
unit, keep the vehicle interior tem-
perature within a normal range by
using the vehicle's air conditioning
or heating system.
• When replacing the fuse, replace it
with a fuse having the correct
capacity.
• All stored bookmarks are all
erased when the car battery is dis-
connected or power to the vehicle
is lost. If this occurs, the book-
marks will have to be reset.
• This equipment is designed to be
used only in a 12 volt DC battery
system with negative ground.
• This unit is made of precision
parts. Do not attempt to disassem-
ble or adjust any parts.
• Do not expose this equipment
(including the speakers and tape)
to water or excessive moisture.CAUTION
• Do not insert warped or poor
quality discs into the CD play-
er as damage to the unit may
occur.
• Do not insert anything like
coins into the player slot as
damage to the unit may occur.
• Do not place beverages close
to the audio system. The play-
back mechanism may be dam-
aged if you spill them.
• Do not strike or allow anything
to impact the audio system,
damage to the system mecha-
nisms could occur.
• Off-road or rough surface
driving may cause the com-
pact disc to skip. Do not use
the compact disc when driv-
ing in such conditions as
damage to the compact disc
face could occur.
(Continued)
(Continued)
• Do not attempt to grab or pull
the compact disc out while the
disc is being pulled into the
audio unit by the self-loading
mechanism. Damage to the
audio unit and compact disc
could occur.
• Avoid using recorded com-
pact discs in your audio unit.
Original compact discs are
recommended for best
results.
WARNING
When driving your vehicle, be
sure to keep the volume of the
unit set low enough to allow you
to hear sounds coming from the
outside.
Page 178 of 298

445
1
2
3
4
5
6
7
8
9
Driving your vehicle
The defroster heats the window to
remove frost, fog and thin ice from
the interior and exterior of the rear
window, while engine is running.To activate the rear window
defroster, press the rear window
defroster button located in the center
console switch panel. The indicator
in the instrument cluster illuminates
when the defroster is ON.
If your vehicle is equipped with the
outside mirror defroster, it will be
operating at the same time when you
operate the rear window defroster.
If there is heavy accumulation of
snow on the rear window, brush it off
before operating the rear defroster.
The rear window defroster automati-
cally turns off after 20 minutes or
when the ignition switch is turned off.
To turn off the defroster, press the
rear window defroster button again.
DEFROSTER
OLD026116N
CAUTION
• To prevent damage to the con-
ductors bonded to the inside
surface of the rear window,
never use sharp instruments
or window cleaners contain-
ing abrasives to clean the win-
dow.
• To prevent the battery from
being discharged, operate the
defroster only while the
engine is running.
• If you want to defrost and
defog on the front windshield,
refer to “Windshield Defrosting
and Defogging” in this section.
Page 246 of 298
1
2
3
4
5
6
7
8
91
2
3
4
5
6
7
8
9Maintenance services / 7-2
Maintenance schedule / 7-3
Owner maintenance / 7-7
Engine compartment / 7-10
Engine oil and oil filter / 7-11
Engine cooling system / 7-12
Brakes and clutch / 7-15
Parking brake / 7-16
Power steering / 7-17
Manual transaxle / 7-18
Automatic transaxle / 7-18
Lubricants and fluids / 7-20
Air cleaner / 7-21
Climate control air filter / 7-22
Wiper blades / 7-23
Battery / 7-25
Tires and wheels / 7-28
Exterior care / 7-40
Interior care / 7-44
Maintenance