fuel cap KIA Spectra 2009 2.G Owner's Manual
[x] Cancel search | Manufacturer: KIA, Model Year: 2009, Model line: Spectra, Model: KIA Spectra 2009 2.GPages: 291, PDF Size: 2.63 MB
Page 83 of 291
373
1
2
3
4
5
6
7
8
9
Knowing your vehicle
WARNING
If pressurized fuel sprays out, it
can cause serious injuries.
Always remove the fuel cap
carefully and slowly. If the cap is
venting fuel or if you hear a
hissing sound, wait until the
condition stops before com-
pletely removing the cap.
1. Stop the engine.
2. To open the fuel filler lid, pull therelease lever. 3. Pull the fuel filler lid out to open.
4. To remove the cap, turn the fuel
tank cap counterclockwise.
5. Refuel as needed.
6. To install the cap, turn it clockwise until it “clicks”. This indicates that
the cap is securely tightened.
7. Close the fuel filler lid and push it lightly and make sure that it is
securely closed.FUEL FILLER LID
1LDA2019
OLD026018
WARNING
To avoid injury from sharp
edges, it is recommended that
protective gloves be worn if
there is a need to open the fuel
filler door manually.
WARNING
Automotive fuels are flamma-
ble/explosive materials. When
refueling, please note the fol-
lowing guidelines carefully.
Failure to follow these guide-
lines may result in severe per-
sonal injury, severe burns or
death by fire or explosion.
Before refueling always notethe location of the Emergency
Gasoline Shut-Off, if available,
at the gas station facility.
(Continued)
Page 84 of 291

Knowing your vehicle74
3
1
2
3
4
5
6
7
8
9
(Continued)
Before touching the fuel noz-
zle or fuel filler cap, you
should eliminate potentially
dangerous static electricity
discharge by touching anoth-
er metal part of the front of the
vehicle, a safe distance away
from the fuel filler neck, noz-
zle, or other gas source.
Do not get back into a vehicle once you have begun refuel-
ing. Do not touch, rub or slide
against any item or fabric
(polyester, satin, nylon, etc.)
capable of producing static
electricity. Static electricity
discharge can ignite fuel
vapors resulting in explosion.
If you must re-enter the vehi-
cle, you should once again
eliminate potentially danger-
ous static electricity dis-
charge by touching a metal
part of the vehicle, away from
the fuel filler neck, nozzle or
other gasoline source.
(Continued)
(Continued)
When using a portable fuelcontainer be sure to place the
container on the ground prior
to refueling. Static electricity
discharge from the container
can ignite fuel vapors causing
a fire. Once refueling has
begun, contact with the vehi-
cle should be maintained until
the filling is complete. Use
only portable fuel containers
designed to carry and store
gasoline.
Do not use cellular phones around a gas station or while
refueling any vehicle. Electric
current and/or electronic
interference from cellular
phones can potentially ignite
fuel vapors causing a fire. If
you must use your cellular
phone, use it in a place away
from the gas station.
(Continued)
(Continued)
When refueling always shutthe engine off. Sparks pro-
duced by electrical compo-
nents related to the engine
can ignite fuel vapors causing
a fire. Always insure that the
engine is OFF before and dur-
ing refueling. Once refueling
is complete, check to make
sure the fuel filler cap and
door are securely closed,
before starting the engine.
Do not light any fire around a gas station. DO NOT use
matches or a lighter and DO
NOT SMOKE or leave a lit cig-
arette in your vehicle while at
a gas station especially during
refueling. Automotive fuel is
highly flammable and can,
when ignited, result in explo-
sion by flames.
(Continued)
Page 85 of 291
375
1
2
3
4
5
6
7
8
9
Knowing your vehicle
(Continued)
If a fire breaks out during refu-eling, leave the vicinity of the
vehicle, and immediately con-
tact the manager of the gas
station or contact the police
and local fire department.
Follow any safety instructions
they provide.
(Continued)
If the fuel filler cap requires replacement, use only a gen-uine Kia cap or the equivalentspecified for your vehicle. Anincorrect fuel filler cap canresult in a serious malfunctionof the fuel system or emissioncontrol system. Correctreplacement caps are avail-able at authorized Kia dealers.
Do not spill fuel on the exteri- or surfaces of the vehicle. Anytype of fuel spilled on paintedsurfaces may damage thepaint.
A loose fuel filler cap may cause the “Check Engine”(Malfunction Indicator) light inthe instrument panel to illumi-nate unnecessarily.
If the fuel filler lid will not open in cold weather because thearea around it is frozen, pushor lightly tap the lid.
CAUTION
Make sure to refuel with gaso- line (unleaded fuel) only forthe gasoline engine vehicles.
Check to make sure the fuel filler cap is securely closedafter refueling.
(Continued)
Page 156 of 291
Driving your vehicle30
4
1
2
3
4
5
6
7
8
9
Engine temperature gauge This gauge shows the temperature
of the engine coolant when the igni-
tion switch is ON.
Do not continue driving with an over-
heated engine. If your vehicle over-
heats, refer to “Overheating” in the
Index.
Fuel gaugeThe fuel gauge indicates the approx-
imate amount of fuel remaining in the
fuel tank.
Fuel tank capacity - 55 litres (14.52
US gal. ).
The fuel gauge is supplemented by a
low fuel warning light, which will illu-
minate when the fuel level has
dropped to about 8.5 liters (2.25 US
gal.).
Instrument panel illuminationWhen the vehicle’s parking lights or
headlights are on, rotate the illumina-
tion control knob to adjust the instru-
ment panel illumination intensity.
OLD026204N
CAUTION
If the gauge pointer moves
beyond the normal range areatoward the “H” position, it indi-cates overheating that maydamage the engine.
CAUTION
Avoid driving with a very lowfuel level. If you run out of fuel,it could case the engine to mis-fire and result in excessive load-ing of the catalytic converter.
Page 161 of 291
435
1
2
3
4
5
6
7
8
9
Driving your vehicle
Malfunction indicator
(if equipped)This indicator light is part of the
Engine Control System which moni-
tors various emission control system
components. If this light illuminates
while driving, it indicates that a
potential problem has been detected
somewhere in the emission control
system.
Generally, your vehicle will continue
to be drivable and will not need tow-
ing, but have the system checked by
an Authorized Kia Dealer as soon as
possible.✽ ✽
NOTICEA loose fuel filler cap may cause the
On Board Diagnostic System
Malfunction Indicator Light ( )
in the instrument panel to illuminate
unnecessarily. Always make sure
that the fuel filler cap is tight.
Air bag warning
(if equipped) This warning light will blink or illumi-
nate for approximately 6 seconds
each time you turn the ignition switch
to the ON position.
If this indicator does not go out, or if
it illuminates while the vehicle is
being driven, see an Authorized Kia
Dealer for immediate service.
CHECK
CHECK
CHECKCHECK
CAUTION
Prolonged driving with the
Emission Control SystemMalfunction Indicator Light ( ) illuminated may causedamage to the emission con-trol systems which couldeffect drivability and/or fueleconomy.
If the
Emission
Control System
Malfunction Indicator Light ( ) begins to flash ON andOFF, potential catalytic con-verter damage is possiblewhich could result in loss ofengine power. Have the EngineControl System inspected assoon as possible by anAuthorized Kia Dealer.
CHECK
CHECKCHECK
CHECK
Page 197 of 291
Driving tips14
5
1
2
3
4
5
6
7
8
9
Refer to your vehicle's tire and load-
ing information label for specific
information about your vehicle's
capacity weight and seating posi-
tions. The combined weight of the
driver, passengers and cargo should
never exceed your vehicle's capacity
weight.
Vehicle certificationThe vehicle certification label is
located on the driver's door sill.
This label shows the maximum
allowable weight of the fully loaded
vehicle. This is called the GVWR
(Gross Vehicle Weight Rating). The
GVWR includes the weight of the
vehicle, all occupants, fuel and
cargo. This label also tells you the maxi-
mum weight that can be supported
by the front and rear axles, called
Gross Axle Weight Rating (GAWR).
To find out the actual loads on your
front and rear axles, you need to go
to a weigh station and weigh your
vehicle. Your dealer can help you with
this. Be sure to spread out your load
equally on both sides of the center-
line.
OLD056901C
Page 199 of 291
Driving tips16
5
1
2
3
4
5
6
7
8
9
WEIGHT OF THE VEHICLEThis section will guide you in the
proper loading of your vehicle and/or
trailer, to keep your loaded vehicle
weight within its design rating capa-
bility, with or without a trailer.
Properly loading your vehicle will
provide maximum return of the vehi-
cle design performance. Before load-
ing your vehicle, familiarize yourself
with the following terms for determin-
ing your vehicle's weight ratings, with
or without a trailer, from the vehicle's
specifications and the compliance
label:
Base curb weight
This is the weight of the vehicle
including a full tank of fuel and all
standard equipment. It does not
include passengers, cargo, or option-
al equipment.
Vehicle curb weight
This is the weight of your new vehicle
when you picked it up from your deal-
er plus any aftermarket equipment.
Cargo weight
This figure includes all weight added
to the Base Curb Weight, including
cargo and optional equipment. GAW (Gross axle weight)
This is the total weight placed on
each axle (front and rear) - including
vehicle curb weight and all payload.
GAWR (Gross axle weight rating)This is the maximum allowable
weight that can be carried by a single
axle (front or rear). These numbers
are shown on the vehicle certification
label.
The total load on each axle must
never exceed its GAWR.
GVW (Gross vehicle weight)
This is the Base Curb Weight plus
actual Cargo Weight plus passen-
gers.
GVWR (Gross vehicle weight rating)
This is the maximum allowable
weight of the fully loaded vehicle
(including all options, equipment,
passengers and cargo). The GVWR
is shown on the vehicle certification
label located on the driver’s door sill.
GCW (Gross combined weight)
This is the weight of the loaded vehi-
cle (GVW) plus the weight of the fully
loaded trailer.
GCWR (Gross combined weight
rating)
This is the maximum allowable
weight of the vehicle and the loaded
trailer - including all cargo and pas-
sengers - that the vehicle can handle
without risking damage. (Important :
The towing vehicle's braking system
is rated for operation at GVWR, not
GCWR. Separate functional brakes
should be used for safe control of
towed vehicles and for trailers weigh-
ing an 340kg (750 lbs).) The GCW
must never exceed the GCWR.
Maximum trailer weight
This is the highest possible weight of
a fully loaded trailer the vehicle can
tow. It assumes a vehicle with only
mandatory options, no cargo, and a
driver. The weight of other optional
equipment, passengers and cargo in
your vehicle will reduce the maxi-
mum trailer weight your vehicle can
tow.
Page 200 of 291
517
Driving tips
1
2
3
4
5
6
7
8
9
Calculating the load your vehicle
can tow
1. Use the appropriate maximumGCWR chart (in the Weight of the
Trailer section in this chapter) for
your type of drive system and
transmission.
2. Weigh your vehicle.
3. Subtract the weight of your vehicle from the maximum GCWR in the
chart. This is the maximum trailer
weight your vehicle can tow. It
must be below the maximum trail-
er weight shown in the chart. Note
that the maximum trailer weight
your vehicle can tow depends on
the total weight of any cargo, pas-
sengers and available equipment
in the vehicle. To identify what the vehicle trailering
capacity is for your vehicle, you
should read the information in
“Weight of the Trailer” that appears
later in this section. Remember that
trailering is different than just driving
your vehicle by itself. Trailering caus-
es major changes in handling, dura-
bility, and fuel economy. Successful,
safe trailering requires correct equip-
ment, and cautious driving.
WARNING
- Towing a
trailer
If you don't use the correct
equipment or you drive improp-
erly, you can lose control when
you pull a trailer. For example, if
the trailer is too heavy, the
brakes may fail, and would at
least be ineffective to promptly
stop the vehicle. You and your
passenger could be seriously or
fatally injured. We do not recom-
mend towing a trailer. However,
in the event there is a need to
tow a trailer, such as in an emer-
gency, follow all the steps in this
section.
Item Specification
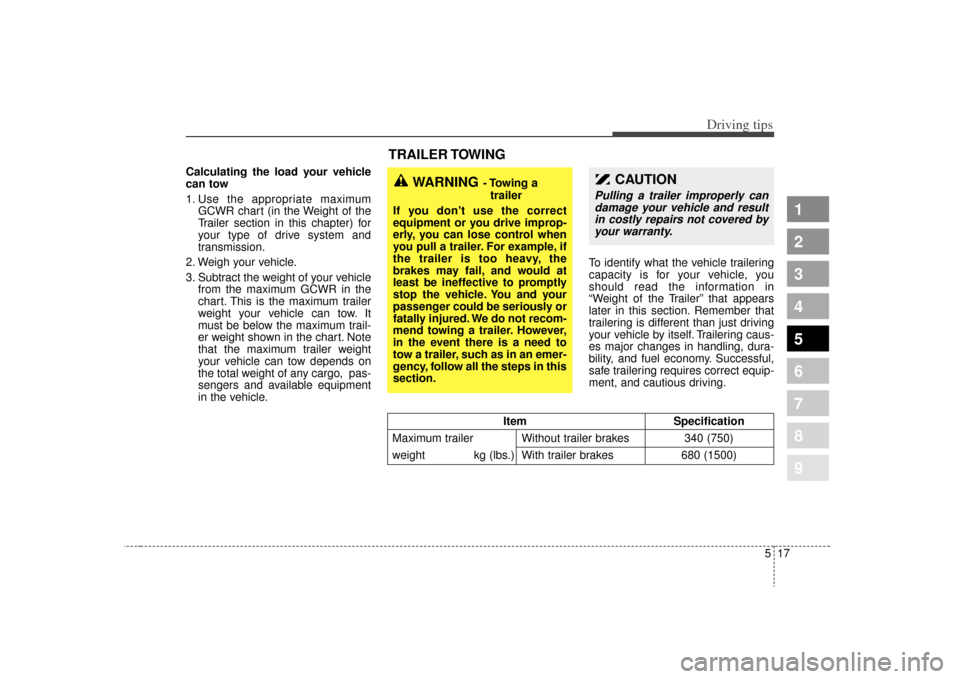
Maximum trailer Without trailer brakes 340 (750)
weight kg (lbs.) With trailer brakes 680 (1500)
TRAILER TOWING
CAUTION
Pulling a trailer improperly can
damage your vehicle and resultin costly repairs not covered byyour warranty.
Page 241 of 291
73
Maintenance
1
2
3
4
5
6
7
8
9
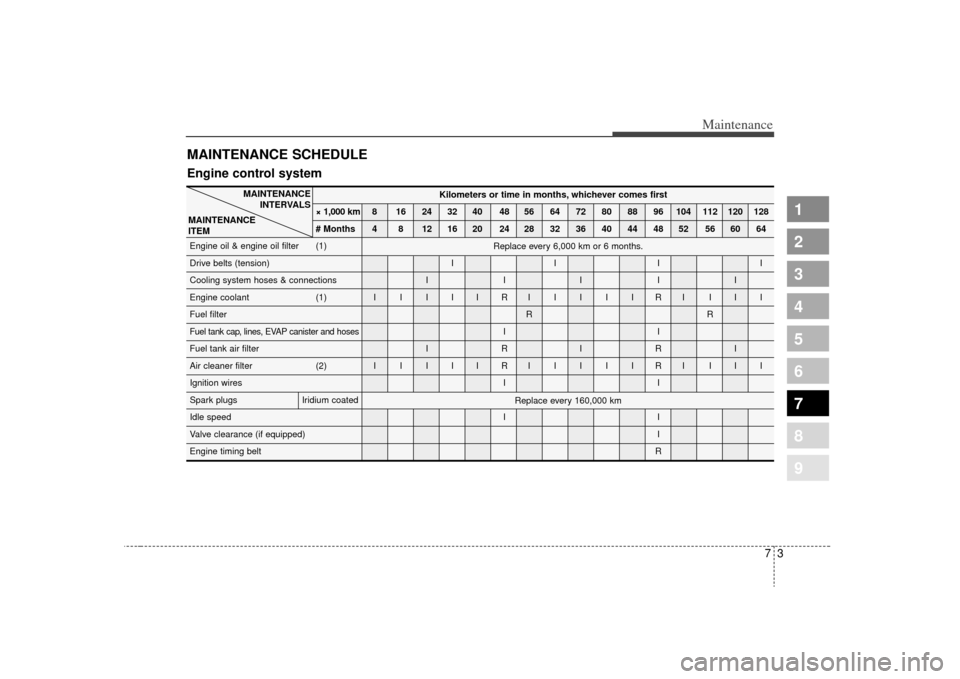
MAINTENANCE SCHEDULE
Kilometers or time in months, whichever comes first
× 1,000 km 8 16 24 32 40 48 56 64 72 80 88 96 104 112 120 128
# Months 4 8 12 16 20 24 28 32 36 40 44 48 52 56 60 64
Engine oil & engine oil filter (1)
Drive belts (tension) I I I I
Cooling system hoses & connections I I I I I
Engine coolant (1) I I I I I R IIIIIRI III
Fuel filter RR
Fuel tank cap, lines, EVAP canister and hoses
II
Fuel tank air filter I R I R I
Air cleaner filter (2) I I I I I R IIIIIRI III
Ignition wires I I
Spark plugs Iridium coated
Idle speed I I I I I
Valve clearance (if equipped) I
Engine timing belt R
MAINTENANCE
INTERVALS
MAINTENANCE
ITEM
Engine control system
Replace every 6,000 km or 6 months.
Replace every 160,000 km
Page 275 of 291
737
Maintenance
1
2
3
4
5
6
7
8
9
Cold Tire Pressure: The amount of
air pressure in a tire, measured in
pounds per square inch (psi) or kilo-
pascals (kPa) before a tire has built
up heat from driving.
Curb Weight: This means the weight
of a motor vehicle with standard and
optional equipment including the
maximum capacity of fuel, oil and
coolant, but without passengers and
cargo.
DOT Markings: The DOT code
includes the Tire Identification
Number (TIN), an alphanumeric des-
ignator which can also identify the
tire manufacturer, production plant,
brand and date of production.
GVWR: Gross Vehicle Weight Rating
GAWR FRT: Gross Axle Weight
Rating for the front Axle.
GAWR RR: Gross Axle Weight
Rating for the rear axle.Intended Outboard Sidewall
: The
side of an asymmetrical tire, that
must always face outward when
mounted on a vehicle.
Kilopascal (kPa): The metric unit for
air pressure.
Load Index: An assigned number
ranging from 1 to 279 that corre-
sponds to the load carrying capacity
of a tire.
Maximum Inflation Pressure : The
maximum air pressure to which a
cold tire may be inflated. The maxi-
mum air pressure is molded onto the
sidewall.
Maximum Load Rating : The load
rating for a tire at the maximum per-
missible inflation pressure for that
tire.
Maximum Loaded Vehicle Weight :
The sum of curb weight; accessory
weight; vehicle capacity weight; and
production options weight.
Normal Occupant Weight:The
number of occupants a vehicle is
designed to seat multiplied by 68 kg
(150 pounds). Occupant Distribution
: Designated
seating positions.
Outward Facing Sidewall: The side
of a asymmetrical tire that has a par-
ticular side that faces outward when
mounted on a vehicle. The outward
facing sidewall bears white lettering
or bears manufacturer, brand, and/or
model name molding that is higher or
deeper than the same moldings on
the inner facing sidewall.
Passenger (P-Metric) Tire : A tire
used on passenger cars and some
light duty trucks and multipurpose
vehicles.
Recommended Inflation Pressure :
Vehicle manufacturer's recommend-
ed tire inflation pressure and shown
on the tire placard.
Radial Ply tire: A pneumatic tire in
which the ply cords that extend to the
beads are laid at 90 degrees to the
centerline of the tread.
Rim: A metal support for a tire and
upon which the tire beads are seat-
ed.
Sidewall: The portion of a tire
between the tread and the bead.