tow KIA SPECTRA5 2006 Owners Manual
[x] Cancel search | Manufacturer: KIA, Model Year: 2006, Model line: SPECTRA5, Model: KIA SPECTRA5 2006Pages: 273, PDF Size: 2.83 MB
Page 16 of 273

35
1
2
3
4
5
6
7
8
9
Knowing your vehicle
✽ ✽NOTICEThe transmitter will not work if any
of following occur:
- The ignition key is in ignition
switch.
- You exceed the operating distance limit (10 m).
- The battery in the transmitter is weak.
- Other vehicles or objects may be blocking the signal.
- The weather is extremely cold.
- The transmitter is close to a radio transmitter such as a radio station
or an airport which can interfere
with normal operation of the
transmitter.
When the transmitter does not work
correctly, open and close the door
with the ignition key. If you have a
problem with the transmitter, con-
tact an authorized Kia Dealer.
✽ ✽ NOTICEKeep the transmitter away from
water or any liquid. If the keyless
entry system is inoperative due to
exposure to water or liquids, it will
not be covered by your manufactur-
er vehicle warranty. Operational distance may vary
depending upon the area the trans-
mitter is used in. For example, if the
vehicle is parked near police sta-
tions, government and public offices,
broadcasting stations, military instal-
lations, airports, or transmitting tow-
ers, etc. This device complies with
Industry Canada Standard RSS-
210.
Operation is subject to the fol-
lowing two conditions:
1. This device may not cause inter- ference, and
2. This device must accept any inter- ference, including interference that
may cause undesired operation of
the device.
WARNING
Changes or modifications not
expressly approved by the party
responsible for compliance
could void the user's authority
to operate the equipment.
LD CAN (ENG) new 3-1~.qxd 7/29/05 10:28 AM Page 5
Page 19 of 273

Knowing your vehicle83
1
2
3
4
5
6
7
8
9
Limp home (override) proce-
dureWhen you turn the ignition key to the
ON position, if the IMMO indicator
remains on continuously after blink-
ing 6 times, your transponder
equipped in the ignition key is out of
order. You cannot start the engine
without the lime home procedure. To
start the engine, you have to input
your password by using the ignition
switch.
The following procedure is how to
input your password of “2345” as an
example.
1. Turn the ignition key to the ON posi-tion. The IMMO indicator ( ) will
blink 6 times and remain on indicat-
ing the beginning of the limp home
procedure.
2. Turn the ignition key to the ACC position. 3. To enter the first digit (in this
example “2”), turn the ignition key
to the ON and ACC position twice.
Perform the same procedure for
the next digits between 3 seconds
and 10 seconds (for example, for
“3”, turn the ignition ON and ACC
3 times).
4. If all of the digits have been input successfully, you have to start the
engine within 10 seconds. If you
attempt to start the engine after 10
seconds, the engine will not start
and you will have to input your
password again.
After performing the limp home pro-
cedure, you have to see an author-
ized Kia dealer immediately to
inspect and repair your ignition key
or immobilizer system.
CAUTION
The transponder in your ignition
key is an important part of the
immobilizer system. It is
designed to give years of trou-
ble free service, however you
should avoid exposure to mois-
ture, static electricity and rough
handling. Immobilizer system
malfunction could occur.
CAUTION
If you cannot start your engine
in spite of limp home procedure,
have your vehicle towed by an
authorized Kia dealer for
inspection and necessary
repairs.
CAUTION
Do not change, alter or adjust
the immobilizer system because
it could cause the immobilizer
system to malfunction and
should only be serviced by an
authorized Kia dealer.
Malfunctions caused by improp-
er alterations, adjustments or
modifications to the immobilizer
system are not covered by your
vehicle manufacturer warranty.
LD CAN (ENG) new 3-1~.qxd 7/29/05 10:28 AM Page 8
Page 20 of 273
39
1
2
3
4
5
6
7
8
9
Knowing your vehicle
Operating door locks from
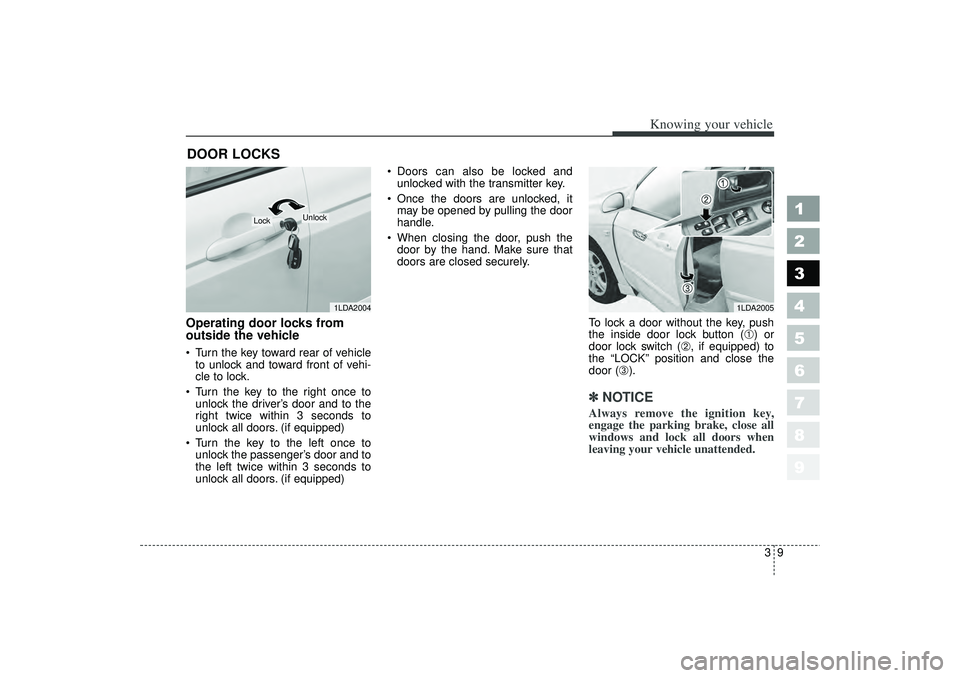
outside the vehicle Turn the key toward rear of vehicleto unlock and toward front of vehi-
cle to lock.
Turn the key to the right once to unlock the driver’s door and to the
right twice within 3 seconds to
unlock all doors. (if equipped)
Turn the key to the left once to unlock the passenger’s door and to
the left twice within 3 seconds to
unlock all doors. (if equipped) Doors can also be locked and
unlocked with the transmitter key.
Once the doors are unlocked, it may be opened by pulling the door
handle.
When closing the door, push the door by the hand. Make sure that
doors are closed securely.
To lock a door without the key, push
the inside door lock button (
➀) or
door lock switch (
➁, if equipped) to
the “LOCK” position and close the
door (
➂).
✽ ✽ NOTICEAlways remove the ignition key,
engage the parking brake, close all
windows and lock all doors when
leaving your vehicle unattended.
DOOR LOCKS
1LDA2004
Lock
Unlock
1LDA2005
LD CAN (ENG) new 3-1~.qxd 7/29/05 10:28 AM Page 9
Page 54 of 273
343
1
2
3
4
5
6
7
8
9
Knowing your vehicle
To clean the belt webbing, use a
mild soap solution recommended
for cleaning upholstery or carpets.
Follow the instructions provided
with the soap.
Do not make modifications or addi-
tions to the safety belt.
After wearing a safety belt, make
sure it fully retracts to the stowed
position. Do not allow the belt to
get caught in the door when you
close it.
Restraint of pregnant women Pregnant women should wear
lap/shoulder belt assemblies when-
ever possible according to specific
recommendations by their doctors.
The lap portion of the belt should be
worn AS SNUGLY AND LOW AS
POSSIBLE.
Restraint of infants and small
children To increase their safety, infants and
young children should always be
restrained by a restraint system
approved for their age and size.
Never allow a child to stand or kneel
on the seat of a moving vehicle.
Never allow a safety belt to be placed
around both a child and an adult or
around two children at the same
time.
It is best for children to be seated in
the rear seats.
WARNING
- Pregnant
women
Pregnant women must never
place the lap portion of the safe-
ty belt over the area of the
abdomen where the fetus is
located or above the abdomen
where the belt could injure the
fetus during an impact.
WARNING
Do not bleach or dye the web-
bing because this may weaken
the webbing fibers and allow
them to fail when loaded in a
collision.
LD CAN (ENG) new 3-1~.qxd 7/29/05 10:28 AM Page 43
Page 62 of 273
351
1
2
3
4
5
6
7
8
9
Knowing your vehicle
7. Double check that the retractor isin the “Auto Lock” mode by
attempting to pull more of the safe-
ty belt out of the retractor. If you
cannot, the retractor is in the “Auto
Lock” mode.
To remove the child restraint, press
the release button on the buckle and
then pull the lap/shoulder belt out of
the restraint and allow the safety belt
to retract fully.
✽ ✽ NOTICEWhen the safety belt is allowed to
retract to its fully stowed position,
the retractor will automatically
switch from the “Auto Lock” mode
to the emergency lock mode for nor-
mal adult usage.
WARNING
- Auto lock
mode
The lap/shoulder belt automati-
cally returns to the “emergency
lock mode” whenever the belt is
allowed to retract fully.
Therefore, the preceding seven
steps must be followed each
time a child restraint is
installed.
If the safety belt is not placed in
the “auto lock” mode, severe
injury or death could occur to
the child and/or other occupants
in the vehicle in a collision,
since the child restraint will not
be effectively held in place.
LD CAN (ENG) new 3-1~.qxd 7/29/05 10:28 AM Page 51
Page 69 of 273
Knowing your vehicle58
3
1
2
3
4
5
6
7
8
9
Airbag system components The main components of your SRS
are:
To indicate that your vehicle is
equipped with airbags, the corre-
sponding airbag covers are
marked with “SRS AIRBAG”.
- Driver’ s airbag (see page 3- 60)
- Passenger’ s airbag(see page 3- 61)
- Side airbag (if equipped, see page 3- 67)
- Curtain airbag (if equipped, see page 3- 68)
A diagnostic system that continual-
ly monitors the system operation.
An indicator light to warn you of a
possible problem with the system.
Emergency power backup in case
your car’ s electrical system is dis-
connected in a crash.
WARNING
- Airbags &
safety belts
Even in vehicles with air bags, you and your passengers
must always wear the safety
belts provided in order to min-
imize the risk and severity of
injury in the event of a colli-
sion or rollover.
Always wear your safety belt. It can help keep you away
from the air bags during heavy
braking just before a collision.
If occupants are not fastened or correctly seated, they can-
not be protected, and thus
face serious injury or death.
Driver’s and front passenger’s airbag are designed to inflate
only in certain frontal colli-
sions, and side and curtain
airbags (if equipped) are
designed to inflate in certain
side impacts.
(Continued)
(Continued)They will generally not provide
protection in side impacts
(vehicles not equipped with
side and curtain airbags) or
rear impacts, rollovers, less
severe frontal collisions. They
will not provide protection
from later impacts in a multi-
impact collision.
If your vehicle has been sub- jected to flood conditions (e.g.
soaked carpeting/standing
water on the floor of the vehi-
cle, etc.) or if your vehicle has
become flood damaged in any
way, do not attempt to start
the vehicle or put the key in
the ignition before discon-
necting the battery. This may
cause airbag deployment,
which could result in serious
personal injury or death. If
flooded conditions are sub-
jected to your vehicle, before
starting the vehicle, have the
vehicle towed to an authorized
Kia dealer for inspection and
necessary repairs.
LD CAN (ENG) new 3-1~.qxd 7/29/05 10:28 AM Page 58
Page 73 of 273

Knowing your vehicle62
3
1
2
3
4
5
6
7
8
9
Main components of occupant
classification system
A detection device located within
the front passenger seat cushion.
Electronic system to determine
whether passenger airbag systems
(both front and side) should be
activated or deactivated.
A warning light located on the
instrument panel which illuminates
the words "PASSENGER AIRBAG
OFF" passenger airbag system is
deactivated.
The instrument panel airbag warn-
ing light is interconnected with the
occupant classification system. If there is no passenger in the front
passenger seat or if the passenger in
the front passenger seat is very light,
(such as a child), the front
PASSEN-
GER AIRBAG OFF indicator may
illuminate.
When this indicator is ON, neither
the front passenger front airbag nor
front passenger side airbag will
deploy in either a side or frontal colli-
sion. Always be sure that you and all vehi-
cle occupants are seated and
restrained properly (sitting upright
with the seat in an upright position,
centered on the seat cushion, with
the person's legs comfortably
extended, feet on the floor, and wear-
ing the safety belt properly) for the
most effective protection by the
airbag and the safety belt.
The OCS may not function proper-
ly if the passenger takes actions
which can defeat the detection sys-
tem. These include:
(1) Failing to sit in an upright posi- tion.
(2) Leaning against the door or cen- ter console.
(3) Sitting towards the sides or the front of the seat.
(4) Putting legs on the dashboard or resting them on other locations
which reduce the passenger
weight on the front seat.
(5) Improperly wearing the safety
belt.
(6) Reclining the seat back.
1LDN2150A
The location of OCS warning indicator
LD CAN (ENG) new 3-1~.qxd 7/29/05 10:28 AM Page 62
Page 76 of 273
365
1
2
3
4
5
6
7
8
9
Knowing your vehicle
(Continued)
If a very low weight adult isseated in the front passenger
seat, the occupant classifica-
tion system may or may not
turn off the right front passen-
ger air bag, depending upon
the person's seating position
and body type. Everyone in
your vehicle should wear a
safety belt properly -- whether
or not there is an air bag for
that person.
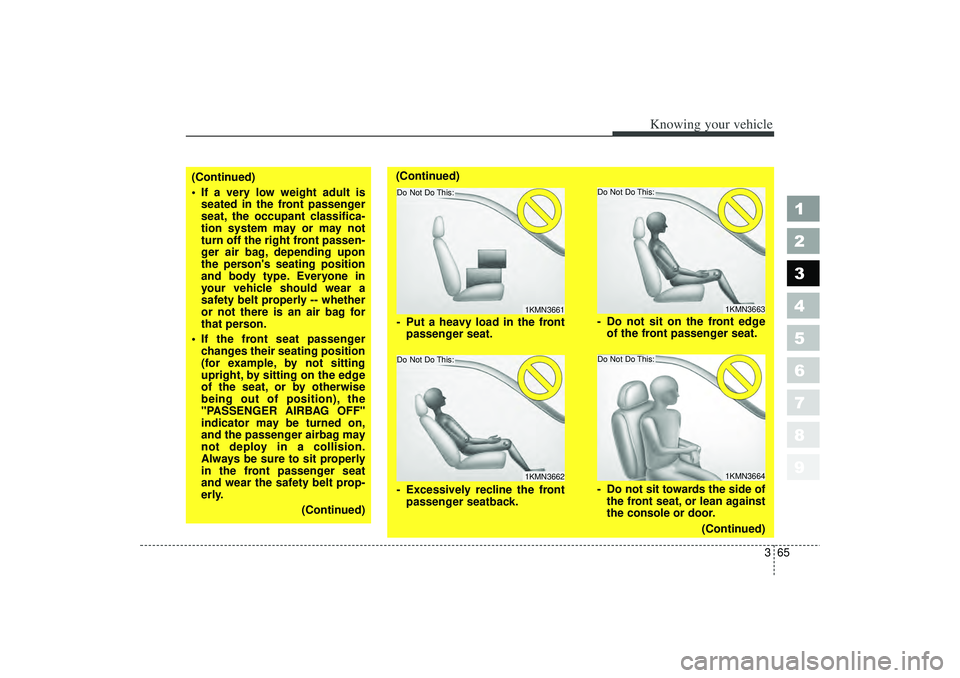
If the front seat passenger changes their seating position
(for example, by not sitting
upright, by sitting on the edge
of the seat, or by otherwise
being out of position), the
"PASSENGER AIRBAG OFF"
indicator may be turned on,
and the passenger airbag may
not deploy in a collision.
Always be sure to sit properly
in the front passenger seat
and wear the safety belt prop-
erly.
(Continued)
1KMN3661
Do Not Do This:Do Not Do This:
1KMN3662
1KMN36631KMN3664
- Put a heavy load in the frontpassenger seat.
- Excessively recline the front passenger seatback. - Do not sit on the front edge
of the front passenger seat.
- Do not sit towards the side of the front seat, or lean against
the console or door.
(Continued)
(Continued)
Do Not Do This:Do Not Do This:
LD CAN (ENG) new 3-1~.qxd 7/29/05 10:29 AM Page 65
Page 100 of 273
389
1
2
3
4
5
6
7
8
9
Knowing your vehicle
Folding the outside rearview
mirror
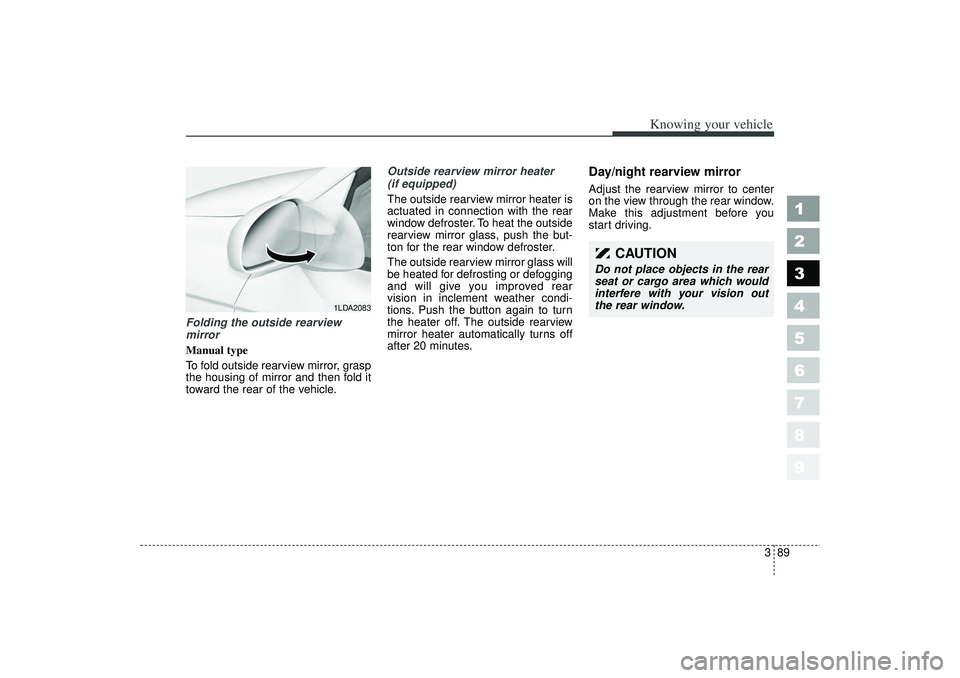
Manual type
To fold outside rearview mirror, grasp
the housing of mirror and then fold it
toward the rear of the vehicle.Outside rearview mirror heater
(if equipped)
The outside rearview mirror heater is
actuated in connection with the rear
window defroster. To heat the outside
rearview mirror glass, push the but-
ton for the rear window defroster.
The outside rearview mirror glass will
be heated for defrosting or defogging
and will give you improved rear
vision in inclement weather condi-
tions. Push the button again to turn
the heater off. The outside rearview
mirror heater automatically turns off
after 20 minutes.
Day/night rearview mirror Adjust the rearview mirror to center
on the view through the rear window.
Make this adjustment before you
start driving.
1LDA2083
CAUTION
Do not place objects in the rear
seat or cargo area which would
interfere with your vision out
the rear window.
LD CAN (ENG) 3-84~.qxd 7/29/05 10:15 AM Page 89
Page 101 of 273
Knowing your vehicle90
3
1
2
3
4
5
6
7
8
9
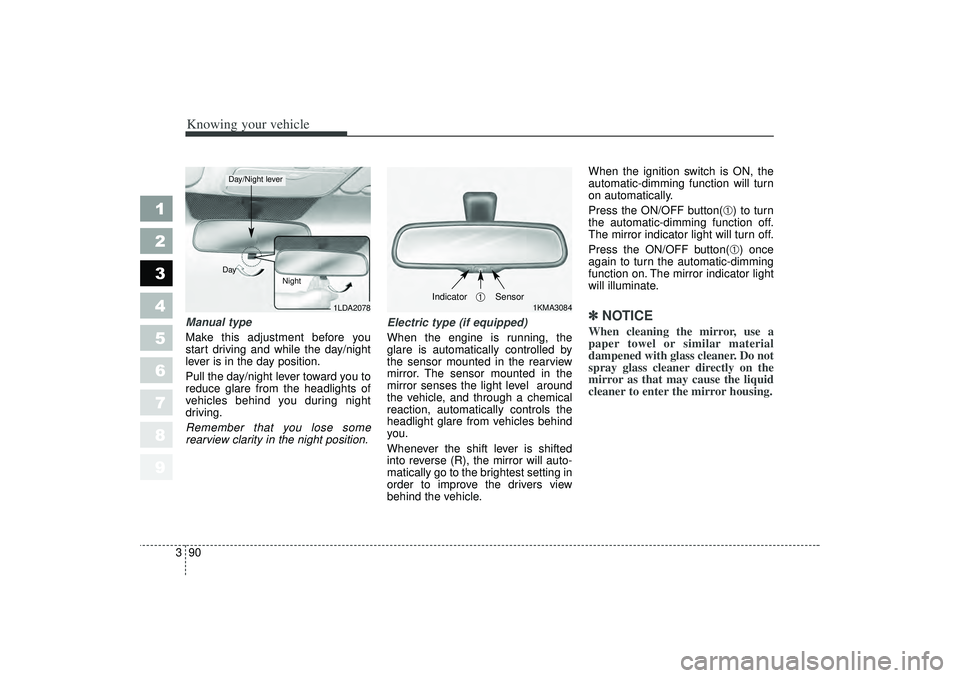
Manual type
Make this adjustment before you
start driving and while the day/night
lever is in the day position.
Pull the day/night lever toward you to
reduce glare from the headlights of
vehicles behind you during night
driving.
Remember that you lose some
rearview clarity in the night position. Electric type (if equipped)
When the engine is running, the
glare is automatically controlled by
the sensor mounted in the rearview
mirror. The sensor mounted in the
mirror senses the light level around
the vehicle, and through a chemical
reaction, automatically controls the
headlight glare from vehicles behind
you.
Whenever the shift lever is shifted
into reverse (R), the mirror will auto-
matically go to the brightest setting in
order to improve the drivers view
behind the vehicle.When the ignition switch is ON, the
automatic-dimming function will turn
on automatically.
Press the ON/OFF button(
➀) to turn
the automatic-dimming function off.
The mirror indicator light will turn off.
Press the ON/OFF button(➀) once
again to turn the automatic-dimming
function on. The mirror indicator light
will illuminate.
✽ ✽ NOTICEWhen cleaning the mirror, use a
paper towel or similar material
dampened with glass cleaner. Do not
spray glass cleaner directly on the
mirror as that may cause the liquid
cleaner to enter the mirror housing.
1LDA2078
Day
Night
Day/Night lever
1KMA3084
➀
Sensor
Indicator
LD CAN (ENG) 3-84~.qxd 7/29/05 10:15 AM Page 90