lights KIA Sportage 2008 JE_ / 2.G Owner's Manual
[x] Cancel search | Manufacturer: KIA, Model Year: 2008, Model line: Sportage, Model: KIA Sportage 2008 JE_ / 2.GPages: 350, PDF Size: 6.42 MB
Page 10 of 350
10
1
2
3
4
5
6
7
8
9Keys / 3-2
Remote keyless entry / 3-3
Theft-alarm system / 3-5
Immobilizer system / 3-6
Door locks / 3-9
Window / 3-16
Seat / 3-19
Safety belts / 3-30
Airbags-supplemental restraint system / 3-54
Hood / 3-80
Fuel filler lid / 3-82
Mirrors / 3-85
Interior lights / 3-89
Storage compartment / 3-91
Interior features / 3-94
Sunroof / 3-100
Luggage net / 3-104
Tonneau cover / 3-105
Luggage center box / 3-107
Roof rack / 3-108
Antenna / 3-109
Knowing your vehicle
10
Page 12 of 350
33
Knowing your vehicle
1
2
3
4
5
6
7
8
9
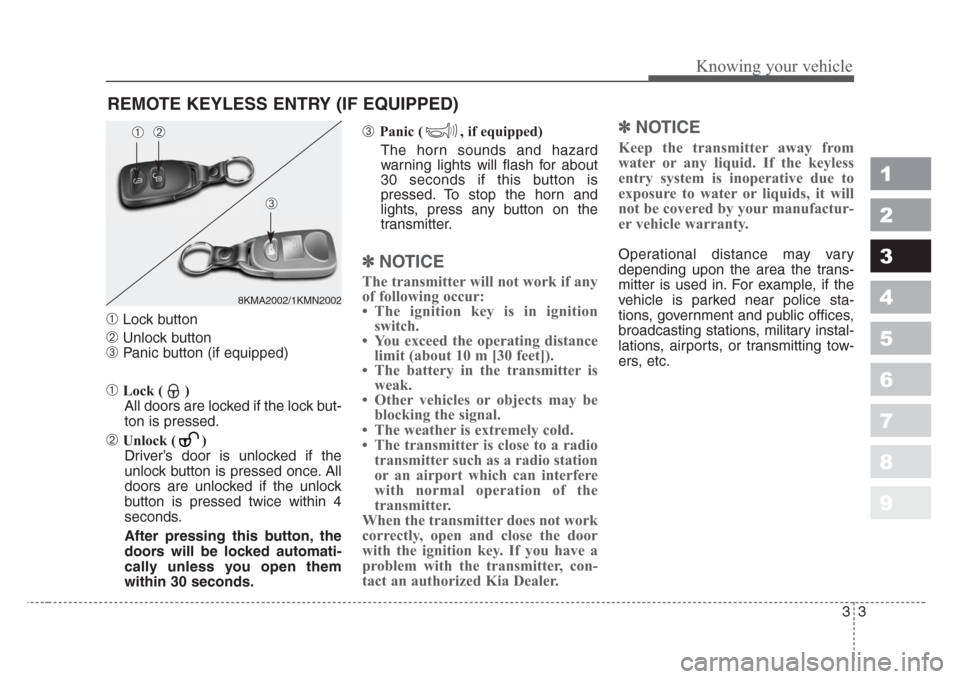
➀Lock button
➁Unlock button
➂Panic button (if equipped)
➀Lock ( )
All doors are locked if the lock but-
ton is pressed.
➁Unlock ( )
Driver’s door is unlocked if the
unlock button is pressed once. All
doors are unlocked if the unlock
button is pressed twice within 4
seconds.
After pressing this button, the
doors will be locked automati-
cally unless you open them
within 30 seconds.
➂ Panic ( , if equipped)
The horn sounds and hazard
warning lights will flash for about
30 seconds if this button is
pressed. To stop the horn and
lights, press any button on the
transmitter.
✽
NOTICE
The transmitter will not work if any
of following occur:
• The ignition key is in ignition
switch.
• You exceed the operating distance
limit (about 10 m [30 feet]).
• The battery in the transmitter is
weak.
• Other vehicles or objects may be
blocking the signal.
• The weather is extremely cold.
• The transmitter is close to a radio
transmitter such as a radio station
or an airport which can interfere
with normal operation of the
transmitter.
When the transmitter does not work
correctly, open and close the door
with the ignition key. If you have a
problem with the transmitter, con-
tact an authorized Kia Dealer.
✽
NOTICE
Keep the transmitter away from
water or any liquid. If the keyless
entry system is inoperative due to
exposure to water or liquids, it will
not be covered by your manufactur-
er vehicle warranty.
Operational distance may vary
depending upon the area the trans-
mitter is used in. For example, if the
vehicle is parked near police sta-
tions, government and public offices,
broadcasting stations, military instal-
lations, airports, or transmitting tow-
ers, etc.
REMOTE KEYLESS ENTRY (IF EQUIPPED)
8KMA2002/1KMN2002
➀➁
➂
Page 14 of 350
35
Knowing your vehicle
1
2
3
4
5
6
7
8
9
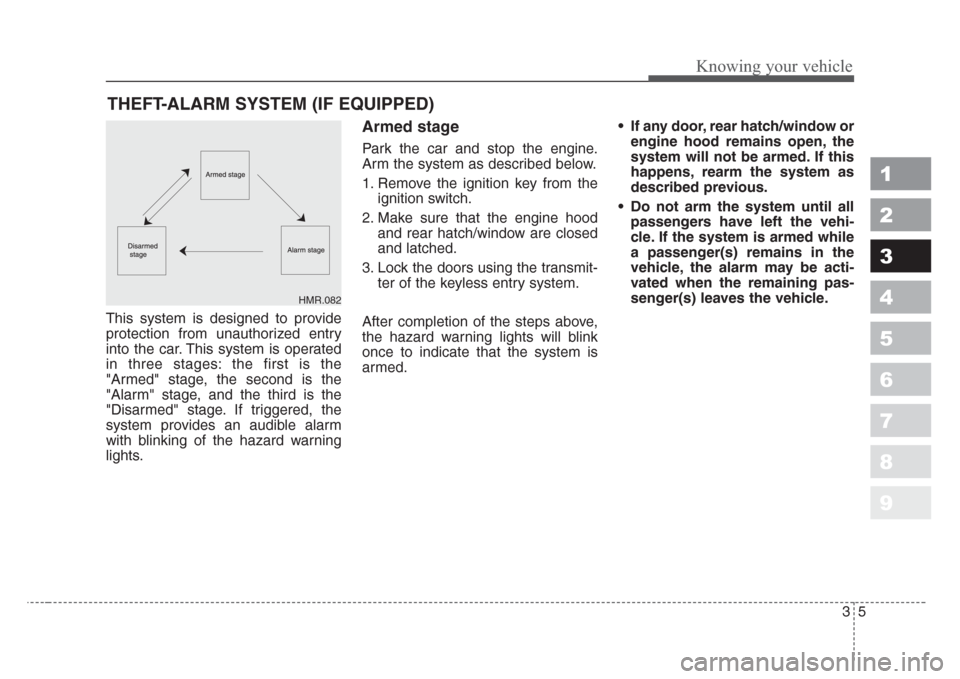
This system is designed to provide
protection from unauthorized entry
into the car. This system is operated
in three stages: the first is the
"Armed" stage, the second is the
"Alarm" stage, and the third is the
"Disarmed" stage. If triggered, the
system provides an audible alarm
with blinking of the hazard warning
lights.
Armed stage
Park the car and stop the engine.
Arm the system as described below.
1. Remove the ignition key from the
ignition switch.
2. Make sure that the engine hood
and rear hatch/window are closed
and latched.
3. Lock the doors using the transmit-
ter of the keyless entry system.
After completion of the steps above,
the hazard warning lights will blink
once to indicate that the system is
armed.• If any door, rear hatch/window or
engine hood remains open, the
system will not be armed.If this
happens, rearm the system as
described previous.
• Do not arm the system until all
passengers have left the vehi-
cle.If the system is armed while
a passenger(s) remains in the
vehicle, the alarm may be acti-
vated when the remaining pas-
senger(s) leaves the vehicle
.
THEFT-ALARM SYSTEM (IF EQUIPPED)
HMR.082
Page 15 of 350
Knowing your vehicle
6 3
1
2
3
4
5
6
7
8
9
Alarm stage
The alarm will be activated if any of
the following occurs while the system
is armed.
• A front or rear door is opened with-
out using the ignition key or trans-
mitter.
• The rear hatch/window is opened
without using the ignition key or
transmitter.
• The engine hood is opened.
The siren will sound and the hazard
warning lights will blink continuously
for 27 seconds, and repeat the alarm
3 times unless the system is dis-
armed. To turn off the system, unlock
the doors with the ignition key or
transmitter.
✽
NOTICE
Avoid trying to start the engine
while the alarm is activated. The
vehicle starting motor is disabled
during the alarm stage.
Disarmed stage
The system will be disarmed when
the doors are unlocked by depress-
ing the unlock button on the transmit-
ter or unlocked with the ignition key.
After depressing unlock button, the
hazard warning lights will blink twice
to indicate that the system is dis-
armed.
After depressing unlock button, if any
door is not opened within 30 sec-
onds, the system will be rearmed.
If the system is not disarmed with the
ignition key or transmitter, insert the
key in the ignition switch, turn the key
to the ON position and wait for 30
seconds. Then the system will be dis-
armed.Your vehicle is equipped with an elec-
tronic engine immobilizer system to
reduce the risk of unauthorized vehi-
cle use.
Your immobilizer system is comprised
of a small transponder in the ignition
key, and antenna coil in the key cylin-
der and Immobilizer Control Unit (or
Smartra Unit).
With this system, whenever you insert
your ignition key into the ignition
switch and turn it to ON, the antenna
coil in the ignition switch receives a
signal from the transponder in the
ignition key and then sends the signal
to the ECU (Engine Control Unit).
The ECU checks the signal whether
the ignition key is valid.
If the key is determined to be valid,
the engine will start.
If the key is determined to be invalid,
the engine will not start.
IMMOBILIZER SYSTEM
(IF EQUIPPED)
Page 96 of 350
387
1
2
3
4
5
6
7
8
9
Knowing your vehicle
Outside rearview mirror heater
(if equipped)
The outside rearview mirror heater is
actuated in connection with the rear
window defroster. To heat the outside
rearview mirror glass, push the but-
ton for the rear window defroster.
The rearview mirror heater (and rear
window defroster) will not operate
unless the engine is running.
The outside rearview mirror glass will
be heated for defrosting or defogging
and will give you improved rear
vision in inclement weather condi-
tions. Push the button again to turn
the heater off. The outside rearview
mirror heater automatically turns off
after 20 minutes.
Inside rearview mirror
Adjust the rearview mirror to center
on the view through the rear window.
Make this adjustment before you
start driving.
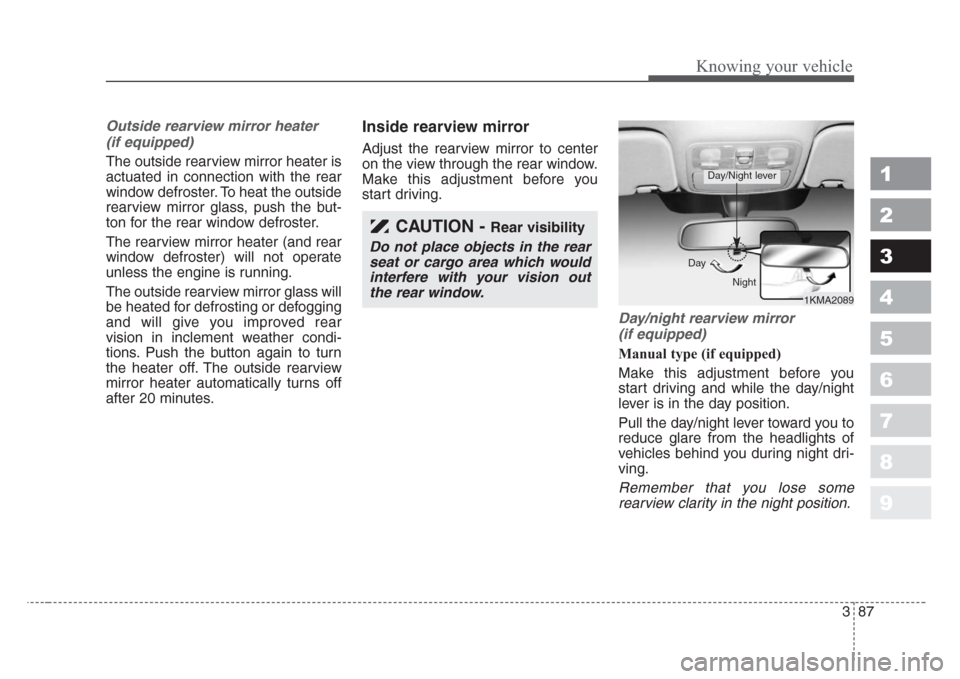
Day/night rearview mirror
(if equipped)
Manual type (if equipped)
Make this adjustment before you
start driving and while the day/night
lever is in the day position.
Pull the day/night lever toward you to
reduce glare from the headlights of
vehicles behind you during night dri-
ving.
Remember that you lose some
rearview clarity in the night position.
CAUTION - Rear visibility
Do not place objects in the rear
seat or cargo area which would
interfere with your vision out
the rear window.
1KMA2089 Day
Night
Day/Night lever
Page 97 of 350
Knowing your vehicle
88 3
1
2
3
4
5
6
7
8
9
Electric type (if equipped)
The electric day/night rearview mir-
ror automatically controls the glare
from the headlights of the car behind
you in nighttime or low light driving
conditions. The sensor mounted in
the mirror senses the light level
around the vehicle, and through a
chemical reaction, automatically
controls the headlight glare from
vehicles behind you.
When the engine is running, the
glare is automatically controlled by
the sensor mounted in the rearview
mirror.
Whenever the shift lever is shifted
into reverse (R), the mirror will auto-
matically go to the brightest setting in
order to improve the drivers view
behind the vehicle.
✽
NOTICE
When cleaning the mirror, use a
paper towel or similar material
dampened with glass cleaner. Do not
spray glass cleaner directly on the
mirror as that may cause the liquid
cleaner to enter the mirror housing.
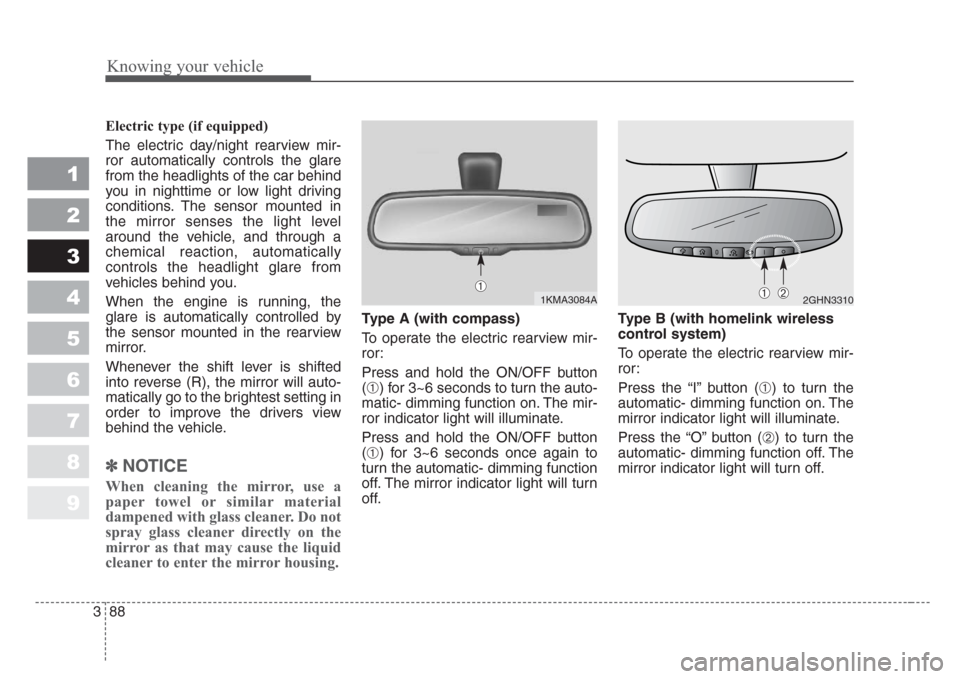
Type A (with compass)
To operate the electric rearview mir-
ror:
Press and hold the ON/OFF button
(
➀) for 3~6 seconds to turn the auto-
matic- dimming function on. The mir-
ror indicator light will illuminate.
Press and hold the ON/OFF button
(
➀) for 3~6 seconds once again to
turn the automatic- dimming function
off. The mirror indicator light will turn
off.Type B (with homelink wireless
control system)
To operate the electric rearview mir-
ror:
Press the “I” button (
➀) to turn the
automatic- dimming function on. The
mirror indicator light will illuminate.
Press the “O” button (
➁) to turn the
automatic- dimming function off. The
mirror indicator light will turn off.
2GHN3310➀➁1KMA3084A
➀
Page 98 of 350
389
1
2
3
4
5
6
7
8
9
Knowing your vehicle
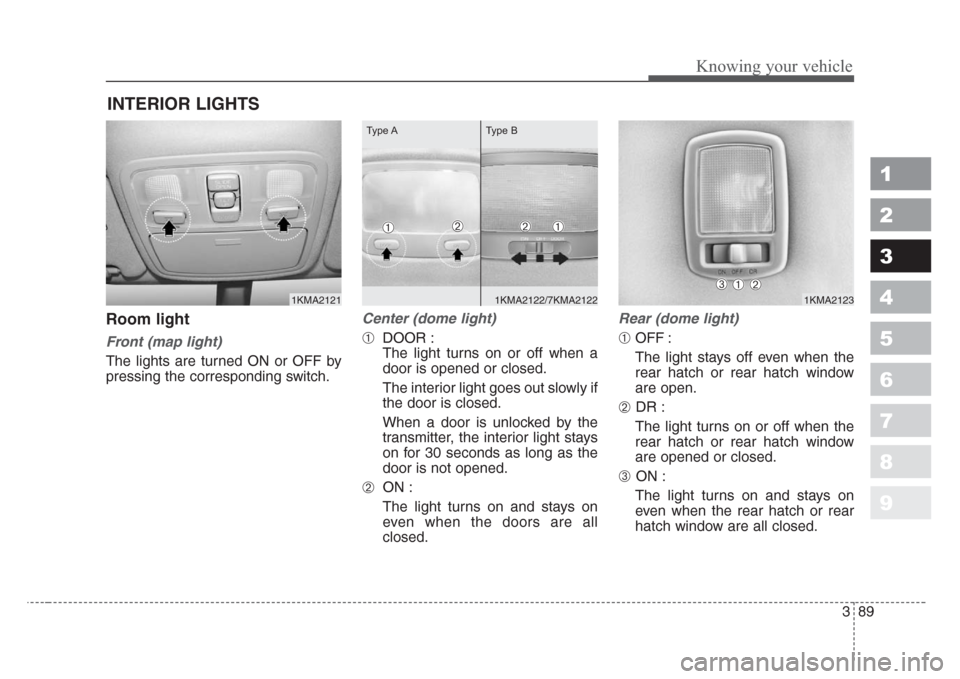
Room light
Front (map light)
The lights are turned ON or OFF by
pressing the corresponding switch.
Center (dome light)
➀DOOR :
The light turns on or off when a
door is opened or closed.
The interior light goes out slowly if
the door is closed.
When a door is unlocked by the
transmitter, the interior light stays
on for 30 seconds as long as the
door is not opened.
➁ON :
The light turns on and stays on
even when the doors are all
closed.
Rear (dome light)
➀OFF :
The light stays off even when the
rear hatch or rear hatch window
are open.
➁ DR :
The light turns on or off when the
rear hatch or rear hatch window
are opened or closed.
➂ ON :
The light turns on and stays on
even when the rear hatch or rear
hatch window are all closed.
INTERIOR LIGHTS
1KMA2122/7KMA21221KMA21231KMA2121
➀➁➂
➀➁
Type A Type B
➀➁
Page 99 of 350
Knowing your vehicle
90 3
1
2
3
4
5
6
7
8
9
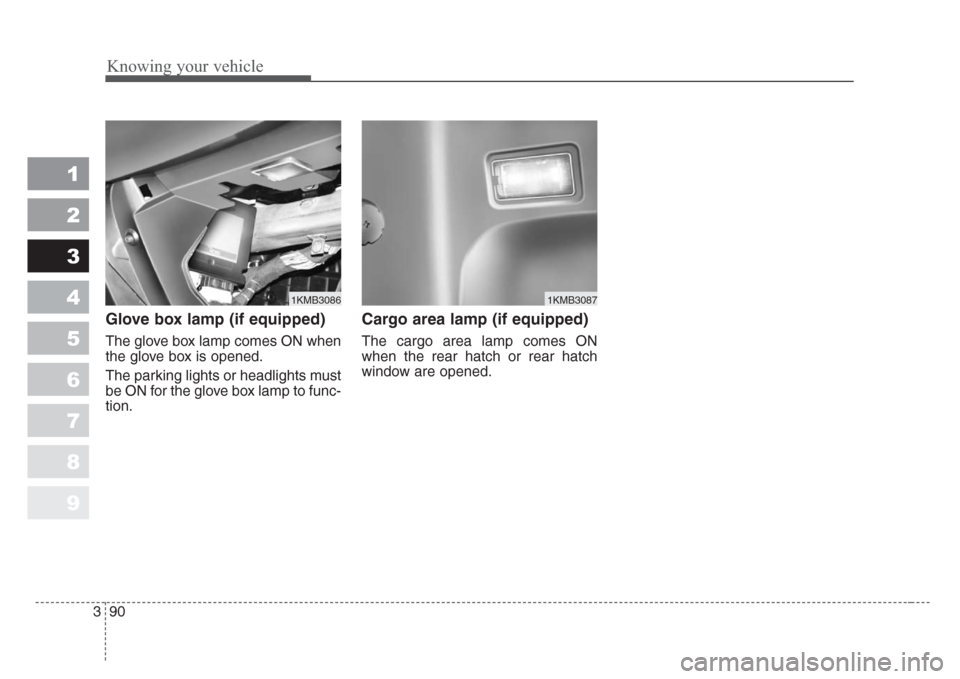
Glove box lamp (if equipped)
The glove box lamp comes ON when
the glove box is opened.
The parking lights or headlights must
be ON for the glove box lamp to func-
tion.
Cargo area lamp (if equipped)
The cargo area lamp comes ON
when the rear hatch or rear hatch
window are opened.
1KMB30861KMB3087
Page 120 of 350
Driving your vehicle
2 4
1
2
3
4
5
6
7
8
9
Illuminated ignition switch
(if equipped)
Whenever a door is opened, the igni-
tion switch will be illuminated for your
convenience, provided the ignition
switch is not in the ON position. The
light will go off approximately 10 sec-
onds after closing the door or when
the ignition switch is turned on.
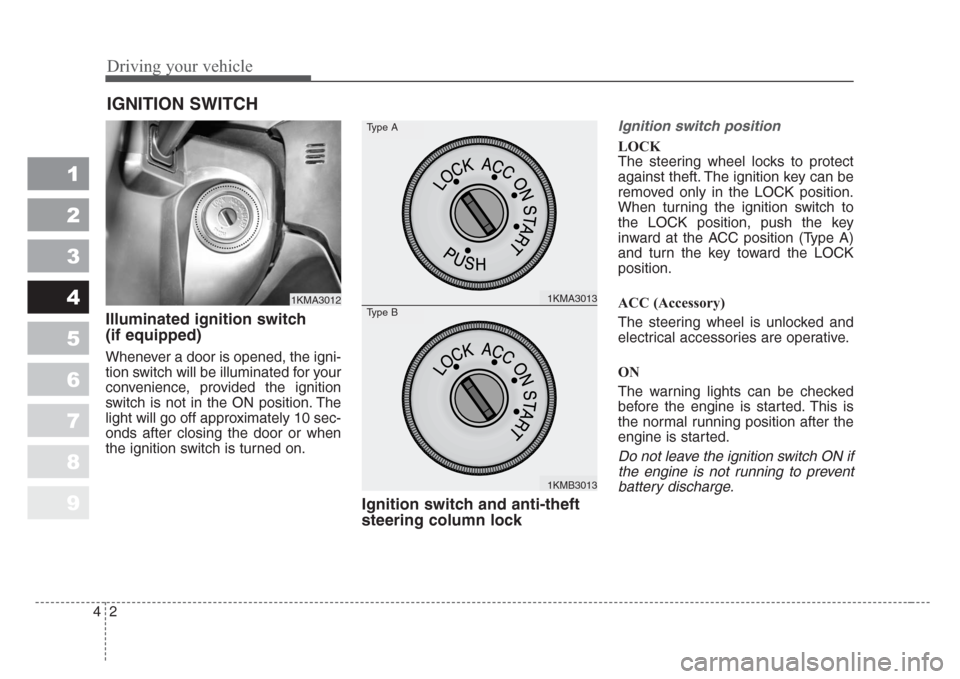
Ignition switch and anti-theft
steering column lock
Ignition switch position
LOCK
The steering wheel locks to protect
against theft. The ignition key can be
removed only in the LOCK position.
When turning the ignition switch to
the LOCK position, push the key
inward at the ACC position (Type A)
and turn the key toward the LOCK
position.
ACC (Accessory)
The steering wheel is unlocked and
electrical accessories are operative.
ON
The warning lights can be checked
before the engine is started. This is
the normal running position after the
engine is started.
Do not leave the ignition switch ON if
the engine is not running to prevent
battery discharge.
IGNITION SWITCH
1KMA30121KMA3013
1KMB3013
Type A
Type B
Page 144 of 350
Driving your vehicle
26 4
1
2
3
4
5
6
7
8
9
Tilt steering (if equipped)
A tilt steering wheel allows you to
adjust the steering wheel before you
drive.You can also raise it to the
highest level to give your legs more
room when you exit and enter the
vehicle.
The steering wheel should be posi-
tioned so that it is comfortable for
you to drive, while permitting you to
see the instrument panel warning
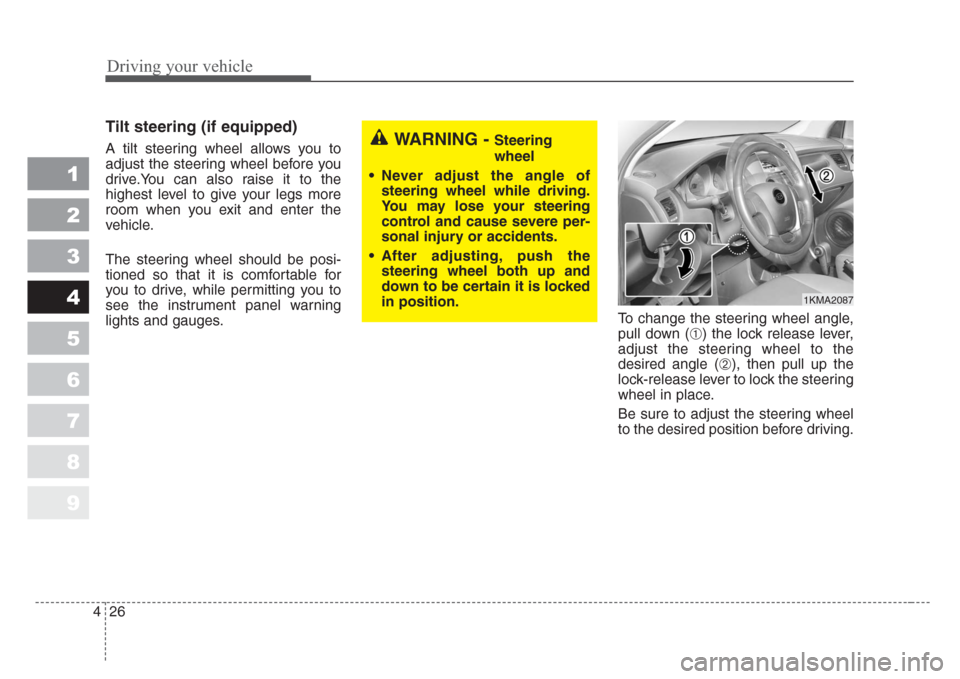
lights and gauges.To change the steering wheel angle,
pull down (
➀) the lock release lever,
adjust the steering wheel to the
desired angle (
➁), then pull up the
lock-release lever to lock the steering
wheel in place.
Be sure to adjust the steering wheel
to the desired position before driving.
WARNING - Steering
wheel
• Never adjust the angle of
steering wheel while driving.
You may lose your steering
control and cause severe per-
sonal injury or accidents.
• After adjusting, push the
steering wheel both up and
down to be certain it is locked
in position.
1KMA2087