fuel cap KIA Sportage 2010 SL / 3.G Owner's Manual
[x] Cancel search | Manufacturer: KIA, Model Year: 2010, Model line: Sportage, Model: KIA Sportage 2010 SL / 3.GPages: 371, PDF Size: 5.23 MB
Page 90 of 371
381
1
2
3
4
5
6
7
8
9
Knowing your vehicle
Closing the hood
1. Before closing the hood, check thefollowing:
ment must be correctly installed.
bustible material must be
removed from the engine com-
partment.
2. Secure the support rod in its clip.
3. Lower the hood to about 30 cm (12 inches) height and then let it
drop to properly lock in place.
Make sure the hood is properly
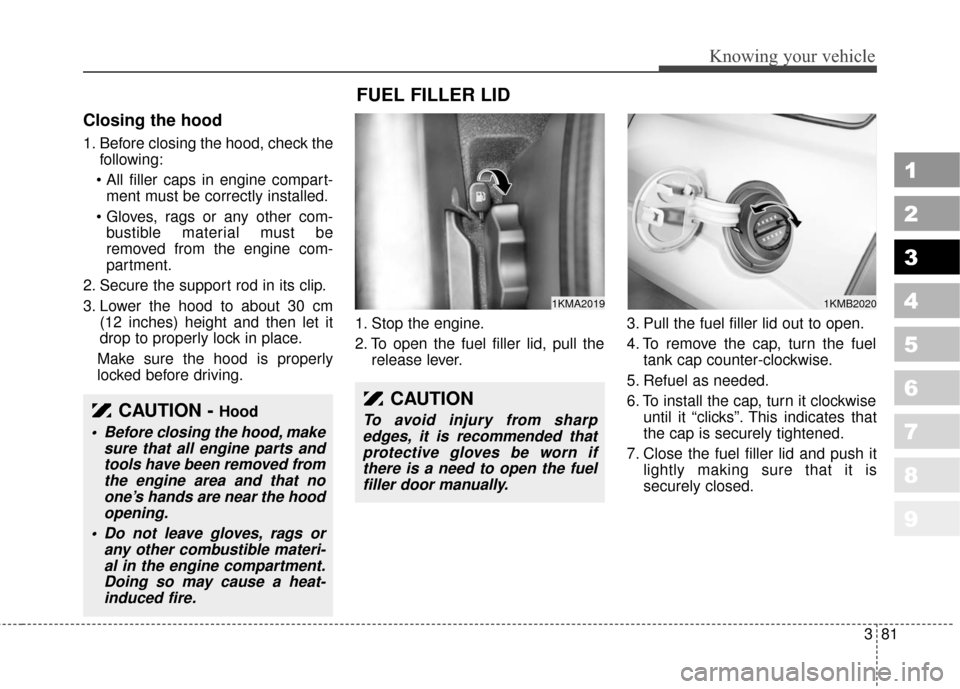
locked before driving. 1. Stop the engine.
2. To open the fuel filler lid, pull the
release lever. 3. Pull the fuel filler lid out to open.
4. To remove the cap, turn the fuel
tank cap counter-clockwise.
5. Refuel as needed.
6. To install the cap, turn it clockwise until it “clicks”. This indicates that
the cap is securely tightened.
7. Close the fuel filler lid and push it lightly making sure that it is
securely closed.
CAUTION - Hood
Before closing the hood, makesure that all engine parts andtools have been removed fromthe engine area and that noone’s hands are near the hoodopening.
Do not leave gloves, rags or any other combustible materi-al in the engine compartment.Doing so may cause a heat-induced fire.
FUEL FILLER LID
1KMA20191KMB2020
CAUTION
To avoid injury from sharpedges, it is recommended thatprotective gloves be worn ifthere is a need to open the fuelfiller door manually.
Page 91 of 371
Knowing your vehicle
82
3
1
2
3
4
5
6
7
8
9
WARNING - Refueling
If pressurized fuel sprays out, it
can cover your clothes or skin
and thus subject you to the risk
of fire and burns. Always
remove the fuel cap carefully
and slowly. If the cap is venting
fuel or if you hear a hissing
sound, wait until the condition
stops before completely remov-
ing the cap.WARNING - Refueling
dangers
Automotive fuels are flammable
materials. When refueling,
please note the following guide-
lines carefully. Failure to follow
these guidelines may result in
severe personal injury, severe
burns or death by fire or explo-
sion.
Read and follow all warnings posted at the gas station facil-
ity.
Before refueling note the loca- tion of the Emergency
Gasoline Shut-Off, if available,
at the gas station facility.
Before touching the fuel noz- zle, you should eliminate
potentially dangerous static
electricity discharge by touch-
ing another metal part of the
vehicle, a safe distance away
from the fuel filler neck, noz-
zle, or other gas source.
(Continued)(Continued)
Do not get back into a vehicleonce you have begun refuel-
ing since you can generate
static electricity by touching,
rubbing or sliding against any
item or fabric (polyester, satin,
nylon, etc.) capable of produc-
ing static electricity. Static
electricity discharge can
ignite fuel vapors resulting in
rapid burning. If you must re-
enter the vehicle, you should
once again eliminate poten-
tially dangerous static elec-
tricity discharge by touching a
metal part of the vehicle, away
from the fuel filler neck, nozzle
or other gasoline source.
When using a portable fuel container be sure to place the
container on the ground prior
to refueling. Static electricity
discharge from the container
can ignite fuel vapors causing
a fire. Once refueling has
begun, contact with the vehi-
cle should be maintained until
the filling is complete.
(Continued)
Page 92 of 371
383
1
2
3
4
5
6
7
8
9
Knowing your vehicle
(Continued)Use only portable plastic fuel
containers designed to carry
and store gasoline.
Do not use cellular phones while refueling. Electric cur-
rent and/or electronic interfer-
ence from cellular phones can
potentially ignite fuel vapors
causing a fire.
When refueling, always shut the engine off. Sparks pro-
duced by electrical compo-
nents related to the engine
can ignite fuel vapors causing
a fire. Once refueling is com-
plete, check to make sure the
filler cap and filler door are
securely closed, before start-
ing the engine.
(Continued)(Continued)
DO NOT use matches or alighter and DO NOT SMOKE or
leave a lit cigarette in your
vehicle while at a gas station
especially during refueling.
Automotive fuel is highly flam-
mable and can, when ignited,
result in fire.
If a fire breaks out during refu- eling, leave the vicinity of the
vehicle, and immediately con-
tact the manager of the gas
station and then contact the
local fire department.CAUTION
Make sure to refuel your vehi- cle according to the “Fuelrequirements” suggested insection 5.
Check to make sure the fuel filler cap is securely closedafter refueling. A loose fuelfiller cap may cause the"Check Engine" (MalfunctionIndicator) light in the instru-ment panel to illuminateunnecessarily.
If the fuel filler cap requires replacement, use only a gen-uine Kia cap or the equivalentspecified for your vehicle. Anincorrect fuel filler cap canresult in a serious malfunctionof the fuel system or emissioncontrol system.
Do not spill fuel on the exteri- or surfaces of the vehicle. Anytype of fuel spilled on paintedsurfaces may damage thepaint.
Page 181 of 371
Driving your vehicle
34
4
1
2
3
4
5
6
7
8
9
Speedometer
The speedometer indicates the for-
ward speed of the vehicle.
Tachometer
The tachometer indicates the
approximate number of engine revo-
lutions per minute (rpm).
Use the tachometer to select the cor-
rect shift points and to prevent lug-
ging and/or over-revving the engine.
The tachometer pointer may move
slightly when the ignition switch is in
ACC or ON position with the engine
OFF. This movement is normal and
will not affect the accuracy of the
tachometer once the engine is run-
ning.
✽ ✽
NOTICE
Do not operate the engine within the
tachometer's RED ZONE.
This may cause severe engine dam-
age.
Fuel gauge
The fuel gauge indicates the approx-
imate amount of fuel remaining in the
fuel tank. The fuel tank capacity is
given in section 8. The fuel gauge is
supplemented by a low fuel warning
light, which will illuminate when the
fuel tank is near empty.
On inclines or curves, the fuel gauge
pointer may fluctuate or the low fuel
warning light may come on earlier
than usual due to the movement of
fuel in the tank.
GAUGES
WARNING- Fuel gauge
Running out of fuel can expose
vehicle occupants to danger.
You must stop and obtain addi-
tional fuel as soon as possible
after the warning light comes on
or when the gauge indicator
comes close to the E level.
CAUTION
Avoid driving with a very low fuel level. If you run out of fuel,it could case the engine to mis-fire and result in excessive load-ing of the catalytic converter.
Page 191 of 371
Driving your vehicle
44
4
1
2
3
4
5
6
7
8
9
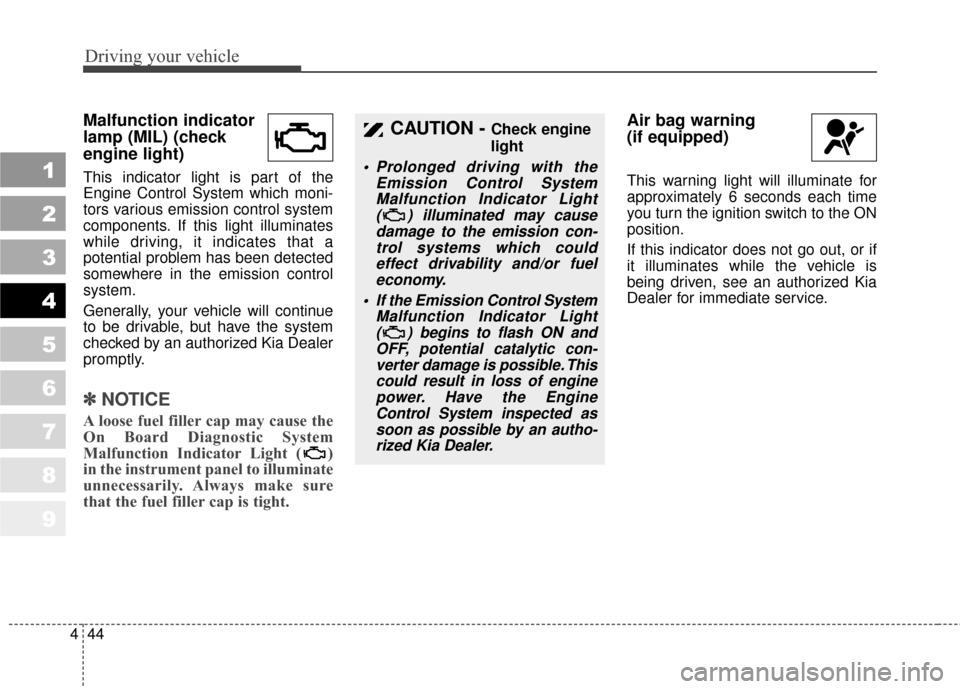
Malfunction indicator
lamp (MIL) (check
engine light)
This indicator light is part of the
Engine Control System which moni-
tors various emission control system
components. If this light illuminates
while driving, it indicates that a
potential problem has been detected
somewhere in the emission control
system.
Generally, your vehicle will continue
to be drivable, but have the system
checked by an authorized Kia Dealer
promptly.
✽ ✽
NOTICE
A loose fuel filler cap may cause the
On Board Diagnostic System
Malfunction Indicator Light ( )
in the instrument panel to illuminate
unnecessarily. Always make sure
that the fuel filler cap is tight.
Air bag warning
(if equipped)
This warning light will illuminate for
approximately 6 seconds each time
you turn the ignition switch to the ON
position.
If this indicator does not go out, or if
it illuminates while the vehicle is
being driven, see an authorized Kia
Dealer for immediate service.
CAUTION - Check engine
light
Prolonged driving with the
Emission Control SystemMalfunction Indicator Light ( ) illuminated may causedamage to the emission con-trol systems which couldeffect drivability and/or fueleconomy.
If the EmissionControl System
Malfunction Indicator Light ( ) begins to flash ON andOFF, potential catalytic con-verter damage is possible. Thiscould result in loss of enginepower. Have the EngineControl System inspected assoon as possible by an autho-rized Kia Dealer.
Page 264 of 371
Driving tips
32
5
1
2
3
4
5
6
7
8
9
WEIGHT OF THE VEHICLE
This section will guide you in the
proper loading of your vehicle and/or
trailer, to keep your loaded vehicle
weight within its design rating capa-
bility, with or without a trailer.
Properly loading your vehicle will
provide maximum return of the vehi-
cle design performance. Before load-
ing your vehicle, familiarize yourself
with the following terms for determin-
ing your vehicle's weight ratings, with
or without a trailer, from the vehicle's
Specifications and the Vehicle
Certification Label:
Base curb weight
This is the weight of the vehicle
including a full tank of fuel and all
standard equipment. It does not
include passengers, cargo, or option-
al equipment.
Vehicle curb weight
This is the weight of your new vehicle
when you picked it up from your deal-
er plus any aftermarket equipment.
Cargo weight
This figure includes all weight added
to the Base Curb Weight, including
cargo and optional equipment. When
towing, trailer tongue load or king pin
weight also is part of the Cargo
Weight.
GAW (Gross axle weight)
This is the total weight placed on
each axle (front and rear) - including
vehicle curb weight and all payload.
GAWR (Gross axle weight rating)
This is the maximum allowable
weight that can be carried by a single
axle (front or rear). These numbers
are shown on the Vehicle
Certification Label. The total load on
each axle must never exceed its
GAWR.
GVW (Gross vehicle weight)
This is the Base Curb Weight plus
actual Cargo Weight plus passen-
gers.
GVWR (Gross vehicle weight
rating)
This is the maximum allowable weight
of the fully loaded vehicle (including
all options, equipment, passengers
and cargo). The GVWR is shown on
the Vehicle Certification Label located
on the driver's door pillar.
Page 265 of 371
533
Driving tips
1
2
3
4
5
6
7
8
9
TRAILER TOWING
✽ ✽ NOTICE
Pulling a trailer improperly can
damage your vehicle and result in
costly repairs not covered by your
warranty. To pull a trailer correctly,
follow the advice in this section.
Your Sportage equipped with a 2.7
liter engine can tow a trailer.
However, we do not recommend
trailer towing for the Sportage
equipped with the 2.0 liter engine. To
identify what the vehicle trailering
capacity is for your vehicle, you
should read the information in
“Weight of the Trailer” that appears
later in this section.
Remember that trailering is different
than just driving your vehicle by itself.
Trailering means changes in han-
dling, durability, and fuel economy.
Successful, safe trailering requires
correct equipment, and it has to be
used properly. This section contains many time-
tested, important trailering tips and
safety rules. Many of these are
important for your safety and that of
your passengers. Please read this
section carefully before you pull a
trailer.
Load-pulling components such as
the engine, transaxle, wheel assem-
blies, and tires are forced to work
harder against the load of the added
weight. The engine is required to
operate at relatively higher speeds
and under greater loads. This addi-
tional burden generates extra heat.
The trailer also adds considerably to
wind resistance, increasing the
pulling requirements.
WARNING- Towing a
trailer
If you don't use the correct
equipment and drive properly,
you can lose control when you
pull a trailer. For example, if the
trailer is too heavy, the brakes
may not work well - or even at
all. You and your passengers
could be seriously or fatally
injured. Pull a trailer only if you
have followed all the steps in
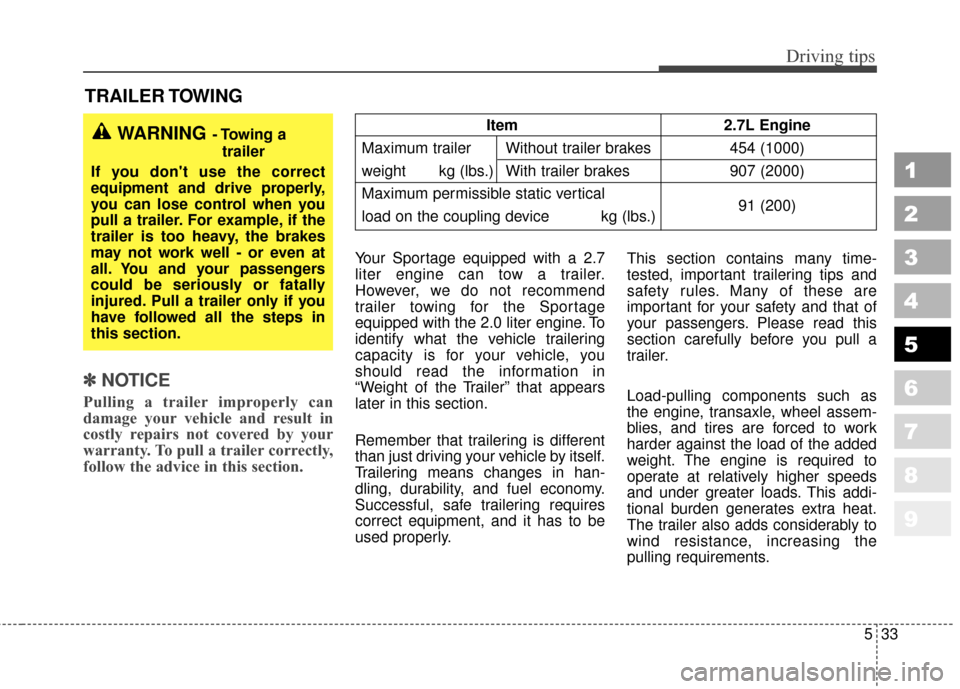
this section.Item 2.7L Engine
Maximum trailer Without trailer brakes 454 (1000)
weight kg (lbs.) With trailer brakes 907 (2000)
Maximum permissible static vertical
load on the coupling device kg (lbs.) 91 (200)
Page 275 of 371
543
Driving tips
1
2
3
4
5
6
7
8
9
Refer to your vehicle's tire and load-
ing information label for specific
information about your vehicle's
capacity weight and seating posi-
tions. The combined weight of the
driver, passengers and cargo should
never exceed your vehicle's capacity
weight.Compliance label
The compliance label is located on
the driver's door sill.
The label shows the size of your orig-
inal tires and the inflation pressures
needed to obtain the gross weight
capacity of your vehicle. This is
called the GVWR (Gross Vehicle
Weight Rating). The GVWR includes
the weight of the vehicle, all occu-
pants, fuel and cargo.
This label also tells you the maxi-
mum weights that can be supported
by the front and rear axles, called
Gross Axle Weight Rating (GAWR).
To find out the actual loads on your
front and rear axles, you need to go
to a weigh station and weigh your
vehicle. Your dealer can help you with
this. Be sure to spread out your load
equally on both sides of the center-
line.WARNING - Over loading
Never exceed the GVWR for your vehicle, or the GAWR for
either the front or rear axle.
Do not load your vehicle any heavier than the GVWR, or
either the maximum front or
rear GAWR. If you do, parts on
your vehicle can break, and it
can change the way your vehi-
cle handles. This could cause
you to lose control and crash.
Also, overloading can shorten
the life of your vehicle.
Page 313 of 371
Maintenance
47
1
2
3
4
5
6
7
8
9
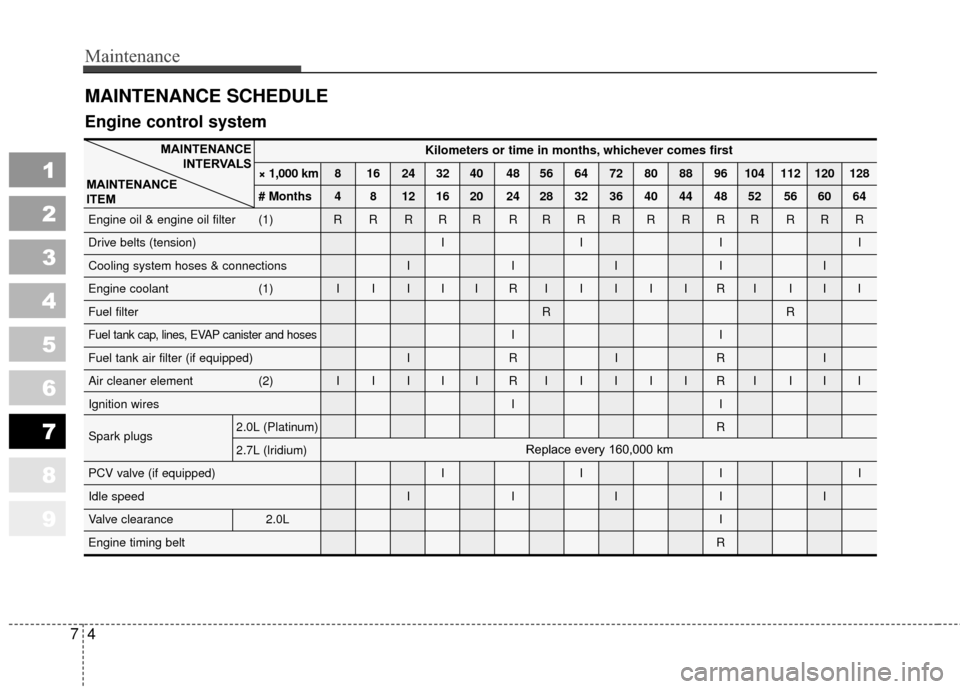
MAINTENANCE SCHEDULE
MAINTENANCEINTERVALS
MAINTENANCE
ITEM
Engine control system
Kilometers or time in months, whichever comes first
× 1,000 km 8 16 24 32 40 48 56 64 72 80 88 96 104 112 120 128
# Months 4 8 12 16 20 24 28 32 36 40 44 48 52 56 60 64
Engine oil & engine oil filter (1) R R R R R R RRRRRRR RRR
Drive belts (tension) I I I I
Cooling system hoses & connections I I I I I
Engine coolant (1) I I I I I R IIIIIRI III
Fuel filter RR
Fuel tank cap, lines, EVAP canister and hosesII
Fuel tank air filter (if equipped) I R I R I
Air cleaner element (2) I I I I I R IIIIIRI III
Ignition wires I I
Spark plugs 2.0L (Platinum)
R
2.7L (lridium)
PCV valve (if equipped) I I I I
Idle speed I I I I I
Valve clearance 2.0L I
Engine timing belt R
Replace every 160,000 km
Page 318 of 371
79
Maintenance
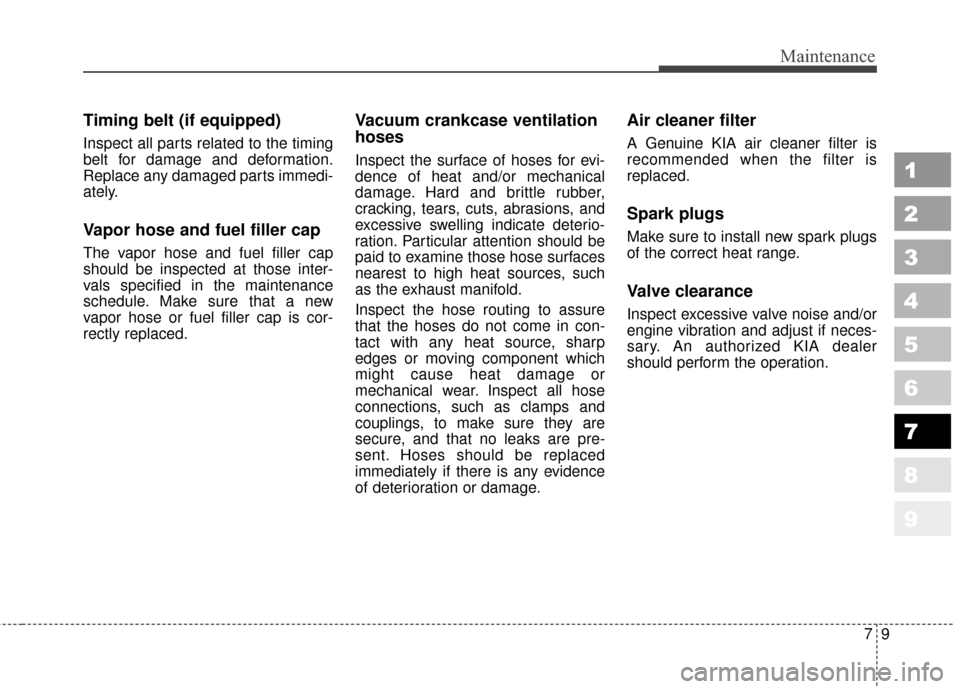
Timing belt (if equipped)
Inspect all parts related to the timing
belt for damage and deformation.
Replace any damaged parts immedi-
ately.
Vapor hose and fuel filler cap
The vapor hose and fuel filler cap
should be inspected at those inter-
vals specified in the maintenance
schedule. Make sure that a new
vapor hose or fuel filler cap is cor-
rectly replaced.
Vacuum crankcase ventilation
hoses
Inspect the surface of hoses for evi-
dence of heat and/or mechanical
damage. Hard and brittle rubber,
cracking, tears, cuts, abrasions, and
excessive swelling indicate deterio-
ration. Particular attention should be
paid to examine those hose surfaces
nearest to high heat sources, such
as the exhaust manifold.
Inspect the hose routing to assure
that the hoses do not come in con-
tact with any heat source, sharp
edges or moving component which
might cause heat damage or
mechanical wear. Inspect all hose
connections, such as clamps and
couplings, to make sure they are
secure, and that no leaks are pre-
sent. Hoses should be replaced
immediately if there is any evidence
of deterioration or damage.
Air cleaner filter
A Genuine KIA air cleaner filter is
recommended when the filter is
replaced.
Spark plugs
Make sure to install new spark plugs
of the correct heat range.
Valve clearance
Inspect excessive valve noise and/or
engine vibration and adjust if neces-
sary. An authorized KIA dealer
should perform the operation.
1
2
3
4
5
6
7
8
9