tow KIA Sportage 2012 SL / 3.G Service Manual
[x] Cancel search | Manufacturer: KIA, Model Year: 2012, Model line: Sportage, Model: KIA Sportage 2012 SL / 3.GPages: 387, PDF Size: 8.44 MB
Page 304 of 387
65
What to do in an emergency
F040101ASA
Jump starting procedure
1. Make sure the booster battery is 12-volt and that its negative terminal is
grounded.
2. If the booster battery is in another vehicle, do not allow the vehicles to
come in contact.
3. Turn off all unnecessary electrical loads.
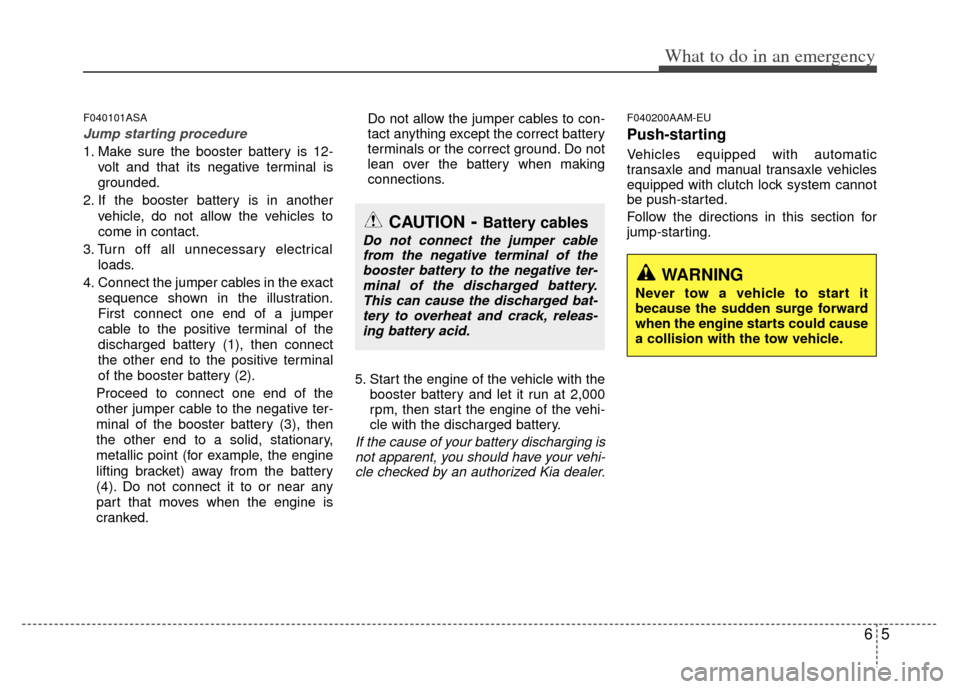
4. Connect the jumper cables in the exact sequence shown in the illustration.
First connect one end of a jumper
cable to the positive terminal of the
discharged battery (1), then connect
the other end to the positive terminal
of the booster battery (2).
Proceed to connect one end of the
other jumper cable to the negative ter-
minal of the booster battery (3), then
the other end to a solid, stationary,
metallic point (for example, the engine
lifting bracket) away from the battery
(4). Do not connect it to or near any
part that moves when the engine is
cranked. Do not allow the jumper cables to con-
tact anything except the correct battery
terminals or the correct ground. Do not
lean over the battery when making
connections.
5. Start the engine of the vehicle with the booster battery and let it run at 2,000
rpm, then start the engine of the vehi-
cle with the discharged battery.
If the cause of your battery discharging isnot apparent, you should have your vehi-cle checked by an authorized Kia dealer.
F040200AAM-EU
Push-starting
Vehicles equipped with automatic
transaxle and manual transaxle vehicles
equipped with clutch lock system cannot
be push-started.
Follow the directions in this section for
jump-starting.
CAUTION- Battery cables
Do not connect the jumper cablefrom the negative terminal of thebooster battery to the negative ter- minal of the discharged battery.This can cause the discharged bat-tery to overheat and crack, releas-ing battery acid.
WARNING
Never tow a vehicle to start it
because the sudden surge forward
when the engine starts could cause
a collision with the tow vehicle.
Page 306 of 387
67
What to do in an emergency
IF YOU HAVE A FLAT TIRE
F070100AEN
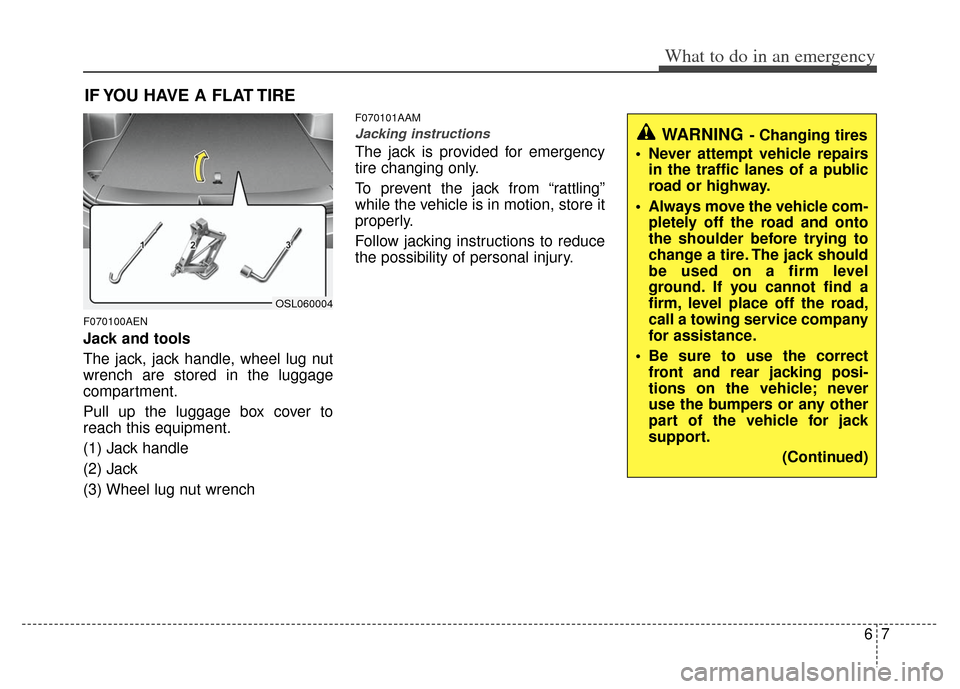
Jack and tools
The jack, jack handle, wheel lug nut
wrench are stored in the luggage
compartment.
Pull up the luggage box cover to
reach this equipment.
(1) Jack handle
(2) Jack
(3) Wheel lug nut wrench
F070101AAM
Jacking instructions
The jack is provided for emergency
tire changing only.
To prevent the jack from “rattling”
while the vehicle is in motion, store it
properly.
Follow jacking instructions to reduce
the possibility of personal injury.
WARNING- Changing tires
Never attempt vehicle repairs in the traffic lanes of a public
road or highway.
Always move the vehicle com- pletely off the road and onto
the shoulder before trying to
change a tire. The jack should
be used on a firm level
ground. If you cannot find a
firm, level place off the road,
call a towing service company
for assistance.
Be sure to use the correct front and rear jacking posi-
tions on the vehicle; never
use the bumpers or any other
part of the vehicle for jack
support.
(Continued)
OSL060004
Page 313 of 387
What to do in an emergency
14
6
Do not take this vehicle through an
automatic car wash while the com-
pact spare tire is installed.
Do not use the compact spare tire on any other vehicle because this
tire has been designed especially
for your vehicle.
The compact spare tire’s tread life is shorter than a regular tire.
Inspect your compact spare tire
regularly and replace worn com-
pact spare tires with the same size
and design, mounted on the same
wheel. The compact spare tire should not
be used on any other wheels, nor
should standard tires, snow tires,
wheel covers or trim rings be used
with the compact spare wheel. If
such use is attempted, damage to
these items or other car compo-
nents may occur.
Do not use more than one compact spare tire at a time.
Do not tow a trailer while the com- pact spare tire is installed.
Page 314 of 387
615
What to do in an emergency
TOWING
F080100AAM-EU
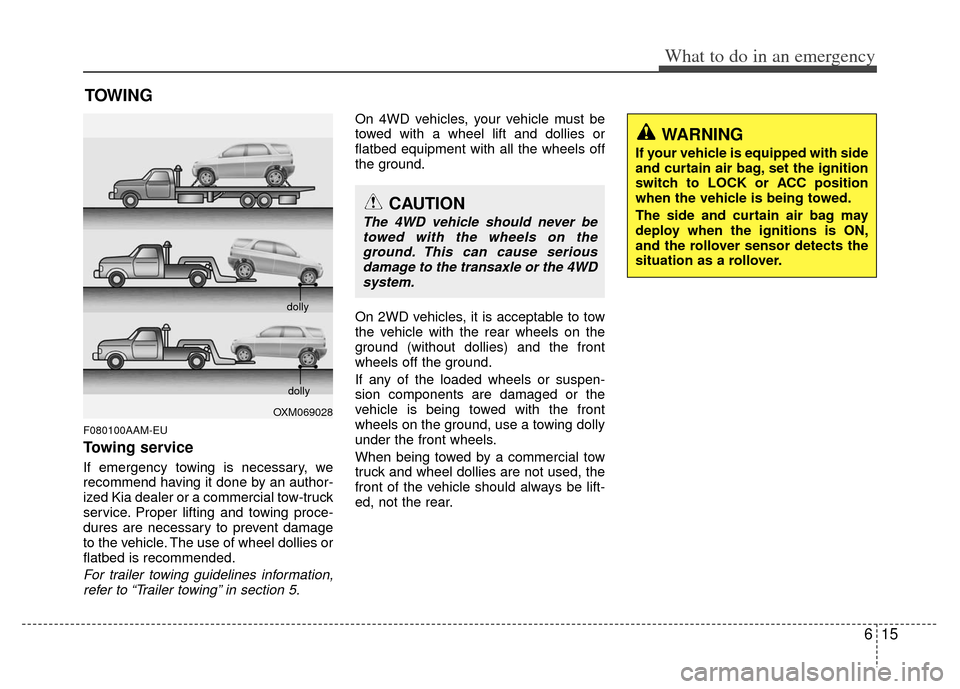
Towing service
If emergency towing is necessary, we
recommend having it done by an author-
ized Kia dealer or a commercial tow-truck
service. Proper lifting and towing proce-
dures are necessary to prevent damage
to the vehicle. The use of wheel dollies or
flatbed is recommended.
For trailer towing guidelines information,refer to “Trailer towing” in section 5.
On 4WD vehicles, your vehicle must be
towed with a wheel lift and dollies or
flatbed equipment with all the wheels off
the ground.
On 2WD vehicles, it is acceptable to tow
the vehicle with the rear wheels on the
ground (without dollies) and the front
wheels off the ground.
If any of the loaded wheels or suspen-
sion components are damaged or the
vehicle is being towed with the front
wheels on the ground, use a towing dolly
under the front wheels.
When being towed by a commercial tow
truck and wheel dollies are not used, the
front of the vehicle should always be lift-
ed, not the rear.
OXM069028 dolly
dolly
CAUTION
The 4WD vehicle should never be
towed with the wheels on theground. This can cause seriousdamage to the transaxle or the 4WDsystem.
WARNING
If your vehicle is equipped with side
and curtain air bag, set the ignition
switch to LOCK or ACC position
when the vehicle is being towed.
The side and curtain air bag may
deploy when the ignitions is ON,
and the rollover sensor detects the
situation as a rollover.
Page 315 of 387
What to do in an emergency
16
6
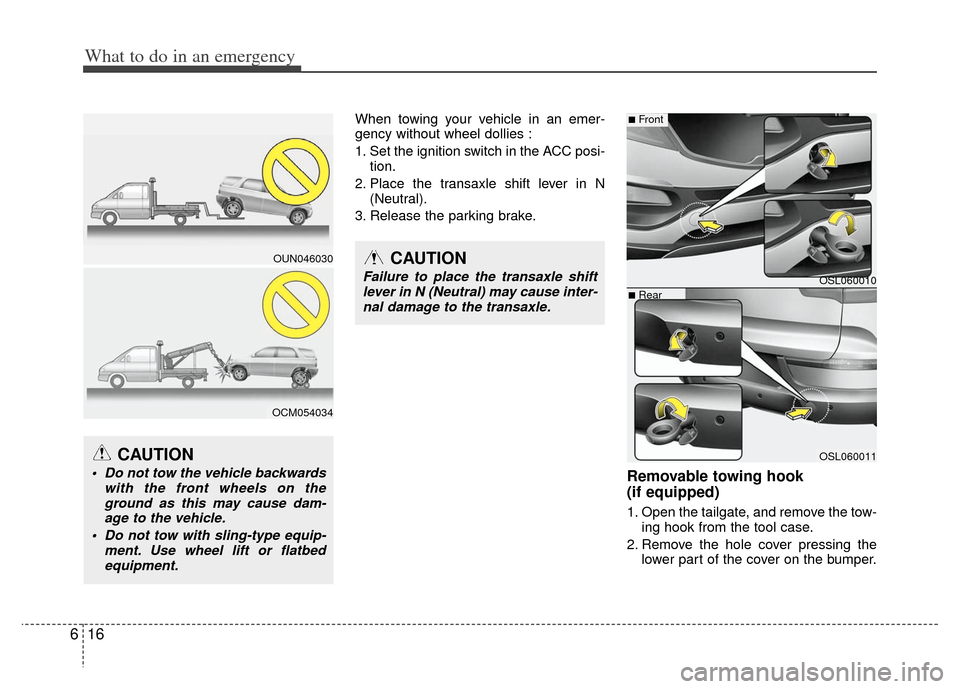
When towing your vehicle in an emer-
gency without wheel dollies :
1. Set the ignition switch in the ACC posi-
tion.
2. Place the transaxle shift lever in N (Neutral).
3. Release the parking brake.
Removable towing hook
(if equipped)
1. Open the tailgate, and remove the tow- ing hook from the tool case.
2. Remove the hole cover pressing the lower part of the cover on the bumper.
CAUTION
Failure to place the transaxle shiftlever in N (Neutral) may cause inter-nal damage to the transaxle.
CAUTION
Do not tow the vehicle backwards with the front wheels on theground as this may cause dam-age to the vehicle.
Do not tow with sling-type equip- ment. Use wheel lift or flatbedequipment.
OUN046030
OCM054034
OSL060010
OSL060011
■Front
■Rear
Page 316 of 387
617
What to do in an emergency
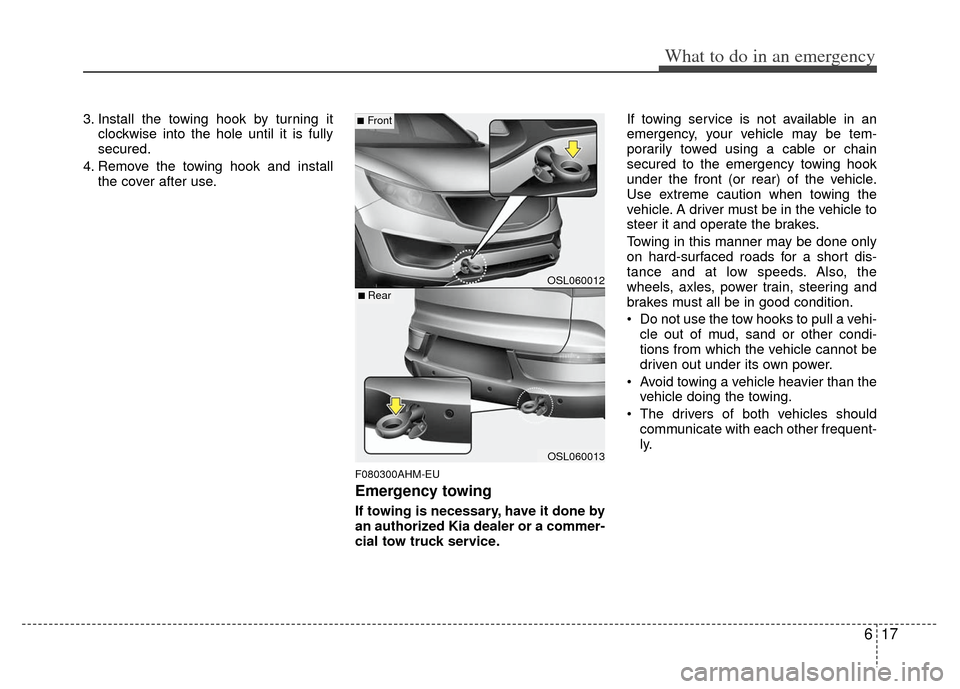
3. Install the towing hook by turning itclockwise into the hole until it is fully
secured.
4. Remove the towing hook and install the cover after use.
F080300AHM-EU
Emergency towing
If towing is necessary, have it done by
an authorized Kia dealer or a commer-
cial tow truck service. If towing service is not available in an
emergency, your vehicle may be tem-
porarily towed using a cable or chain
secured to the emergency towing hook
under the front (or rear) of the vehicle.
Use extreme caution when towing the
vehicle. A driver must be in the vehicle to
steer it and operate the brakes.
Towing in this manner may be done only
on hard-surfaced roads for a short dis-
tance and at low speeds. Also, the
wheels, axles, power train, steering and
brakes must all be in good condition.
Do not use the tow hooks to pull a vehi-
cle out of mud, sand or other condi-
tions from which the vehicle cannot be
driven out under its own power.
Avoid towing a vehicle heavier than the vehicle doing the towing.
The drivers of both vehicles should communicate with each other frequent-
ly.
OSL060012
OSL060013
■Front
■ Rear
Page 317 of 387
What to do in an emergency
18
6
Before emergency towing, check that
the hook is not broken or damaged.
Fasten the towing cable or chain securely to the hook.
Do not jerk the hook. Apply it steadily and with even force.
To avoid damaging the hook, do not pull from the side or at a vertical angle.
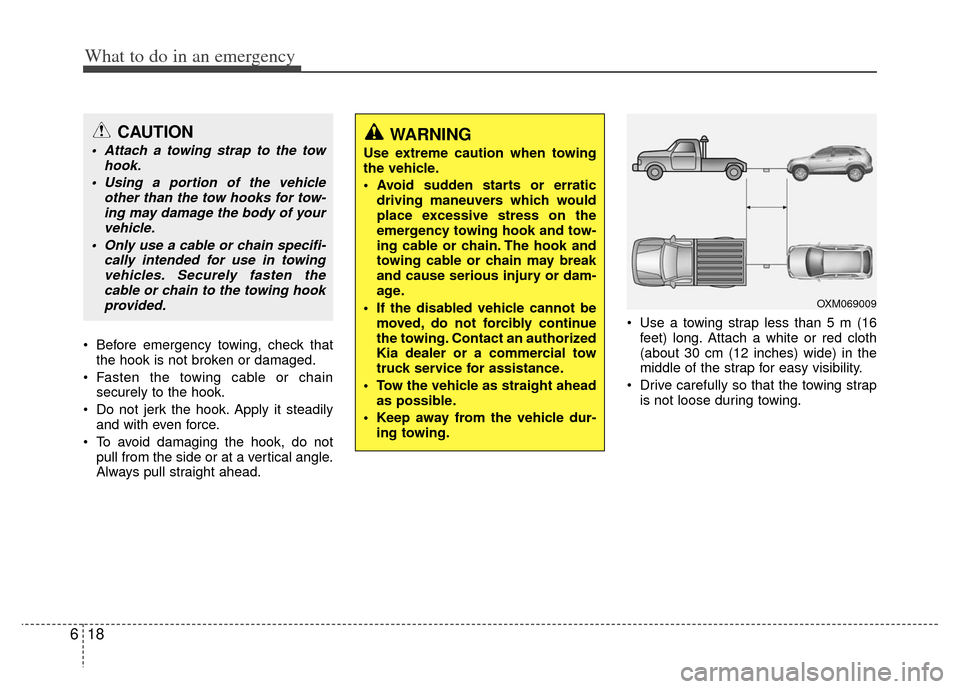
Always pull straight ahead. Use a towing strap less than 5 m (16
feet) long. Attach a white or red cloth
(about 30 cm (12 inches) wide) in the
middle of the strap for easy visibility.
Drive carefully so that the towing strap is not loose during towing.
CAUTION
Attach a towing strap to the tow hook.
Using a portion of the vehicle other than the tow hooks for tow-ing may damage the body of yourvehicle.
Only use a cable or chain specifi- cally intended for use in towingvehicles. Securely fasten thecable or chain to the towing hook provided.WARNING
Use extreme caution when towing
the vehicle.
driving maneuvers which would
place excessive stress on the
emergency towing hook and tow-
ing cable or chain. The hook and
towing cable or chain may break
and cause serious injury or dam-
age.
If the disabled vehicle cannot be moved, do not forcibly continue
the towing. Contact an authorized
Kia dealer or a commercial tow
truck service for assistance.
Tow the vehicle as straight ahead as possible.
Keep away from the vehicle dur- ing towing.
OXM069009
Page 318 of 387
619
What to do in an emergency
F080301AAM-EU
Emergency towing precautions
Turn the ignition switch to ACC so thesteering wheel isn’t locked.
Place the transaxle shift lever in N (Neutral).
Release the parking bake.
Press the brake pedal with more force than usual since you will have reduced
brake performance.
More steering effort will be required because the power steering system
will be disabled.
If you are driving down a long hill, the brakes may overheat and brake per-
formance will be reduced. Stop often
and let the brakes cool off.
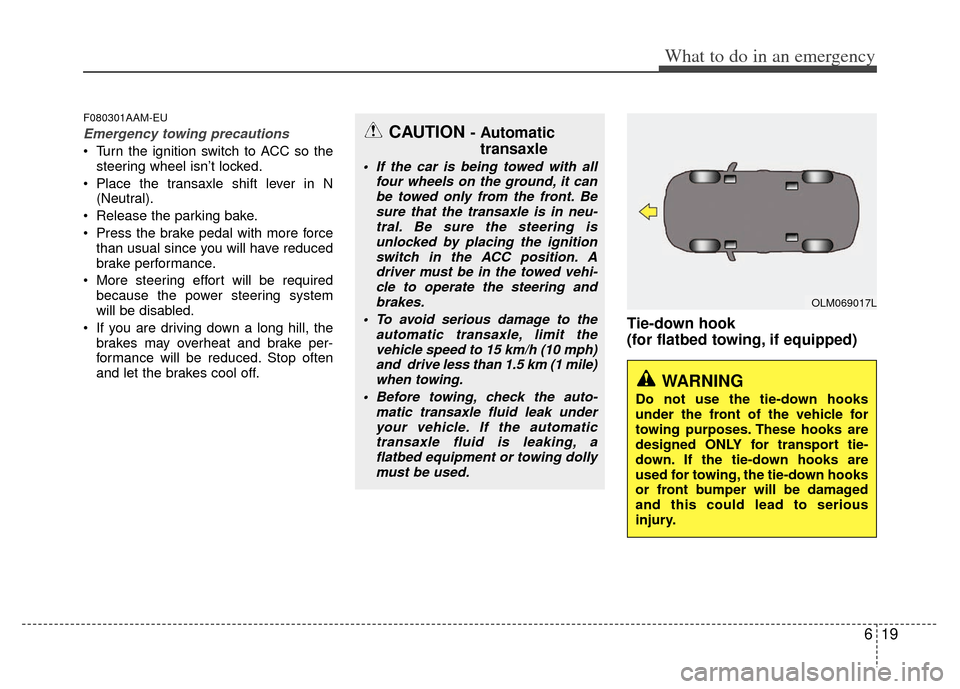
Tie-down hook
(for flatbed towing, if equipped)
CAUTION - Automatictransaxle
If the car is being towed with all
four wheels on the ground, it canbe towed only from the front. Besure that the transaxle is in neu-tral. Be sure the steering is unlocked by placing the ignitionswitch in the ACC position. Adriver must be in the towed vehi-cle to operate the steering andbrakes.
To avoid serious damage to the automatic transaxle, limit thevehicle speed to 15 km/h (10 mph)and drive less than 1.5 km (1 mile)when towing.
Before towing, check the auto- matic transaxle fluid leak underyour vehicle. If the automatic transaxle fluid is leaking, aflatbed equipment or towing dollymust be used.
WARNING
Do not use the tie-down hooks
under the front of the vehicle for
towing purposes. These hooks are
designed ONLY for transport tie-
down. If the tie-down hooks are
used for towing, the tie-down hooks
or front bumper will be damaged
and this could lead to serious
injury.
OLM069017L
Page 330 of 387
Maintenance
12
7
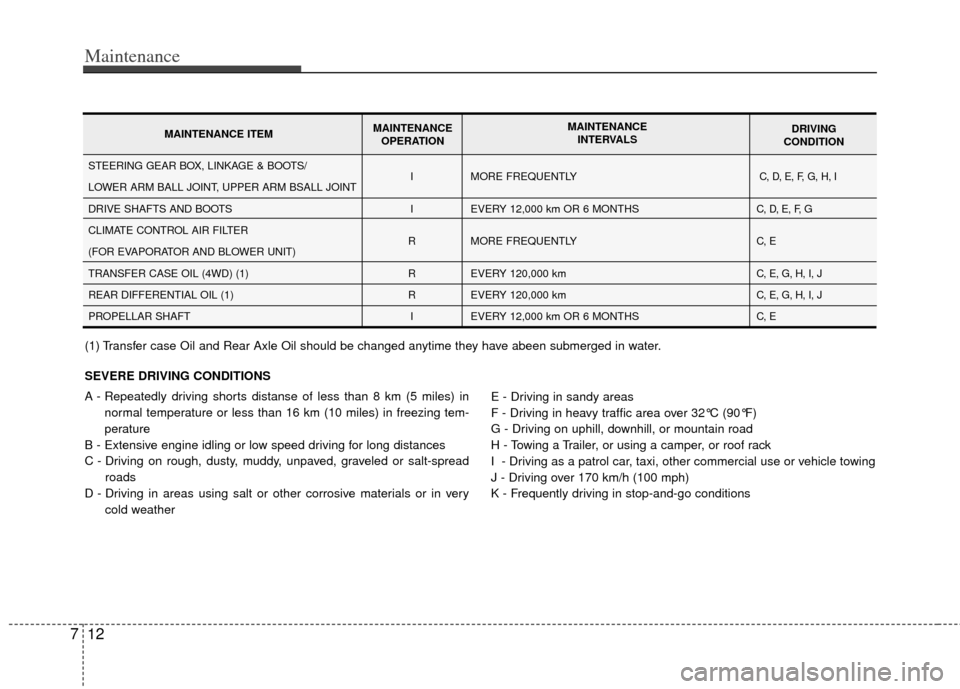
SEVERE DRIVING CONDITIONS
A - Repeatedly driving shorts distanse of less than 8 km (5 miles) in
normal temperature or less than 16 km (10 miles) in freezing tem-
perature
B - Extensive engine idling or low speed driving for long distances
C - Driving on rough, dusty, muddy, unpaved, graveled or salt-spread roads
D - Driving in areas using salt or other corrosive materials or in very cold weather E - Driving in sandy areas
F - Driving in heavy traffic area over 32°C (90°F)
G - Driving on uphill, downhill, or mountain road
H - Towing a Trailer, or using a camper, or roof rack
I - Driving as a patrol car, taxi, other commercial use or vehicle towing
J - Driving over 170 km/h (100 mph)
K - Frequently driving in stop-and-go conditions
I
I
R
R
R I MORE FREQUENTLY
EVERY 12,000 km OR 6 MONTHS
MORE FREQUENTLY
EVERY 120,000 km
EVERY 120,000 km
EVERY 12,000 km OR 6 MONTHSC, D, E, F, G, H, I
C, D, E, F, G
C, E
C, E, G, H, I, J
C, E, G, H, I, J
C, ESTEERING GEAR BOX, LINKAGE & BOOTS/
LOWER ARM BALL JOINT, UPPER ARM BSALL JOINT
DRIVE SHAFTS AND BOOTS
CLIMATE CONTROL AIR FILTER
(FOR EVAPORATOR AND BLOWER UNIT)
TRANSFER CASE OIL (4WD) (1)
REAR DIFFERENTIAL OIL (1)
PROPELLAR SHAFT
MAINTENANCE ITEM MAINTENANCE
OPERATION MAINTENANCE
INTERVALS DRIVING
CONDITION
(1) Transfer case Oil and Rear Axle Oil should be changed anytime they have abeen submerged in water.
Page 336 of 387
Maintenance
18
7
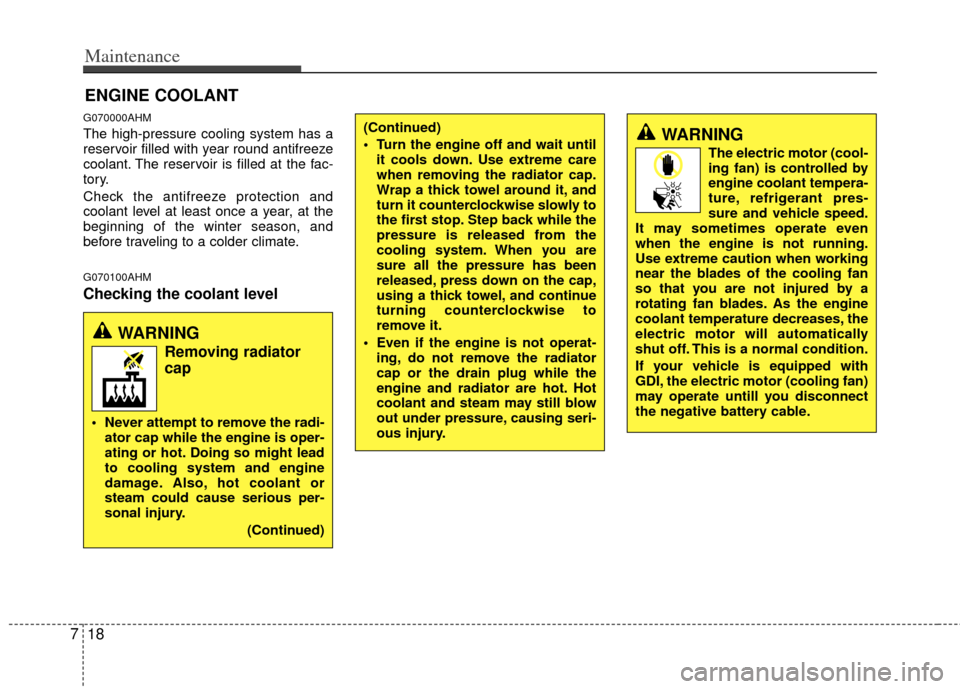
ENGINE COOLANT
G070000AHM
The high-pressure cooling system has a
reservoir filled with year round antifreeze
coolant. The reservoir is filled at the fac-
tory.
Check the antifreeze protection and
coolant level at least once a year, at the
beginning of the winter season, and
before traveling to a colder climate.
G070100AHM
Checking the coolant level
WARNING
Removing radiator
cap
Never attempt to remove the radi-
ator cap while the engine is oper-
ating or hot. Doing so might lead
to cooling system and engine
damage. Also, hot coolant or
steam could cause serious per-
sonal injury.
(Continued)
(Continued)
Turn the engine off and wait untilit cools down. Use extreme care
when removing the radiator cap.
Wrap a thick towel around it, and
turn it counterclockwise slowly to
the first stop. Step back while the
pressure is released from the
cooling system. When you are
sure all the pressure has been
released, press down on the cap,
using a thick towel, and continue
turning counterclockwise to
remove it.
Even if the engine is not operat- ing, do not remove the radiator
cap or the drain plug while the
engine and radiator are hot. Hot
coolant and steam may still blow
out under pressure, causing seri-
ous injury.WARNING
The electric motor (cool-
ing fan) is controlled by
engine coolant tempera-
ture, refrigerant pres-
sure and vehicle speed.
It may sometimes operate even
when the engine is not running.
Use extreme caution when working
near the blades of the cooling fan
so that you are not injured by a
rotating fan blades. As the engine
coolant temperature decreases, the
electric motor will automatically
shut off. This is a normal condition.
If your vehicle is equipped with
GDI, the electric motor (cooling fan)
may operate untill you disconnect
the negative battery cable.