clutch KIA Sportage 2016 QL / 4.G Owner's Manual
[x] Cancel search | Manufacturer: KIA, Model Year: 2016, Model line: Sportage, Model: KIA Sportage 2016 QL / 4.GPages: 501, PDF Size: 18.95 MB
Page 16 of 501
Your vehicle at a glance
62
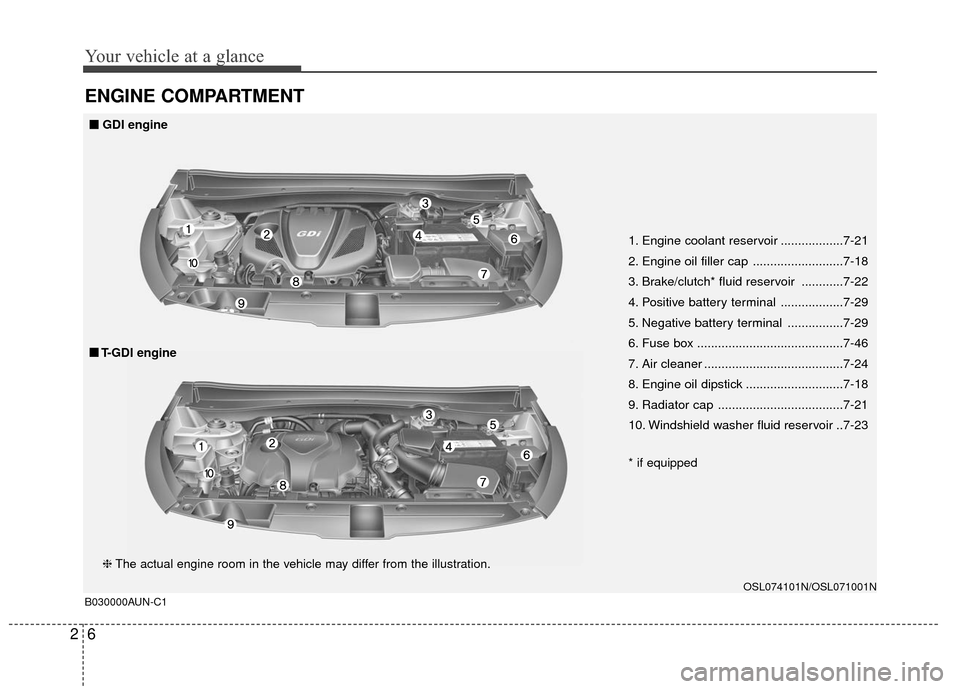
ENGINE COMPARTMENT
B030000AUN-C1
1. Engine coolant reservoir ..................7-21
2. Engine oil filler cap ..........................7-18
3. Brake/clutch* fluid reservoir ............7-22
4. Positive battery terminal ..................7-29
5. Negative battery terminal ................7-29
6. Fuse box ..........................................7-46
7. Air cleaner ........................................7-24
8. Engine oil dipstick ............................7-18
9. Radiator cap ....................................7-21
10. Windshield washer fluid reservoir ..7-23
* if equipped
OSL074101N/OSL071001N
❈The actual engine room in the vehicle may differ from the illustration.
■
■
GDI engine
■
■ T-GDI engine
Page 164 of 501
477
Features of your vehicle
Press cluch pedal to start engine
If the ENGINE START/STOP button
turns to the ACC position twice by
pressing the button repeatedly with-
out depressing the clutch pedal, the
warning illuminates on the LCD dis-
play for about 10 seconds to indicate
that you should depress the clutch
pedal to start the engine.
Shift to "P" position
If you try to turn off the engine without
the shift lever in the P (Park) position,
the ENGINE START/STOP button will
turn to the ACC position. If the button
is pressed once more it will turn to the
ON position. The warning illuminates
on the LCD display for about 10 sec-
onds to indicate that you should press
the ENGINE START/STOP button
with the shift lever in the P (Park) posi-
tion to turn off the engine.
Also, the warning chime sounds for
about 10 seconds. (if equipped)Check stop lamp fuse
When the stop lamp fuse is discon-
nected, the warning illuminates for
10 seconds on the LCD display.
Replace the fuse with a new one. If
that is not possible you can start the
engine by pressing the engine
start/stop button for 10 seconds with
the engine start/stop button in ACC.
Press start button again
If you can not operate the ENGINE
START/STOP button when there is a
problem with the ENGINE
START/STOP button system, the
warning illuminates for 10 seconds
and the chime sounds continuously
to indicate that you could start the
engine by pressing the ENGINE
START/STOP button once more.
The chime will stop if the ENGINE
START/STOP button system works
normally or the theft alarm system is
armed.
If the warning illuminates each time
you press the ENGINE
START/STOP button, take your vehi-
cle to an authorized Kia dealer and
have the system checked.
Page 331 of 501
Driving your vehicle
65
E030204APB
START
Turn the ignition switch to the START
position to start the engine. The
engine will crank until you release
the key; then it returns to the ON
position. The brake warning light can
be checked in this position.
E030205AHM
The anti-theft steering column lock is
not a substitute for the parking brake.
Before leaving the driver’s seat,
always make sure the shift lever is
engaged in 1st gear for the manual
transaxle or P (Park) for automatic
transaxle, set the parking brake fully
and shut the engine off. Unexpected
and sudden vehicle movement may
occur if these precautions are not
taken.E040100AUN
Starting the engine
WARNING - Ignitionswitch
Never turn the ignition switch to
LOCK or ACC while the vehicle
is moving. This would result in
loss of directional control and
braking function, which could
cause an accident.
WARNING- Proper footwear
Always wear appropriate shoes
when operating your vehicle.
Unsuitable shoes (high heels,
ski boots, sandals, etc.) may
interfere with your ability to use
the brake and accelerator pedal,
and the clutch (if equipped).
Page 332 of 501
57
Driving your vehicle
1. Make sure the parking brake isapplied.
2. Manual Transaxle - Depress the
clutch pedal fully and shift the
transaxle into Neutral. Keep the
clutch pedal and brake pedal
depressed while turning the ignition
switch to the start position. The
starter will not operate if the clutch
pedal is not fully depressed.
Automatic Transaxle - Place the
transaxle shift lever in P (Park).
Depress the brake pedal fully.
You can also start the engine when the shift lever is in the N (Neutral)position.
3. Turn the ignition switch to START and hold it there until the engine starts (a
maximum of 10 seconds), then
release the key.
It should be started without depress-ing the accelerator.
4. Do not wait for the engine to warm up while the vehicle remains stationary.
Start driving at moderate engine
speeds. (Steep accelerating and
decelerating should be avoided.) If the engine stalls while you are in
motion, do not attempt to move the
shift lever to the P (Park) position. If
traffic and road conditions permit,
you may put the shift lever in the N
(Neutral) position while the vehicle is
still moving and turn the ignition
switch to the START position in an
attempt to restart the engine.
WARNING- Steering
wheel
Never reach for any controls
through the steering wheel
while the vehicle is in motion.
The presence of your hand or
arm in this area could cause a
loss of vehicle control.
CAUTION - Starter
Do not engage the starter for
more than 10 seconds. If theengine stalls or fails to start,wait 5 to 10 seconds before re-engaging the starter. Improperuse of the starter may damageit.
Page 337 of 501
Driving your vehicle
12
5
E050000AUN E050100BUN-C1
Manual transaxle operation
The manual transaxle has 6 forward
gears.
This shift pattern is imprinted on the
shift knob. The transaxle is fully syn-
chronized in all forward gears so
shifting to either a higher or a lower
gear is easily accomplished.
Press the clutch pedal down fully
while shifting, then release it slowly.
If your vehicle is equipped with an
ignition lock switch, the engine will
not start when starting the engine
without depressing the clutch pedal.
(if equipped)
The gearshift lever must be returned
to the neutral position before shifting
into R (Reverse).
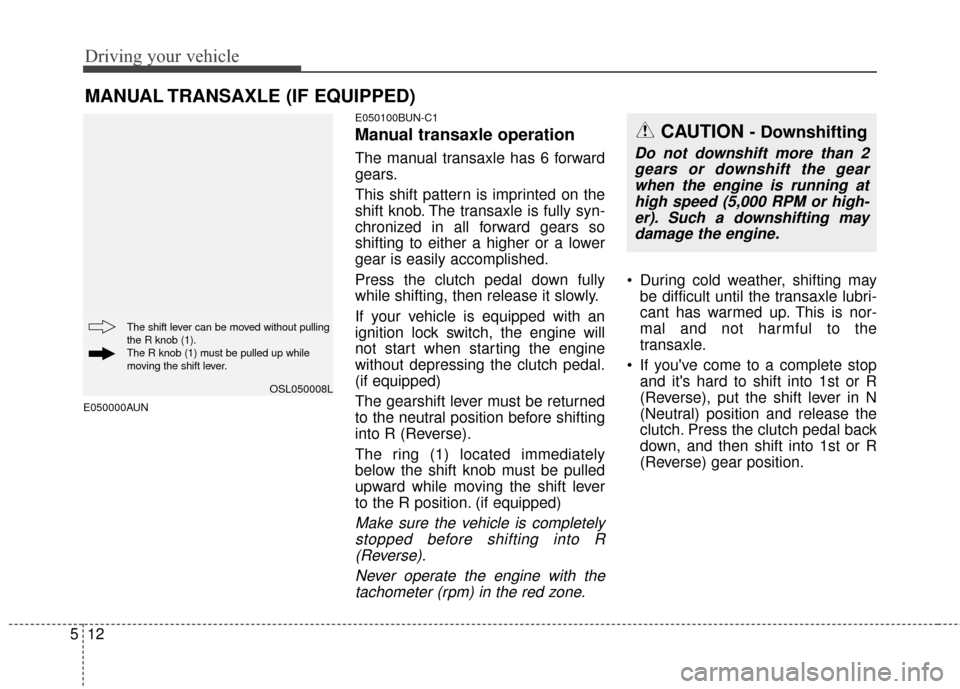
The ring (1) located immediately
below the shift knob must be pulled
upward while moving the shift lever
to the R position. (if equipped)
Make sure the vehicle is completely
stopped before shifting into R(Reverse).
Never operate the engine with thetachometer (rpm) in the red zone.
During cold weather, shifting may be difficult until the transaxle lubri-
cant has warmed up. This is nor-
mal and not harmful to the
transaxle.
If you've come to a complete stop and it's hard to shift into 1st or R
(Reverse), put the shift lever in N
(Neutral) position and release the
clutch. Press the clutch pedal back
down, and then shift into 1st or R
(Reverse) gear position.
MANUAL TRANSAXLE (IF EQUIPPED)
CAUTION - Downshifting
Do not downshift more than 2gears or downshift the gearwhen the engine is running athigh speed (5,000 RPM or high-er). Such a downshifting maydamage the engine.
OSL050008L
The shift lever can be moved without pulling
the R knob (1).
The R knob (1) must be pulled up while
moving the shift lever.
Page 338 of 501
513
Driving your vehicle
E050101AUN
Using the clutch
The clutch should be pressed all the
way to the floor before shifting, then
released slowly. The clutch pedal
should always be fully released while
driving. Do not rest your foot on the
clutch pedal while driving. This can
cause unnecessary wear. Do not par-
tially engage the clutch to hold the car
on an incline. This causes unneces-
sary wear. Use the foot brake or park-
ing brake to hold the car on an incline.
Do not operate the clutch pedal rapid-
ly and repeatedly.
E050102AUN
Downshifting
When you must slow down in heavy
traffic or while driving up steep hills,
downshift before the engine starts to
labor. Downshifting reduces the
chance of stalling and gives better
acceleration when you again need to
increase your speed. When the vehicle
is traveling down steep hills, downshift-
ing helps maintain safe speed and pro-
longs brake life.
CAUTION
To avoid premature clutchwear and damage, do notdrive with your foot resting onthe clutch pedal. Also, don’tuse the clutch to hold thevehicle stopped on an uphillgrade, while waiting for a traf-fic light, etc.
Do not use the shift lever as a handrest during driving, asthis can result in prematurewear of the transaxle shiftforks.
WARNING- Incline park- ing
Before leaving the driver’s seat,
always set the parking brake
fully and shut the engine off.
Then make sure the transaxle is
shifted into 1st gear when the
vehicle is parked on a level or
uphill grade, and shifted into R
(Reverse) on a downhill grade.
Unexpected and sudden vehicle
movement can occur if these
precautions are not followed in
the order identified.
Page 339 of 501
Driving your vehicle
14
5
E050200AUN-C1
Good driving practices
Never take the vehicle out of gear
and coast down a hill. This is
extremely hazardous. Always leave
the vehicle in gear.
Don't "ride" the brakes. This can cause them to overheat and mal-
function. Instead, when you are
driving down a long hill, slow down
and shift to a lower gear. When you
do this, engine braking will help
slow down the vehicle.
Slow down before shifting to a lower gear. This will help avoid
over-revving the engine, which can
cause damage.
Slow down when you encounter cross winds. This gives you much
better control of your vehicle.
Be sure the vehicle is completely stopped before you attempt to shift
into reverse. The transaxle can be
damaged if you do not. To shift into
reverse, depress the clutch, move
the shift lever to neutral, then shift
to the reverse position. Exercise extreme caution when
driving on a slippery surface. Be
especially careful when braking,
accelerating or shifting gears. On a
slippery surface, an abrupt change
in vehicle speed can cause the
drive wheels to lose traction and
the vehicle to go out of control.
Always buckle-up! In a collision, an unbelted occupant is significantly
more likely to be seriously injured
or killed than a properly belted
occupant.
Avoid high speeds when cornering or turning. High speed cornering
and turning increase the risk of
vehicle rollover. Rollover accidents
are violent and unpredictable.
Never exceed posted speed limits.
Page 370 of 501
545
Driving your vehicle
E090300AAM-EU
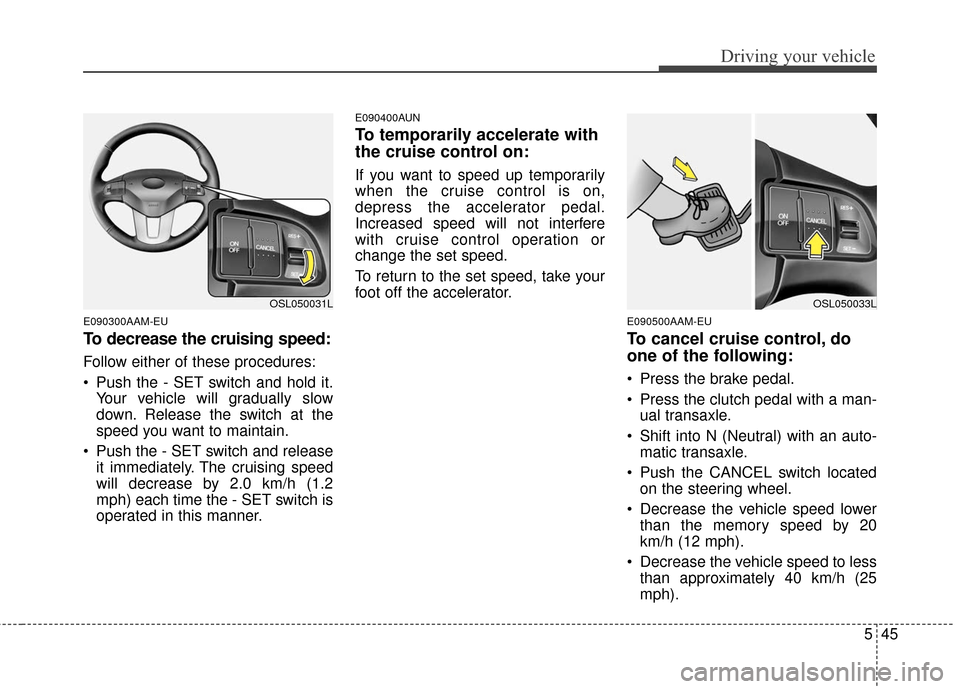
To decrease the cruising speed:
Follow either of these procedures:
Push the - SET switch and hold it.Your vehicle will gradually slow
down. Release the switch at the
speed you want to maintain.
Push the - SET switch and release it immediately. The cruising speed
will decrease by 2.0 km/h (1.2
mph) each time the - SET switch is
operated in this manner.
E090400AUN
To temporarily accelerate with
the cruise control on:
If you want to speed up temporarily
when the cruise control is on,
depress the accelerator pedal.
Increased speed will not interfere
with cruise control operation or
change the set speed.
To return to the set speed, take your
foot off the accelerator.
E090500AAM-EU
To cancel cruise control, do
one of the following:
Press the brake pedal.
Press the clutch pedal with a man-ual transaxle.
Shift into N (Neutral) with an auto- matic transaxle.
Push the CANCEL switch located on the steering wheel.
Decrease the vehicle speed lower than the memory speed by 20
km/h (12 mph).
Decrease the vehicle speed to less than approximately 40 km/h (25
mph).
OSL050031LOSL050033L
Page 403 of 501
What to do in an emergency
66
F040101ASA
Jump starting procedure
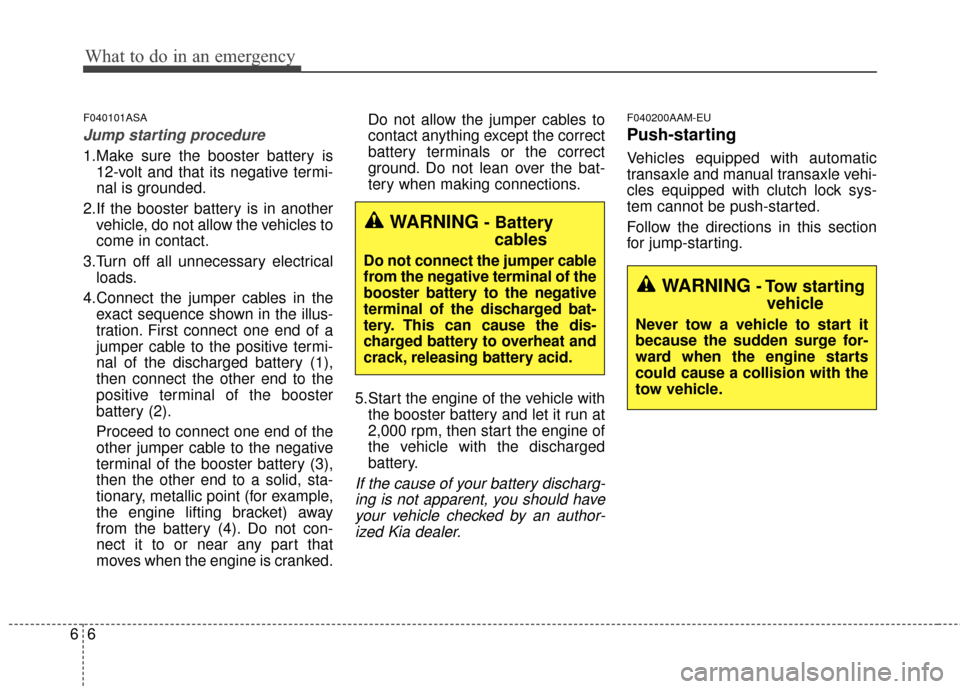
1.Make sure the booster battery is12-volt and that its negative termi-
nal is grounded.
2.If the booster battery is in another vehicle, do not allow the vehicles to
come in contact.
3.Turn off all unnecessary electrical loads.
4.Connect the jumper cables in the exact sequence shown in the illus-
tration. First connect one end of a
jumper cable to the positive termi-
nal of the discharged battery (1),
then connect the other end to the
positive terminal of the booster
battery (2).
Proceed to connect one end of the
other jumper cable to the negative
terminal of the booster battery (3),
then the other end to a solid, sta-
tionary, metallic point (for example,
the engine lifting bracket) away
from the battery (4). Do not con-
nect it to or near any part that
moves when the engine is cranked. Do not allow the jumper cables to
contact anything except the correct
battery terminals or the correct
ground. Do not lean over the bat-
tery when making connections.
5.Start the engine of the vehicle with the booster battery and let it run at
2,000 rpm, then start the engine of
the vehicle with the discharged
battery.
If the cause of your battery discharg-ing is not apparent, you should haveyour vehicle checked by an author-ized Kia dealer.
F040200AAM-EU
Push-starting
Vehicles equipped with automatic
transaxle and manual transaxle vehi-
cles equipped with clutch lock sys-
tem cannot be push-started.
Follow the directions in this section
for jump-starting.
WARNING- Tow starting vehicle
Never tow a vehicle to start it
because the sudden surge for-
ward when the engine starts
could cause a collision with the
tow vehicle.
WARNING- Batterycables
Do not connect the jumper cable
from the negative terminal of the
booster battery to the negative
terminal of the discharged bat-
tery. This can cause the dis-
charged battery to overheat and
crack, releasing battery acid.
Page 419 of 501
Maintenance
Engine compartment . . . . . . . . . . . . . . . . . . . . . . . . 7-2
Maintenance services . . . . . . . . . . . . . . . . . . . . . . . . 7-3
• Owner’s responsibility . . . . . . . . . . . . . . . . . . . . . . . . . 7-3
. . . . . . . . . . . . . . . . . 7-4
Owner maintenance . . . . . . . . . . . . . . . . . . . . . . . . . 7-5
Normal maintenance schedule . . . . . . . . . . . . . . . . 7-7
Maintenance under severe usage conditions . . . . 7-12
Explanation of scheduled maintenance items . . . 7-14
Engine oil. . . . . . . . . . . . . . . . . . . . . . . . . . . . . . . . . 7-17
Engine coolant . . . . . . . . . . . . . . . . . . . . . . . . . . . . 7-19
Brake/clutch fluid . . . . . . . . . . . . . . . . . . . . . . . . . . 7-22
Washer fluid . . . . . . . . . . . . . . . . . . . . . . . . . . . . . . 7-23
Parking brake . . . . . . . . . . . . . . . . . . . . . . . . . . . . . 7-23
Air cleaner. . . . . . . . . . . . . . . . . . . . . . . . . . . . . . . . 7-24
Climate control air filter . . . . . . . . . . . . . . . . . . . . 7-25
Wiper blades . . . . . . . . . . . . . . . . . . . . . . . . . . . . . . 7-26
Battery . . . . . . . . . . . . . . . . . . . . . . . . . . . . . . . . . . . 7-\
29
Tires and wheels . . . . . . . . . . . . . . . . . . . . . . . . . . . 7-32
. . . . . . . . . . . . . . . . . . . . . . . . . . . . . . . . . . . . \
7-32
. . . . . . . 7-32
. . . . . . . . . . . . . . . . . . . . . . . . . . . . . . . . . 7-34
. . . . . . . . . . . . . . . 7-35
. . . . . . . . . . . . . . . . . . . . . . . . . . . . . 7-37
. . . . . . . . . . . . . . . . . . . . . . . . . . . 7-37
. . . . . . . . . . . . . . . . . . . . . . . . . . . . . . . . . 7-37
. . . . . . . . . . . . . . . . . . . . . . . . . . . . . 7-37
. . . . . . . . . . . . . . . . . . . . . . . . . 7-37
. . . . . . . . . . . . . . . . 7-42
. . . . . . . . . . . . . . . . . . . . . . . . . . . . . . . 7-44
. . . . . . . . . . . . . . . . . . . . . . . . . . . . . . . . 7-43
. . . . . . . . . . . . . . . . . . . . . . . . . . . . . . . . . . . 7-\
44
. . . . . . . . . . . . . . . . . . . . . . . . . . . . . . 7-44
. . . . . . . . . . . . . . . . . . . . . . . . . . 7-45
Fuses . . . . . . . . . . . . . . . . . . . . . . . . . . . . . . . . . . . . \
7-46
. . . . . . . . . . . . . . . . . . . 7-47
. . . . . . . . . . . . . . . . . . . . 7-51
. . . . . . . . . . . . . . . . 7-52
Appearance care . . . . . . . . . . . . . . . . . . . . . . . . . . . 7-58
. . . . . . . . . . . . . . . . . . . . . . . . . . . . . . . . 7-58
. . . . . . . . . . . . . . . . . . . . . . . . . . . . . . . . . 7-63
Emission control system . . . . . . . . . . . . . . . . . . . . 7-65
7