flat KIA Sportage 2017 QL / 4.G Workshop Manual
[x] Cancel search | Manufacturer: KIA, Model Year: 2017, Model line: Sportage, Model: KIA Sportage 2017 QL / 4.GPages: 595, PDF Size: 16.22 MB
Page 453 of 595
721
What to do in an emergency
To prevent the jack, wheel lug nut
wrench and spare tire from rattling
while the vehicle is in motion, store
them properly.
Check the inflation pressures as
soon as possible after installing the
spare tire. Adjust it to the specified
pressure, if necessary. Refer to
“Tires and wheels” in section 8.
Important - use of compact sparetire
Your vehicle is equipped with a com-
pact spare tire. This compact spare
tire takes up less space than a regu-
lar-size tire. This tire is smaller than a
conventional tire and is designed for
temporary use only.
You should drive carefully when the compact spare is in use. The
compact spare should be replaced
by the proper conventional tire and
rim at the first opportunity.
The operation of this vehicle is not recommended with more than one
compact spare tire in use at the
same time. The compact spare should be inflat-
ed to 420 kPa (60 psi).
✽ ✽
NOTICE
Check the inflation pressure after
installing the spare tire. Adjust it to
the specified pressure, as necessary.
WARNING- Spare tire
The compact spare tire is for
emergency use only. Do not
operate your vehicle on this
compact spare at speeds over
80 km/h (50 mph). The original
tire should be repaired or
replaced as soon as possible to
avoid failure of the spare possi-
bly leading to personal injury or
death.WARNING- Wheel studs
If the studs are damaged, they
may lose their ability to retain
the wheel. This could lead to the
loss of the wheel and a collision
resulting in serious injuries.
Page 456 of 595
What to do in an emergency
24
7
IF YOU HAVE A FLAT TIRE (WITH TIRE MOBILITY KIT, IF EQUIPPED)
For safe operation, carefully read
and follow the instructions in this
manual before use.
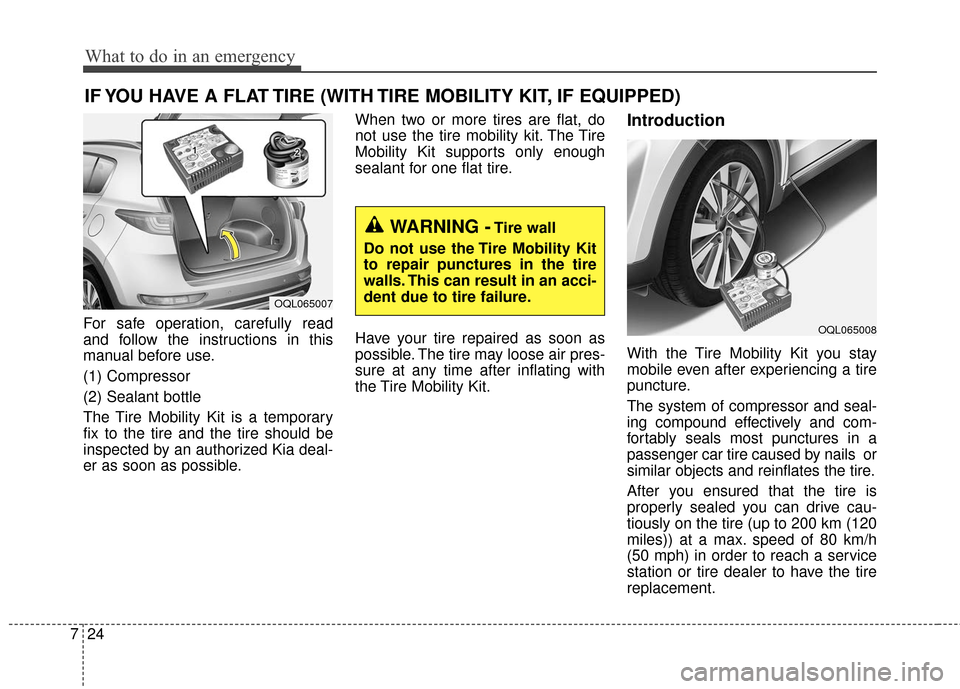
(1) Compressor
(2) Sealant bottle
The Tire Mobility Kit is a temporary
fix to the tire and the tire should be
inspected by an authorized Kia deal-
er as soon as possible. When two or more tires are flat, do
not use the tire mobility kit. The Tire
Mobility Kit supports only enough
sealant for one flat tire.
Have your tire repaired as soon as
possible. The tire may loose air pres-
sure at any time after inflating with
the Tire Mobility Kit.
Introduction
With the Tire Mobility Kit you stay
mobile even after experiencing a tire
puncture.
The system of compressor and seal-
ing compound effectively and com-
fortably seals most punctures in a
passenger car tire caused by nails or
similar objects and reinflates the tire.
After you ensured that the tire is
properly sealed you can drive cau-
tiously on the tire (up to 200 km (120
miles)) at a max. speed of 80 km/h
(50 mph) in order to reach a service
station or tire dealer to have the tire
replacement.
OQL065008
OQL065007
WARNING -Tire wall
Do not use the Tire Mobility Kit
to repair punctures in the tire
walls. This can result in an acci-
dent due to tire failure.
Page 457 of 595
725
What to do in an emergency
It is possible that some tires, espe-
cially with larger punctures or dam-
age to the sidewall, cannot be sealed
completely.
Air pressure loss in the tire may
adversely affect tire performance.
For this reason, you should avoid
abrupt steering or other driving
maneuvers, especially if the vehicle
is heavily loaded or if a trailer is in
use.
The Tire Mobility Kit is not designed
or intended as a permanent tire
repair method and is to be used for
one tire only.
This instruction shows you step by
step procedure to temporarily seal
the puncture.
Read the section "Notes on the safe
use of the Tire Mobility Kit".Notes on the safe use of the
Tire Mobility Kit
Park your car at the side of theroad so that you can work with the
Tire Mobility Kit away from moving
traffic.
To be sure your vehicle will not move, even when you're on fairly
level ground, always set your park-
ing brake.
Only use the Tire Mobility Kit for sealing/inflation passenger car
tires. Only punctured areas located
within the tread region of the tire
can be sealed using the tire mobil-
ity kit.
Do not use on motorcycles, bicy- cles or any other type of tires.
When the tire and wheel are dam- aged, do not use Tire Mobility Kit
for your safety.
Use of the Tire Mobility Kit may not be effective for tire damage larger
than approximately 6 mm (0.24 in).
Please contact the nearest Kia
dealership if the tire cannot be
made roadworthy with the Tire
Mobility Kit. Do not use the Tire Mobility Kit if a
tire is severely damaged by driving
run flat or with insufficient air pres-
sure.
Do not remove any foreign objects such as nails or screws that have
penetrated the tire.
Provided the car is outdoors, leave the engine running. Otherwise
operating the compressor may
eventually drain the car battery.
Never leave the Tire Mobility Kit unattended while it is being used.
Do not leave the compressor run- ning for more than 10 min. at a time
or it may overheat.
Do not use the Tire Mobility Kit if the ambient temperature is below -
-30°C (22°F).
Page 458 of 595
What to do in an emergency
26
7
✽ ✽
NOTICE
Carefully remove any extra sealant
applied on the tire air pressure sen-
sor and wheel after repairing the
tire.
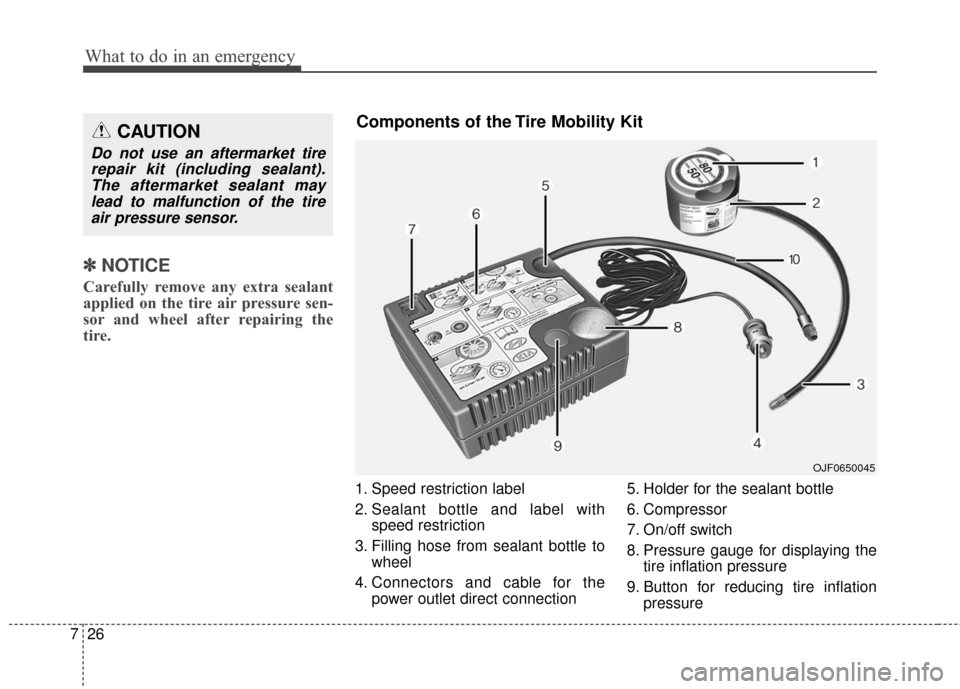
1. Speed restriction label
2. Sealant bottle and label with
speed restriction
3. Filling hose from sealant bottle to wheel
4. Connectors and cable for the power outlet direct connection 5. Holder for the sealant bottle
6. Compressor
7. On/off switch
8. Pressure gauge for displaying the
tire inflation pressure
9. Button for reducing tire inflation pressure
CAUTION
Do not use an aftermarket tirerepair kit (including sealant).The aftermarket sealant maylead to malfunction of the tireair pressure sensor.
OJF0650045
Components of the Tire Mobility Kit
Page 461 of 595
729
What to do in an emergency
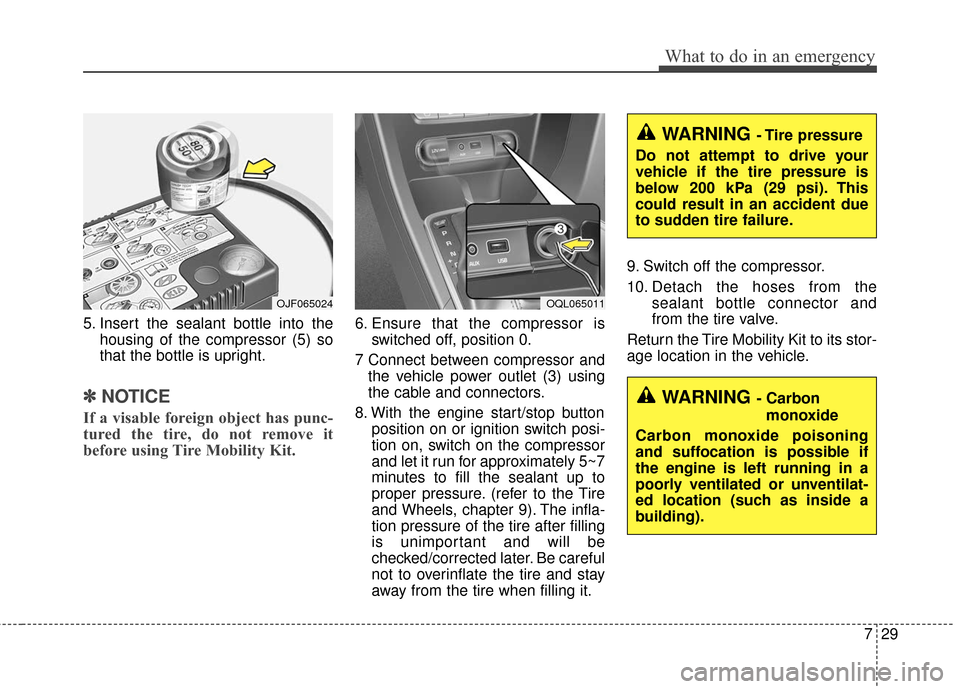
5. Insert the sealant bottle into thehousing of the compressor (5) so
that the bottle is upright.
✽ ✽NOTICE
If a visable foreign object has punc-
tured the tire, do not remove it
before using Tire Mobility Kit.
6. Ensure that the compressor is
switched off, position 0.
7 Connect between compressor and the vehicle power outlet (3) using
the cable and connectors.
8. With the engine start/stop button position on or ignition switch posi-
tion on, switch on the compressor
and let it run for approximately 5~7
minutes to fill the sealant up to
proper pressure. (refer to the Tire
and Wheels, chapter 9). The infla-
tion pressure of the tire after filling
is unimportant and will be
checked/corrected later. Be careful
not to overinflate the tire and stay
away from the tire when filling it. 9. Switch off the compressor.
10. Detach the hoses from the
sealant bottle connector and
from the tire valve.
Return the Tire Mobility Kit to its stor-
age location in the vehicle.
OJF065024OQL065011
WARNING - Carbon monoxide
Carbon monoxide poisoning
and suffocation is possible if
the engine is left running in a
poorly ventilated or unventilat-
ed location (such as inside a
building).
WARNING - Tire pressure
Do not attempt to drive your
vehicle if the tire pressure is
below 200 kPa (29 psi). This
could result in an accident due
to sudden tire failure.
Page 462 of 595
What to do in an emergency
30
7
Distributing the sealant
11. Immediately drive approximately
7~10 km (4~6 miles or, about 10
min) to evenly distribute the
sealant in the tire.
Do not exceed a speed of 80 km/h
(50 mph). If possible, do not fall
below a speed of 20 km/h (12 mph).
While driving, if you experience any
unusual vibration, ride disturbance or
noise, reduce your speed and drive
with caution until you can safely pull
off of the side of the road.
Call for road side service or towing.
When you use the Tire Mobility Kit,
the tire pressure sensors and wheel
may be stained by sealant.
Therefore, remove the tire pressure
sensors and wheel stained by
sealant and we recommend that
inspect at an authorized Kia dealer.
Checking the tire inflation
pressure
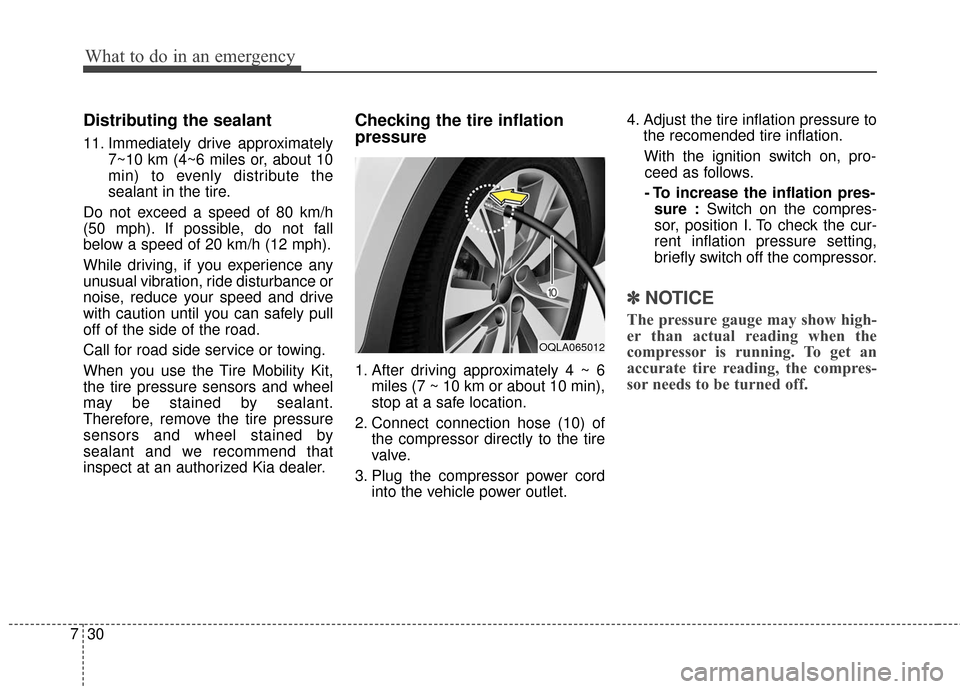
1. After driving approximately 4 ~ 6 miles (7 ~ 10 km or about 10 min),
stop at a safe location.
2. Connect connection hose (10) of the compressor directly to the tire
valve.
3. Plug the compressor power cord into the vehicle power outlet. 4. Adjust the tire inflation pressure to
the recomended tire inflation.
With the ignition switch on, pro- ceed as follows.
- To increase the inflation pres- sure : Switch on the compres-
sor, position I. To check the cur-
rent inflation pressure setting,
briefly switch off the compressor.
✽ ✽ NOTICE
The pressure gauge may show high-
er than actual reading when the
compressor is running. To get an
accurate tire reading, the compres-
sor needs to be turned off.
OQLA065012
Page 463 of 595
731
What to do in an emergency
- To reduce the inflation pres-sure: Press the button (9) on the
compressor.Technical Data
System voltage: DC 12 V
Working voltage: DC 10 - 15 V
Amperage rating: max. 15 A
Suitable for use at temperatures:
-30 ~ +70°C (-22 ~ +158°F)
Max. working pressure: 6 bar (87 psi)
Size
Compressor: 168 x 150 x 68 mm (6.6 x 5.9 x 2.7 in.)
Sealant bottle: 104 x ø 85 mm (4.1 x ø 3.3 in.)
Compressor weight: 1.05 kg (2.31 lbs)
Sealant volume: 300 ml (18.3 cu. in.)
CAUTION - Tire pressuresensor
When you use the Tire MobilityKit including sealant notapproved by Kia, the tire pres-sure sensors may be damagedby sealant. The sealant on thetire pressure sensor and wheelshould be removed when youreplace the tire with a new oneand inspect the tire pressuresensors at an authorized dealer.
Page 464 of 595
What to do in an emergency
32
7
TOWING
Towing service
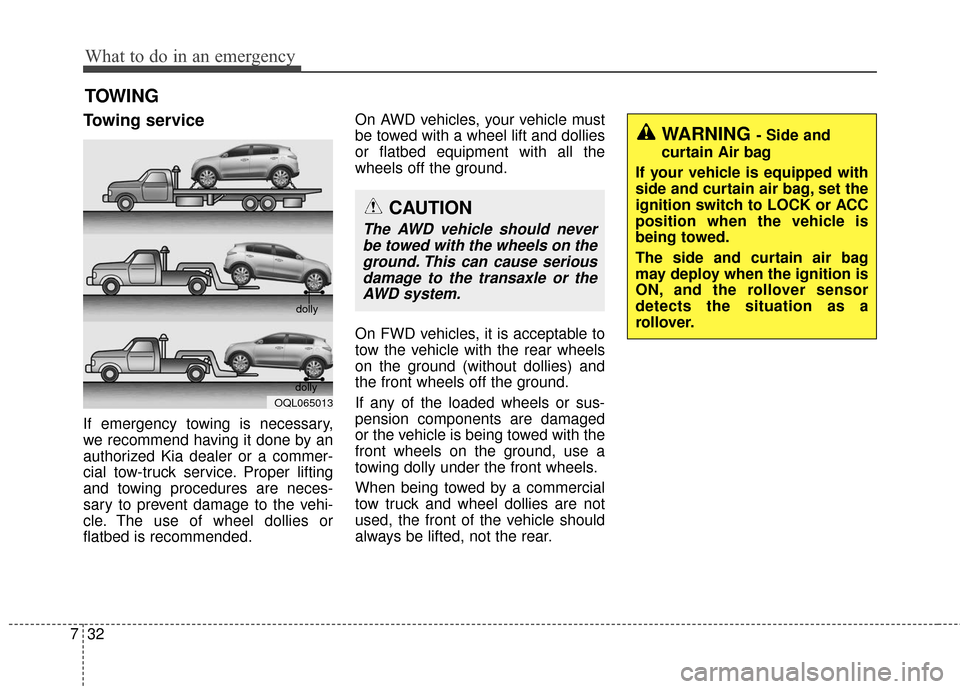
If emergency towing is necessary,
we recommend having it done by an
authorized Kia dealer or a commer-
cial tow-truck service. Proper lifting
and towing procedures are neces-
sary to prevent damage to the vehi-
cle. The use of wheel dollies or
flatbed is recommended. On AWD vehicles, your vehicle must
be towed with a wheel lift and dollies
or flatbed equipment with all the
wheels off the ground.
On FWD vehicles, it is acceptable to
tow the vehicle with the rear wheels
on the ground (without dollies) and
the front wheels off the ground.
If any of the loaded wheels or sus-
pension components are damaged
or the vehicle is being towed with the
front wheels on the ground, use a
towing dolly under the front wheels.
When being towed by a commercial
tow truck and wheel dollies are not
used, the front of the vehicle should
always be lifted, not the rear.
OQL065013
dolly
dolly
WARNING - Side and
curtain Air bag
If your vehicle is equipped with
side and curtain air bag, set the
ignition switch to LOCK or ACC
position when the vehicle is
being towed.
The side and curtain air bag
may deploy when the ignition is
ON, and the rollover sensor
detects the situation as a
rollover.
CAUTION
The AWD vehicle should never be towed with the wheels on theground. This can cause seriousdamage to the transaxle or theAWD system.
Page 465 of 595
733
What to do in an emergency
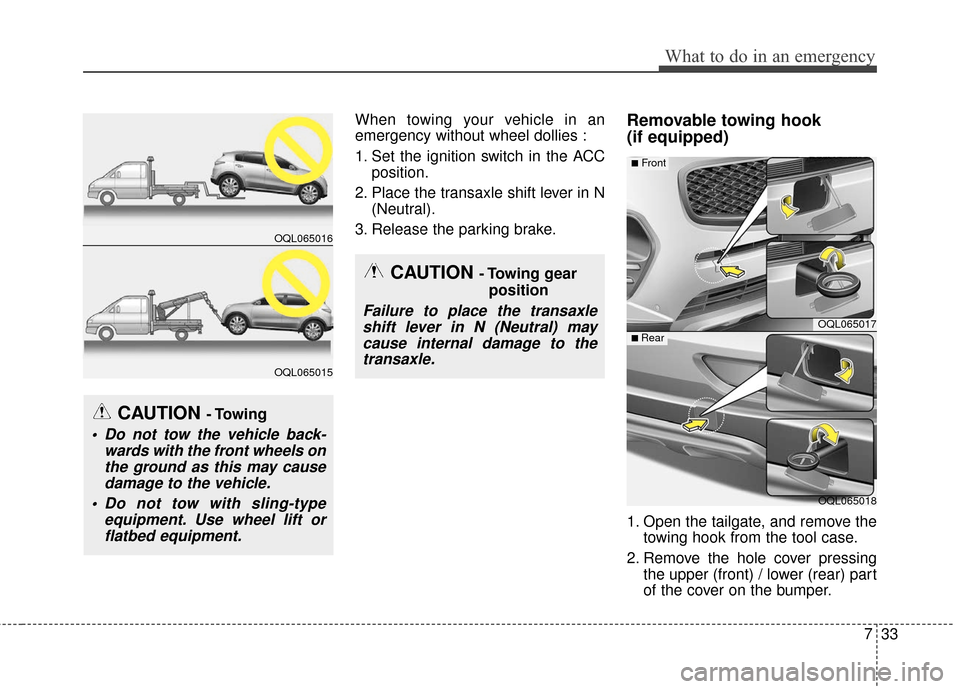
When towing your vehicle in an
emergency without wheel dollies :
1. Set the ignition switch in the ACCposition.
2. Place the transaxle shift lever in N (Neutral).
3. Release the parking brake.Removable towing hook
(if equipped)
1. Open the tailgate, and remove the towing hook from the tool case.
2. Remove the hole cover pressing the upper (front) / lower (rear) part
of the cover on the bumper.
CAUTION - Towing gear
position
Failure to place the transaxleshift lever in N (Neutral) maycause internal damage to thetransaxle.
CAUTION - Towing
Do not tow the vehicle back- wards with the front wheels onthe ground as this may causedamage to the vehicle.
Do not tow with sling-type equipment. Use wheel lift orflatbed equipment.
OQL065016
OQL065015
OQL065017
OQL065018
■Front
■ Rear
Page 468 of 595
Emergency towing precautions
Turn the ignition switch to ACC sothe steering wheel isn’t locked.
Place the transaxle shift lever in N (Neutral).
Release the parking bake.
Press the brake pedal with more force than normal since you will
have reduced brake performance.
More steering effort will be required because the power steer-
ing system will be disabled.
If you are driving down a long hill, the brakes may overheat and brake
performance will be reduced. Stop
often and let the brakes cool off. If the car is being towed with all
four wheels on the ground, it can
be towed only from the front. Be
sure that the transaxle is in neutral.
Be sure the steering is unlocked by
placing the ignition switch in the
ACC position. A driver must be in
the towed vehicle to operate the
steering and brakes.
CAUTION - Automatictransaxle
To avoid serious damage to
the automatic transaxle, limitthe vehicle speed to 15 km/h(10 mph) and drive less than 1km (1.5 mile) when towing.
Before towing, check the auto- matic transaxle for fluid leaksunder your vehicle. If the auto-matic transaxle fluid is leak-ing, flatbed equipment or atowing dolly must be used.
736
What to do in an emergency