automatic KIA Sportage 2017 QL / 4.G Owner's Manual
[x] Cancel search | Manufacturer: KIA, Model Year: 2017, Model line: Sportage, Model: KIA Sportage 2017 QL / 4.GPages: 595, PDF Size: 16.22 MB
Page 6 of 595
13
Introduction
Gasoline containing alcohol andmethanol
Gasohol, a mixture of gasoline and
ethanol (also known as grain alco-
hol), and gasoline or gasohol con-
taining methanol (also known as
wood alcohol) are being marketed
along with or instead of leaded or
unleaded gasoline. Pursuant to EPA regulations, ethanol
may be used in your vehicle.
Do not use gasohol containing more
than 15% ethanol, and do not use
gasoline or gasohol containing any
methanol. Ethanol provides less
energy than gasoline and it attracts
water, and it is thus likely to reduce
your fuel efficiency and could lower
your MPG results.
Methanol may cause drivability prob-
lems and damage to the fuel system,
engine control system and emission
control system.
Discontinue using gasohol of any
kind if drivability problems occur.
Vehicle damage or drivability prob-
lems may not be covered by the
manufacturer’s warranty if they result
from the use of:
1. Gasoline or gasohol containing
methanol.
2. Leaded fuel or leaded gasohol.
3. Gasohol containing more than 15% ethanol. "E85" fuel is an alternative fuel com-
prised of 85 percent ethanol and 15
percent gasoline, and is manufac-
tured exclusively for use in Flexible
Fuel Vehicles. “E85” is not compati-
ble with your vehicle. Use of “E85”
may result in poor engine perform-
ance and damage to your vehicle's
engine and fuel system. Kia recom-
mends that customers do not use
fuel with an ethanol content exceed-
ing 15%.
✽ ✽
NOTICE
Your New Vehicle Limited Warranty
does not cover damage to the fuel sys-
tem or any performance problems
caused by the use of “E85” fuel.
✽ ✽
NOTICE
Never use any fuel containing
methanol. Discontinue use of any
methanol containing product which
may inhibit proper drivability.
WARNING - Refueling
• Do not "top off" after the noz- zle automatically shuts off.
Attempts to force more fuel
into the tank can cause fuel
overflow onto you and the
ground causing a risk of fire.
Always check that the fuel cap is installed securely to pre-
vent fuel spillage, especially
in the event of an accident.
Page 15 of 595
25
Your vehicle at a glance
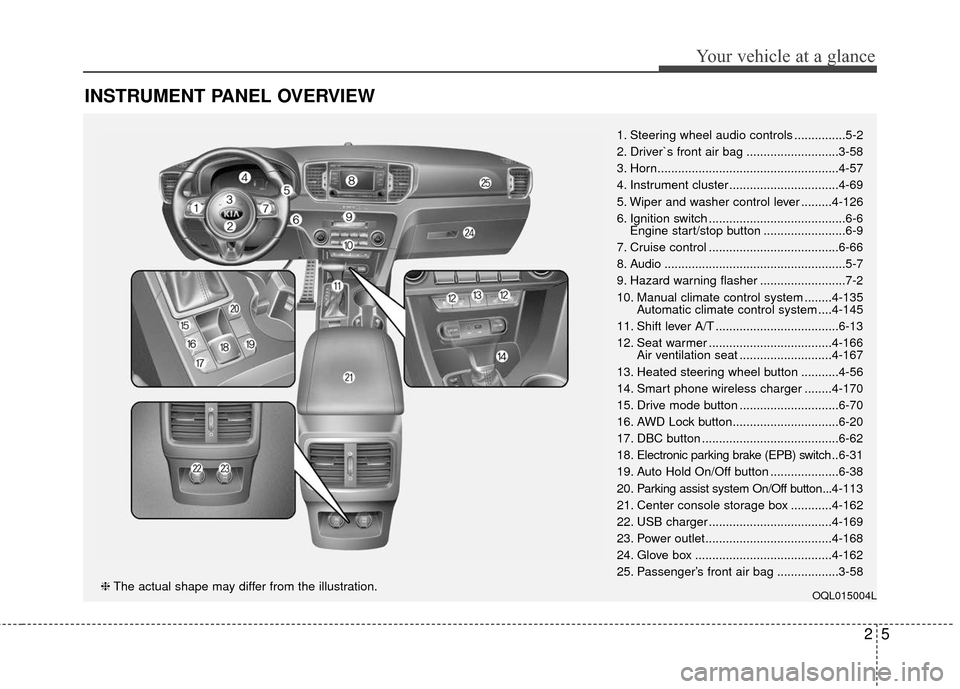
INSTRUMENT PANEL OVERVIEW
1. Steering wheel audio controls ...............5-2
2. Driver`s front air bag ...........................3-58
3. Horn.....................................................4-57
4. Instrument cluster ................................4-69
5. Wiper and washer control lever .........4-126
6. Ignition switch ........................................6-6Engine start/stop button ........................6-9
7. Cruise control ......................................6-66
8. Audio .....................................................5-7
9. Hazard warning flasher .........................7-2
10. Manual climate control system ........4-135 Automatic climate control system ....4-145
11. Shift lever A/T ....................................6-13
12. Seat warmer ....................................4-166 Air ventilation seat ...........................4-167
13. Heated steering wheel button ...........4-56
14. Smart phone wireless charger ........4-170
15. Drive mode button .............................6-70
16. AWD Lock button...............................6-20
17. DBC button ........................................6-62
18. Electronic parking brake (EPB) switch .. 6-31
19. Auto Hold On/Off button ....................6-38
20. Parking assist system On/Off button...4-113
21. Center console storage box ............4-162
22. USB charger ....................................4-169
23. Power outlet.....................................4-168
24. Glove box ........................................4-162
25. Passenger’s front air bag ..................3-58
OQL015004L❈ The actual shape may differ from the illustration.
Page 34 of 595
Safety features of your vehicle
18
3
When returning the rear seatbacks to
the upright position, remember to
return the rear shoulder belts to their
proper position.
CAUTION - Damaging
rear seat belt buckles
When you fold the rear seat- back, insert the buckle betweenthe rear seatback and cushion.Doing so can prevent the bucklefrom being damaged by the rearseatback.
WARNING - Cargo loading
Make sure the engine is off, the
automatic transaxle is in P (Park)
and the parking brake is secure-
ly applied whenever loading or
unloading cargo. Failure to take
these steps may allow the vehi-
cle to move if the shift lever is
inadvertently moved to another
position.
WARNING- Cargo
Do not place objects in the rear
seats, since they cannot be
properly secured and may hit
vehicle occupants in a collision.WARNING - Rear
Seatback
When returning the rear seat to
the upright position:
Be careful not to damage the seat belt webbing or buckle.
Ensure the seatback is com- pletely locked into its upright
position by pushing on the
top of the seatback.
Failure to adhere to any of
these instructions could
result in serious injury or
death in the event of a crash.
Page 37 of 595
321
Safety features of your vehicle
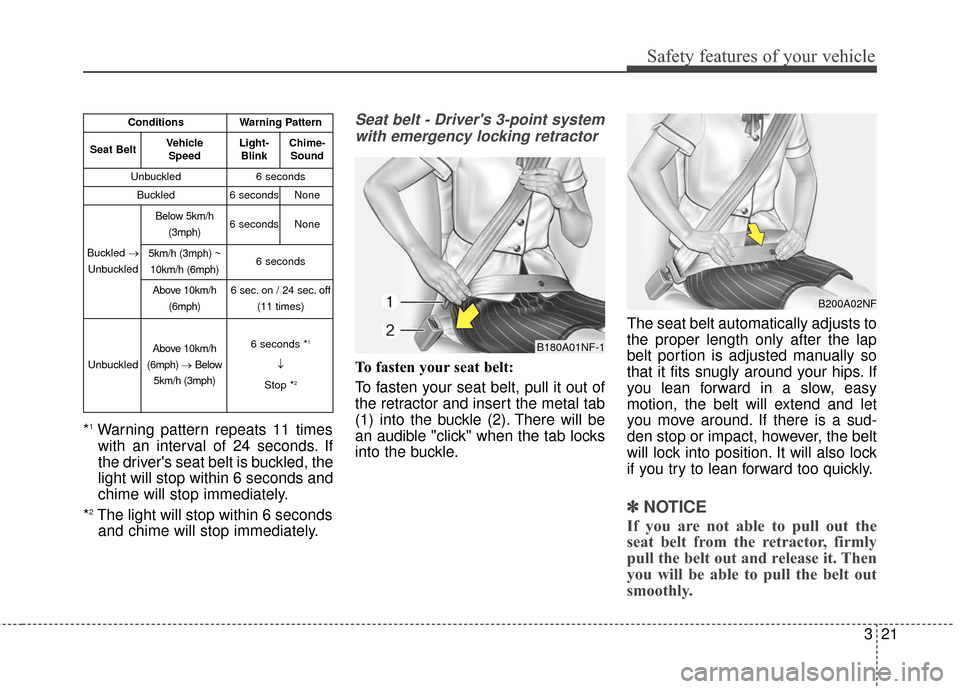
*1Warning pattern repeats 11 timeswith an interval of 24 seconds. If
the driver's seat belt is buckled, the
light will stop within 6 seconds and
chime will stop immediately.
*
2The light will stop within 6 seconds and chime will stop immediately.
Seat belt - Driver's 3-point system
with emergency locking retractor
To fasten your seat belt:
To fasten your seat belt, pull it out of
the retractor and insert the metal tab
(1) into the buckle (2). There will be
an audible "click" when the tab locks
into the buckle. The seat belt automatically adjusts to
the proper length only after the lap
belt portion is adjusted manually so
that it fits snugly around your hips. If
you lean forward in a slow, easy
motion, the belt will extend and let
you move around. If there is a sud-
den stop or impact, however, the belt
will lock into position. It will also lock
if you try to lean forward too quickly.
✽ ✽
NOTICE
If you are not able to pull out the
seat belt from the retractor, firmly
pull the belt out and release it. Then
you will be able to pull the belt out
smoothly.
ConditionsWarning Pattern
Seat BeltVehicle
SpeedLight-BlinkChime-Sound
Unbuckled6 seconds
Buckled6 secondsNone
Buckled →
Unbuckled
Below 5km/h (3mph)6 secondsNone
5km/h (3mph) ~10km/h (6mph)6 seconds
Above 10km/h (6mph)6 sec. on / 24 sec. off (11 times)
Unbuckled
Above 10km/h
(6mph) →Below
5km/h (3mph)6 seconds *1
↓
Stop *
2
B180A01NF-1
B200A02NF
Page 40 of 595
Safety features of your vehicle
24
3
✽ ✽
NOTICE
If you are not able to pull out the
safety belt from the retractor, firmly
pull the belt out and release it. After
release, you will be able to pull the
belt out smoothly.
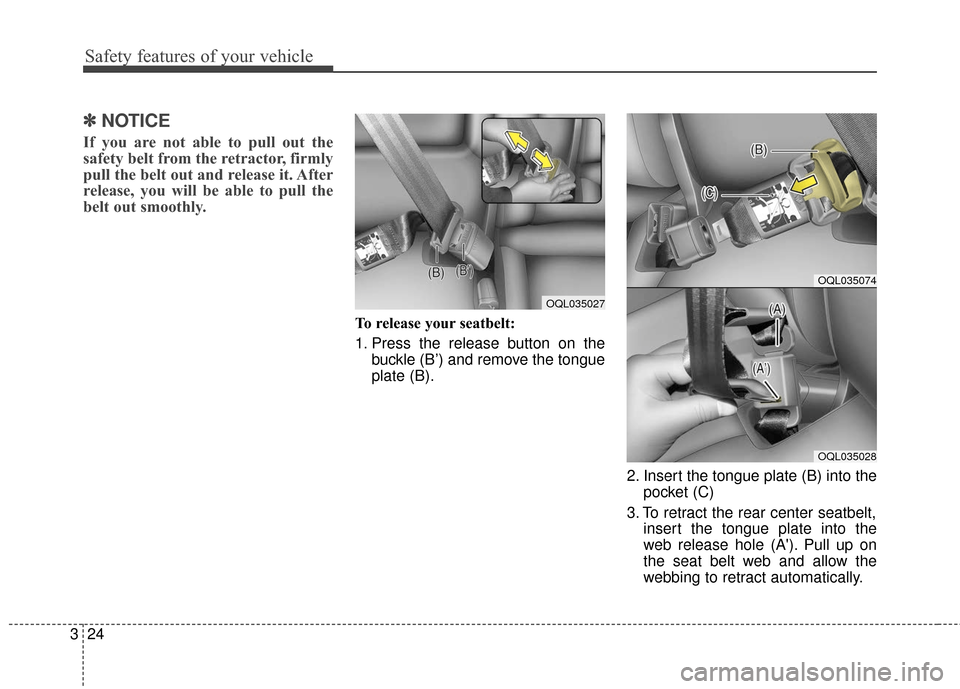
To release your seatbelt:
1. Press the release button on the
buckle (B’) and remove the tongue
plate (B).
2. Insert the tongue plate (B) into thepocket (C)
3. To retract the rear center seatbelt, insert the tongue plate into the
web release hole (A'). Pull up on
the seat belt web and allow the
webbing to retract automatically.
OQL035027
OQL035074
OQL035028
Page 56 of 595
Safety features of your vehicle
40
3
3. Check that the child restraint is
securely attached to the seat by
pushing and pulling the seat for-
ward and from side-to-side.
Securing a child restraint with a
lap belt or lap/shoulder belt
When not using the LATCH system,
all child restraints must be secured to
a vehicle rear seat with the lap part
of a lap/shoulder belt.
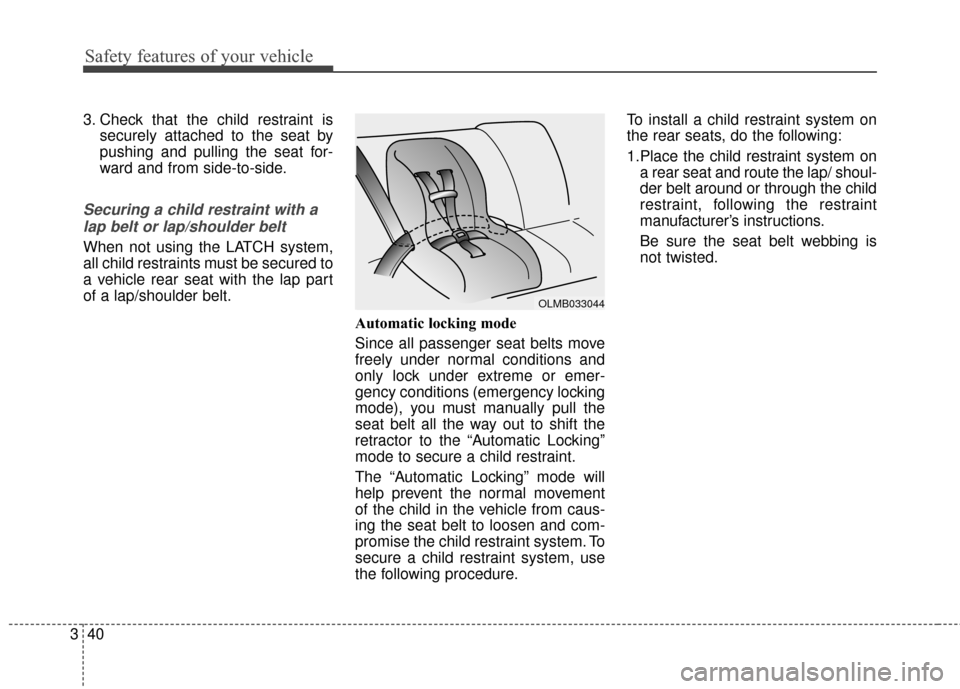
Automatic locking mode
Since all passenger seat belts move
freely under normal conditions and
only lock under extreme or emer-
gency conditions (emergency locking
mode), you must manually pull the
seat belt all the way out to shift the
retractor to the “Automatic Locking”
mode to secure a child restraint.
The “Automatic Locking” mode will
help prevent the normal movement
of the child in the vehicle from caus-
ing the seat belt to loosen and com-
promise the child restraint system. To
secure a child restraint system, use
the following procedure.To install a child restraint system on
the rear seats, do the following:
1.Place the child restraint system on
a rear seat and route the lap/ shoul-
der belt around or through the child
restraint, following the restraint
manufacturer’s instructions.
Be sure the seat belt webbing is
not twisted.
OLMB033044
Page 57 of 595
341
Safety features of your vehicle
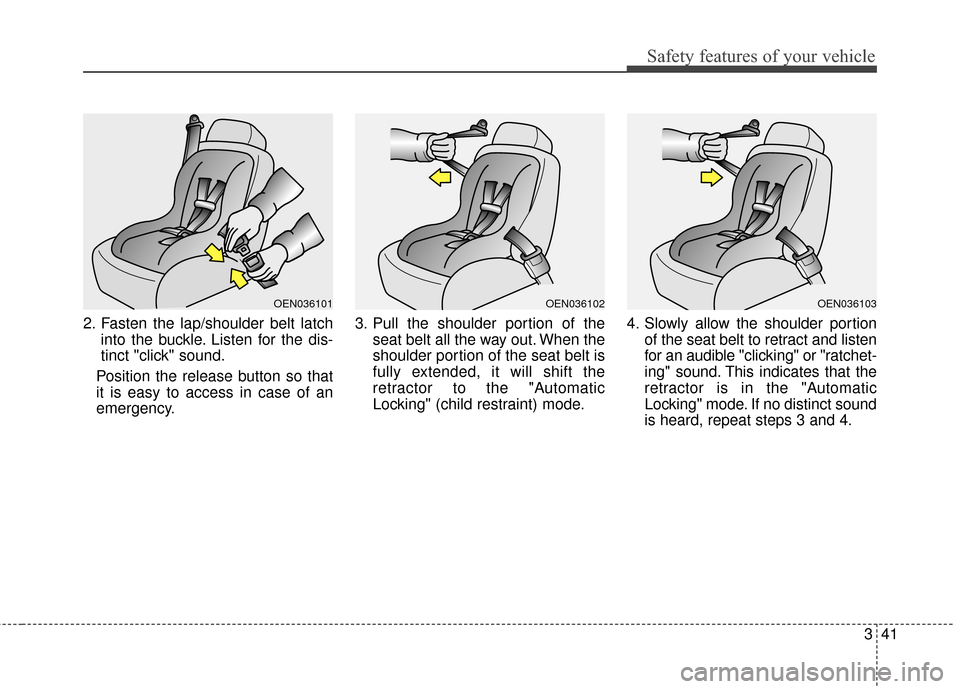
2. Fasten the lap/shoulder belt latchinto the buckle. Listen for the dis-
tinct "click" sound.
Position the release button so that
it is easy to access in case of an
emergency. 3. Pull the shoulder portion of the
seat belt all the way out. When the
shoulder portion of the seat belt is
fully extended, it will shift the
retractor to the "Automatic
Locking" (child restraint) mode. 4. Slowly allow the shoulder portion
of the seat belt to retract and listen
for an audible "clicking" or "ratchet-
ing" sound. This indicates that the
retractor is in the "Automatic
Locking" mode. If no distinct sound
is heard, repeat steps 3 and 4.
OEN036101OEN036102OEN036103
Page 58 of 595
Safety features of your vehicle
42
3
5. Remove as much slack from the
belt as possible by pushing down
on the child restraint system while
feeding the shoulder belt back into
the retractor.
6. Push and pull on the child restraint system to confirm that the seat
belt is holding it firmly in place. If it
is not, release the seat belt and
repeat steps 2 through 6.
7. Double check that the retractor is in the "Automatic Locking" mode
by attempting to pull more of the
seat belt out of the retractor. If you
cannot, the retractor is in the
"Automatic Locking" mode.
If your CRS manufacturer instructs or
recommends you to use a tether
anchor with the lap/shoulder belt,
refer to the previous pages for more
information.✽ ✽ NOTICE
When the seat belt is allowed to
retract to its fully stowed position,
the retractor will automatically
switch from the "Automatic
Locking" mode to the emergency
lock mode for normal adult usage.
To remove the child restraint, press
the release button on the buckle and
then pull the lap/shoulder belt out of
the restraint and allow the seat belt
to retract fully.
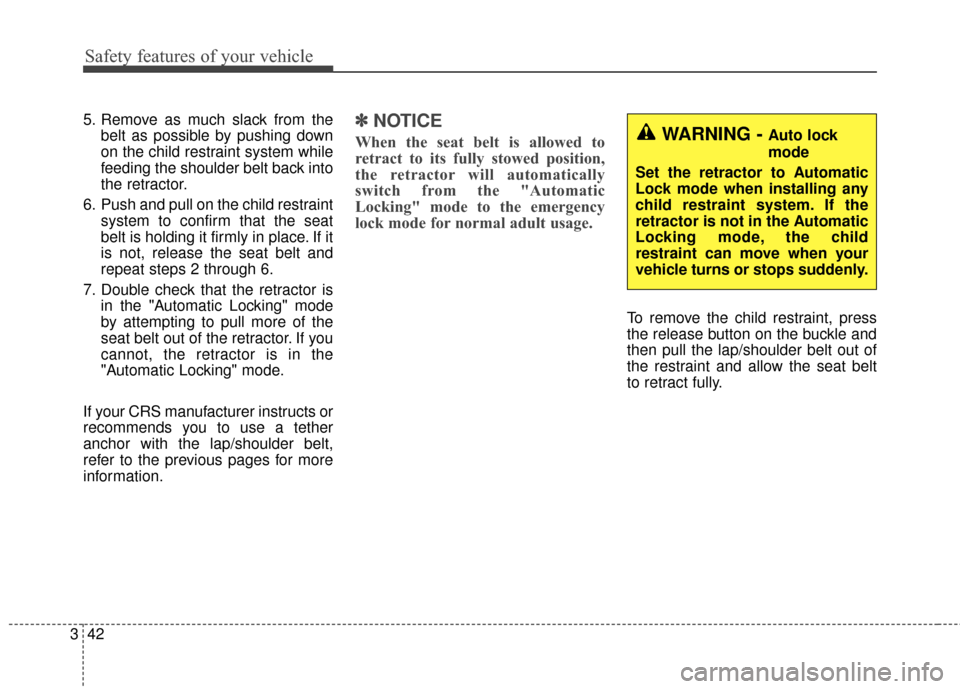
WARNING - Auto lock
mode
Set the retractor to Automatic
Lock mode when installing any
child restraint system. If the
retractor is not in the Automatic
Locking mode, the child
restraint can move when your
vehicle turns or stops suddenly.
Page 64 of 595
Safety features of your vehicle
48
3
If any of the following conditions
occur, this indicates a malfunction in
the air bag system. Have an author-
ized Kia dealer inspect the air bag
system as soon as possible.
The light does not turn on briefly
when you turn the ignition ON.
The light stays on after illuminating for approximately 6 seconds.
The light comes on while the vehi- cle is in motion.
The light blinks when the ignition switch is in ON position. The front air bag modules are locat-
ed both in the center of the steering
wheel and in the front passenger's
panel above the glove box. When the
SRSCM detects a sufficiently severe
impact to the front of the vehicle, it
will automatically deploy the front air
bags. Upon deployment, tear seams mold-
ed directly into the pad covers will
separate under pressure from the
expansion of the air bags. Further
opening of the covers then allows full
inflation of the air bags.
B240B01L
Driver’s front air bag (1)
B240B02L
Driver’s front air bag (2)
Page 88 of 595
• Turn signals and lane change signals . . . . . . . . . . . 4-124
• Front fog light . . . . . . . . . . . . . . . . . . . . . . . . . . . . . . 4-124
• Check headlight . . . . . . . . . . . . . . . . . . . . . . . . . . . . 4-125
• AFLS (Adaptive Front Lighting System) . . . . . . . . 4-125
Wipers and washers . . . . . . . . . . . . . . . . . . . . . . . 4-126
• Windshield wipers . . . . . . . . . . . . . . . . . . . . . . . . . . 4-126
• Front windshield washers . . . . . . . . . . . . . . . . . . . . . 4-127
• Rear window wiper and washer switch. . . . . . . . . . 4-128
Interior lights . . . . . . . . . . . . . . . . . . . . . . . . . . . . 4-130
• Automatic turn off function . . . . . . . . . . . . . . . . . . . 4-130
• Room lamp . . . . . . . . . . . . . . . . . . . . . . . . . . . . . . . . . 4-130
• Map lamp . . . . . . . . . . . . . . . . . . . . . . . . . . . . . . . . . 4-131
• Liftgate room lamp . . . . . . . . . . . . . . . . . . . . . . . . . . 4-132
• Vanity mirror lamp . . . . . . . . . . . . . . . . . . . . . . . . . . 4-132
• Glove box lamp . . . . . . . . . . . . . . . . . . . . . . . . . . . . . 4-132
Welcome system . . . . . . . . . . . . . . . . . . . . . . . . . . 4-133
• Headlight (Headlamp) escort function . . . . . . . . . . 4-133
• Interior light . . . . . . . . . . . . . . . . . . . . . . . . . . . . . . . 4-133
• Pocket lamp . . . . . . . . . . . . . . . . . . . . . . . . . . . . . . . . 4-133
Defroster . . . . . . . . . . . . . . . . . . . . . . . . . . . . . . . . 4-134
• Rear window defroster . . . . . . . . . . . . . . . . . . . . . . . 4-134
Manual climate control system . . . . . . . . . . . . . . 4-135
• Heating and air conditioning . . . . . . . . . . . . . . . . . . 4-136
• System operation . . . . . . . . . . . . . . . . . . . . . . . . . . . . 4-141
• Climate control air filter. . . . . . . . . . . . . . . . . . . . . . 4-143
• Checking the amount of air conditioner refrigerantand compressor lubricant. . . . . . . . . . . . . . . . . . . . 4-143
Automatic climate control system . . . . . . . . . . . 4-145
• Automatic heating and air conditioning . . . . . . . . . 4-146
• Manual heating and air conditioning . . . . . . . . . . . 4-147
• System operation . . . . . . . . . . . . . . . . . . . . . . . . . . . . 4-153
• Climate control air filter. . . . . . . . . . . . . . . . . . . . . . 4-155
• Checking the amount of air conditioner refrigerant and compressor lubricant . . . . . . . . . . . . . . . . . . . . . . . 4-156
Windshield defrosting and defogging . . . . . . . . . 4-157
• Manual climate control system . . . . . . . . . . . . . . . . 4-157
• Automatic climate control system . . . . . . . . . . . . . . 4-158
• Defogging logic. . . . . . . . . . . . . . . . . . . . . . . . . . . . . . 4-159
Clean air . . . . . . . . . . . . . . . . . . . . . . . . . . . . . . . . 4-161
Storage compartments . . . . . . . . . . . . . . . . . . . . . 4-162
• Center console storage . . . . . . . . . . . . . . . . . . . . . . . 4-162
• Glove box . . . . . . . . . . . . . . . . . . . . . . . . . . . . . . . . . . 4-16\
2
• Sunglass holder . . . . . . . . . . . . . . . . . . . . . . . . . . . . . 4-163
• Luggage box . . . . . . . . . . . . . . . . . . . . . . . . . . . . . . . . 4-163
• Two types of luggage board use . . . . . . . . . . . . . . . . 4-164
4