tail gate KIA SPORTAGE 2018 Owners Manual
[x] Cancel search | Manufacturer: KIA, Model Year: 2018, Model line: SPORTAGE, Model: KIA SPORTAGE 2018Pages: 605, PDF Size: 13.79 MB
Page 93 of 605
47
Features of your vehicle
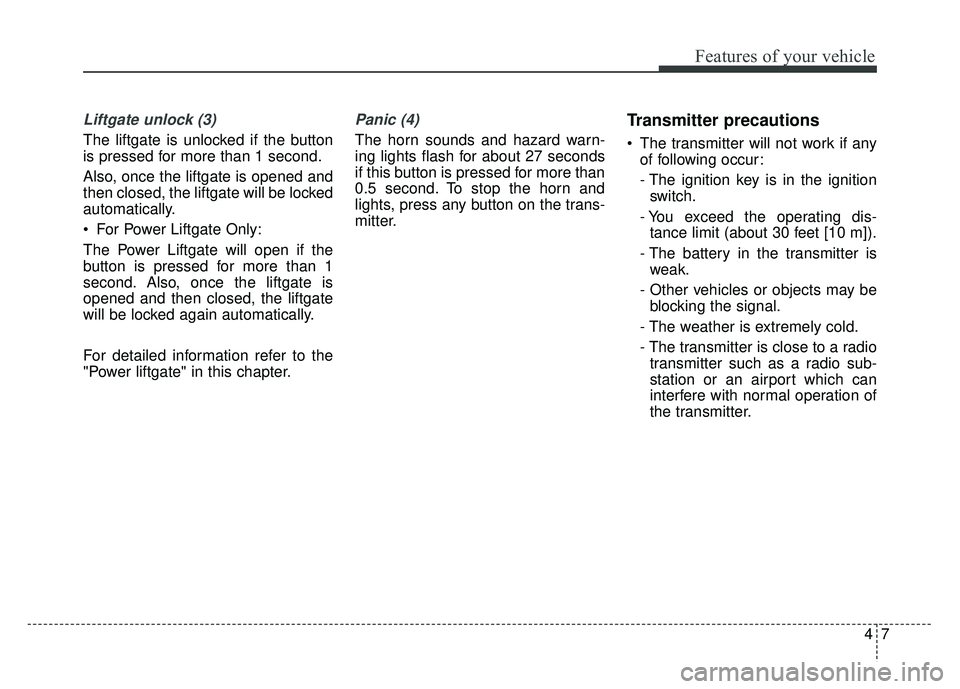
Liftgate unlock (3)
The liftgate is unlocked if the button
is pressed for more than 1 second.
Also, once the liftgate is opened and
then closed, the liftgate will be locked
automatically.
For Power Liftgate Only:
The Power Liftgate will open if the
button is pressed for more than 1
second. Also, once the liftgate is
opened and then closed, the liftgate
will be locked again automatically.
For detailed information refer to the
"Power liftgate" in this chapter.
Panic (4)
The horn sounds and hazard warn-
ing lights flash for about 27 seconds
if this button is pressed for more than
0.5 second. To stop the horn and
lights, press any button on the trans-
mitter.
Transmitter precautions
The transmitter will not work if anyof following occur:
- The ignition key is in the ignitionswitch.
- You exceed the operating dis- tance limit (about 30 feet [10 m]).
- The battery in the transmitter is weak.
- Other vehicles or objects may be blocking the signal.
- The weather is extremely cold.
- The transmitter is close to a radio transmitter such as a radio sub-
station or an airport which can
interfere with normal operation of
the transmitter.
Page 98 of 605
Features of your vehicle
12
4
Record your key number
The key code number
is stamped on the bar
code tag attached to
the key set. Should
you lose your keys,
this number will enable an author-
ized Kia dealer to duplicate the keys
easily. Remove the bar code tag and
store it in a safe place. Also, record
the code number and keep it in a
safe and handy place, but not in the
vehicle.
Smart key function
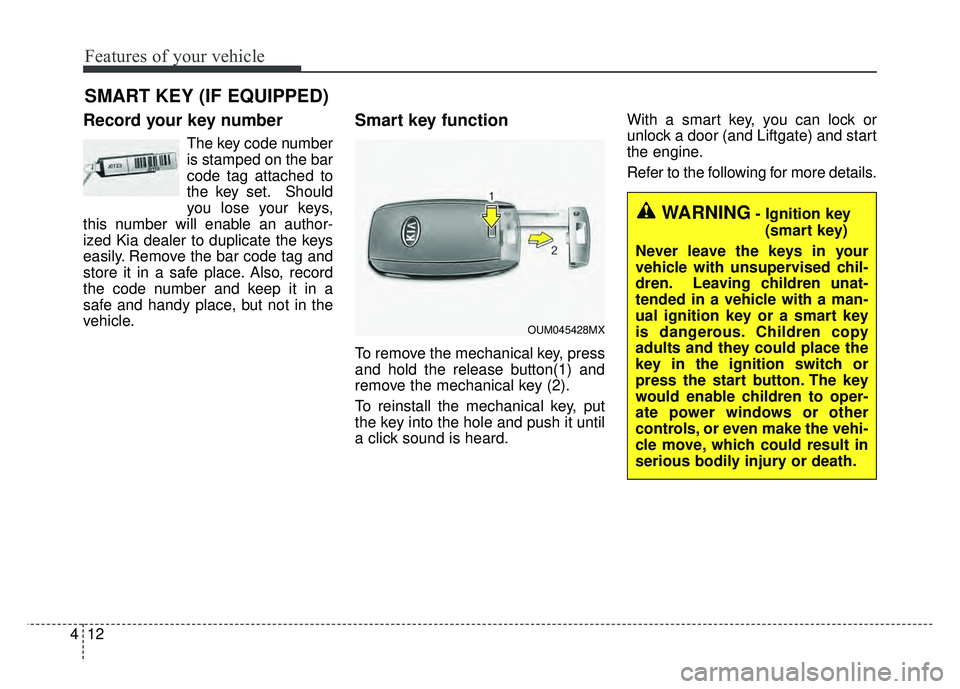
To remove the mechanical key, press
and hold the release button(1) and
remove the mechanical key (2).
To reinstall the mechanical key, put
the key into the hole and push it until
a click sound is heard. With a smart key, you can lock or
unlock a door (and Liftgate) and start
the engine.
Refer to the following for more details.
SMART KEY (IF EQUIPPED)
OUM045428MX
WARNING- Ignition key
(smart key)
Never leave the keys in your
vehicle with unsupervised chil-
dren. Leaving children unat-
tended in a vehicle with a man-
ual ignition key or a smart key
is dangerous. Children copy
adults and they could place the
key in the ignition switch or
press the start button. The key
would enable children to oper-
ate power windows or other
controls, or even make the vehi-
cle move, which could result in
serious bodily injury or death.
Page 101 of 605
415
Features of your vehicle
Using the button on the smart key
1. Press the liftgate unlock button (3)for more than 1 second.
2. When all doors are locked, the hazard warning lights will blink two
times.
For Power Liftgate Only:
The Power Liftgate will open if the
button is pressed for more than 1
second. Also, once the liftgate is
opened and then closed, the liftgate
will be locked again automatically.
For detailed information refer to the
"Power liftgate" in this chapter.Panic
1. Press the panic button (4) for more than 1 second.
2. The horn sounds and hazard warning light flash for about 27
seconds.
✽ ✽NOTICE
To stop the horn and lights, press
any button on the smart key.
Start-up
You can start the engine without
inserting the key. For detailed infor-
mation refer to the “Engine start/stop
button” in chapter 6.
Page 165 of 605
479
Features of your vehicle
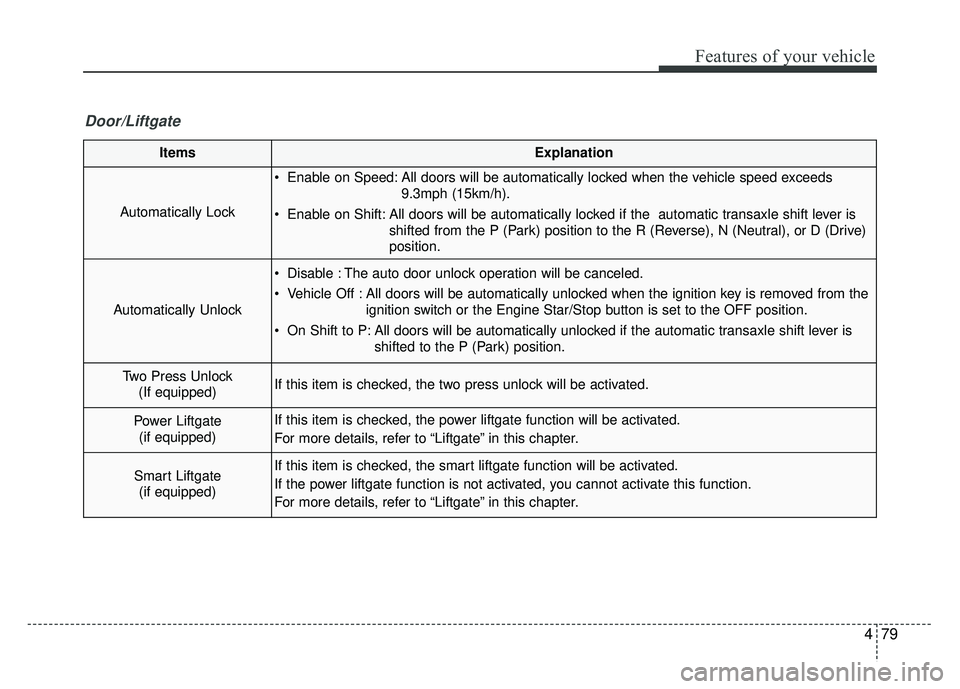
ItemsExplanation
Automatically Lock
Enable on Speed: All doors will be automatically locked when the vehicle speed exceeds9.3mph (15km/h).
Enable on Shift: All doors will be automatically locked if the automatic transaxle shift lever is shifted from the P (Park) position to the R (Reverse), N (Neutral), or D (Drive)
position.
Automatically Unlock
Disable : The auto door unlock operation will be canceled.
Vehicle Off : All doors will be automatically unlocked when the ignition key is removed from theignition switch or the Engine Star/Stop button is set to the OFF position.
On Shift to P: All doors will be automatically unlocked if the automatic transaxle shift lever is shifted to the P (Park) position.
Two Press Unlock(If equipped)If this item is checked, the two press unlock will be activated.
Power Liftgate (if equipped)If this item is checked, the power liftgate function will be activated.
For more details, refer to “Liftgate” in this chapter.
Smart Liftgate (if equipped)If this item is checked, the smart liftgate function will be activated.
If the power liftgate function is not activated, you cannot activate this function.
For more details, refer to “Liftgate” in this chapter.
Door/Liftgate
Page 360 of 605
633
Driving your vehicle
To release EPB (electronic parking
brake) automatically:
Shift lever in P (Park)With the engine running depress
the brake pedal and shift out of P
(Park) to R (Reverse) or D (Drive).
Shift lever in N (Neutral) With the engine running depress
the brake pedal and shift out of N
(Neutral) to R (Reverse) or D
(Drive).
Automatic Transaxle 1. Start the engine.
2. Fasten the driver's seat belt.
3. Close the driver's door, engine hood and tailgate.
4. Depress the accelerator pedal while the shift lever is in R (Rear),
D (Drive) or manual mode.
Make sure the brake warning light
goes off.✽ ✽ NOTICE
• For your safety, you can engage
the EPB even though the ignition
switch or engine stop/start button
is in the OFF position, but you
cannot release it.
• For your safety, depress the brake pedal and release the parking
brake manually with the EPB
switch when you drive downhill or
when backing up the vehicle.
Do not follow the above procedure
when driving on a flat level ground.
The vehicle may suddenly move for-
ward.
✽ ✽ NOTICE
If the parking brake warning light is
still on even though the EPB has
been released, have the system
checked by an authorized Kia dealer.
EPB (electronic parking brake) may
be automatically applied when:
The EPB is overheated
Requested by other systems
✽ ✽NOTICE
If the driver turns the engine off by
mistake while Auto Hold is operat-
ing, EPB will be automatically
applied. (Vehicles equipped with
Auto Hold)
CAUTION
Do not drive your vehicle with
the EPB applied. It may causeexcessive brake pad and brakerotor wear.
Page 467 of 605
733
What to do in an emergency
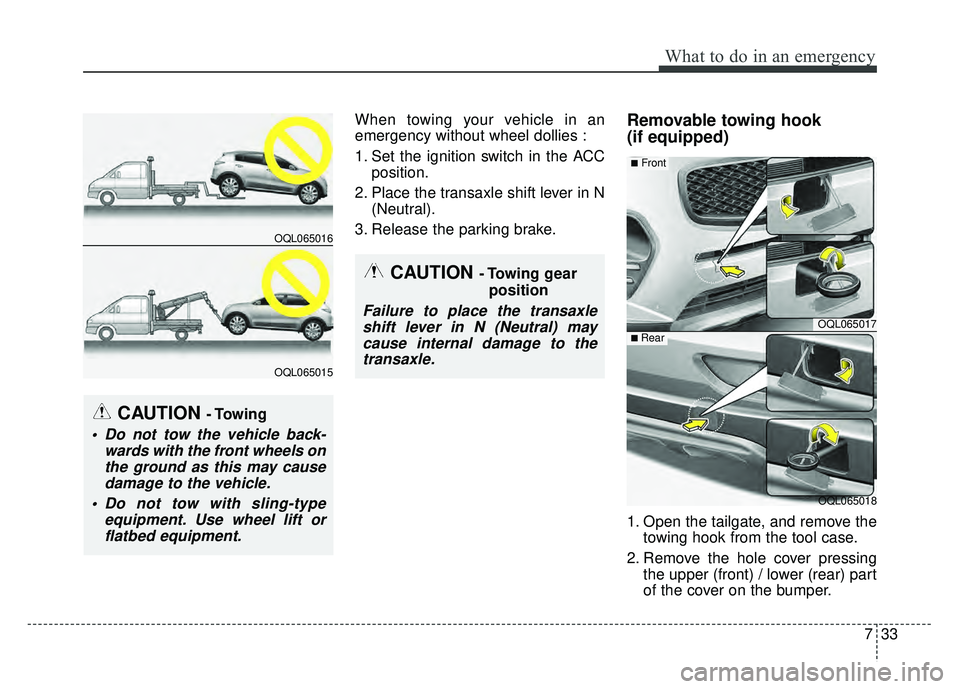
When towing your vehicle in an
emergency without wheel dollies :
1. Set the ignition switch in the ACCposition.
2. Place the transaxle shift lever in N (Neutral).
3. Release the parking brake.Removable towing hook
(if equipped)
1. Open the tailgate, and remove the towing hook from the tool case.
2. Remove the hole cover pressing the upper (front) / lower (rear) part
of the cover on the bumper.
CAUTION - Towing gear
position
Failure to place the transaxleshift lever in N (Neutral) maycause internal damage to thetransaxle.
CAUTION - Towing
Do not tow the vehicle back- wards with the front wheels onthe ground as this may causedamage to the vehicle.
Do not tow with sling-type equipment. Use wheel lift orflatbed equipment.
OQL065016
OQL065015
OQL065017
OQL065018
■Front
■ Rear
Page 472 of 605
• Radial-ply tires . . . . . . . . . . . . . . . . . . . . . . . . . . . . . . 8-58
• Low aspect ratio tire . . . . . . . . . . . . . . . . . . . . . . . . . . 8-58
Fuses . . . . . . . . . . . . . . . . . . . . . . . . . . . . . . . . . . . . \
8-60
• Inner panel fuse replacement . . . . . . . . . . . . . . . . . . . 8-61
• Engine compartment fuse replacement. . . . . . . . . . . 8-63
• Fuse/relay panel description. . . . . . . . . . . . . . . . . . . . 8-66
Light bulbs . . . . . . . . . . . . . . . . . . . . . . . . . . . . . . . 8-78
• Bulb replacement precaution . . . . . . . . . . . . . . . . . . . 8-78
• Light bulb position (Front). . . . . . . . . . . . . . . . . . . . . 8-79
• Light bulb position (Rear) . . . . . . . . . . . . . . . . . . . . . 8-80
• Light bulb position (Side) . . . . . . . . . . . . . . . . . . . . . . 8-81
• Headlamp (HID type) bulb replacement . . . . . . . . . 8-81
• Headlamp (High/Low beam) bulb replacement . . . . 8-82
• Front turn signal lamp bulb replacement . . . . . . . . . 8-83
• Position lamp + DRL bulb replacement . . . . . . . . . . 8-84
• Front fog lamp (Bulb and LED type) bulbreplacement . . . . . . . . . . . . . . . . . . . . . . . . . . . . . . . . 8-84
• Stop and tail lamp bulb replacement . . . . . . . . . . . . 8-85
• Tail lamp (inside) bulb replacement . . . . . . . . . . . . . 8-86
• Stop and tail lamp (LED type) bulb replacement . . 8-87
• Back-up lamp and Rear turn signal lamp bulb replacement . . . . . . . . . . . . . . . . . . . . . . . . . . . . . . . . 8-87
• High mounted stop lamp bulb replacement . . . . . . . 8-88
• License plate lamp bulb Replacement. . . . . . . . . . . . 8-88
• Side repeater lamp (LED type) bulb replacement . . 8-89 • Map lamp bulb replacement . . . . . . . . . . . . . . . . . . . 8-89
• Vanity mirror lamp bulb replacement . . . . . . . . . . . 8-89
• Room lamp bulb replacement . . . . . . . . . . . . . . . . . . 8-90
• Personal lamp bulb replacement . . . . . . . . . . . . . . . . 8-91
• Glove box lamp bulb replacement . . . . . . . . . . . . . . . 8-91
• Tailgate room lamp bulb replacement . . . . . . . . . . . 8-92
Appearance care . . . . . . . . . . . . . . . . . . . . . . . . . . . 8-93
• Exterior care . . . . . . . . . . . . . . . . . . . . . . . . . . . . . . . . 8-93
• Interior care . . . . . . . . . . . . . . . . . . . . . . . . . . . . . . . . . 8-98
Emission control system . . . . . . . . . . . . . . . . . . . 8-101
• 1. Crankcase emission control system . . . . . . . . . . . 8-101
• 2. Evaporative emission control (including ORVR:
Onboard Refueling Vapor Recovery) system . . 8-101
• 3. Exhaust emission control system . . . . . . . . . . . . . 8-102
California Perchlorate notice . . . . . . . . . . . . . . . 8-104
8
Page 539 of 605
869
Maintenance
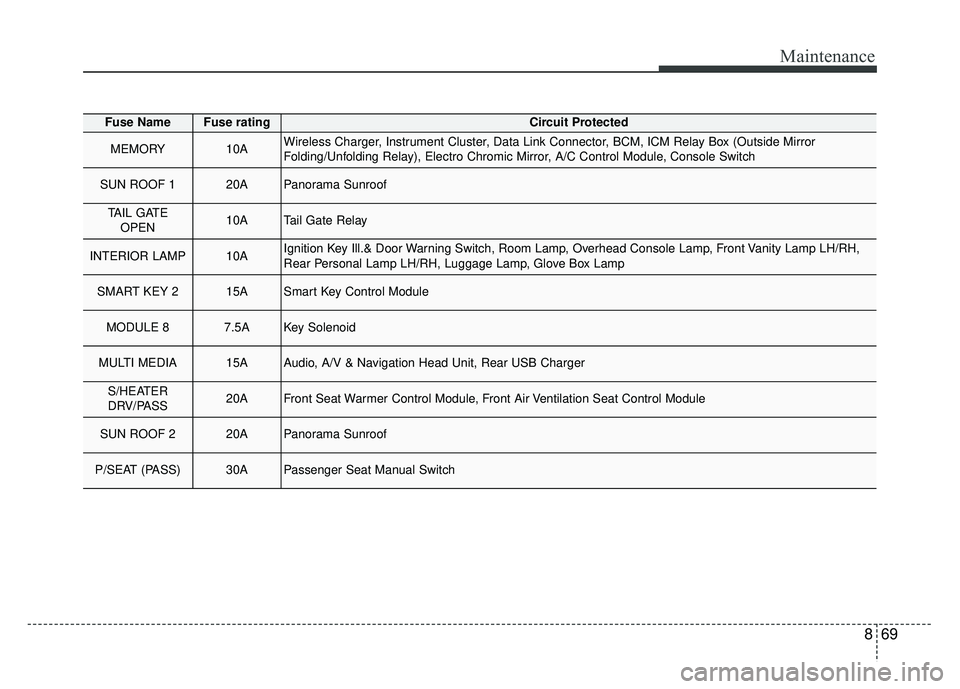
Fuse NameFuse ratingCircuit Protected
MEMORY10AWireless Charger, Instrument Cluster, Data Link Connector, BCM, ICM Relay Box (Outside Mirror
Folding/Unfolding Relay), Electro Chromic Mirror, A/C Control Module, Console Switch
SUN ROOF 120APanorama Sunroof
TAIL GATEOPEN10ATail Gate Relay
INTERIOR LAMP10AIgnition Key Ill.& Door Warning Switch, Room Lamp, Overhead Console Lamp, Front Vanity Lamp LH/RH,
Rear Personal Lamp LH/RH, Luggage Lamp, Glove Box Lamp
SMART KEY 215ASmart Key Control Module
MODULE 87.5AKey Solenoid
MULTI MEDIA15AAudio, A/V & Navigation Head Unit, Rear USB Charger
S/HEATER
DRV/PASS20AFront Seat Warmer Control Module, Front Air Ventilation Seat Control Module
SUN ROOF 220APanorama Sunroof
P/SEAT (PASS)30APassenger Seat Manual Switch
Page 543 of 605
873
Maintenance
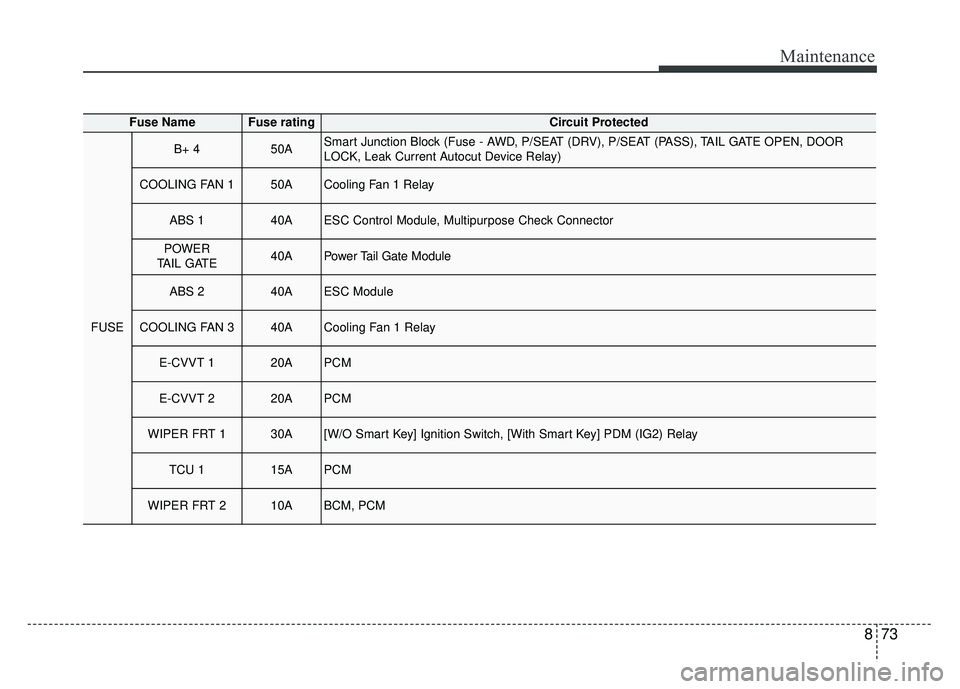
Fuse NameFuse ratingCircuit Protected
FUSE
B+ 450ASmart Junction Block (Fuse - AWD, P/SEAT (DRV), P/SEAT (PASS), TAIL GATE OPEN, DOOR
LOCK, Leak Current Autocut Device Relay)
COOLING FAN 150ACooling Fan 1 Relay
ABS 140AESC Control Module, Multipurpose Check Connector
POWER
TAIL GATE40APower Tail Gate Module
ABS 240AESC Module
COOLING FAN 340ACooling Fan 1 Relay
E-CVVT 120APCM
E-CVVT 220APCM
WIPER FRT 130A[W/O Smart Key] Ignition Switch, [With Smart Key] PDM (IG2) Relay
TCU 115APCM
WIPER FRT 210ABCM, PCM
Page 555 of 605
885
Maintenance
Stop and tail lamp bulb
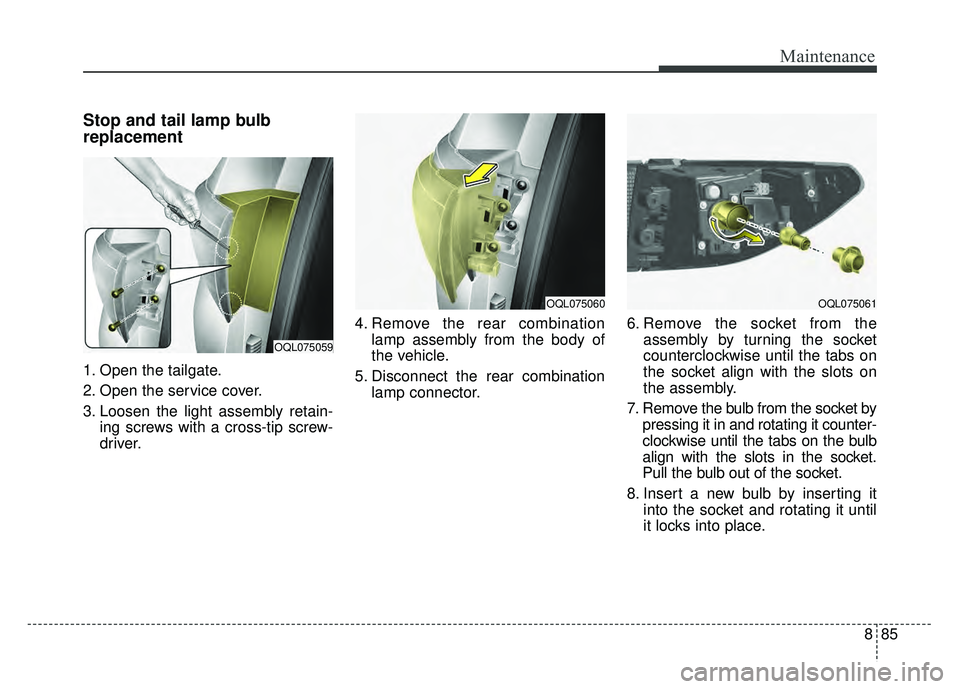
replacement
1. Open the tailgate.
2. Open the service cover.
3. Loosen the light assembly retain-ing screws with a cross-tip screw-
driver. 4. Remove the rear combination
lamp assembly from the body of
the vehicle.
5. Disconnect the rear combination lamp connector. 6. Remove the socket from the
assembly by turning the socket
counterclockwise until the tabs on
the socket align with the slots on
the assembly.
7. Remove the bulb from the socket by pressing it in and rotating it counter-
clockwise until the tabs on the bulb
align with the slots in the socket.
Pull the bulb out of the socket.
8. Insert a new bulb by inserting it into the socket and rotating it until
it locks into place.
OQL075059
OQL075060OQL075061