check engine KIA SPORTAGE 2021 Features and Functions Guide
[x] Cancel search | Manufacturer: KIA, Model Year: 2021, Model line: SPORTAGE, Model: KIA SPORTAGE 2021Pages: 58, PDF Size: 4.22 MB
Page 2 of 58
WELCOME TO THE KIA FAMILY!
Your new Kia vehicle has been designed, engineered and manufactured to provide you with years of comfortable and dependable driving. Kia is committed
to quality, innovation, safety and – above all – your satisfaction.
USING THIS FEATURES & FUNCTIONS GUIDE
The information contained in this guide is a brief overview of the operation and features of your new Kia vehicle.
This Features & Functions Guide and the specific operational and safety information it provides are not a substitute for your Owner’s Manual. In the interest
of your safety and that of the vehicle’s occupants, and to help you avoid risks that may result in death or serious injury, Kia reminds you to carefully read the
Owner’s Manual in order to fully familiarize yourself with the important information and safety warnings it contains.
While Kia endeavors to ensure that the information contained in this guide is accurate at the time of printing, Kia may change vehicle specifications without
notice in advance of or after the fact and assumes no liability in connection with such changes.
1.
If you’re having trouble scanning codes, check the following:
§ The code should be centered and focused in your mobile device’s camera screen
§ Consider moving your device closer to or farther away from the code
§ The code should be well lit, without significant shadow
§ Avoid scanning from a significant angle
§ Confirm that the device’s app supports 2D QR Code scanning
§ Tr y another QR Code Reader app; not all apps are created equal
2. After scanning, you may experience a “connection error” message or a “connecting” message with no subsequent response. These messages typically indicate that your device is having trouble connecting to the Internet
QUICK TIPS
VIDEOS AND QR CODES
Kia provides a number of video resources to assist you with becoming familiar with the features and functions found in your Kia
vehicle. You can access these resources by snapping the QR Codes with your mobile device using the built-in QR Code Reader
or a downloaded QR Code Reader App.
After opening the QR Code Reader App on your mobile device, the app will utilize your device’s camera. Center the code in the
camera viewing area - With some apps, as soon as the app recognizes the code, it will launch the corresponding video.
With other apps, you will have to snap or “take a picture” of the code. The app will then launch the corresponding video.
For operation specifics, refer to the instructions that come with the QR Code Reader app. You can also view the videos by
visiting the following website: www.youtube.com/KiaFeatureVideos.
One-Click Fuel Cap Video
To view a video on your mobile device, snap this QR Code or visit the listed website. Refer to this page for more information.
www.youtube.com/KiaFeatureVideos
QR CODE
Page 5 of 58
INSTRUMENT CLUSTER
*IF EQUIPPED 3ALWAYS CHECK THE OWNER’S MANUAL FOR COMPLETE OPER ATING INFORMATION AND SAFET Y WARNINGS.
INSTRUMENT CLUSTER
(Type A Cluster)
This illustration is for demonstration purposes only. Some indicators and warning lights may not appear in illustration. On the vehicle, they may appear in the LCD.
Your vehicle’s instrument cluster & indicator light locations may differ from those in the illustrations.
For more information on the instrument cluster and the function of all indicator and warning lights, please refer to section 2 in the Owner’s Manual.
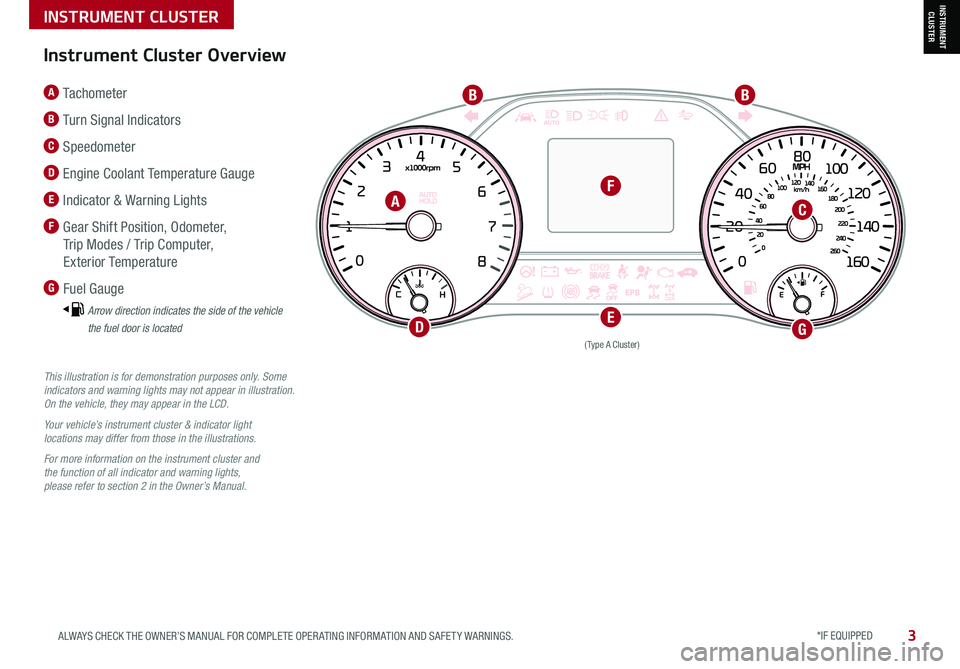
A Tachometer
B Turn Signal Indicators
C Speedometer
D Engine Coolant Temperature Gauge
E Indicator & Warning Lights
F Gear Shift Position, Odometer,
Trip Modes / Trip Computer,
Exterior Temperature
G Fuel Gauge
Arrow direction indicates the side of the vehicle
the fuel door is located
Instrument Cluster Overview
A
BB
C
DE
F
G
Page 7 of 58
5
INSTRUMENT CLUSTER
ALWAYS CHECK THE OWNER’S MANUAL FOR COMPLETE OPER ATING INFORMATION AND SAFET Y WARNINGS. *IF EQUIPPED
The TPMS indicator functions as both Low Tire Pressure
Light and TPMS Malfunction Indicator.
The indicator will illuminate if it detects one or more tires is significantly
underinflated, the vehicle has a spare tire installed without TPMS or the
outside temperature becomes significantly lower.
Inflate tire(s) to specifications using an accurate digital tire pressure gauge
to turn off Low Tire Pressure Indicator . See front driver’s door jamb for
PSI specification. The Low Tire Pressure
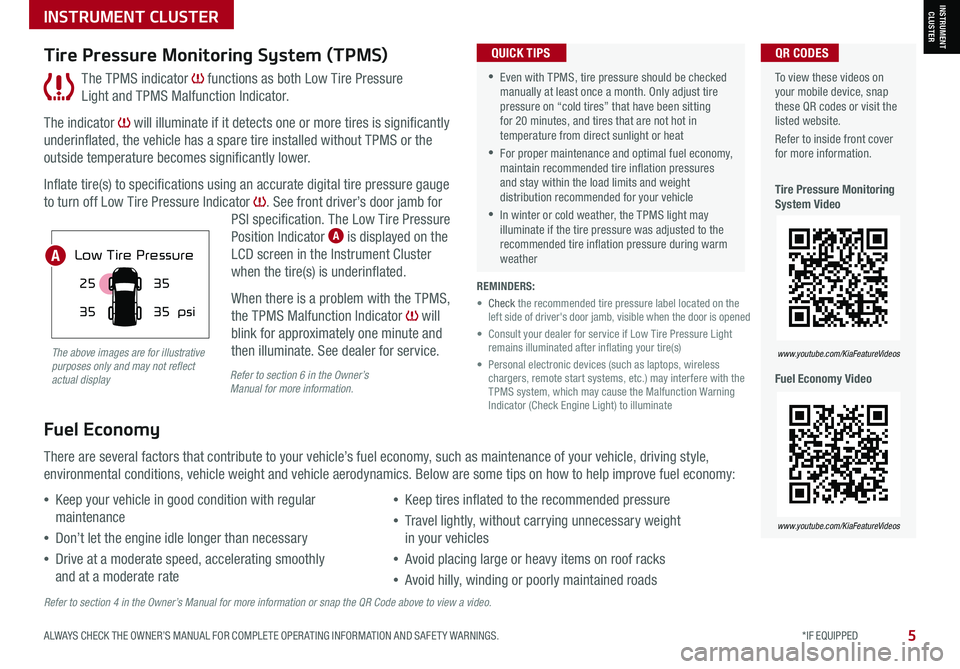
Position Indicator A is displayed on the
LCD screen in the Instrument Cluster
when the tire(s) is underinflated.
When there is a problem with the TPMS,
the TPMS Malfunction Indicator will
blink for approximately one minute and
then illuminate. See dealer for service.
Tire Pressure Monitoring System (TPMS)
REMINDERS:
• Check the recommended tire pressure label located on the left side of driver's door jamb, visible when the door is opened
• Consult your dealer for service if Low Tire Pressure Light remains illuminated after inflating your tire(s)
• Personal electronic devices (such as laptops, wireless chargers, remote start systems, etc.) may interfere with the TPMS system, which may cause the Malfunction Warning Indicator (Check Engine Light) to illuminate
Fuel Economy
There are several factors that contribute to your vehicle’s fuel economy, such as maintenance of your vehicle, driving style,
environmental conditions, vehicle weight and vehicle aerodynamics. Below are some tips on how to help improve fuel economy:
Refer to section 4 in the Owner’s Manual for more information or snap the QR Code above to view a video.
The above images are for illustrative purposes only and may not reflect actual displayRefer to section 6 in the Owner’sManual for more information.
•Keep your vehicle in good condition with regular
maintenance
•Don’t let the engine idle longer than necessary
•Drive at a moderate speed, accelerating smoothly
and at a moderate rate
•Keep tires inflated to the recommended pressure
•Travel lightly, without carrying unnecessary weight
in your vehicles
•Avoid placing large or heavy items on roof racks
•Avoid hilly, winding or poorly maintained roads
To view these videos on your mobile device, snap these QR codes or visit the listed website.
Refer to inside front cover for more information.
Tire Pressure Monitoring System Video
Fuel Economy Video
www.youtube.com/KiaFeatureVideos
www.youtube.com/KiaFeatureVideos
25
35 35
35
psi
Low Tire Pressure
35
25
35
35
psi
Low Tire Pressure
QR CODES
•Even with TPMS, tire pressure should be checked manually at least once a month. Only adjust tire pressure on “cold tires” that have been sitting for 20 minutes, and tires that are not hot in temperature from direct sunlight or heat
•For proper maintenance and optimal fuel economy, maintain recommended tire inflation pressures and stay within the load limits and weight distribution recommended for your vehicle
•In winter or cold weather, the TPMS light may illuminate if the tire pressure was adjusted to the recommended tire inflation pressure during warm weather
QUICK TIPS
A
INSTRUMENT CLUSTER
Page 9 of 58
*IF EQUIPPED 7ALWAYS CHECK THE OWNER’S MANUAL FOR COMPLETE OPER ATING INFORMATION AND SAFET Y WARNINGS.
VEHICLE SETTINGS
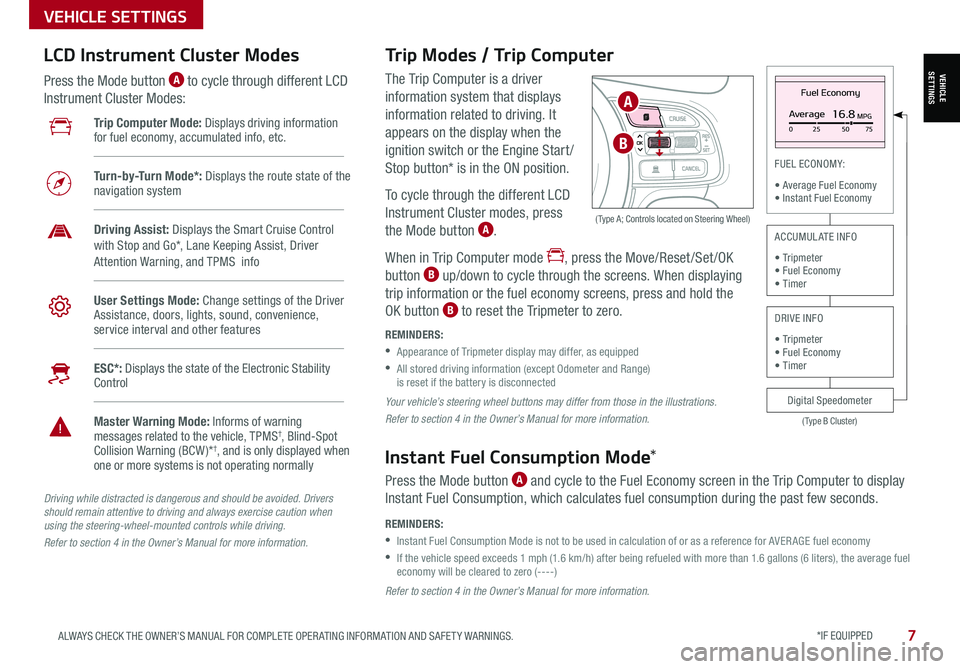
The Trip Computer is a driver
information system that displays
information related to driving. It
appears on the display when the
ignition switch or the Engine Start /
Stop button* is in the ON position.
To cycle through the different LCD
Instrument Cluster modes, press
the Mode button A.
When in Trip Computer mode , press the Move/Reset /Set /OK
button B up/down to cycle through the screens. When displaying
trip information or the fuel economy screens, press and hold the
OK button B to reset the Tripmeter to zero.
REMINDERS:
•
Appearance of Tripmeter display may differ, as equipped
•
All stored driving information (except Odometer and Range) is reset if the battery is disconnected
OK
Trip Modes / Trip Computer LCD Instrument Cluster Modes
Press the Mode button A to cycle through different LCD
Instrument Cluster Modes:
Your vehicle’s steering wheel buttons may differ from those in the illustrations.
Refer to section 4 in the Owner’s Manual for more information.
Driving while distracted is dangerous and should be avoided. Drivers should remain attentive to driving and always exercise caution when using the steering-wheel-mounted controls while driving.
Refer to section 4 in the Owner’s Manual for more information.
Refer to section 4 in the Owner’s Manual for more information.
( Type A; Controls located on Steering Wheel)
Instant Fuel Consumption Mode*
Press the Mode button A and cycle to the Fuel Economy screen in the Trip Computer to display
Instant Fuel Consumption, which calculates fuel consumption during the past few seconds.
REMINDERS:
•
Instant Fuel Consumption Mode is not to be used in calculation of or as a reference for AVER AGE fuel economy
•
If the vehicle speed exceeds 1 mph (1.6 km/h) after being refueled with more than 1.6 gallons (6 liters), the average fuel economy will be cleared to zero (----)
Fuel Economy
Average16.8MPG025 5075
(Type B Cluster)
FUEL ECONOMY:
• Average Fuel Economy• Instant Fuel Economy
Digital Speedometer
ACCUMULATE INFO
• Tripmeter• Fuel Economy• Timer
DRIVE INFO
• Tripmeter • Fuel Economy • Timer
Trip Computer Mode: Displays driving information for fuel economy, accumulated info, etc.
Turn-by-Turn Mode*: Displays the route state of the navigation system
Driving Assist: Displays the Smart Cruise Control with Stop and Go*, Lane Keeping Assist, Driver
Attention Warning, and TPMS info
User Settings Mode: Change settings of the Driver Assistance, doors, lights, sound, convenience, service interval and other features
ESC*: Displays the state of the Electronic Stability Control
Master Warning Mode: Informs of warning messages related to the vehicle, TPMS†, Blind-Spot Collision Warning (BCW )*†, and is only displayed when one or more systems is not operating normally
A
B
VEHICLESETTINGS
Page 10 of 58
8*IF EQUIPPED SPORTAGE FEATURES & FUNCTIONS GUIDE
VEHICLE SETTINGS
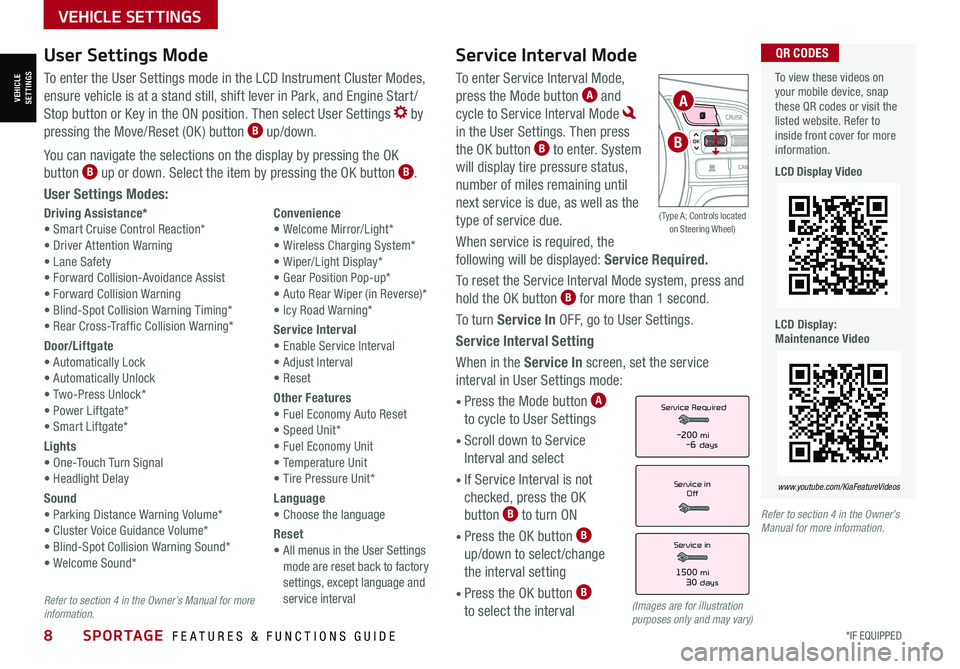
Service Interval Mode
To enter Service Interval Mode,
press the Mode button A and
cycle to Service Interval Mode
in the User Settings. Then press
the OK button B to enter. System
will display tire pressure status,
number of miles remaining until
next service is due, as well as the
type of service due.
When service is required, the
following will be displayed: Service Required.
To reset the Service Interval Mode system, press and
hold the OK button B for more than 1 second.
To turn Service In OFF, go to User Settings.
Service Interval Setting
When in the Service In screen, set the service
interval in User Settings mode:
• Press the Mode button A
to cycle to User Settings
• Scroll down to Service
Interval and select
•
If Service Interval is not
checked, press the OK
button B to turn ON
• Press the OK button B
up/down to select /change
the interval setting
•
Press the OK button B
to select the interval
Driving Assistance*• Smart Cruise Control Reaction*• Driver Attention Warning• Lane Safety• Forward Collision-Avoidance Assist• Forward Collision Warning• Blind-Spot Collision Warning Timing*• Rear Cross-Traffic Collision Warning*
Door/Liftgate• Automatically Lock• Automatically Unlock• Two-Press Unlock*• Power Liftgate*• Smart Liftgate*
Lights• One-Touch Turn Signal• Headlight Delay
Sound• Parking Distance Warning Volume*• Cluster Voice Guidance Volume*• Blind-Spot Collision Warning Sound*• Welcome Sound*
Convenience• Welcome Mirror/Light*• Wireless Charging System*• Wiper/Light Display*• Gear Position Pop-up*• Auto Rear Wiper (in Reverse)*• Icy Road Warning*
Service Interval• Enable Service Interval• Adjust Interval• Reset
Other Features• Fuel Economy Auto Reset• Speed Unit*• Fuel Economy Unit• Temperature Unit• Tire Pressure Unit*
Language• Choose the language
Reset•
All menus in the User Settings mode are reset back to factory settings, except language and service interval
Service in
Off
Service Required
Service in
1500 mi30 days
-200 mi-6 days
To view these videos on your mobile device, snap these QR codes or visit the listed website. Refer to inside front cover for more information.
LCD Display Video
LCD Display: Maintenance Video
www.youtube.com/KiaFeatureVideos
QR CODESUser Settings Mode
To enter the User Settings mode in the LCD Instrument Cluster Modes,
ensure vehicle is at a stand still, shift lever in Park, and Engine Start /
Stop button or Key in the ON position. Then select User Settings by
pressing the Move/Reset (OK ) button B up/down.
You can navigate the selections on the display by pressing the OK
button B up or down. Select the item by pressing the OK button B.
User Settings Modes:
(Images are for illustration purposes only and may vary)
Refer to section 4 in the Owner’s Manual for more information.
Refer to section 4 in the Owner’s Manual for more information.
OK
A
B
( Type A; Controls located on Steering Wheel)
VEHICLESETTINGS
Page 13 of 58
11ALWAYS CHECK THE OWNER’S MANUAL FOR COMPLETE OPER ATING INFORMATION AND SAFET Y WARNINGS. *IF EQUIPPED †LEGAL DISCL AIMERS ON BACK INSIDE COVER
ADVANCED DRIVER ASSISTANCE SYSTEMS (ADAS)
Lane Keeping Assist (LKA)†6
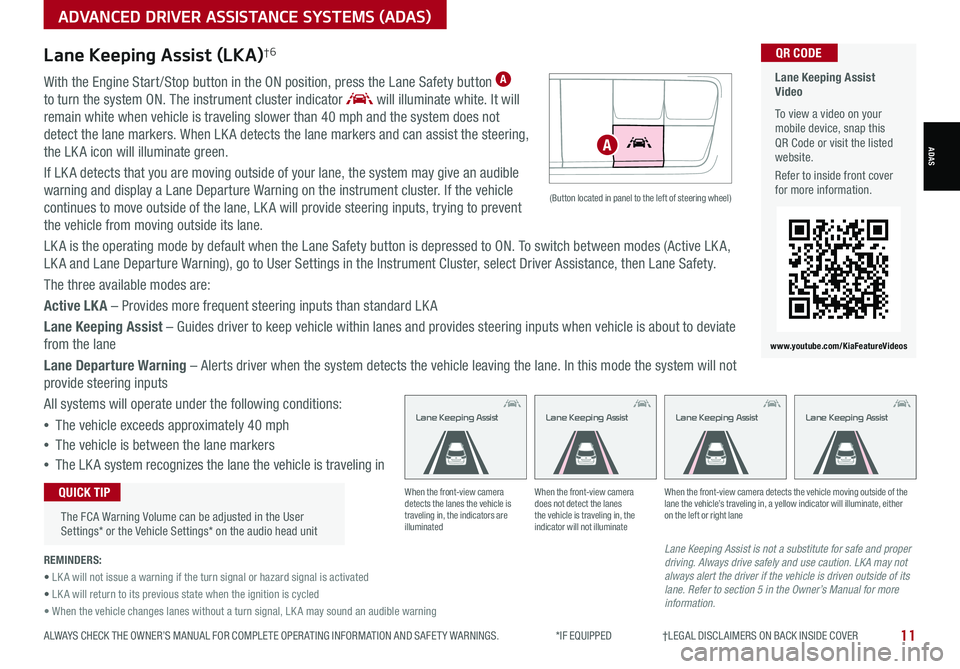
With the Engine Start /Stop button in the ON position, press the Lane Safety button A
to turn the system ON. The instrument cluster indicator will illuminate white. It will
remain white when vehicle is traveling slower than 40 mph and the system does not
detect the lane markers. When LK A detects the lane markers and can assist the steering,
the LK A icon will illuminate green.
If LK A detects that you are moving outside of your lane, the system may give an audible
warning and display a Lane Departure Warning on the instrument cluster. If the vehicle
continues to move outside of the lane, LK A will provide steering inputs, trying to prevent
the vehicle from moving outside its lane.
LK A is the operating mode by default when the Lane Safety button is depressed to ON. To switch between modes (Active LK A,
LK A and Lane Departure Warning), go to User Settings in the Instrument Cluster, select Driver Assistance, then Lane Safety.
The three available modes are:
Active LKA – Provides more frequent steering inputs than standard LK A
Lane Keeping Assist – Guides driver to keep vehicle within lanes and provides steering inputs when vehicle is about to deviate
from the lane
Lane Departure Warning – Alerts driver when the system detects the vehicle leaving the lane. In this mode the system will not
provide steering inputs
All systems will operate under the following conditions:
•The vehicle exceeds approximately 40 mph
•The vehicle is between the lane markers
•The LK A system recognizes the lane the vehicle is traveling in
Lane Keeping Assist is not a substitute for safe and proper driving. Always drive safely and use caution. LKA may not always alert the driver if the vehicle is driven outside of its lane. Refer to section 5 in the Owner’s Manual for more information.
When the front-view camera detects the lanes the vehicle is traveling in, the indicators are illuminated
When the front-view camera does not detect the lanes the vehicle is traveling in, the indicator will not illuminate
When the front-view camera detects the vehicle moving outside of the lane the vehicle’s traveling in, a yellow indicator will illuminate, either on the left or right lane
Lane Keeping AssistLane Keeping AssistLane Keeping AssistLane Keeping Assist
REMINDERS:
• LK A will not issue a warning if the turn signal or hazard signal is activated
• LK A will return to its previous state when the ignition is cycled
• When the vehicle changes lanes without a turn signal, LK A may sound an audible warning
Lane Keeping Assist Video
To view a video on your mobile device, snap this QR Code or visit the listed website.
Refer to inside front cover for more information.
www.youtube.com/KiaFeatureVideos
QR CODE
ADAS
The FCA Warning Volume can be adjusted in the User Settings* or the Vehicle Settings* on the audio head unit
QUICK TIP
(Button located in panel to the left of steering wheel)
A
Page 17 of 58
DRIVER'S PANEL
15ALWAYS CHECK THE OWNER’S MANUAL FOR COMPLETE OPER ATING INFORMATION AND SAFET Y WARNINGS. *IF EQUIPPED †LEGAL DISCL AIMERS ON BACK INSIDE COVER
Engine Start/Stop Button*†9
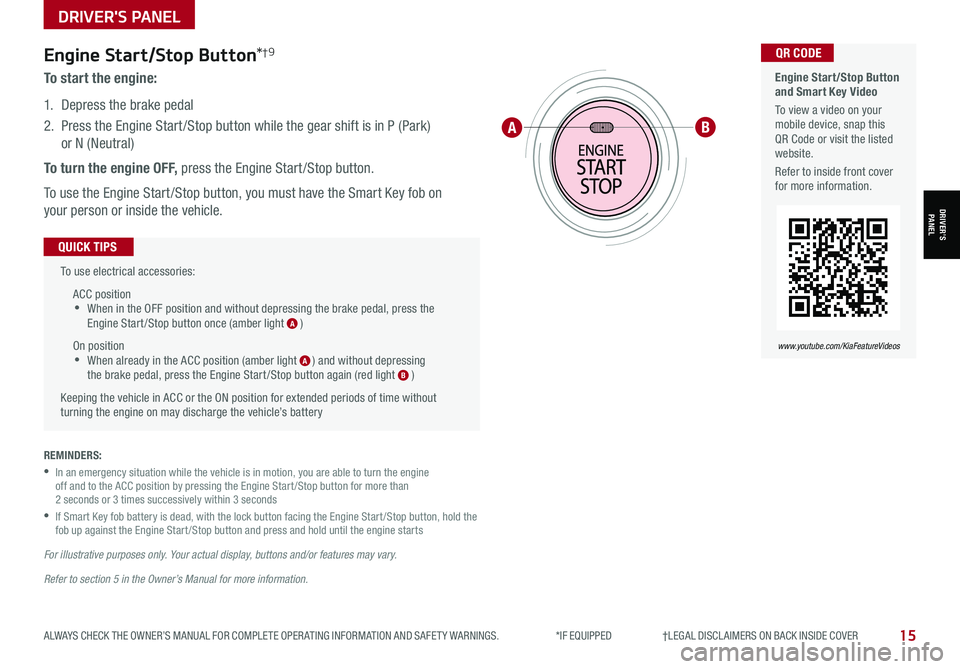
To start the engine:
1. Depress the brake pedal
2.
Press the Engine Start /Stop button while the gear shift is in P (Park)
or N (Neutral)
To turn the engine OFF, press the Engine Start /Stop button.
To use the Engine Start /Stop button, you must have the Smart Key fob on
your person or inside the vehicle.
To use electrical accessories:
ACC position •When in the OFF position and without depressing the brake pedal, press the Engine Start /Stop button once (amber light A )
On position •When already in the ACC position (amber light A ) and without depressing the brake pedal, press the Engine Start /Stop button again (red light B )
Keeping the vehicle in ACC or the ON position for extended periods of time without turning the engine on may discharge the vehicle’s battery
QUICK TIPS
REMINDERS:
•
In an emergency situation while the vehicle is in motion, you are able to turn the engine off and to the ACC position by pressing the Engine Start /Stop button for more than 2 seconds or 3 times successively within 3 seconds
•
If Smart Key fob battery is dead, with the lock button facing the Engine Start /Stop button, hold the fob up against the Engine Start /Stop button and press and hold until the engine starts
For illustrative purposes only. Your actual display, buttons and/or features may vary.
Refer to section 5 in the Owner’s Manual for more information.
AB
Engine Start/Stop Button and Smart Key Video
To view a video on your mobile device, snap this QR Code or visit the listed website.
Refer to inside front cover for more information.
www.youtube.com/KiaFeatureVideos
QR CODE
DRIVER’SPANEL
Page 21 of 58
19ALWAYS CHECK THE OWNER’S MANUAL FOR COMPLETE OPER ATING INFORMATION AND SAFET Y WARNINGS. *IF EQUIPPED †LEGAL DISCL AIMERS ON BACK INSIDE COVER
STEERING WHEEL CONTROLS
STEERING WHEEL CONTROLS
REMINDERS: •Driving Assist CRUISE button must be ON in order to turn SCC ON/OFF
•SCC can operate when the vehicle is driving faster than 6 mph
•
SCC is activated when ignition is turned on. Speed will need to be reset when ignition is cycled on
•
SCC is turned ON again when the ignition is cycled off, then on again. The speed setting will need to be reset when ignition is cycled
•
SCC is also canceled when the driver’s door is opened, gear shift is changed out of D (Drive), EPB is activated and various other conditions. See Owner’s Manual for other conditions
•
If SCC is left on, it can be activated inadvertently. Keep the system off when not in use to avoid setting a speed that the driver is not aware of
•
When following a vehicle, the system will automatically adjust your cruise speed based on the vehicle detected in front
For SCC to operate:
•When no vehicle is in front, you must be traveling at a minimum speed of 20 mph
•When following a vehicle, you must be traveling at a minimum speed of 6 mph
When following a vehicle, the system will automatically adjust your cruise speed based on the vehicle detected ahead. If the vehicle detected remains at a standstill for more than 3 seconds, the system will disable
QUICK TIPS
Smart Cruise Control (SCC)*†6 (continued)
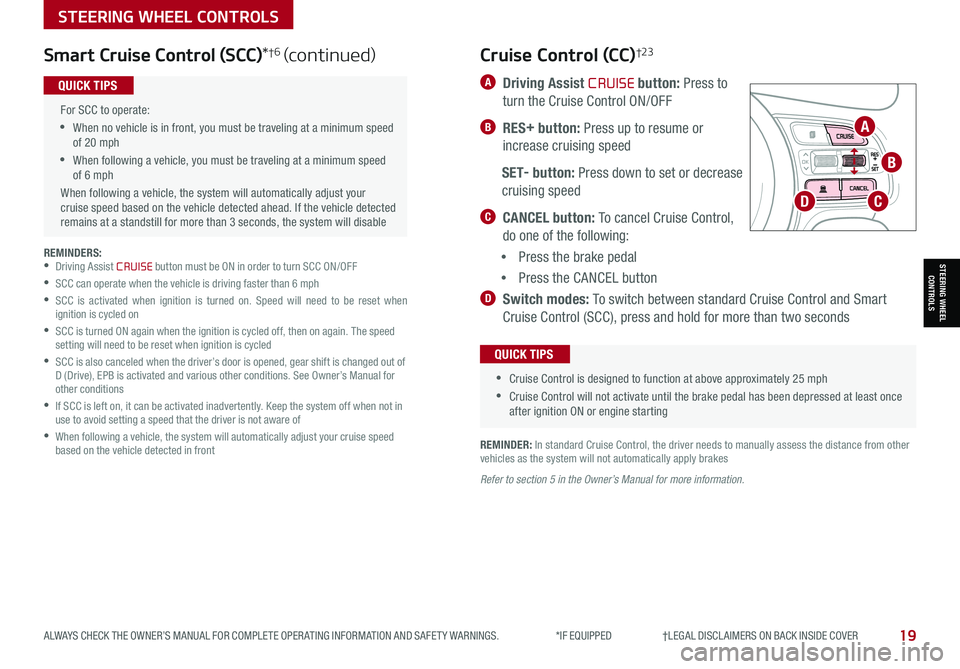
A Driving Assist CRUISE button: Press to
turn the Cruise Control ON/OFF
B RES+ button: Press up to resume or
increase cruising speed
SET- button: Press down to set or decrease
cruising speed
C CANCEL button: To cancel Cruise Control,
do one of the following:
•Press the brake pedal
•Press the CANCEL button
D Switch modes: To switch between standard Cruise Control and Smart
Cruise Control (SCC), press and hold for more than two seconds
Cruise Control (CC)†2 3
•
•Cruise Control is designed to function at above approximately 25 mph
•Cruise Control will not activate until the brake pedal has been depressed at least once after ignition ON or engine starting
QUICK TIPS
REMINDER: In standard Cruise Control, the driver needs to manually assess the distance from other vehicles as the system will not automatically apply brakes
Refer to section 5 in the Owner’s Manual for more information.
OK
A
B
CD
Page 27 of 58
AUDIO SYSTEMS
ALWAYS CHECK THE OWNER’S MANUAL FOR COMPLETE OPER ATING INFORMATION AND SAFET Y WARNINGS. *IF EQUIPPED
AUDIOSYSTEMS
25
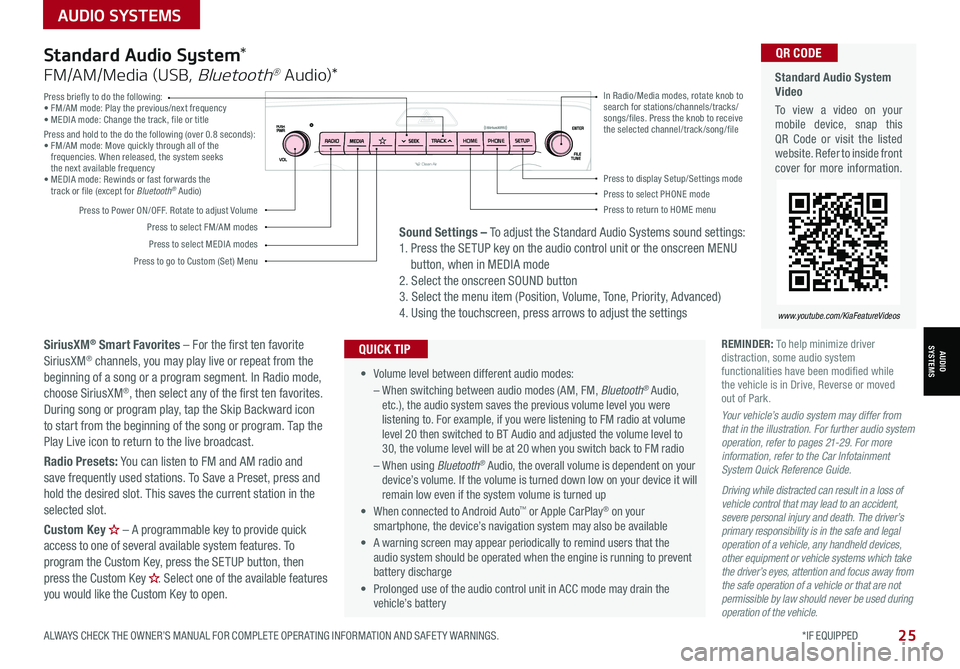
Press briefly to do the following:• FM/AM mode: Play the previous/next frequency• MEDIA mode: Change the track, file or titlePress and hold to the do the following (over 0.8 seconds):• FM/AM mode: Move quickly through all of the frequencies. When released, the system seeks the next available frequency• MEDIA mode: Rewinds or fast forwards the track or file (except for Bluetooth® Audio)
Press to Power ON/OFF. Rotate to adjust Volume
Press to select FM/AM modes
Press to select MEDIA modes
Press to display Setup/Settings modePress to select PHONE modePress to return to HOME menu
Press to go to Custom (Set) Menu
In Radio/Media modes, rotate knob to search for stations/channels/tracks/songs/files. Press the knob to receive the selected channel/track /song/fileHOME PHONE
Standard Audio System Video
To view a video on your mobile device, snap this QR Code or visit the listed website. Refer to inside front cover for more information.
www.youtube.com/KiaFeatureVideos
QR CODE
• Volume level between different audio modes:
– When switching between audio modes (AM, FM, Bluetooth® Audio, etc.), the audio system saves the previous volume level you were listening to. For example, if you were listening to FM radio at volume level 20 then switched to BT Audio and adjusted the volume level to 30, the volume level will be at 20 when you switch back to FM radio
– When using Bluetooth® Audio, the overall volume is dependent on your device’s volume. If the volume is turned down low on your device it will remain low even if the system volume is turned up
• When connected to Android Auto™ or Apple CarPlay® on your smartphone, the device’s navigation system may also be available
•
A warning screen may appear periodically to remind users that the audio system should be operated when the engine is running to prevent battery discharge
• Prolonged use of the audio control unit in ACC mode may drain the vehicle’s battery
QUICK TIP
Standard Audio System*
FM/AM/Media (USB, Bluetooth® Au dio)*
SiriusXM® Smart Favorites – For the first ten favorite SiriusXM® channels, you may play live or repeat from the beginning of a song or a program segment. In Radio mode, choose SiriusXM®, then select any of the first ten favorites. During song or program play, tap the Skip Backward icon to start from the beginning of the song or program. Tap the Play Live icon to return to the live broadcast.
Radio Presets: You can listen to FM and AM radio and save frequently used stations. To Save a Preset, press and hold the desired slot. This saves the current station in the selected slot.
Custom Key H
Page 29 of 58
AUDIO SYSTEMS
AUDIOSYSTEMS
27ALWAYS CHECK THE OWNER’S MANUAL FOR COMPLETE OPER ATING INFORMATION AND SAFET Y WARNINGS. *IF EQUIPPED
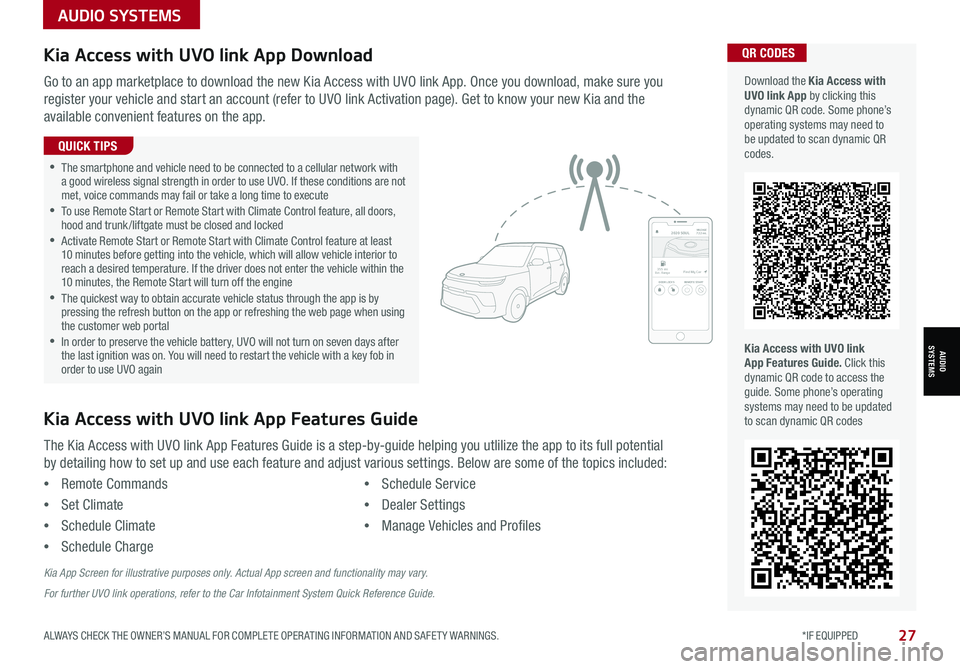
Kia Access with UVO link App DownloadQR CODES
Kia Access with UVO link App Features Guide. Click this dynamic QR code to access the guide. Some phone’s operating systems may need to be updated to scan dynamic QR codes
Download the Kia Access with UVO link App by clicking this dynamic QR code. Some phone’s operating systems may need to be updated to scan dynamic QR codes.
Go to an app marketplace to download the new Kia Access with UVO link App. Once you download, make sure you
register your vehicle and start an account (refer to UVO link Activation page). Get to know your new Kia and the
available convenient features on the app.
The Kia Access with UVO link App Features Guide is a step-by-guide helping you utlilize the app to its full potential
by detailing how to set up and use each feature and adjust various settings. Below are some of the topics included:
•Remote Commands
•Set Climate
•Schedule Climate
•Schedule Charge
•Schedule Service
•Dealer Settings
•Manage Vehicles and Profiles
Kia Access with UVO link App Features Guide
2020 SOULMILEAGE722 mi.
355 miEst. RangeDOOR LOCKSREMOTE STARTFind My Car
•The smartphone and vehicle need to be connected to a cellular network with a good wireless signal strength in order to use UVO. If these conditions are not met, voice commands may fail or take a long time to execute •
To use Remote Start or Remote Start with Climate Control feature, all doors, hood and trunk /liftgate must be closed and locked •
Activate Remote Start or Remote Start with Climate Control feature at least 10 minutes before getting into the vehicle, which will allow vehicle interior to reach a desired temperature. If the driver does not enter the vehicle within the 10 minutes, the Remote Start will turn off the engine •
The quickest way to obtain accurate vehicle status through the app is by pressing the refresh button on the app or refreshing the web page when using the customer web portal •In order to preserve the vehicle battery, UVO will not turn on seven days after the last ignition was on. You will need to restart the vehicle with a key fob in order to use UVO again
QUICK TIPS
Kia App Screen for illustrative purposes only. Actual App screen and functionality may vary.
For further UVO link operations, refer to the Car Infotainment System Quick Reference Guide.