change time KIA SPORTAGE 2022 Owners Manual
[x] Cancel search | Manufacturer: KIA, Model Year: 2022, Model line: SPORTAGE, Model: KIA SPORTAGE 2022Pages: 630, PDF Size: 9.69 MB
Page 26 of 630
39
Safety features of your vehicle
Seat belts must be snug against your
hips and chest to work properly.
When the seatback is reclined, the
shoulder belt cannot do its job
because it will not be snug against
your chest. Instead, it will be in front
of you. During an accident, you could
be thrown into the seat belt, causing
neck or other injuries.
The more the seatback is reclined,
the greater chance the passenger’s
hips will slide under the lap belt or
the passenger’s neck will strike the
shoulder belt.Seat height
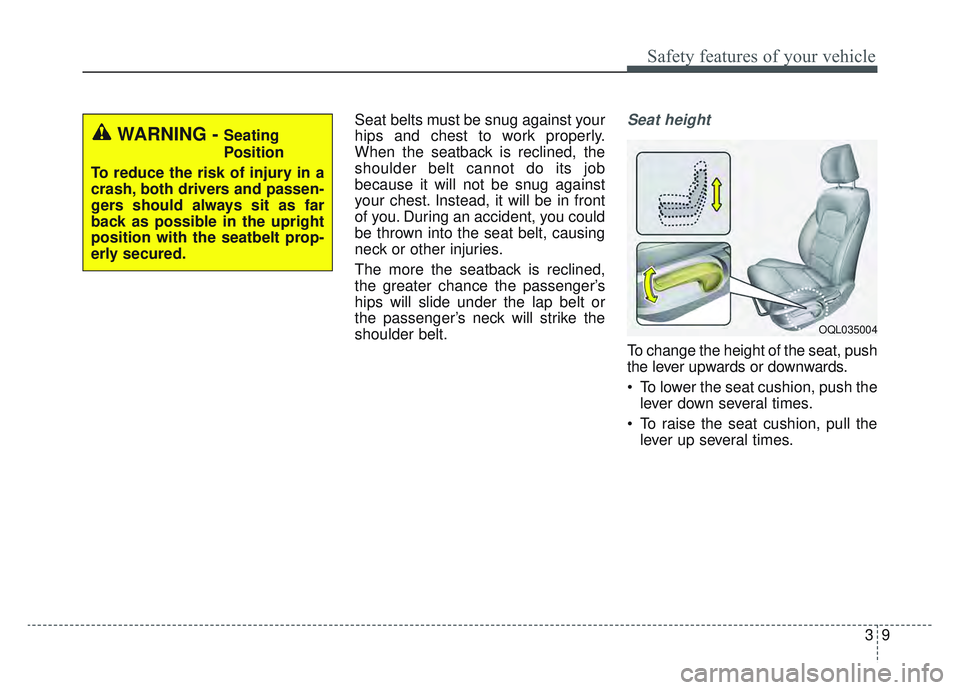
To change the height of the seat, push
the lever upwards or downwards.
To lower the seat cushion, push thelever down several times.
To raise the seat cushion, pull the lever up several times.
OQL035004
WARNING - Seating
Position
To reduce the risk of injury in a
crash, both drivers and passen-
gers should always sit as far
back as possible in the upright
position with the seatbelt prop-
erly secured.
Page 91 of 630
Steering wheel . . . . . . . . . . . . . . . . . . . . . . . . . . . . . 4-58
• Electronic Power Steering (EPS) . . . . . . . . . . . . . . . . 4-58
• Tilt and telescopic steering . . . . . . . . . . . . . . . . . . . . . 4-59
• Heated steering wheel . . . . . . . . . . . . . . . . . . . . . . . . . 4-60
• Horn . . . . . . . . . . . . . . . . . . . . . . . . . . . . . . . . . . . . \
. . . 4-61
Mirrors . . . . . . . . . . . . . . . . . . . . . . . . . . . . . . . . . . 4-62\
• Inside rearview mirror . . . . . . . . . . . . . . . . . . . . . . . . 4-62
• Outside rearview mirror. . . . . . . . . . . . . . . . . . . . . . . 4-76
Instrument cluster . . . . . . . . . . . . . . . . . . . . . . . . . 4-80
• Instrument cluster control . . . . . . . . . . . . . . . . . . . . . 4-81
• LCD display control . . . . . . . . . . . . . . . . . . . . . . . . . . 4-81
• Gauges . . . . . . . . . . . . . . . . . . . . . . . . . . . . . . . . . . . . \
. 4-82
• Transmission shift indicator . . . . . . . . . . . . . . . . . . . . 4-85
LCD display . . . . . . . . . . . . . . . . . . . . . . . . . . . . . . 4-86
• LCD modes. . . . . . . . . . . . . . . . . . . . . . . . . . . . . . . . . . 4-86\
• User settings mode. . . . . . . . . . . . . . . . . . . . . . . . . . . . 4-89
Trip modes (Trip computer) . . . . . . . . . . . . . . . . . 4-94
• Trip modes . . . . . . . . . . . . . . . . . . . . . . . . . . . . . . . . . . 4-94\
• Fuel economy . . . . . . . . . . . . . . . . . . . . . . . . . . . . . . . . 4-94
• Warning messages . . . . . . . . . . . . . . . . . . . . . . . . . . . . 4-97
Warning and indicator lights . . . . . . . . . . . . . . . 4-104
• Warning lights . . . . . . . . . . . . . . . . . . . . . . . . . . . . . . 4-104
• Indicator lights . . . . . . . . . . . . . . . . . . . . . . . . . . . . . . 4-111
Rear View Monitor (RVM) . . . . . . . . . . . . . . . . . 4-117Reverse Parking Distance Warning (PDW). . . . 4-118
• Operation of Reverse Parking Distance Warning . . . 4-118
• Non-operational conditions of Reverse Parking
Distance Warning . . . . . . . . . . . . . . . . . . . . . . . . . . 4-119
• Reverse Parking Distance Warning precautions . . 4-119
• Self-diagnosis . . . . . . . . . . . . . . . . . . . . . . . . . . . . . . . 4-121
Forward/Reverse Parking Distance Warning (PDW) . . . . . . . . . . . . . . . . . . . . . . . . . . . . . . . . . 4-122
• Operation of Parking Distance Warning . . . . . . . . 4-122
• Non-operational conditions of Parking Distance
Warning . . . . . . . . . . . . . . . . . . . . . . . . . . . . . . . . . . 4-12\
4
• Self-diagnosis . . . . . . . . . . . . . . . . . . . . . . . . . . . . . . . 4-126
Lighting . . . . . . . . . . . . . . . . . . . . . . . . . . . . . . . . . 4-127
• Battery saver function. . . . . . . . . . . . . . . . . . . . . . . . 4-127
• Daytime running light . . . . . . . . . . . . . . . . . . . . . . . . 4-127
• Lighting control . . . . . . . . . . . . . . . . . . . . . . . . . . . . . 4-127
• High beam operation. . . . . . . . . . . . . . . . . . . . . . . . . 4-129
• High Beam Assist (HBA) . . . . . . . . . . . . . . . . . . . . . 4-130
• Turn signals and lane change signals . . . . . . . . . . . 4-132
• Front fog light . . . . . . . . . . . . . . . . . . . . . . . . . . . . . . 4-133
• Check headlight . . . . . . . . . . . . . . . . . . . . . . . . . . . . . 4-133
• Dynamic Bending Light (DBL) . . . . . . . . . . . . . . . . 4-134
Wipers and washers . . . . . . . . . . . . . . . . . . . . . . . 4-135
• Windshield wipers . . . . . . . . . . . . . . . . . . . . . . . . . . . 4-135
• Front windshield washers . . . . . . . . . . . . . . . . . . . . . 4-136
4
Page 123 of 630
Features of your vehicle
34
4
Power liftgate non-opening condi-
tions
The power liftgate will not open auto-
matically, when the vehicle is moving
more than 2mph(3km/h) or the auto-
matic shift lever is not in P(Park) posi-
tion.
✽ ✽ NOTICE
The chime will sound continuously if
you drive over 2 mph (3 km/h) with
the liftgate opened. Stop your vehi-
cle at a safe place as soon as possible
to check if your liftgate is opened.
✽ ✽NOTICE
• The power liftgate can be operated
when the engine is not running.
However the power liftgate opera-
tion consumes large amounts of
vehicle electric power. To prevent
the battery from being discharged,
do not operate it excessively.
• To prevent the battery from being discharged, do not leave the power
liftgate in the open position for a
long time.
• Do not modify or repair any part of the power liftgate by yourself.
This must be done by an author-
ized Kia dealer.
• When jacking up the vehicle to change a tire or repair the vehicle,
do not operate the power liftgate.
This could cause the power liftgate
to operate improperly. (Continued)
CAUTION
Do not operate the power lift-
gate more than 5 times continu-ously.
It may damage the power liftgatesystem. If you operate the powerliftgate more than 5 times con-tinuously, the chime will sound 3times and the power liftgate willnot operate. At this time, stopoperating the liftgate and leave itfor more than 1 minute.
WARNING
Make sure there are no people
or objects around the liftgate
before opening or closing the
power liftgate. Wait until the lift-
gate is open fully and stopped
before loading or unloading
cargo from the vehicle.
Page 147 of 630
Features of your vehicle
58
4
Electronic power steering
(EPS)
The power steering uses a motor to
assist you in steering the vehicle. If
the engine is off or if the power steer-
ing system becomes inoperative, the
vehicle may still be steered, but it will
require increased steering effort.
Electronic power steering is con-
trolled by a power steering control
unit which senses the steering wheel
torque and vehicle speed to com-
mand the motor.
The steering becomes heavier as the
vehicle’s speed increases and
becomes lighter as the vehicle’s
speed decreases for optimum steer-
ing control.
Should you notice any change in the
effort required to steer during normal
vehicle operation, have the power
steering checked by an authorized
Kia dealer. If the Electronic Power Steering
System does not operate normally,
the warning light will illuminate on
the instrument cluster. The steering
wheel may require increased
steering effort. Take your vehicle to
an authorized Kia dealer and have
the vehicle checked as soon as
possible.
When you operate the steering wheel in low temperature, the steer-
ing effort may be high or abnormal
noise may occur. If temperature
rises, the noise will likely disappear.
This is a normal condition.
When the vehicle is stationary, and the steering wheel is turned all the
way to the left or right continuous-
ly, the steering wheel becomes
harder to turn. The power assist is
limited to protect the motor from
overheating.
As time passes, the steering wheel
will return to its normal condition.
✽ ✽ NOTICE
The following symptoms may occur
during normal vehicle operation:
• The EPS warning light does not
illuminate.
• The steering gets heavy immedi- ately after turning the ignition
switch on. This happens as the sys-
tem performs the EPS system
diagnostics. When the diagnostics
are completed, the steering wheel
will return to its normal condition.
• A click noise may be heard from the EPS relay after the ignition
switch is turned to the ON or
LOCK (OFF) position.
• A motor noise may be heard when the vehicle is at a stop or at a low
driving speed.
• If the Electronic Power Steering System does not operate normally,
the warning light will illuminate on
the instrument cluster. The steer-
ing wheel may become difficult to
control or operate abnormally.
Take your vehicle to an authorized
Kia dealer and have the vehicle
checked as soon as possible. (Continued)
STEERING WHEEL
Page 158 of 630
469
Features of your vehicle
FCC ID: NZLZTVHL3
IC: 4112A-ZTVHL3
This device complies with part 15
of the FCC Rules.
Operation is subject to the following
two conditions:
1. This device may not cause harmfulinterference, and
2. This device must accept any inter- ference received, including inter-
ference that may cause undesired
operation.
✽ ✽NOTICE
The transceiver has been tested and
complies with FCC and Industry
Canada rules. Changes or modifica-
tions not expressly approved by the
party responsible for compliance
could void the user's authority to
operate the device.
Electric chromic mirror (ECM)
with HomeLink®system, com-
pass (if equipped)
Your vehicle may be equipped with a
Gentex Automatic-Dimming Mirror
with a Z-Nav™ Electronic Compass
Display and an Integrated
HomeLink
®Wireless Control
System. During nighttime driving,
this feature will automatically detect
and reduce rearview mirror glare
while the compass indicates the
direction the vehicle is pointed. The
HomeLink
®Universal Transceiver
allows you to activate your garage
door(s), electric gate, home lighting,
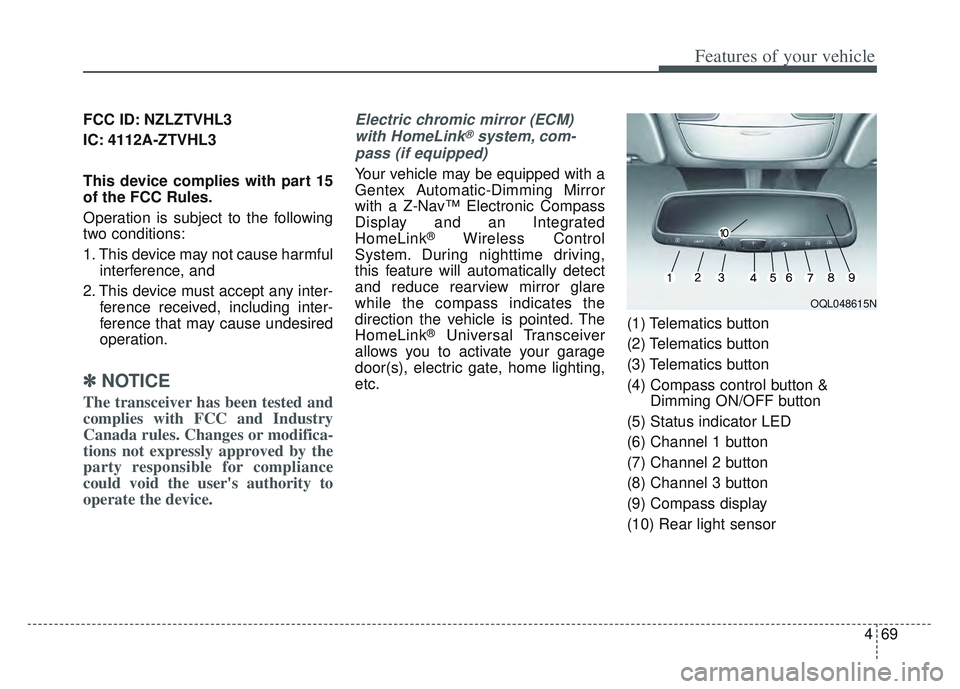
etc. (1) Telematics button
(2) Telematics button
(3) Telematics button
(4) Compass control button &
Dimming ON/OFF button
(5) Status indicator LED
(6) Channel 1 button
(7) Channel 2 button
(8) Channel 3 button
(9) Compass display
(10) Rear light sensor
OQL048615N
Page 162 of 630
473
Features of your vehicle
Programming HomeLink®
Please note the following:
When programming a garage dooropener, it is advised to park the
vehicle outside of the garage.
It is recommended that a new bat- tery be placed in the hand-held
transmitter of the device being pro-
grammed to HomeLink
®for quicker
training and accurate transmission
of the radio-frequency signal.
Some vehicles may require the ignition switch to be placed in the
ACC (or "Accessories") position for
programming and/or operation of
HomeLink
®.
In the event that there are still pro- gramming difficulties or questions
after following the programming
steps listed below, contact
HomeLink
®at: www.homelink.com
or by calling 1-800-355-3515.
Programming
To train most devices, follow these
instructions:
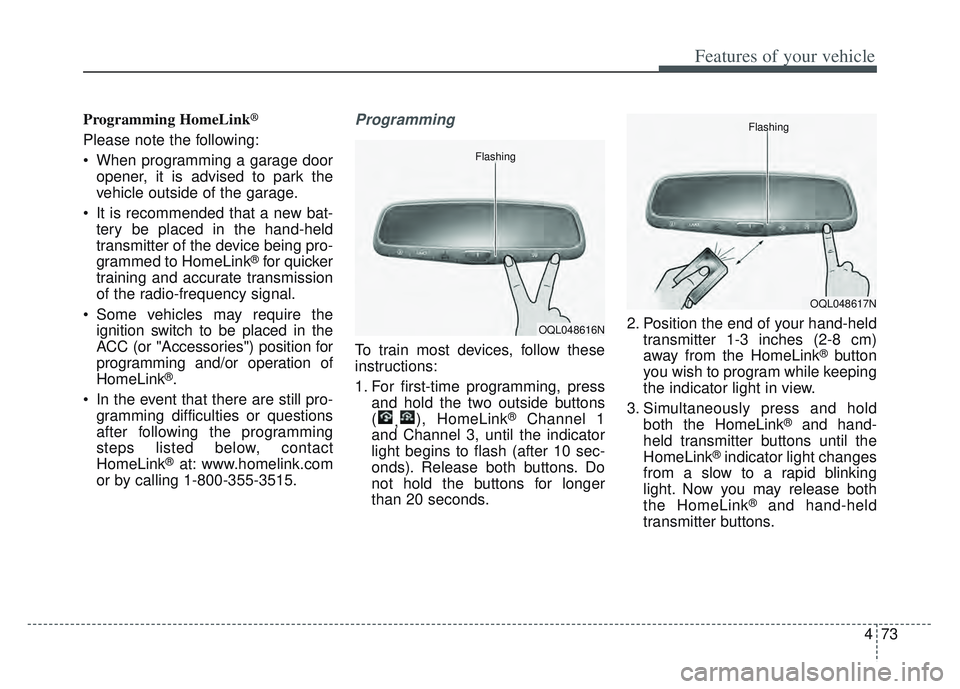
1. For first-time programming, press and hold the two outside buttons
( ,), HomeLink
®Channel 1
and Channel 3, until the indicator
light begins to flash (after 10 sec-
onds). Release both buttons. Do
not hold the buttons for longer
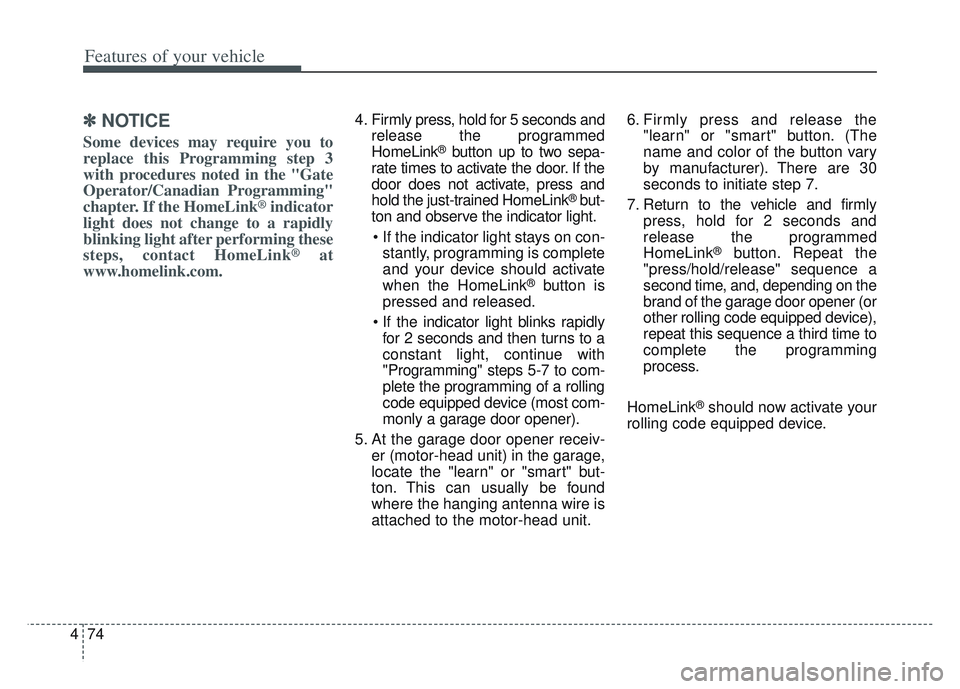
than 20 seconds. 2. Position the end of your hand-held
transmitter 1-3 inches (2-8 cm)
away from the HomeLink
®button
you wish to program while keeping
the indicator light in view.
3. Simultaneously press and hold both the HomeLink
®and hand-
held transmitter buttons until the
HomeLink
®indicator light changes
from a slow to a rapid blinking
light. Now you may release both
the HomeLink
®and hand-held
transmitter buttons.
OQL048616N
Flashing
OQL048617N
Flashing
Page 163 of 630
Features of your vehicle
74
4
✽ ✽
NOTICE
Some devices may require you to
replace this Programming step 3
with procedures noted in the "Gate
Operator/Canadian Programming"
chapter. If the HomeLink
®indicator
light does not change to a rapidly
blinking light after performing these
steps, contact HomeLink
®at
www.homelink.com.
4. Firmly press, hold for 5 seconds and
release the programmed
HomeLink
®button up to two sepa-
rate times to activate the door. If the
door does not activate, press and
hold the just-trained HomeLink
®but-
ton and observe the indicator light.
stantly, programming is complete
and your device should activate
when the HomeLink
®button is
pressed and released.
for 2 seconds and then turns to a
constant light, continue with
"Programming" steps 5-7 to com-
plete the programming of a rolling
code equipped device (most com-
monly a garage door opener).
5. At the garage door opener receiv- er (motor-head unit) in the garage,
locate the "learn" or "smart" but-
ton. This can usually be found
where the hanging antenna wire is
attached to the motor-head unit. 6. Firmly press and release the
"learn" or "smart" button. (The
name and color of the button vary
by manufacturer). There are 30
seconds to initiate step 7.
7. Return to the vehicle and firmly press, hold for 2 seconds and
release the programmed
HomeLink
®button. Repeat the
"press/hold/release" sequence a
second time, and, depending on the
brand of the garage door opener (or
other rolling code equipped device),
repeat this sequence a third time to
complete the programming
process.
HomeLink
®should now activate your
rolling code equipped device.
Page 165 of 630
Features of your vehicle
76
4
Erasing HomeLink®buttons
Individual buttons cannot be erased.
However, to erase all three pro-
grammed buttons:
1. Press and hold the two outer
HomeLink
®buttons until the indi-
cator light begins to flash after 10
seconds.
2. Release both buttons. Do not hold for longer than 20 seconds.
The Integrated HomeLink
®Wireless
Control System is now in the training
(learn) mode and can be pro-
grammed at any time following the
appropriate steps in the
Programming chapters above.
NVS
®is a registered trademark and
Z-Nav™ is a trademark of the Gentex
Corporation, Zeeland, Michigan.
HomeLink
®is a registered trademark
owned by Johnson Controls,
Incorporated, Milwaukee, Wisconsin. FCC ID: NZLZTVHL3
IC: 4112A-ZTVHL3
This device complies with part 15
of the FCC Rules.
Operation is subject to the following
two conditions:
1. This device may not cause harmful
interference, and
2. This device must accept any inter- ference received, including inter-
ference that may cause undesired
operation.
✽ ✽NOTICE
The transceiver has been tested and
complies with FCC and Industry
Canada rules. Changes or modifica-
tions not expressly approved by the
party responsible for compliance
could void the user's authority to
operate the device.
Outside rearview mirror
Be sure to adjust the mirror angles
before driving.
Your vehicle is equipped with both
left-hand and right-hand outside
rearview mirrors. The mirrors can be
adjusted remotely with the remote
switch. The mirror heads can be fold-
ed back to prevent damage during an
automatic vehicle wash or when
passing through a narrow street.
The right outside rearview mirror is
convex. Objects seen in the mirror
are closer than they appear.
Use your interior rearview mirror or
direct observation to determine the
actual distance of following vehicles
when changing lanes.
Page 177 of 630
Features of your vehicle
88
4
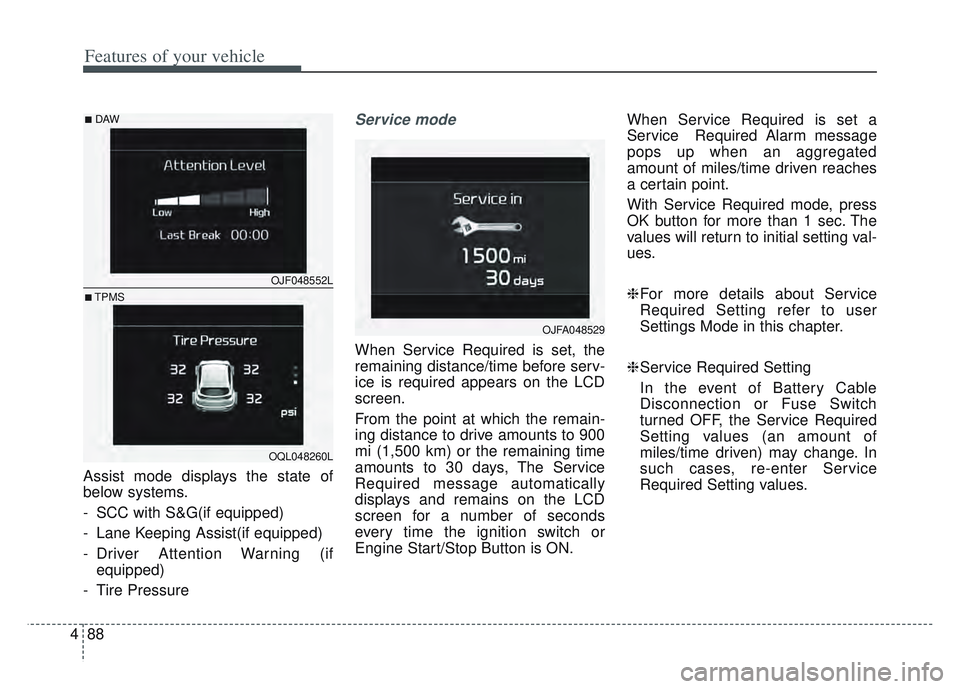
Assist mode displays the state of
below systems.
- SCC with S&G(if equipped)
- Lane Keeping Assist(if equipped)
- Driver Attention Warning (if
equipped)
- Tire Pressure
Service mode
When Service Required is set, the
remaining distance/time before serv-
ice is required appears on the LCD
screen.
From the point at which the remain-
ing distance to drive amounts to 900
mi (1,500 km) or the remaining time
amounts to 30 days, The Service
Required message automatically
displays and remains on the LCD
screen for a number of seconds
every time the ignition switch or
Engine Start/Stop Button is ON. When Service Required is set a
Service Required Alarm message
pops up when an aggregated
amount of miles/time driven reaches
a certain point.
With Service Required mode, press
OK button for more than 1 sec. The
values will return to initial setting val-
ues.
❈
For more details about Service
Required Setting refer to user
Settings Mode in this chapter.
❈ Service Required Setting
In the event of Battery Cable
Disconnection or Fuse Switch
turned OFF, the Service Required
Setting values (an amount of
miles/time driven) may change. In
such cases, re-enter Service
Required Setting values.
OJFA048529
OJF048552L
OQL048260L
■DAW
■TPMS
Page 179 of 630
Features of your vehicle
90
4
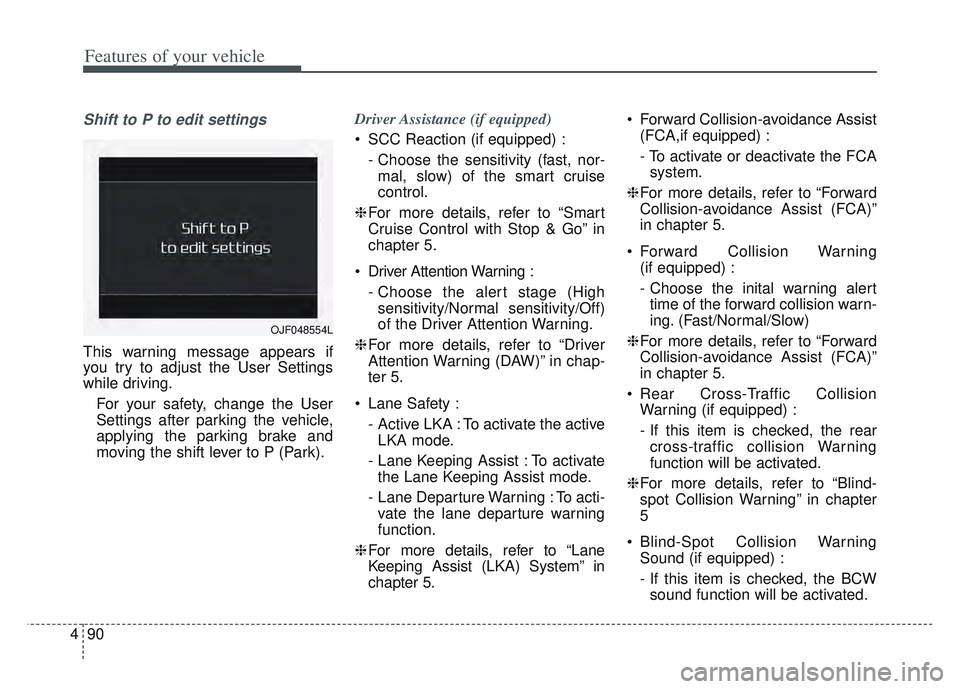
Shift to P to edit settings
This warning message appears if
you try to adjust the User Settings
while driving.
For your safety, change the User
Settings after parking the vehicle,
applying the parking brake and
moving the shift lever to P (Park). Driver Assistance (if equipped)
SCC Reaction (if equipped) :
- Choose the sensitivity (fast, nor-mal, slow) of the smart cruise
control.
❈ For more details, refer to “Smart
Cruise Control with Stop & Go” in
chapter 5.
Driver Attention Warning : - Choose the alert stage (Highsensitivity/Normal sensitivity/Off)
of the Driver Attention Warning.
❈ For more details, refer to “Driver
Attention Warning (DAW)” in chap-
ter 5.
Lane Safety : - Active LKA : To activate the activeLKA mode.
- Lane Keeping Assist : To activate the Lane Keeping Assist mode.
- Lane Departure Warning : To acti- vate the lane departure warning
function.
❈ For more details, refer to “Lane
Keeping Assist (LKA) System” in
chapter 5. Forward Collision-avoidance Assist
(FCA,if equipped) :
- To activate or deactivate the FCAsystem.
❈ For more details, refer to “Forward
Collision-avoidance Assist (FCA)”
in chapter 5.
Forward Collision Warning (if equipped) :
- Choose the inital warning alerttime of the forward collision warn-
ing. (Fast/Normal/Slow)
❈ For more details, refer to “Forward
Collision-avoidance Assist (FCA)”
in chapter 5.
Rear Cross-Traffic Collision Warning (if equipped) :
- If this item is checked, the rearcross-traffic collision Warning
function will be activated.
❈ For more details, refer to “Blind-
spot Collision Warning” in chapter
5
Blind-Spot Collision Warning Sound (if equipped) :
- If this item is checked, the BCWsound function will be activated.
OJF048554L