check KIA STINGER 2018 Owners Manual
[x] Cancel search | Manufacturer: KIA, Model Year: 2018, Model line: STINGER, Model: KIA STINGER 2018Pages: 551, PDF Size: 13.75 MB
Page 410 of 551
What to do in an emergency
10
6
✽ ✽
NOTICE
If the TPMS, Low Tire Pressure
indicator does not illuminate for 3
seconds when the Engine Start/Stop
button is turned to the ON, or
engine is running, or if they remain
illuminated after coming on for
approximately 3 seconds, take your
vehicle to your nearest authorized
Kia dealer and have the system
checked.
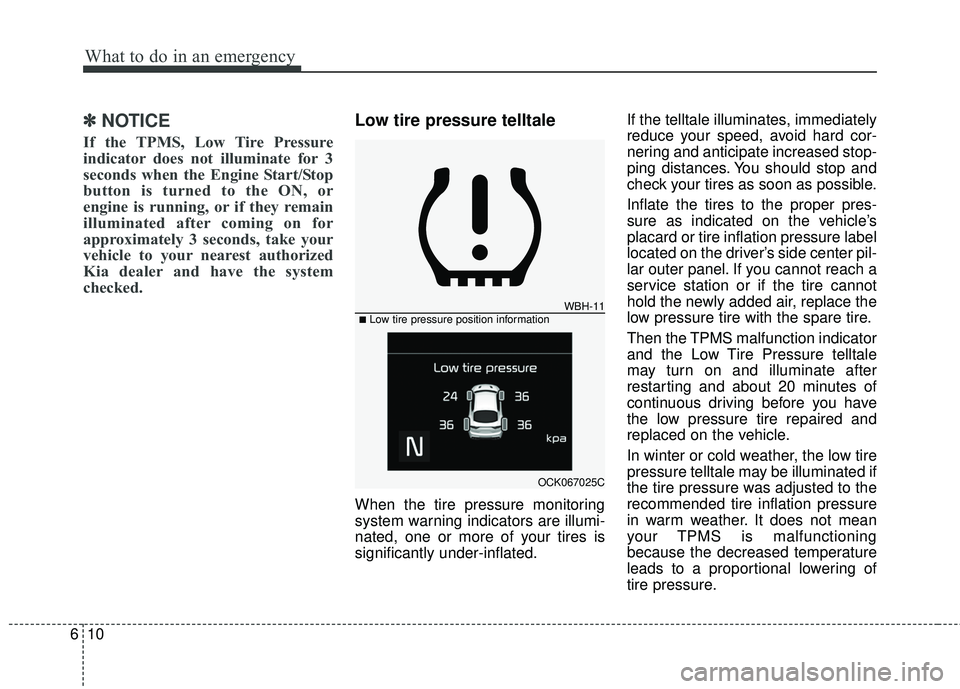
Low tire pressure telltale
When the tire pressure monitoring
system warning indicators are illumi-
nated, one or more of your tires is
significantly under-inflated. If the telltale illuminates, immediately
reduce your speed, avoid hard cor-
nering and anticipate increased stop-
ping distances. You should stop and
check your tires as soon as possible.
Inflate the tires to the proper pres-
sure as indicated on the vehicle’s
placard or tire inflation pressure label
located on the driver’s side center pil-
lar outer panel. If you cannot reach a
service station or if the tire cannot
hold the newly added air, replace the
low pressure tire with the spare tire.
Then the TPMS malfunction indicator
and the Low Tire Pressure telltale
may turn on and illuminate after
restarting and about 20 minutes of
continuous driving before you have
the low pressure tire repaired and
replaced on the vehicle.
In winter or cold weather, the low tire
pressure telltale may be illuminated if
the tire pressure was adjusted to the
recommended tire inflation pressure
in warm weather. It does not mean
your TPMS is malfunctioning
because the decreased temperature
leads to a proportional lowering of
tire pressure.
WBH-11
OCK067025C
■Low tire pressure position information
Page 411 of 551
611
What to do in an emergency
When you drive your vehicle from a
warm area to a cold area or from a
cold area to a warm area, or the out-
side temperature is greatly higher or
lower, you should check the tire infla-
tion pressure and adjust the tires to
the recommended tire inflation pres-
sure.
When filling tires with more air, con-
ditions to turn off the low tire pres-
sure telltale may not be met. This is
because a tire inflator has a margin
of error in performance. The low tire
pressure telltale will be turned off if
the tire pressure is above the recom-
mended tire inflation pressure.TPMS (Tire PressureMonitoring System)malfunction indicator
The low tire pressure telltale will illu-
minate after it blinks for approximate-
ly one minute when there is a prob-
lem with the Tire Pressure
Monitoring System. If the system is
able to correctly detect an underinfla-
tion warning at the same time as sys-
tem failure then it will illuminate both
the TPMS malfunction and low tire
pressure position telltales e.g. if
Front Left sensor fails, the TPMS
malfunction indicator illuminates, but
if the Front Right, Rear Left, or Rear
Right tire is under-inflated, the low
tire pressure position telltales may
illuminate together with the TPMS
malfunction indicator.
Have the system checked by an
authorized Kia dealer as soon as
possible to determine the cause of
the problem. The TPMS malfunction indicator
may be illuminated if the vehicle is
moving around electric power sup-
ply cables or radios transmitters
such as at police stations, govern-
ment and public offices, broadcast-
ing stations, military installations,
airports, or transmitting towers,
etc. This can interfere with normal
operation of the Tire Pressure
Monitoring System (TPMS).
The TPMS malfunction indicator may be illuminated if snow chains
are used or some separate elec-
tronic devices such as notebook
computer, mobile charger, remote
starter or navigation etc., are used
in the vehicle. This can interfere
with normal operation of the Tire
Pressure Monitoring System
(TPMS).
WARNING- Low pressure
damage
Do not drive on low pressure
tires. Significantly low tire pres-
sure can cause the tires to over-
heat and fail making the vehicle
unstable resulting in increased
braking distances and a loss of
vehicle control.
Page 419 of 551
619
What to do in an emergency
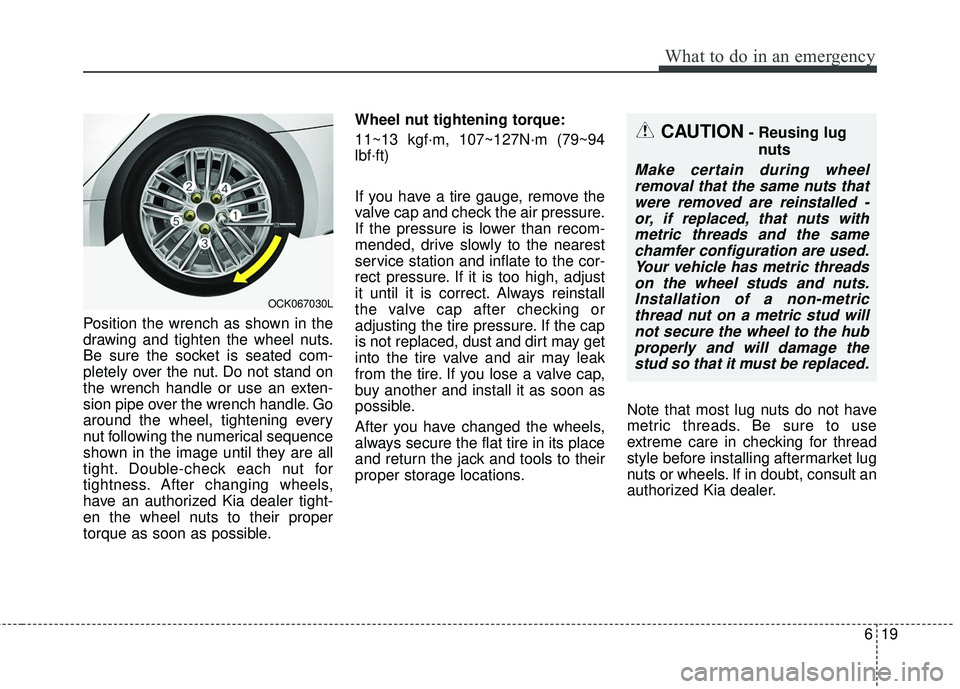
Position the wrench as shown in the
drawing and tighten the wheel nuts.
Be sure the socket is seated com-
pletely over the nut. Do not stand on
the wrench handle or use an exten-
sion pipe over the wrench handle. Go
around the wheel, tightening every
nut following the numerical sequence
shown in the image until they are all
tight. Double-check each nut for
tightness. After changing wheels,
have an authorized Kia dealer tight-
en the wheel nuts to their proper
torque as soon as possible.Wheel nut tightening torque:
11~13 kgf·m, 107~127N·m (79~94
lbf·ft)
If you have a tire gauge, remove the
valve cap and check the air pressure.
If the pressure is lower than recom-
mended, drive slowly to the nearest
service station and inflate to the cor-
rect pressure. If it is too high, adjust
it until it is correct. Always reinstall
the valve cap after checking or
adjusting the tire pressure. If the cap
is not replaced, dust and dirt may get
into the tire valve and air may leak
from the tire. If you lose a valve cap,
buy another and install it as soon as
possible.
After you have changed the wheels,
always secure the flat tire in its place
and return the jack and tools to their
proper storage locations.
Note that most lug nuts do not have
metric threads. Be sure to use
extreme care in checking for thread
style before installing aftermarket lug
nuts or wheels. If in doubt, consult an
authorized Kia dealer.
CAUTION- Reusing lug
nuts
Make certain during wheelremoval that the same nuts thatwere removed are reinstalled -or, if replaced, that nuts withmetric threads and the samechamfer configuration are used.Your vehicle has metric threadson the wheel studs and nuts.Installation of a non-metricthread nut on a metric stud willnot secure the wheel to the hubproperly and will damage thestud so that it must be replaced.
OCK067030L
Page 420 of 551
What to do in an emergency
20
6
To prevent the jack, wheel lug nut
wrench and spare tire from rattling
while the vehicle is in motion, store
them properly.
Check the inflation pressures as
soon as possible after installing the
spare tire. Adjust it to the specified
pressure, if necessary. Refer to
“Tires and wheels” in section 7.
Important - use of compact spare
tire
Your vehicle is equipped with a com-
pact spare tire. This compact spare
tire takes up less space than a regu-
lar-size tire. This tire is smaller than a
conventional tire and is designed for
temporary use only.
You should drive carefully when the compact spare is in use. The
compact spare should be replaced
by the proper conventional tire and
rim at the first opportunity.
The operation of this vehicle is not recommended with more than one
compact spare tire in use at the
same time. The compact spare should be inflat-
ed to 420 kPa (60 psi).
✽ ✽
NOTICE
Check the inflation pressure after
installing the spare tire. Adjust it to
the specified pressure, as necessary.
WARNING- Spare tire
The compact spare tire is for
emergency use only. Do not
operate your vehicle on this
compact spare at speeds over
80 km/h (50 mph). The original
tire should be repaired or
replaced as soon as possible to
avoid failure of the spare possi-
bly leading to personal injury or
death.WARNING- Wheel studs
If the studs are damaged, they
may lose their ability to retain
the wheel. This could lead to the
loss of the wheel and a collision
resulting in serious injuries.
Page 423 of 551
623
What to do in an emergency
TOWING
Towing service
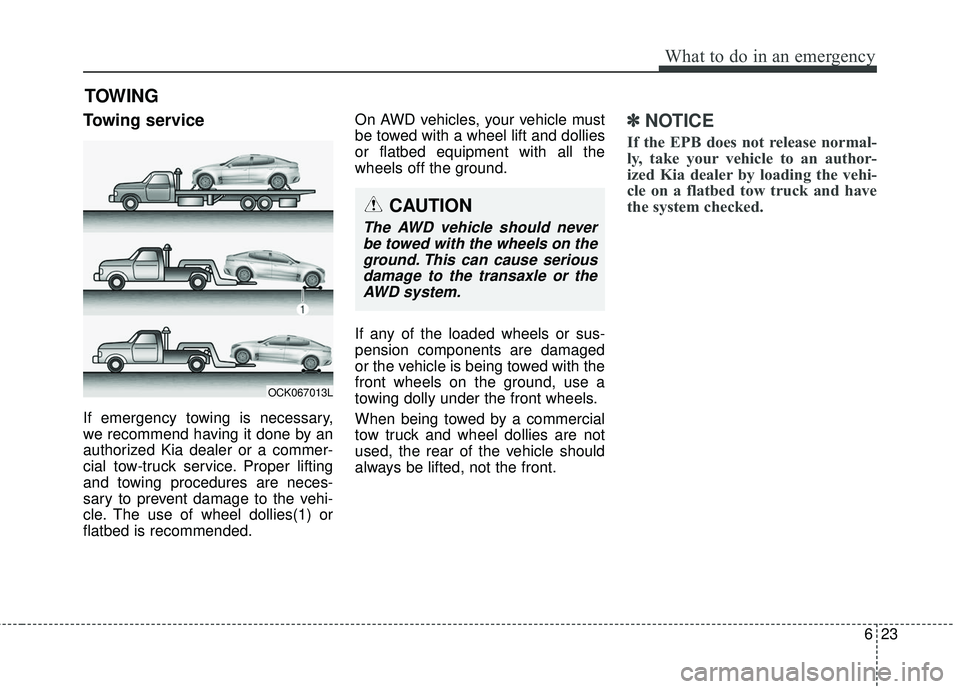
If emergency towing is necessary,
we recommend having it done by an
authorized Kia dealer or a commer-
cial tow-truck service. Proper lifting
and towing procedures are neces-
sary to prevent damage to the vehi-
cle. The use of wheel dollies(1) or
flatbed is recommended.On AWD vehicles, your vehicle must
be towed with a wheel lift and dollies
or flatbed equipment with all the
wheels off the ground.
If any of the loaded wheels or sus-
pension components are damaged
or the vehicle is being towed with the
front wheels on the ground, use a
towing dolly under the front wheels.
When being towed by a commercial
tow truck and wheel dollies are not
used, the rear of the vehicle should
always be lifted, not the front.
✽ ✽
NOTICE
If the EPB does not release normal-
ly, take your vehicle to an author-
ized Kia dealer by loading the vehi-
cle on a flatbed tow truck and have
the system checked.
OCK067013L
CAUTION
The AWD vehicle should never
be towed with the wheels on theground. This can cause seriousdamage to the transaxle or theAWD system.
Page 426 of 551
What to do in an emergency
26
6
If towing service is not available in an
emergency, your vehicle may be
temporarily towed using a cable or
chain secured to the emergency tow-
ing hook under the front (or rear) of
the vehicle. Use extreme caution
when towing the vehicle. A driver
must be in the vehicle to steer it and
operate the brakes.
Towing in this manner may be done
only on hard-surfaced roads for a
short distance and at low speed.
Also, the wheels, axles, power train,
steering and brakes must all be in
good condition.
Do not use the tow hooks to pull a
vehicle out of mud, sand or other
conditions from which the vehicle
cannot be driven out under its own
power.
Avoid towing a vehicle heavier than the vehicle doing the towing.
The drivers of both vehicles should communicate with each other fre-
quently. Attach a towing strap to the tow
hook.
Use only a cable or chain specifical- ly intended for use in towing vehi-
cles. Securely fasten the cable or
chain to the towing hook provided.
Before emergency towing, check if the hook is not broken or damaged.
Fasten the towing cable or chain securely to the hook.
Do not jerk the hook. Apply it steadily and with even force.
To avoid damaging the hook, do not pull from the side or at a vertical
angle. Always pull straight ahead.CAUTION
Using a portion of the vehicleother than the tow hooks fortowing may damage the body ofyour vehicle.
Page 428 of 551
What to do in an emergency
28
6
If the car is being towed with all
four wheels on the ground, it can
be towed only from the front. Be
sure that the transaxle is in neutral.
Be sure the steering is unlocked by
placing the Engine Start/Stop but-
ton to ACC position. A driver must
be in the towed vehicle to operate
the steering and brakes.
CAUTION- Automatic
transaxle
To avoid serious damage to the automatic transaxle, limitthe vehicle speed to 15 km/h(10 mph) and drive less than1.5 km (1 mile) when towing.
Before towing, check the auto- matic transaxle for fluid leaksunder your vehicle. If the auto-matic transaxle fluid is leak-ing, flatbed equipment or atowing dolly must be used.
Page 429 of 551
Maintenance
Engine compartment . . . . . . . . . . . . . . . . . . . . . . . . 7-3
Maintenance services . . . . . . . . . . . . . . . . . . . . . . . . 7-4
• Owner’s responsibility . . . . . . . . . . . . . . . . . . . . . . . . . 7-4
• Owner maintenance precautions . . . . . . . . . . . . . . . . . 7-5
Owner maintenance . . . . . . . . . . . . . . . . . . . . . . . . . 7-7
• Owner maintenance schedule. . . . . . . . . . . . . . . . . . . . 7-7
Scheduled maintenance service. . . . . . . . . . . . . . . . 7-9
Explanation of scheduled maintenance items . . . 7-16
Checking fluid levels . . . . . . . . . . . . . . . . . . . . . . . 7-19
Engine oil. . . . . . . . . . . . . . . . . . . . . . . . . . . . . . . . . 7-20
• Checking the engine oil level . . . . . . . . . . . . . . . . . . . 7-20
• Changing the engine oil and filter . . . . . . . . . . . . . . . 7-21
Engine coolant . . . . . . . . . . . . . . . . . . . . . . . . . . . . 7-22
• Checking the coolant level . . . . . . . . . . . . . . . . . . . . . 7-22
• Changing the coolant . . . . . . . . . . . . . . . . . . . . . . . . . 7-25
Brake fluid . . . . . . . . . . . . . . . . . . . . . . . . . . . . . . . 7-26
• Checking the brake fluid level . . . . . . . . . . . . . . . . . . 7-26
Washer fluid . . . . . . . . . . . . . . . . . . . . . . . . . . . . . . 7-27
• Checking the washer fluid level . . . . . . . . . . . . . . . . . 7-27
Parking brake . . . . . . . . . . . . . . . . . . . . . . . . . . . . . 7-28
• Checking the parking brake. . . . . . . . . . . . . . . . . . . . 7-28
Air cleaner. . . . . . . . . . . . . . . . . . . . . . . . . . . . . . . . 7-29
• Filter replacement . . . . . . . . . . . . . . . . . . . . . . . . . . . . 7-29
Climate control air filter . . . . . . . . . . . . . . . . . . . . 7-30
• Filter inspection . . . . . . . . . . . . . . . . . . . . . . . . . . . . . . 7-30
Wiper blades . . . . . . . . . . . . . . . . . . . . . . . . . . . . . . 7-32
• Blade inspection . . . . . . . . . . . . . . . . . . . . . . . . . . . . . . 7-32
• Blade replacement . . . . . . . . . . . . . . . . . . . . . . . . . . . . 7-32
Battery . . . . . . . . . . . . . . . . . . . . . . . . . . . . . . . . . . . 7-\
35
• Battery replacement . . . . . . . . . . . . . . . . . . . . . . . . . . 7-35
• For best battery service . . . . . . . . . . . . . . . . . . . . . . . 7-35
• Recharging the battery . . . . . . . . . . . . . . . . . . . . . . . . 7-37
• Reset items . . . . . . . . . . . . . . . . . . . . . . . . . . . . . . . . . . 7-38\
Tires and wheels . . . . . . . . . . . . . . . . . . . . . . . . . . . 7-39
• Tire care . . . . . . . . . . . . . . . . . . . . . . . . . . . . . . . . . . . . \
7-39
• Recommended cold tire inflation pressures . . . . . . . 7-39
• Tire pressure . . . . . . . . . . . . . . . . . . . . . . . . . . . . . . . . 7-40
• Checking tire inflation pressure. . . . . . . . . . . . . . . . . 7-40
• Tire rotation . . . . . . . . . . . . . . . . . . . . . . . . . . . . . . . . . 7-41
• Wheel alignment and tire balance . . . . . . . . . . . . . . . 7-42
• Tire replacement . . . . . . . . . . . . . . . . . . . . . . . . . . . . . 7-43
• Wheel replacement . . . . . . . . . . . . . . . . . . . . . . . . . . . 7-44
• Tire traction . . . . . . . . . . . . . . . . . . . . . . . . . . . . . . . . . 7-44
• Tire maintenance . . . . . . . . . . . . . . . . . . . . . . . . . . . . 7-44
• Tire sidewall labeling . . . . . . . . . . . . . . . . . . . . . . . . . 7-44
• All season tires . . . . . . . . . . . . . . . . . . . . . . . . . . . . . . 7-51
• Summer tires . . . . . . . . . . . . . . . . . . . . . . . . . . . . . . . . 7-51
• Snow tires . . . . . . . . . . . . . . . . . . . . . . . . . . . . . . . . . . . 7-\
51
7
Page 435 of 551
77
Maintenance
OWNER MAINTENANCE
The following lists are vehicle checks
and inspections that should be per-
formed by the owner or an author-
ized Kia dealer at the frequencies
indicated to help ensure safe,
dependable operation of your vehi-
cle.
Any adverse conditions should be
brought to the attention of your deal-
er as soon as possible.
These Owner Maintenance Checks
are generally not covered by war-
ranties and you may be charged for
labor, parts and lubricants used.Owner maintenance schedule
When you stop for fuel:
Check the engine oil level.
Check the coolant level in coolantreservoir.
Check the windshield washer fluid level.
Look for low or under-inflated tires.
While operating your vehicle:
Note any changes in the sound of the exhaust or any smell of
exhaust fumes in the vehicle.
Check for vibrations in the steering wheel. Notice any increased steer-
ing effort or looseness in the steer-
ing wheel, or change in its straight-
ahead position.
Notice if your vehicle constantly turns slightly or “pulls” to one side
when traveling on smooth, level
road.
When stopping, listen and check for unusual sounds, pulling to one
side, increased brake pedal travel
or “hard-to-push” brake pedal.
If any slipping or changes in the operation of your transaxle occurs,
check the transaxle fluid level.
Check the automatic transaxle P (Park) function.
Check the parking brake.
Check for fluid leaks under your vehicle (water dripping from the air
conditioning system during or after
use is normal).
WARNING- Hot coolant
Be careful when checking your
engine coolant level when the
engine is hot. Scalding hot
coolant and steam may blow
out under pressure.
Page 436 of 551
Maintenance
87
At least monthly:
Check the coolant level in theengine coolant reservoir.
Check the operation of all exterior lights, including the stoplights, turn
signals and hazard warning flash-
ers.
Check the inflation pressures of all tires including the spare.
At least twice a year
(i.e., every Spring and Fall) :
Check the radiator, heater and air conditioning hoses for leaks or
damage.
Check the windshield washer spray and wiper operation. Clean
the wiper blades with clean cloth
dampened with washer fluid.
Check the headlight alignment.
Check the muffler, exhaust pipes, shields and clamps.
Check the lap/shoulder belts for wear and function.
Check for worn tires and loose wheel lug nuts.
At least once a year :
Clean the body and door drainholes.
Lubricate the door hinges and check the hood hinges.
Lubricate the door and hood locks and latches.
Lubricate the door rubber weather- strips.
Check the air conditioning system.
Inspect and lubricate automatic transaxle linkage and controls.
Clean the battery and terminals.
Check the brake fluid level.