child lock KIA STINGER 2018 Owners Manual
[x] Cancel search | Manufacturer: KIA, Model Year: 2018, Model line: STINGER, Model: KIA STINGER 2018Pages: 551, PDF Size: 13.75 MB
Page 58 of 551
Safety features of your vehicle
42
3
3. Check that the child restraint is
securely attached to the seat by
pushing and pulling the seat for-
ward and from side-to-side.
Securing a child restraint with a
lap/shoulder belt
When not using the LATCH system,
all child restraints must be secured to
a vehicle rear seat with the lap part
of a lap/shoulder belt.
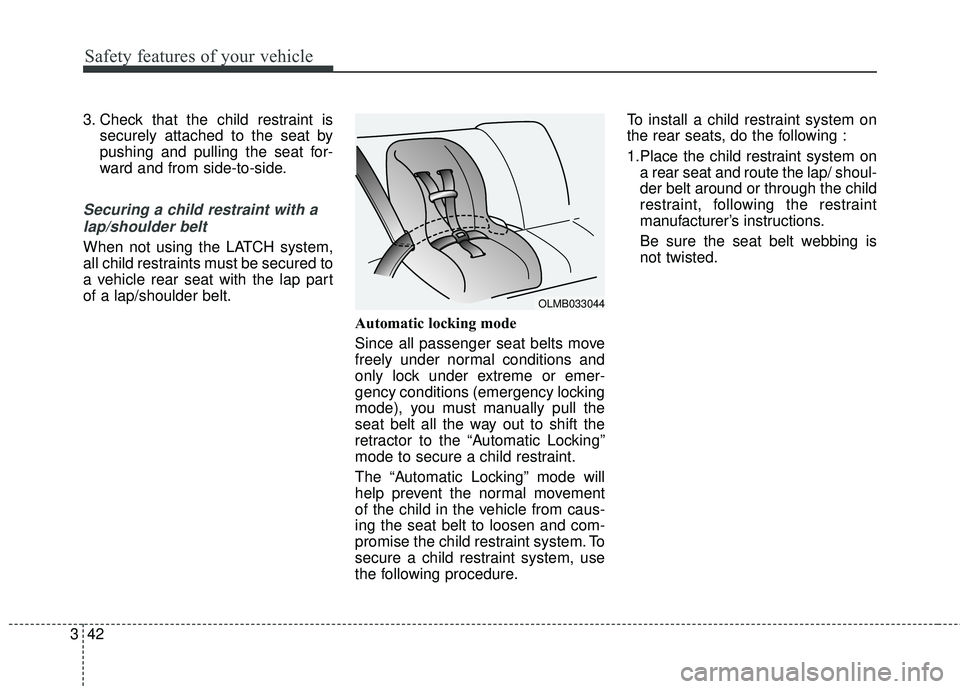
Automatic locking mode
Since all passenger seat belts move
freely under normal conditions and
only lock under extreme or emer-
gency conditions (emergency locking
mode), you must manually pull the
seat belt all the way out to shift the
retractor to the “Automatic Locking”
mode to secure a child restraint.
The “Automatic Locking” mode will
help prevent the normal movement
of the child in the vehicle from caus-
ing the seat belt to loosen and com-
promise the child restraint system. To
secure a child restraint system, use
the following procedure.To install a child restraint system on
the rear seats, do the following :
1.Place the child restraint system on
a rear seat and route the lap/ shoul-
der belt around or through the child
restraint, following the restraint
manufacturer’s instructions.
Be sure the seat belt webbing is
not twisted.
OLMB033044
Page 59 of 551
343
Safety features of your vehicle
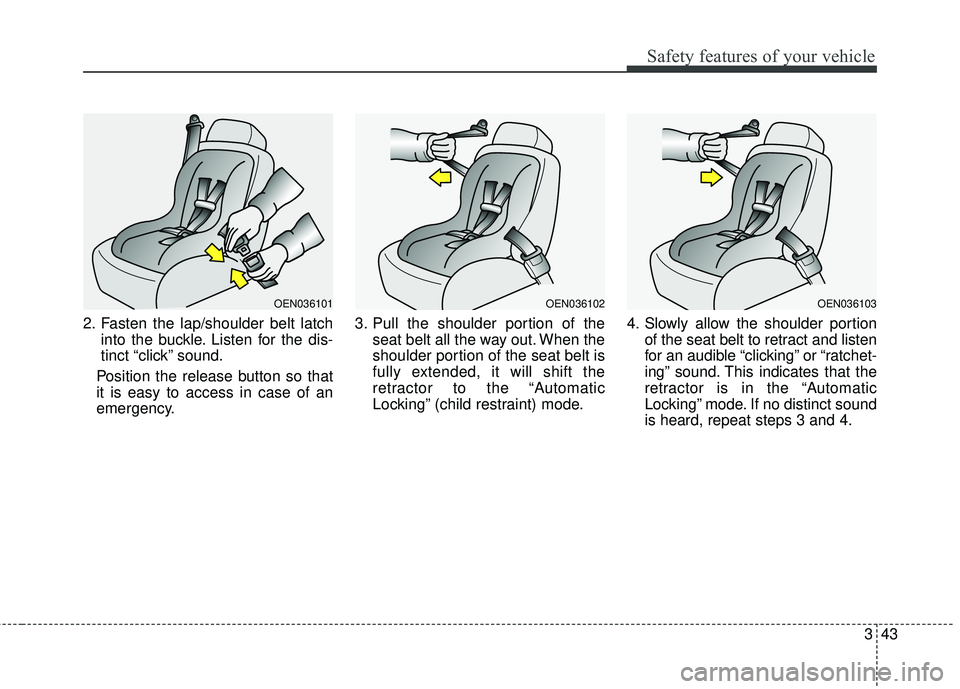
2. Fasten the lap/shoulder belt latchinto the buckle. Listen for the dis-
tinct “click” sound.
Position the release button so that
it is easy to access in case of an
emergency. 3. Pull the shoulder portion of the
seat belt all the way out. When the
shoulder portion of the seat belt is
fully extended, it will shift the
retractor to the “Automatic
Locking” (child restraint) mode. 4. Slowly allow the shoulder portion
of the seat belt to retract and listen
for an audible “clicking” or “ratchet-
ing” sound. This indicates that the
retractor is in the “Automatic
Locking” mode. If no distinct sound
is heard, repeat steps 3 and 4.
OEN036101OEN036102OEN036103
Page 60 of 551
Safety features of your vehicle
44
3
5. Remove as much slack from the
belt as possible by pushing down
on the child restraint system while
feeding the shoulder belt back into
the retractor.
6. Push and pull on the child restraint system to confirm that the seat
belt is holding it firmly in place. If it
is not, release the seat belt and
repeat steps 2 through 6.
7. Double check that the retractor is in the “Automatic Locking” mode
by attempting to pull more of the
seat belt out of the retractor. If you
cannot, the retractor is in the
“Automatic Locking” mode.
If your CRS manufacturer instructs or
recommends you to use a tether
anchor with the lap/shoulder belt,
refer to the previous pages for more
information.✽ ✽ NOTICE
When the seat belt is allowed to
retract to its fully stowed position,
the retractor will automatically
switch from the “Automatic
Locking” mode to the emergency
lock mode for normal adult usage.
To remove the child restraint, press
the release button on the buckle and
then pull the lap/shoulder belt out of
the restraint and allow the seat belt
to retract fully.
WARNING - Auto lock
mode
Set the retractor to Automatic
Lock mode when installing any
child restraint system. If the
retractor is not in the Automatic
Locking mode, the child restraint
can move when your vehicle
turns or stops suddenly.
Page 88 of 551
Features of your vehicle
Smart key . . . . . . . . . . . . . . . . . . . . . . . . . . . . . . . . . 4-5
• Record your key number . . . . . . . . . . . . . . . . . . . . . . . 4-5
• Smart key functions . . . . . . . . . . . . . . . . . . . . . . . . . . . 4-5
• Remote keyless entry system operations . . . . . . . . . . . 4-8
• Transmitter precautions . . . . . . . . . . . . . . . . . . . . . . . 4-10
• This device complies with Industry Canada licence-exempt RSS standard (s) . . . . . . . . 4-10
• Battery replacement . . . . . . . . . . . . . . . . . . . . . . . . . . 4-11
• Mechanical key operations . . . . . . . . . . . . . . . . . . . . . 4-11
• Immobilizer system . . . . . . . . . . . . . . . . . . . . . . . . . . . 4-12
Theft-alarm system . . . . . . . . . . . . . . . . . . . . . . . . 4-14
• Armed stage . . . . . . . . . . . . . . . . . . . . . . . . . . . . . . . . . 4-14
• Theft-alarm stage . . . . . . . . . . . . . . . . . . . . . . . . . . . . 4-15
• Disarmed stage. . . . . . . . . . . . . . . . . . . . . . . . . . . . . . . 4-15
Door locks . . . . . . . . . . . . . . . . . . . . . . . . . . . . . . . . 4-16
• Operating door locks from outside the vehicle . . . . 4-16
• Operating door locks from inside the vehicle . . . . . . 4-17
• Door lock/unlock features. . . . . . . . . . . . . . . . . . . . . . 4-19
• Child-protector rear door lock. . . . . . . . . . . . . . . . . . 4-19
Liftgate . . . . . . . . . . . . . . . . . . . . . . . . . . . . . . . . . . 4-21\
• Non-Powered liftgate. . . . . . . . . . . . . . . . . . . . . . . . . . 4-21
• Power liftgate . . . . . . . . . . . . . . . . . . . . . . . . . . . . . . . . 4-23
• Emergency liftgate safety release. . . . . . . . . . . . . . . . 4-28
Smart liftgate . . . . . . . . . . . . . . . . . . . . . . . . . . . . . 4-30
Windows . . . . . . . . . . . . . . . . . . . . . . . . . . . . . . . . . 4-34
• Power windows . . . . . . . . . . . . . . . . . . . . . . . . . . . . . . 4-35
Hood. . . . . . . . . . . . . . . . . . . . . . . . . . . . . . . . . . . . \
. 4-39
• Opening the hood . . . . . . . . . . . . . . . . . . . . . . . . . . . . 4-39
• Closing the hood . . . . . . . . . . . . . . . . . . . . . . . . . . . . . 4-40
Fuel filler lid . . . . . . . . . . . . . . . . . . . . . . . . . . . . . . 4-41
• Opening the fuel filler lid . . . . . . . . . . . . . . . . . . . . . . 4-41
• Closing the fuel filler lid . . . . . . . . . . . . . . . . . . . . . . . 4-41
• Emergency fuel filler lid release . . . . . . . . . . . . . . . . 4-42
Wide sunroof. . . . . . . . . . . . . . . . . . . . . . . . . . . . . . 4-45
• Sunroof open warning. . . . . . . . . . . . . . . . . . . . . . . . . 4-46
• Sunshade . . . . . . . . . . . . . . . . . . . . . . . . . . . . . . . . . . . 4-\
47
• Sliding the sunroof . . . . . . . . . . . . . . . . . . . . . . . . . . . 4-47
• Tilting the sunroof . . . . . . . . . . . . . . . . . . . . . . . . . . . . 4-49
• Closing the sunroof . . . . . . . . . . . . . . . . . . . . . . . . . . . 4-49
• Resetting the sunroof . . . . . . . . . . . . . . . . . . . . . . . . . 4-50
Steering wheel . . . . . . . . . . . . . . . . . . . . . . . . . . . . . 4-51
• Electric Power Steering (EPS) . . . . . . . . . . . . . . . . . . 4-51
• Tilt and telescopic steering . . . . . . . . . . . . . . . . . . . . . 4-52
• Heated steering wheel . . . . . . . . . . . . . . . . . . . . . . . . . 4-53
• Horn . . . . . . . . . . . . . . . . . . . . . . . . . . . . . . . . . . . . \
. . . 4-54
4
Page 92 of 551
45
Features of your vehicle
Record your key number
The key code num-
ber is stamped on
the key code tag
attached to the key
set. Should you
lose your keys, this number will
enable an authorized Kia dealer to
duplicate the keys easily.
Remove the key code tag and store it
in a safe place. Also, record the key
code number and keep it in a safe
and handy place, but not in the vehi-
cle.
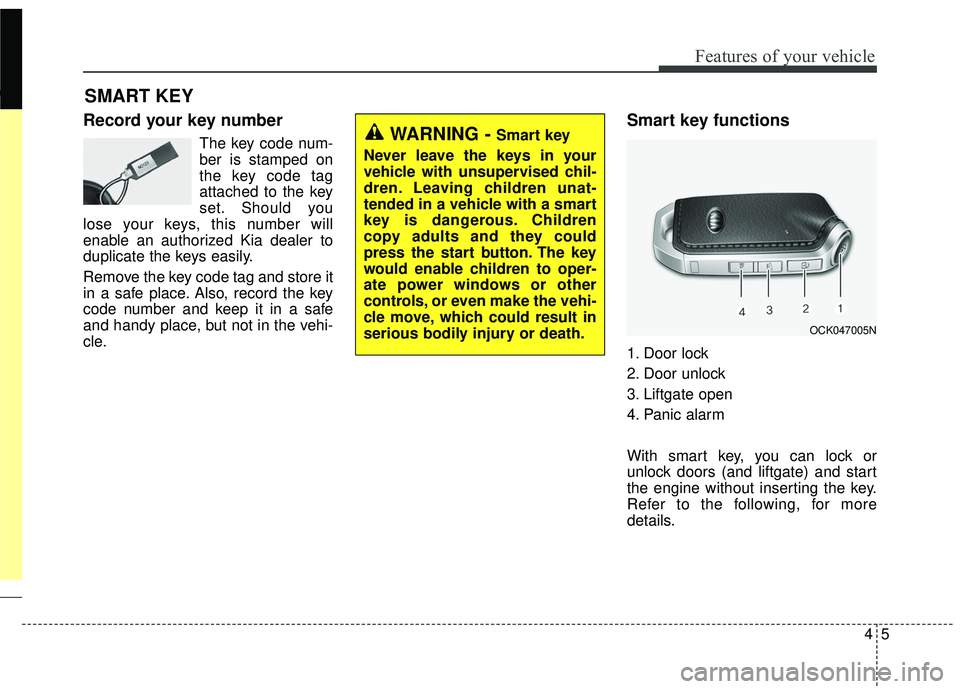
Smart key functions
1. Door lock
2. Door unlock
3. Liftgate open
4. Panic alarm
With smart key, you can lock or
unlock doors (and liftgate) and start
the engine without inserting the key.
Refer to the following, for more
details.
SMART KEY
WARNING - Smart key
Never leave the keys in your
vehicle with unsupervised chil-
dren. Leaving children unat-
tended in a vehicle with a smart
key is dangerous. Children
copy adults and they could
press the start button. The key
would enable children to oper-
ate power windows or other
controls, or even make the vehi-
cle move, which could result in
serious bodily injury or death.
OCK047005N
Page 106 of 551
419
Features of your vehicle
Door lock/unlock features
Impact sensing door unlock sys-tem
All doors will automatically unlock
when an impact causes the air bags
to deploy.
Speed sensing door lock system
All doors will automatically lock after
the vehicle speed exceeds 15 km/h
(9 mph).
You can activate or deactivate the
auto door lock/unlock features in the
vehicle. Refer to “User setting” in this
chapter.
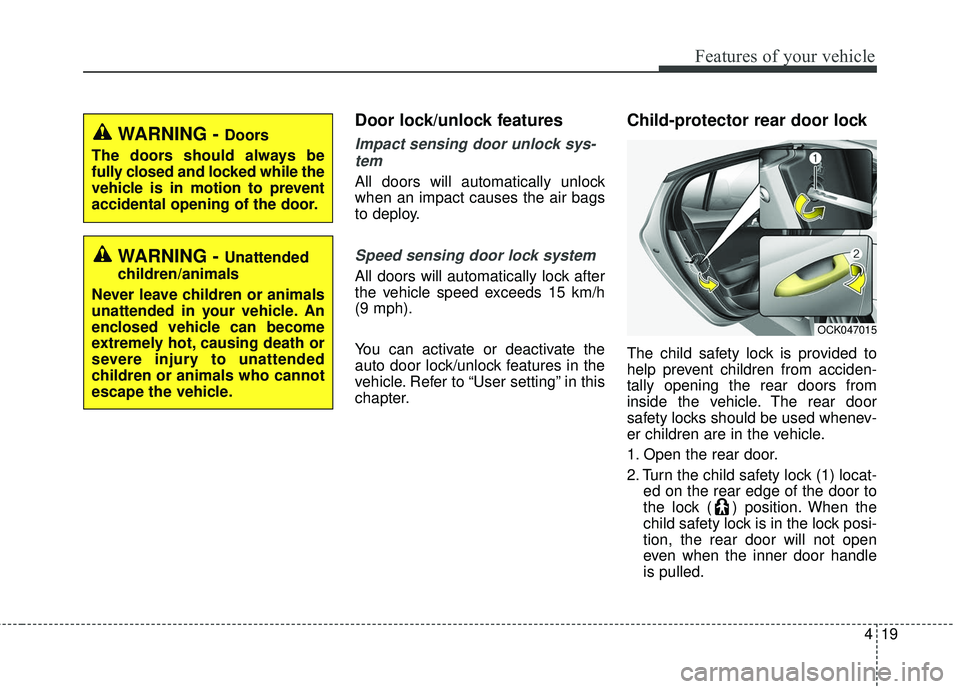
Child-protector rear door lock
The child safety lock is provided to
help prevent children from acciden-
tally opening the rear doors from
inside the vehicle. The rear door
safety locks should be used whenev-
er children are in the vehicle.
1. Open the rear door.
2. Turn the child safety lock (1) locat- ed on the rear edge of the door to
the lock ( ) position. When the
child safety lock is in the lock posi-
tion, the rear door will not open
even when the inner door handle
is pulled.
WARNING - Doors
The doors should always be
fully closed and locked while the
vehicle is in motion to prevent
accidental opening of the door.
WARNING - Unattended
children/animals
Never leave children or animals
unattended in your vehicle. An
enclosed vehicle can become
extremely hot, causing death or
severe injury to unattended
children or animals who cannot
escape the vehicle.
OCK047015
Page 107 of 551
Features of your vehicle
20
4
3. Close the rear door.
To open the rear door, pull the out-
side door handle (2).
Even though the doors may be
unlocked, the rear door will not open
by pulling the inner door handle until
the rear door child safety lock is
unlocked.
WARNING- Rear door
locks
Use the rear door safety locks
whenever children are in the
vehicle. If a child accidently
opens the rear doors while the
vehicle is moving, they may fall
out.
Page 114 of 551
427
Features of your vehicle
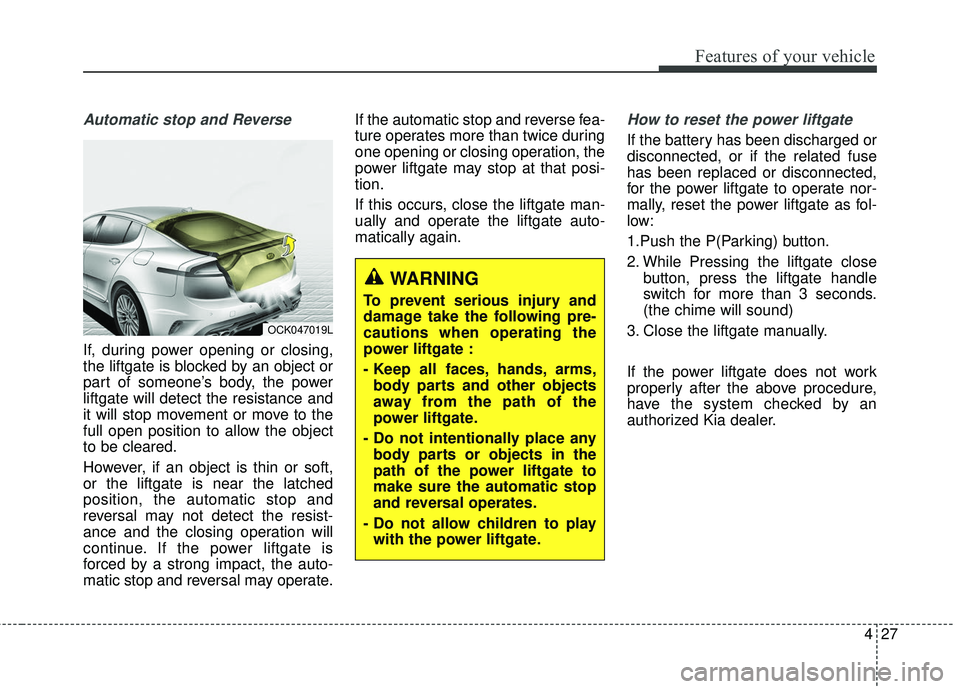
Automatic stop and Reverse
If, during power opening or closing,
the liftgate is blocked by an object or
part of someone’s body, the power
liftgate will detect the resistance and
it will stop movement or move to the
full open position to allow the object
to be cleared.
However, if an object is thin or soft,
or the liftgate is near the latched
position, the automatic stop and
reversal may not detect the resist-
ance and the closing operation will
continue. If the power liftgate is
forced by a strong impact, the auto-
matic stop and reversal may operate.If the automatic stop and reverse fea-
ture operates more than twice during
one opening or closing operation, the
power liftgate may stop at that posi-
tion.
If this occurs, close the liftgate man-
ually and operate the liftgate auto-
matically again.
How to reset the power liftgate
If the battery has been discharged or
disconnected, or if the related fuse
has been replaced or disconnected,
for the power liftgate to operate nor-
mally, reset the power liftgate as fol-
low:
1.Push the P(Parking) button.
2. While Pressing the liftgate close
button, press the liftgate handle
switch for more than 3 seconds.
(the chime will sound)
3. Close the liftgate manually.
If the power liftgate does not work
properly after the above procedure,
have the system checked by an
authorized Kia dealer.
OCK047019L
WARNING
To prevent serious injury and
damage take the following pre-
cautions when operating the
power liftgate :
- Keep all faces, hands, arms, body parts and other objects
away from the path of the
power liftgate.
- Do not intentionally place any body parts or objects in the
path of the power liftgate to
make sure the automatic stop
and reversal operates.
- Do not allow children to play with the power liftgate.
Page 116 of 551
429
Features of your vehicle
You and your passengers must beaware of the location of the
Emergency Liftgate Safety
Release lever in this vehicle and
how to open the liftgate in case you
are accidentally locked in the lift-
gate.
Your vehicle should be kept locked and the Smart Key should be kept
out of the reach of children.
Parents should teach their children
about the dangers of playing in lift-
gate.
Use the release lever for emergen- cies only.
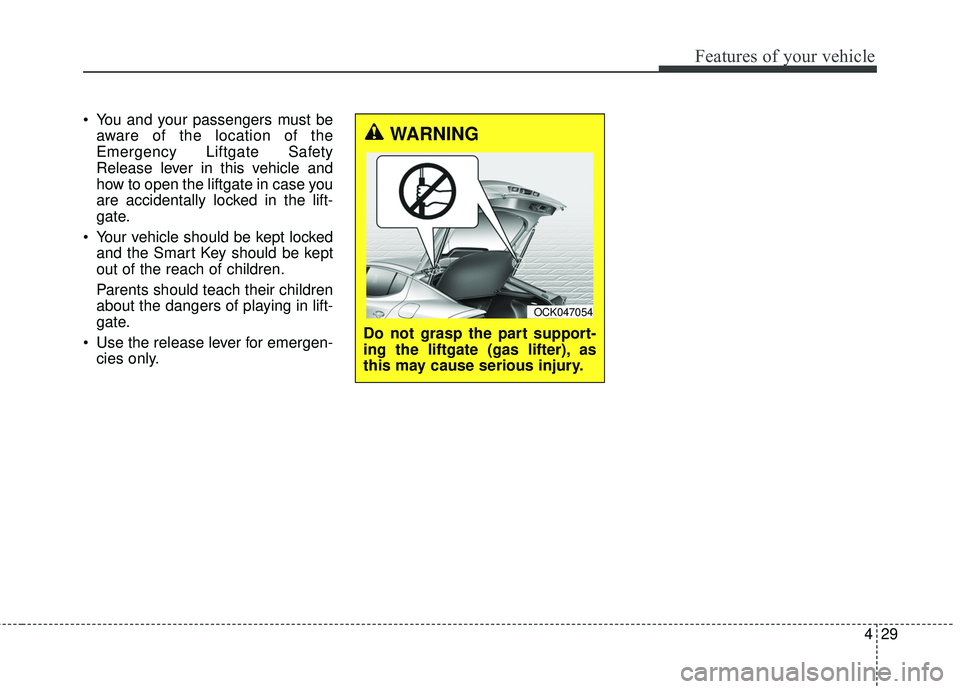
WARNING
Do not grasp the part support-
ing the liftgate (gas lifter), as
this may cause serious injury.
OCK047054
Page 119 of 551
Features of your vehicle
32
4
✽ ✽
NOTICE
The key should be kept out of reach
of children. Children may inadver-
tently open the Smart Liftgate while
playing around the rear area of the
vehicle.
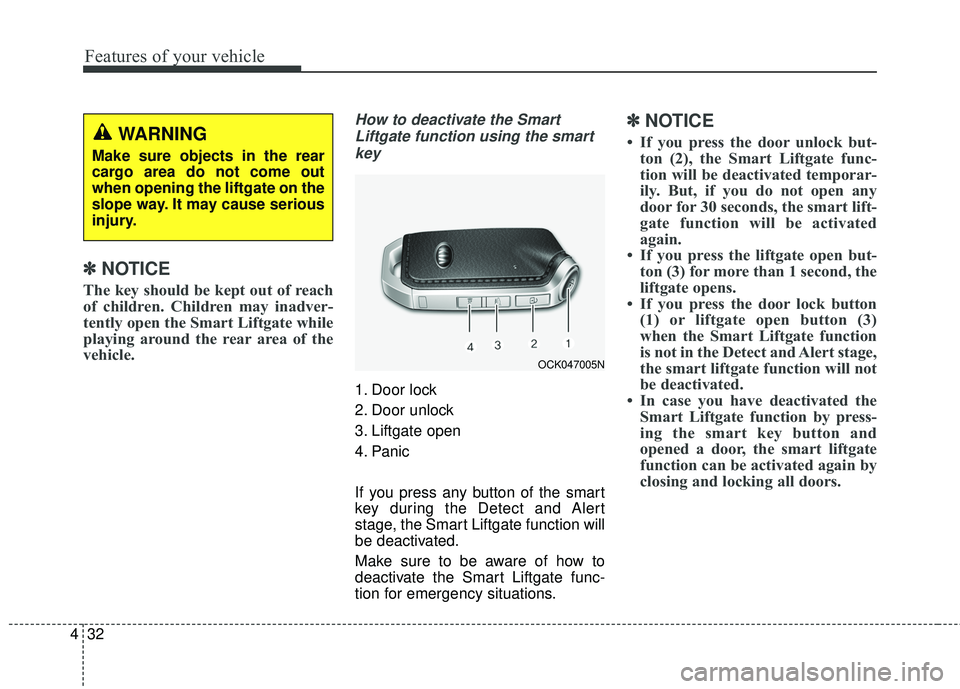
How to deactivate the Smart
Liftgate function using the smartkey
1. Door lock
2. Door unlock
3. Liftgate open
4. Panic
If you press any button of the smart
key during the Detect and Alert
stage, the Smart Liftgate function will
be deactivated.
Make sure to be aware of how to
deactivate the Smart Liftgate func-
tion for emergency situations.
✽ ✽ NOTICE
• If you press the door unlock but-
ton (2), the Smart Liftgate func-
tion will be deactivated temporar-
ily. But, if you do not open any
door for 30 seconds, the smart lift-
gate function will be activated
again.
• If you press the liftgate open but- ton (3) for more than 1 second, the
liftgate opens.
• If you press the door lock button (1) or liftgate open button (3)
when the Smart Liftgate function
is not in the Detect and Alert stage,
the smart liftgate function will not
be deactivated.
• In case you have deactivated the Smart Liftgate function by press-
ing the smart key button and
opened a door, the smart liftgate
function can be activated again by
closing and locking all doors.WARNING
Make sure objects in the rear
cargo area do not come out
when opening the liftgate on the
slope way. It may cause serious
injury.
OCK047005N