cruise control KIA TELLURIDE 2021 Features and Functions Guide
[x] Cancel search | Manufacturer: KIA, Model Year: 2021, Model line: TELLURIDE, Model: KIA TELLURIDE 2021Pages: 70, PDF Size: 8.41 MB
Page 3 of 70
www.kia.com Consumer Affairs - Roadside Assistance†18: 1-800-333-4KIA (800-333-4542) Always check the Owner’s Manual for complete operating information and safety warnings.
Driving while distracted can result in a loss of vehicle control that may lead to an accident, severe personal injury and death. The driver’s
primary responsibility is in the safe and legal operation of a vehicle, and any handheld devices, other equipment or vehicle systems which
take the driver’s eyes, attention and focus away from the safe operation of a vehicle or that are not permissible by law should never be used
during operation of the vehicle.
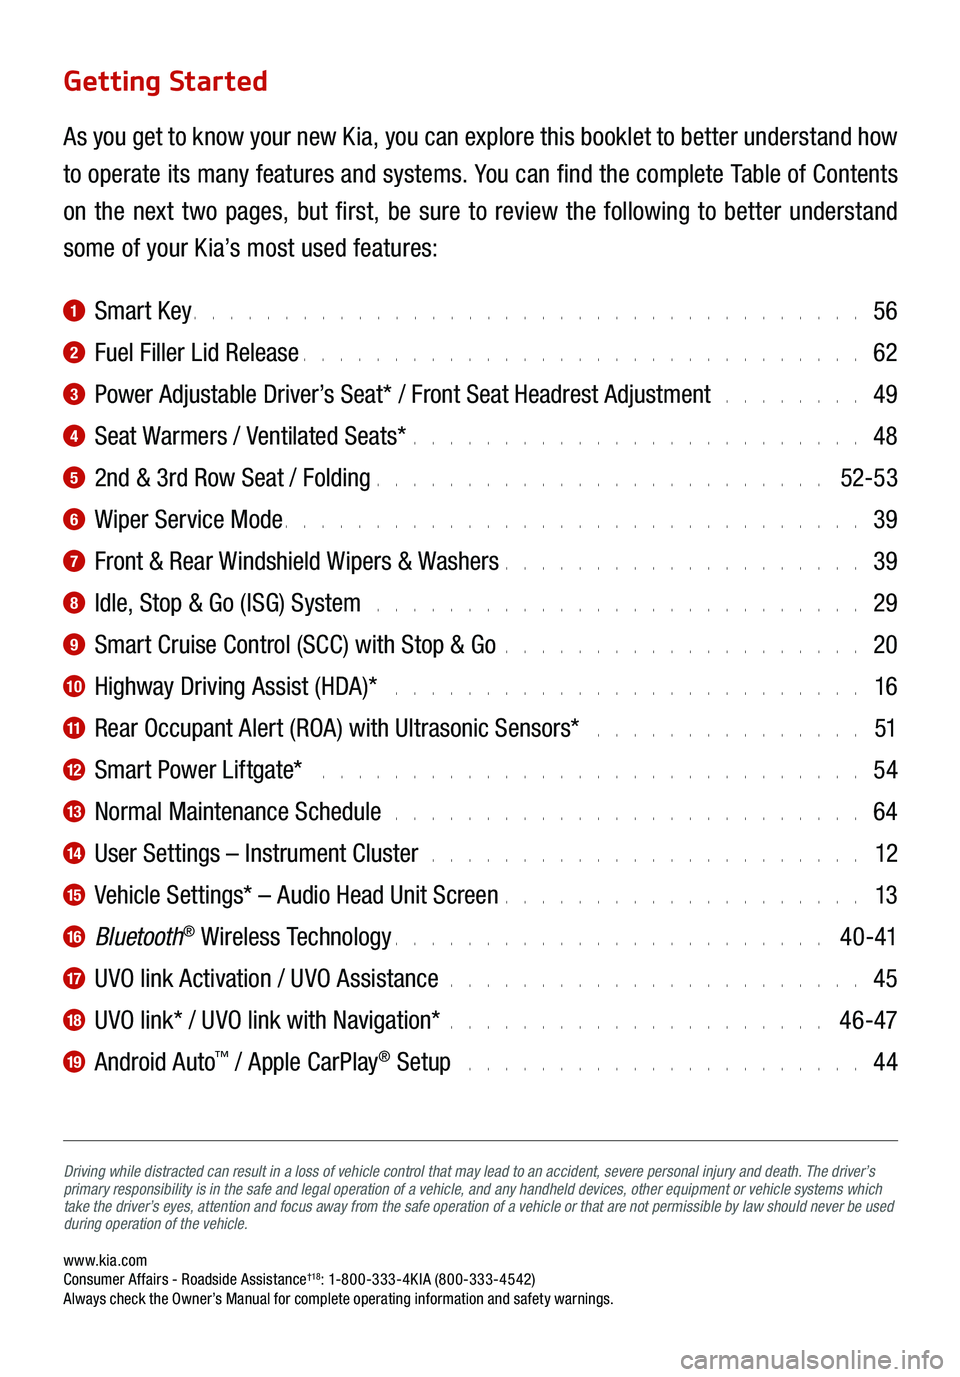
Getting Started
As you get to know your new Kia, you can explore this booklet to better understand how
to operate its many features and systems. You can find the complete Table of Contents
on the next two pages, but first, be sure to review the following to better understand
some of your Kia’s most used features:
1 Smart Key . . . . . . . . . . . . . . . . . . . . . . . . . . . . . . . . . . . . . 56
2 Fuel Filler Lid Release . . . . . . . . . . . . . . . . . . . . . . . . . . . . . . . 62
3 Power Adjustable Driver’s Seat* / Front Seat Headrest Adjustment . . . . . . . . 49
4 Seat Warmers / Ventilated Seats* . . . . . . . . . . . . . . . . . . . . . . . . . 48
5 2nd & 3rd Row Seat / Folding . . . . . . . . . . . . . . . . . . . . . . . . . 52-53
6 Wiper Service Mode . . . . . . . . . . . . . . . . . . . . . . . . . . . . . . . . 39
7 Front & Rear Windshield Wipers & Washers . . . . . . . . . . . . . . . . . . . . 39
8 Idle, Stop & Go (ISG) System . . . . . . . . . . . . . . . . . . . . . . . . . . . 29
9 Smart Cruise Control (SCC) with Stop & Go . . . . . . . . . . . . . . . . . . . . 20
10 Highway Driving Assist (HDA)* . . . . . . . . . . . . . . . . . . . . . . . . . . 16
11 Rear Occupant Alert (ROA) with Ultrasonic Sensors* . . . . . . . . . . . . . . . 51
12 Smart Power Liftgate* . . . . . . . . . . . . . . . . . . . . . . . . . . . . . . 54
13 Normal Maintenance Schedule . . . . . . . . . . . . . . . . . . . . . . . . . . 64
14 User Settings – Instrument Cluster . . . . . . . . . . . . . . . . . . . . . . . . 12
15 Vehicle Settings* – Audio Head Unit Screen . . . . . . . . . . . . . . . . . . . . 13
16 Bluetooth® Wireless Technology . . . . . . . . . . . . . . . . . . . . . . . . 4 0 -41
17 UVO link Activation / UVO Assistance . . . . . . . . . . . . . . . . . . . . . . . 45
18 UVO link* / UVO link with Navigation* . . . . . . . . . . . . . . . . . . . . . 46-47
19 Android Auto™ / Apple CarPlay® Setup . . . . . . . . . . . . . . . . . . . . . . 44
Page 4 of 70
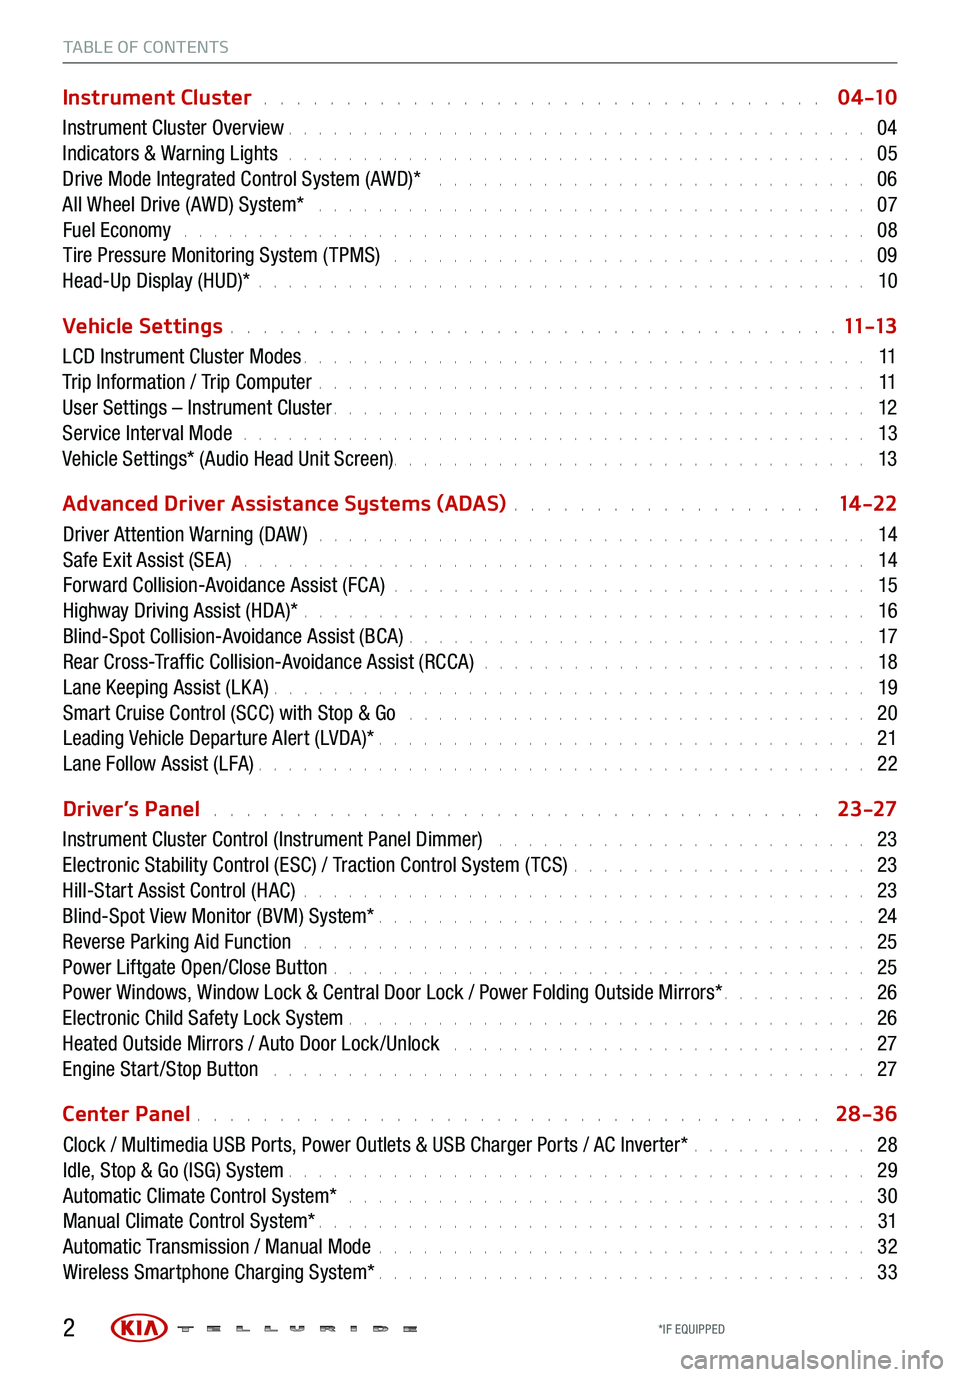
TABLE OF CONTENTS
Instrument Cluster . . . . . . . . . . . . . . . . . . . . . . . . . . . . . . . . . . 0 4 -10
Instrument Cluster Overview . . . . . . . . . . . . . . . . . . . . . . . . . . . . . . . . . . . . \
. . . 04
Indicators & Warning Lights . . . . . . . . . . . . . . . . . . . . . . . . . . . . . . . . . . . . \
. . . 05
Drive Mode Integrated Control System (AWD)* . . . . . . . . . . . . . . . . . . . . . . . . . . . . . 06
All Wheel Drive (AWD) System* . . . . . . . . . . . . . . . . . . . . . . . . . . . . . . . . . . . . . 07
Fuel Economy . . . . . . . . . . . . . . . . . . . . . . . . . . . . . . . . . . . . \
. . . . . . . . . . 08
Tire Pressure Monitoring System ( TPMS) . . . . . . . . . . . . . . . . . . . . . . . . . . . . . . . . 09
Head-Up Display (HUD)* . . . . . . . . . . . . . . . . . . . . . . . . . . . . . . . . . . . . \
. . . . . 10
Vehicle Settings
. . . . . . . . . . . . . . . . . . . . . . . . . . . . . . . . . . . . \
. 11 -13
LCD Instrument Cluster Modes . . . . . . . . . . . . . . . . . . . . . . . . . . . . . . . . . . . . \
. . 11
Trip Information / Trip Computer . . . . . . . . . . . . . . . . . . . . . . . . . . . . . . . . . . . . \
. 11
User Settings – Instrument Cluster . . . . . . . . . . . . . . . . . . . . . . . . . . . . . . . . . . . . \
12
Service Interval Mode . . . . . . . . . . . . . . . . . . . . . . . . . . . . . . . . . . . . . . . . . . 13
Vehicle Settings* (Audio Head Unit Screen) . . . . . . . . . . . . . . . . . . . . . . . . \
. . . . . . . . 13
Advanced Driver Assistance Systems (ADAS)
. . . . . . . . . . . . . . . . . . . 14 -22
Driver Attention Warning (DAW ) . . . . . . . . . . . . . . . . . . . . . . . . . . . . . . . . . . . . . 14
Safe Exit Assist (SE A) . . . . . . . . . . . . . . . . . . . . . . . . . . . . . . . . . . . . . . . . . . 14
Forward Collision-Avoidance Assist (FCA) . . . . . . . . . . . . . . . . . . . . . . . . . . . . . . . . 15
Highway Driving Assist (HDA)* . . . . . . . . . . . . . . . . . . . . . . . . . . . . . . . . . . . . \
. . 16
Blind-Spot Collision-Avoidance Assist (BCA) . . . . . . . . . . . . . . . . . . . . . . . . . . . . . . . 17
Rear Cross-Traffic Collision-Avoidance Assist (RCCA) . . . . . . . . . . . . . . . . . . . . . . . . . . 18
Lane Keeping Assist (LK A) . . . . . . . . . . . . . . . . . . . . . . . . . . . . . . . . . . . . \
. . . . 19
Smart Cruise Control (SCC) with Stop & Go . . . . . . . . . . . . . . . . . . . . . . . . . . . . . . . 20
Leading Vehicle Departure Alert (LVDA)* . . . . . . . . . . . . . . . . . . . . . . . . . . . . . . . . . 21
Lane Follow Assist (LFA) . . . . . . . . . . . . . . . . . . . . . . . . . . . . . . . . . . . . \
. . . . . 22
Driver’s Panel
. . . . . . . . . . . . . . . . . . . . . . . . . . . . . . . . . . . . . 23-27
Instrument Cluster Control (Instrument Panel Dimmer) . . . . . . . . . . . . . . . . . . . . . . . . . 23
Electronic Stability Control (ESC) / Traction Control System ( TCS) . . . . . . . . . . . . . . . . . . . . 23
Hill-Start Assist Control (HAC) . . . . . . . . . . . . . . . . . . . . . . . . . . . . . . . . . . . . \
. . 23
Blind-Spot View Monitor (BVM) System* . . . . . . . . . . . . . . . . . . . . . . . . . . . . . . . . . 24
Reverse Parking Aid Function . . . . . . . . . . . . . . . . . . . . . . . . . . . . . . . . . . . . \
. . 25
Power Liftgate Open/Close Button . . . . . . . . . . . . . . . . . . . . . . . . . . . . . . . . . . . . 25
Power Windows, Window Lock & Central Door Lock / Power Folding Outside Mirrors* . . . . . . . . . . 26
Electronic Child Safety Lock System . . . . . . . . . . . . . . . . . . . . . . . . . . . . . . . . . . . 26
Heated Outside Mirrors / Auto Door Lock /Unlock . . . . . . . . . . . . . . . . . . . . . . . . . . . . 27
Engine Start /Stop Button . . . . . . . . . . . . . . . . . . . . . . . . . . . . . . . . . . . . \
. . . . 27
Center Panel
. . . . . . . . . . . . . . . . . . . . . . . . . . . . . . . . . . . . \
. . 28-36
Clock / Multimedia USB Ports, Power Outlets & USB Charger Ports / AC Inverter* . . . . . . . . . . . . 28
Idle, Stop & Go (ISG) System . . . . . . . . . . . . . . . . . . . . . . . . . . . . . . . . . . . . \
. . . 29
Automatic Climate Control System* . . . . . . . . . . . . . . . . . . . . . . . . . . . . . . . . . . . 30
Manual Climate Control System* . . . . . . . . . . . . . . . . . . . . . . . . . . . . . . . . . . . . \
. 31
Automatic Transmission / Manual Mode . . . . . . . . . . . . . . . . . . . . . . . . . . . . . . . . . 32
Wireless Smartphone Charging System* . . . . . . . . . . . . . . . . . . . . . . . . . . . . . . . . . 33
2*IF EQUIPPED
Page 5 of 70
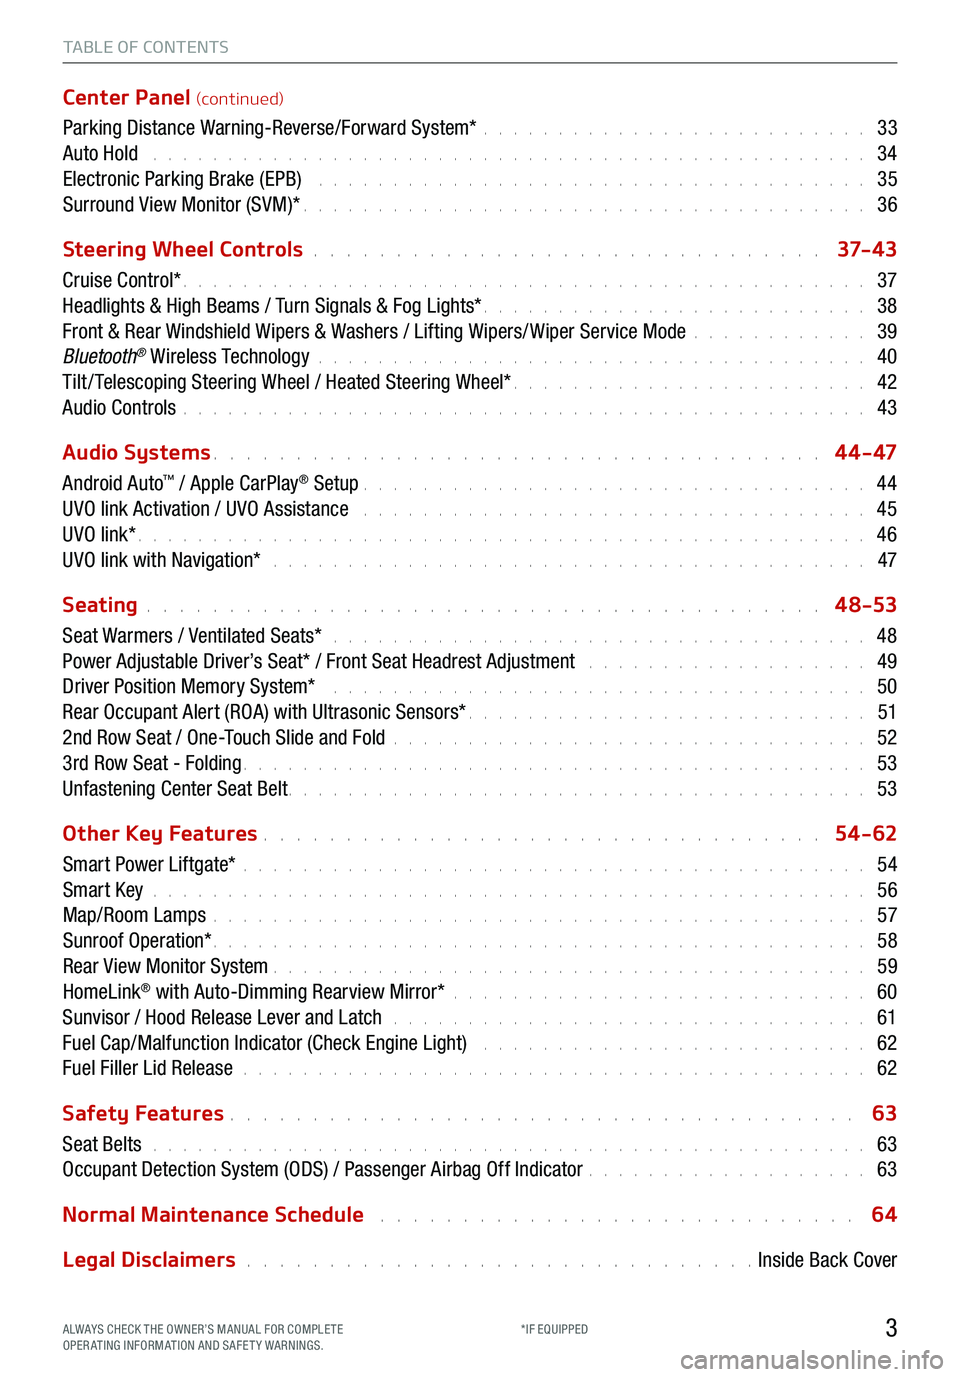
TABLE OF CONTENTS
Center Panel (continued)
Parking Distance Warning-Reverse/Forward System* . . . . . . . . . . . . . . . . . . . . . . . . . . 33
Auto Hold . . . . . . . . . . . . . . . . . . . . . . . . . . . . . . . . . . . . \
. . . . . . . . . . . . 34
Electronic Parking Brake (EPB) . . . . . . . . . . . . . . . . . . . . . . . . . . . . . . . . . . . . . 35
Surround View Monitor (SVM)* . . . . . . . . . . . . . . . . . . . . . . . . . . . . . . . . . . . . \
. . 36
Steering Wheel Controls
. . . . . . . . . . . . . . . . . . . . . . . . . . . . . . . 37- 4 3
Cruise Control* . . . . . . . . . . . . . . . . . . . . . . . . . . . . . . . . . . . . \
. . . . . . . . . . 37
Headlights & High Beams / Turn Signals & Fog Lights* . . . . . . . . . . . . . . . . . . . . . . . . . . 38
Front & Rear Windshield Wipers & Washers / Lifting Wipers/ Wiper Service Mode . . . . . . . . . . . . 39
Bluetooth
® Wireless Technology . . . . . . . . . . . . . . . . . . . . . . . . . . . . . . . . . . . . \
. 40
Tilt / Telescoping Steering Wheel / Heated Steering Wheel* . . . . . . . . . . . . . . . . . . . . . . . . 42
Audio Controls . . . . . . . . . . . . . . . . . . . . . . . . . . . . . . . . . . . . \
. . . . . . . . . . 43
Audio Systems
. . . . . . . . . . . . . . . . . . . . . . . . . . . . . . . . . . . . \
. 4 4 - 47
Android Auto
™ / Apple CarPlay® Setup . . . . . . . . . . . . . . . . . . . . . . . . . . . . . . . . . . 44
UVO link Activation / UVO Assistance . . . . . . . . . . . . . . . . . . . . . . . . . . . . . . . . . . 45
UVO link* . . . . . . . . . . . . . . . . . . . . . . . . . . . . . . . . . . . . \
. . . . . . . . . . . . . 46
UVO link with Navigation* . . . . . . . . . . . . . . . . . . . . . . . . . . . . . . . . . . . . . . . . 47
Seating
. . . . . . . . . . . . . . . . . . . . . . . . . . . . . . . . . . . . \
. . . . . 4 8-53
Seat Warmers / Ventilated Seats* . . . . . . . . . . . . . . . . . . . . . . . . . . . . . . . . . . . . 48
Power Adjustable Driver’s Seat* / Front Seat Headrest Adjustment . . . . . . . . . . . . . . . . . . . 49
Driver Position Memory System* . . . . . . . . . . . . . . . . . . . . . . . . . . . . . . . . . . . . 50
Rear Occupant Alert (ROA) with Ultrasonic Sensors* . . . . . . . . . . . . . . . . . . . . . . . . . . . 51
2nd Row Seat / One-Touch Slide and Fold . . . . . . . . . . . . . . . . . . . . . . . . . . . . . . . . 52
3rd Row Seat - Folding . . . . . . . . . . . . . . . . . . . . . . . . . . . . . . . . . . . . \
. . . . . . 53
Unfastening Center Seat Belt . . . . . . . . . . . . . . . . . . . . . . . . . . . . . . . . . . . . \
. . . 53
Other Key Features
. . . . . . . . . . . . . . . . . . . . . . . . . . . . . . . . . . 54-62
Smart Power Liftgate* . . . . . . . . . . . . . . . . . . . . . . . . . . . . . . . . . . . . \
. . . . . . 54
Smart Key . . . . . . . . . . . . . . . . . . . . . . . . . . . . . . . . . . . . \
. . . . . . . . . . . . 56
Map/Room Lamps . . . . . . . . . . . . . . . . . . . . . . . . . . . . . . . . . . . . \
. . . . . . . . 57
Sunroof Operation* . . . . . . . . . . . . . . . . . . . . . . . . . . . . . . . . . . . . \
. . . . . . . . 58
Rear View Monitor System . . . . . . . . . . . . . . . . . . . . . . . . . . . . . . . . . . . . \
. . . . 59
HomeLink
® with Auto-Dimming Rearview Mirror* . . . . . . . . . . . . . . . . . . . . . . . . . . . . 60
Sunvisor / Hood Release Lever and Latch . . . . . . . . . . . . . . . . . . . . . . . . . . . . . . . . 61
Fuel Cap/Malfunction Indicator (Check Engine Light) . . . . . . . . . . . . . . . . . . . . . . . . . . 62
Fuel Filler Lid Release . . . . . . . . . . . . . . . . . . . . . . . . . . . . . . . . . . . . \
. . . . . . 62
Safety Features
. . . . . . . . . . . . . . . . . . . . . . . . . . . . . . . . . . . . \
. . 63
Seat Belts . . . . . . . . . . . . . . . . . . . . . . . . . . . . . . . . . . . . \
. . . . . . . . . . . . 63
Occupant Detection System (ODS) / Passenger Airbag Off Indicator . . . . . . . . . . . . . . . . . . . 63
Normal Maintenance Schedule
. . . . . . . . . . . . . . . . . . . . . . . . . . . . . 64
Legal Disclaimers
. . . . . . . . . . . . . . . . . . . . . . . . . . . . . . . Inside Back Cover
3ALWAYS CHECK THE OWNER’S MANUAL FOR COMPLE TE
OPERATING INFORMATION AND SAFETY WARNINGS. *IF EQUIPPED
Page 7 of 70
5
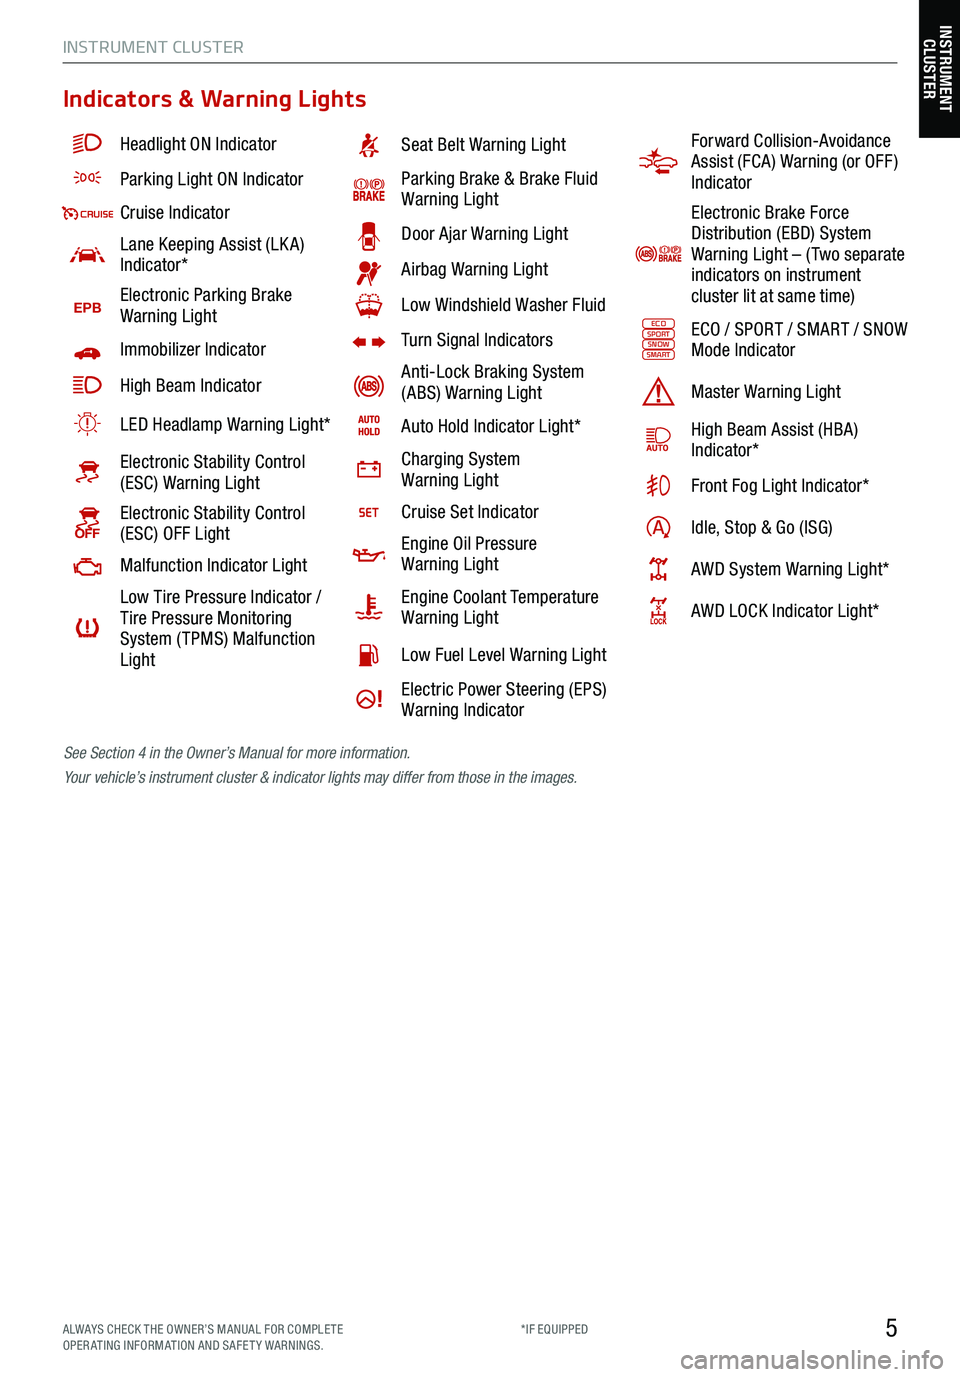
Indicators & Warning Lights
Headlight ON Indicator
Parking Light ON Indicator
Cruise Indicator
Lane Keeping Assist (LK A)
Indicator*
EPBElectronic Parking Brake
Warning Light
Immobilizer Indicator
High Beam Indicator
LED Headlamp Warning Light*
Electronic Stability Control
(ESC) Warning Light
Electronic Stability Control
(ESC) OFF Light
Malfunction Indicator Light
Low Tire Pressure Indicator /
Tire Pressure Monitoring
System ( TPMS) Malfunction
Light
Seat Belt Warning Light
Parking Brake & Brake Fluid
Warning Light
Door Ajar Warning Light
Airbag Warning Light
Low Windshield Washer Fluid
Turn Signal Indicators
Anti-Lock Braking System
(ABS) Warning Light
Auto Hold Indicator Light*
Charging System
Warning Light
Cruise Set Indicator
Engine Oil Pressure
Warning Light
Engine Coolant Temperature
Warning Light
Low Fuel Level Warning Light
Electric Power Steering (EPS)
Warning Indicator
Forward Collision-Avoidance
Assist (FCA) Warning (or OFF )
Indicator
Electronic Brake Force
Distribution (EBD) System
Warning Light – ( Two separate
indicators on instrument
cluster lit at same time)
ECOSPORTSNOWSMARTECO / SPORT / SMART / SNOW
Mode Indicator
Master Warning Light
High Beam Assist (HBA)
Indicator*
Front Fog Light Indicator*
Idle, Stop & Go (ISG)
AWD System Warning Light*
AWD LOCK Indicator Light*
See Section 4 in the Owner’s Manual for more information.
Your vehicle’s instrument cluster & indicator lights may differ from those in the images.
INSTRUMENT CLUSTER
INSTRUMENT
CLUSTER
ALWAYS CHECK THE OWNER’S MANUAL FOR COMPLE TE
OPERATING INFORMATION AND SAFETY WARNINGS. *IF EQUIPPED
Page 12 of 70
10*IF EQUIPPED
†LEG AL DISCL AIMERS ON BACK INSIDE COVER
INSTRUMENT CLUSTER
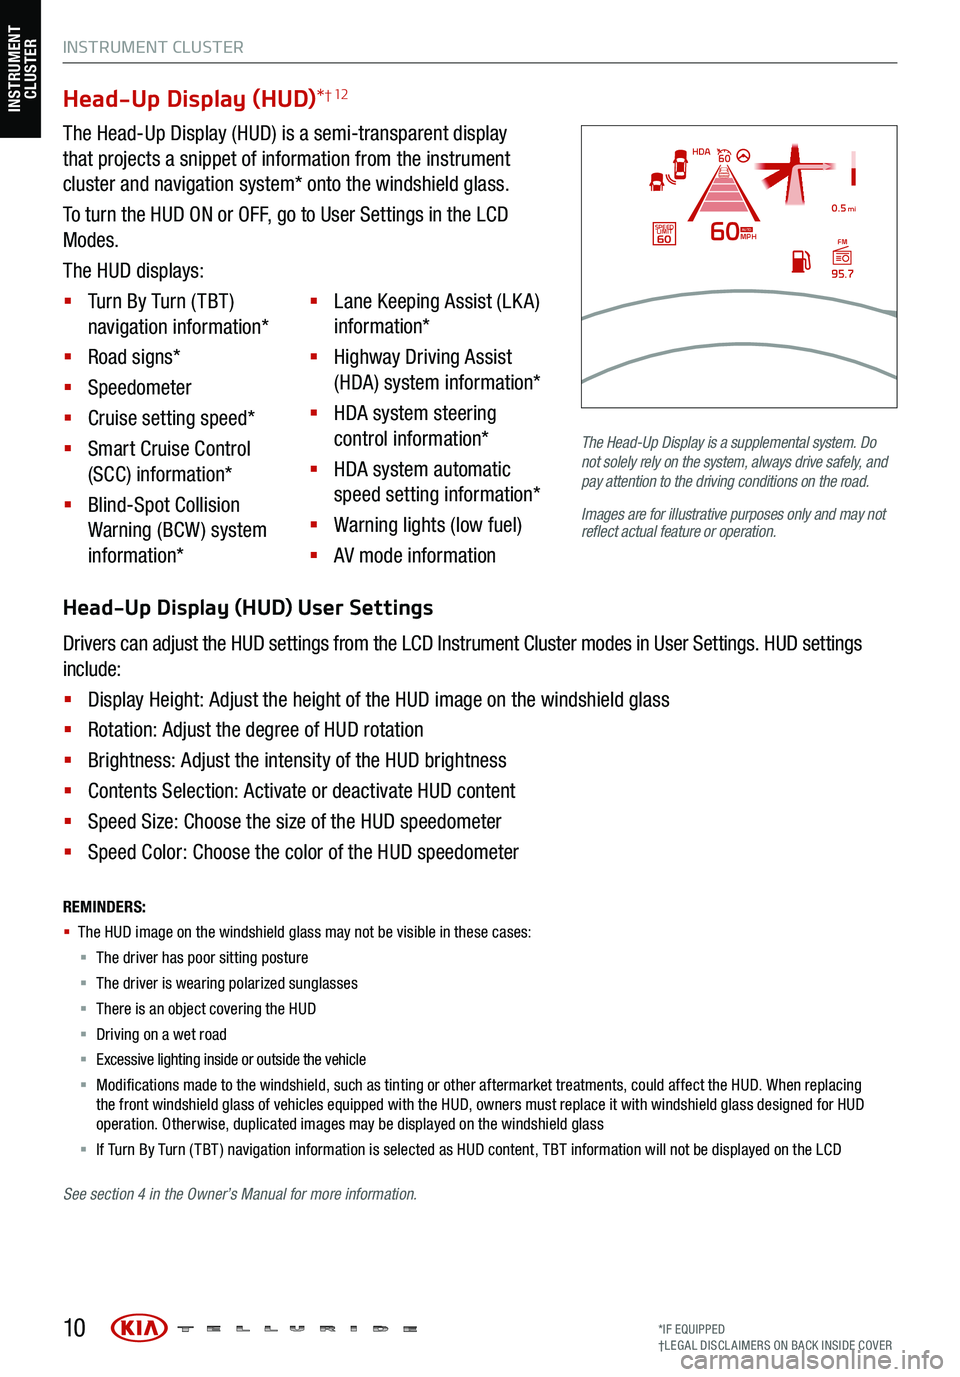
See section 4 in the Owner’s Manual for more information. The Head-Up Display
is a supplemental system. Do
not solely rely on the system, always drive safely, and
pay attention to the driving conditions on the road.
Images are for illustrative purposes only and may not
reflect actual feature or operation.
REMINDERS:
§
The HUD image on the windshield glass may not be visible in these cases:
§
The driver has poor sitting posture
§ The driver is wearing polarized sunglasses
§ There is an object covering the HUD
§ Driving on a wet road
§ Excessive lighting inside or outside the vehicle
§ Modifications made to the windshield, such as tinting or other aftermarket treatments, could affect the HUD. When replacing
the front windshield glass of vehicles equipped with the HUD, owners must replace it with windshield glass designed for HUD
operation. Otherwise, duplicated images may be displayed on the windshield glass
§ If Turn By Turn ( TBT ) navigation information is selected as HUD content, TBT information will not be displayed on the LCD
Head-Up Display (HUD) *† 12
The Head-Up Display (HUD) is a semi-transparent display
that projects a snippet of information from the instrument
cluster and navigation system* onto the windshield glass.
To turn the HUD ON or OFF, go to User Settings in the LCD
Modes.
The HUD displays:
§ Turn By Turn ( TBT )
navigation information*
§ Road signs*
§ Speedometer
§ Cruise setting speed*
§ Smart Cruise Control
(SCC) information*
§ Blind-Spot Collision
Warning (BCW ) system
information* §
Lane Keeping Assist (LK A)
information*
§ Highway Driving Assist
(HDA) system information*
§ HDA system steering
control information*
§ HDA system automatic
speed setting information*
§ Warning lights (low fuel)
§ AV mode information
MPH
0.5 mi
FM
95.7
60
60HDA
SPEED LIMITAUTO
Head-Up Display (HUD) User Settings
Drivers can adjust the HUD settings from the LCD Instrument Cluster modes in User Settings. HUD settings
include:
§ Display Height: Adjust the height of the HUD image on the windshield glass
§ Rotation: Adjust the degree of HUD rotation
§ Brightness: Adjust the intensity of the HUD brightness
§ Contents Selection: Activate or deactivate HUD content
§ Speed Size: Choose the size of the HUD speedometer
§ Speed Color: Choose the color of the HUD speedometer
INSTRUMENT
CLUSTER
Page 13 of 70
11ALWAYS CHECK THE OWNER’S MANUAL FOR COMPLE TE
OPERATING INFORMATION AND SAFETY WARNINGS. *IF EQUIPPED
VEHICLE SET TINGS
Trip Information / Trip Computer
The Trip Computer is a driver information system that displays information
related to driving when the Engine Start /Stop button is in the ON position.
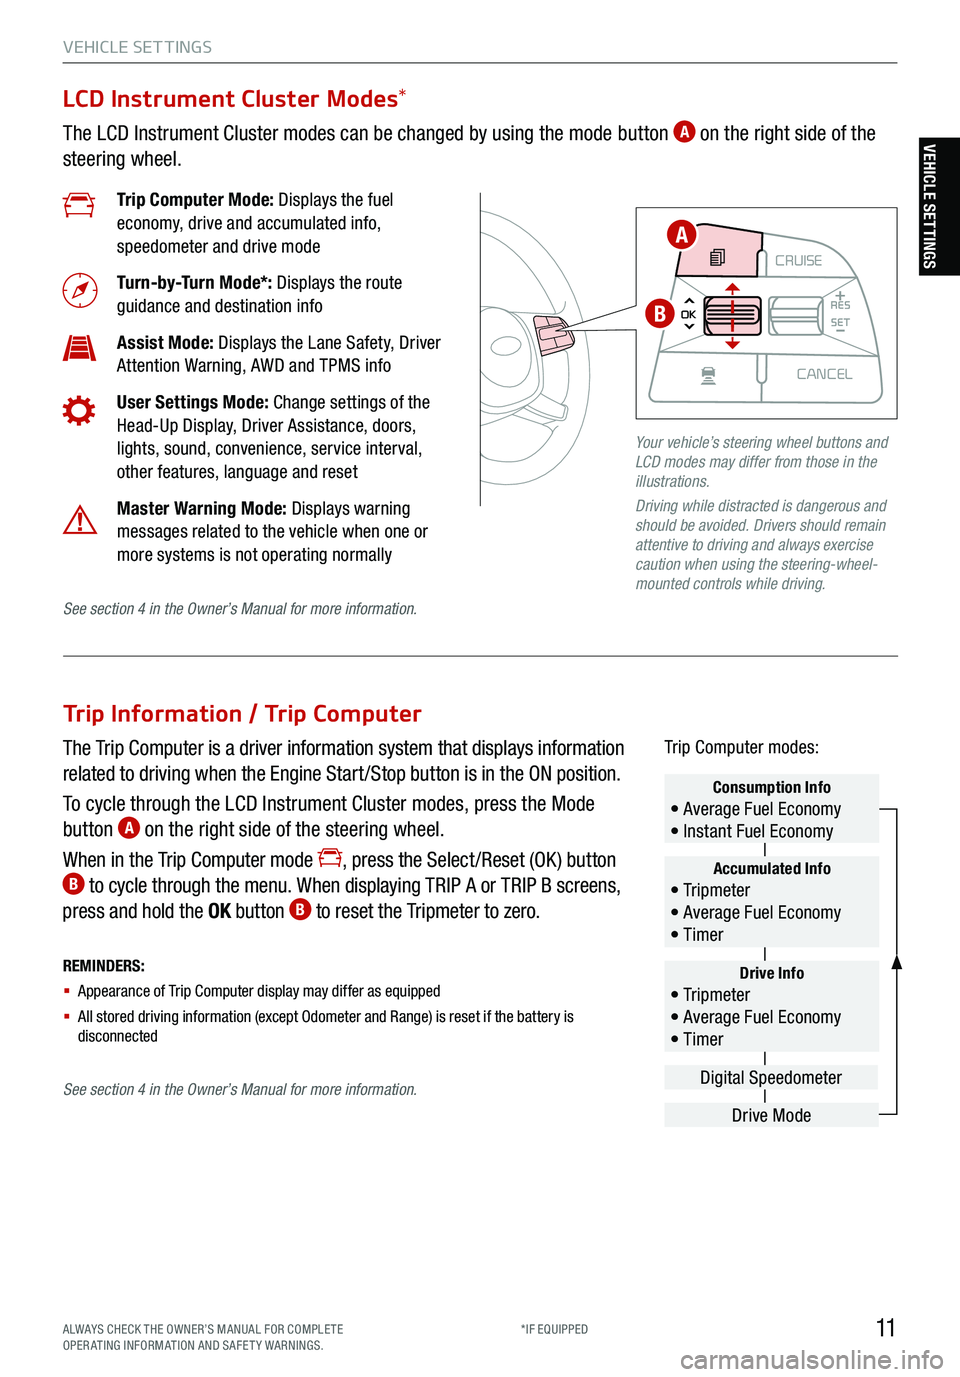
To cycle through the LCD Instrument Cluster modes, press the Mode
button
A on the right side of the steering wheel.
When in the Trip Computer mode
, press the Select /Reset (OK ) button B to cycle through the menu. When displaying TRIP A or TRIP B screens,
press and hold the OK button B to reset the Tripmeter to zero.
REMINDERS:
§ Appearance of Trip Computer display may differ as equipped
§ All stored driving information (except Odometer and Range) is reset if the battery is
disconnectedDrive Info• Tr ipme t e r
• Average Fuel Economy
• Timer
Accumulated Info• Tr ipme t e r
• Average Fuel Economy
• Timer
Consumption Info• Average Fuel Economy
• Instant Fuel Economy
Drive Mode
Digital Speedometer
Trip Computer modes:
LCD Instrument Cluster Modes
*
The LCD Instrument Cluster modes can be changed by using the mode button A on the right side of the
steering wheel.
Trip Computer Mode: Displays the fuel
economy, drive and accumulated info,
speedometer and drive mode
Turn-by-Turn Mode*: Displays the route
guidance and destination info
Assist Mode: Displays the Lane Safety, Driver
Attention Warning, AWD and TPMS info
User Settings Mode: Change settings of the
Head-Up Display, Driver Assistance, doors,
lights, sound, convenience, service interval,
other features, language and reset
Master Warning Mode: Displays warning
messages related to the vehicle when one or
more systems is not operating normally
Your vehicle’s steering wheel buttons and
LCD modes may differ from those in the
illustrations.
Driving while distracted is dangerous and
should be avoided. Drivers should remain
attentive to driving and always exercise
caution when using the steering-wheel-
mounted controls while driving.
CRUISE
MODE CRUISE
CANCEL
RES
OK SET
CRUISE
CANCEL
RES
OK SET
MODE CRUISE
CANCEL
RES
OK SET
MODE
CANCEL
RES
OK SET
MODECRUISE
CANCEL
RES
OK SET
CRUISE
CANCEL
RES
OK SET
A
B
See section 4 in the Owner’s Manual for more information.
See section 4 in the Owner’s Manual for more information.
VEHICLE SETTINGS
Page 14 of 70
12
VEHICLE SET TINGS
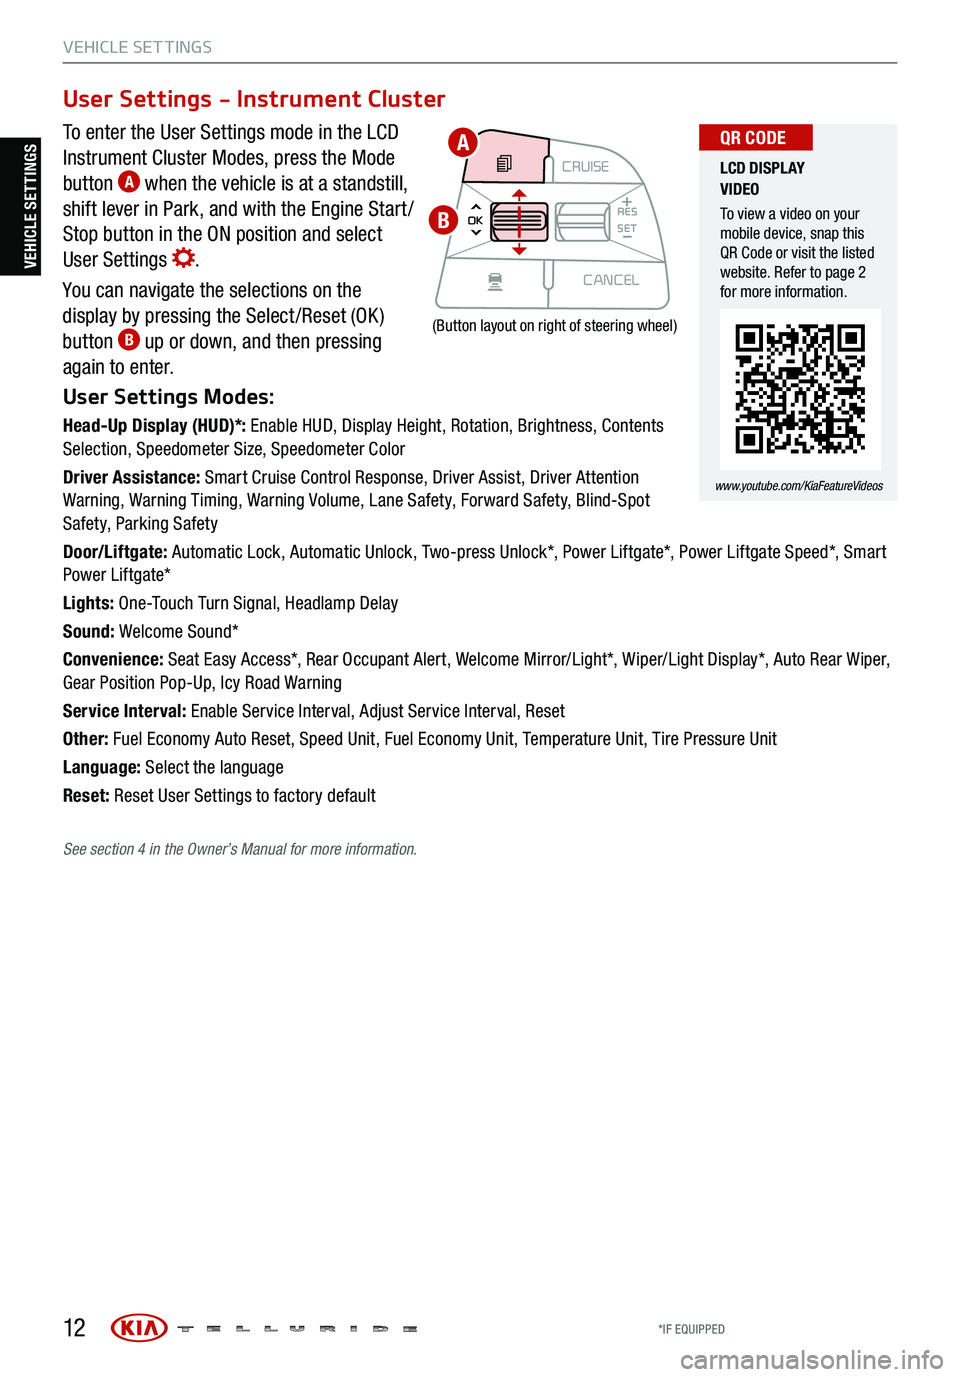
To enter the User Settings mode in the LCD
Instrument Cluster Modes, press the Mode
button
A when the vehicle is at a standstill,
shift lever in Park, and with the Engine Start /
Stop button in the ON position and select
User Settings
.
You can navigate the selections on the
display by pressing the Select /Reset (OK )
button
B up or down, and then pressing
again to enter.
User Settings Modes:
Head-Up Display (HUD)*: Enable HUD, Display Height, Rotation, Brightness, Contents
Selection, Speedometer Size, Speedometer Color
Driver Assistance: Smart Cruise Control Response, Driver Assist, Driver Attention
Warning, Warning Timing, Warning Volume, Lane Safety, Forward Safety, Blind-Spot
Safety, Parking Safety
Door/Liftgate: Automatic Lock, Automatic Unlock, Two-press Unlock*, Power Liftgate*, Power Liftgate Speed*, Smart
Power Liftgate*
Lights: One-Touch Turn Signal, Headlamp Delay
Sound: Welcome Sound*
Convenience: Seat Easy Access*, Rear Occupant Alert, Welcome Mirror/Light*, Wiper/Light Display*, Auto Rear Wiper,
Gear Position Pop-Up, Icy Road Warning
Service Interval: Enable Service Interval, Adjust Service Interval, Reset
Other: Fuel Economy Auto Reset, Speed Unit, Fuel Economy Unit, Temperature Unit, Tire Pressure Unit
Language: Select the language
Reset: Reset User Settings to factory default
User Settings - Instrument Cluster
CRUISE
MODE CRUISE
CANCEL
RES
OK SET
CRUISE
CANCEL
RES
OK SET
MODE CRUISE
CANCEL
RES
OK SET
MODE
CANCEL
RES
OK SET
MODECRUISE
CANCEL
RES
OK SET
CRUISE
CANCEL
RES
OK SET
(Button layout on right of steering wheel)
LCD DISPLAY
VIDEO
To view a video on your
mobile device, snap this
QR Code or visit the listed
website. Refer to page 2
for more information.
www.youtube.com/KiaFeatureVideos
QR CODEA
B
VEHICLE SETTINGS
See section 4 in the Owner’s Manual for more information.
*IF EQUIPPED
Page 18 of 70
16
REMINDERS:
§ Current highway speeds and controlled or limited access road
information may vary. Future navigation updates may change
this information
§ If the driver changes the speed while in automatic speed setting
mode, it deactivates and enters a manual mode
§ When the ignition is cycled, the system returns to its previous
state, on or off Highway
Driving Assist is not a substitute for safe driving,
may not detect all objects around the vehicle, and only
functions on certain federal highways. Always drive safely
and use caution . See the Owner’s Manual for more detailed
information, limitations and conditions.
See section 5 in the Owner’s Manual for more information.
Highway Driving Assist (HDA) *†6
The Highway Driving Assist (HDA) system is designed to adjust the speed of the vehicle when driving on
limited/controlled access highways. The system can adjust the vehicle’s speed based on available highway
speed information. The automatic speed setting mode is designed to set the speed automatically by adjusting
to the current speed limits of the highway vehicle is traveling on.
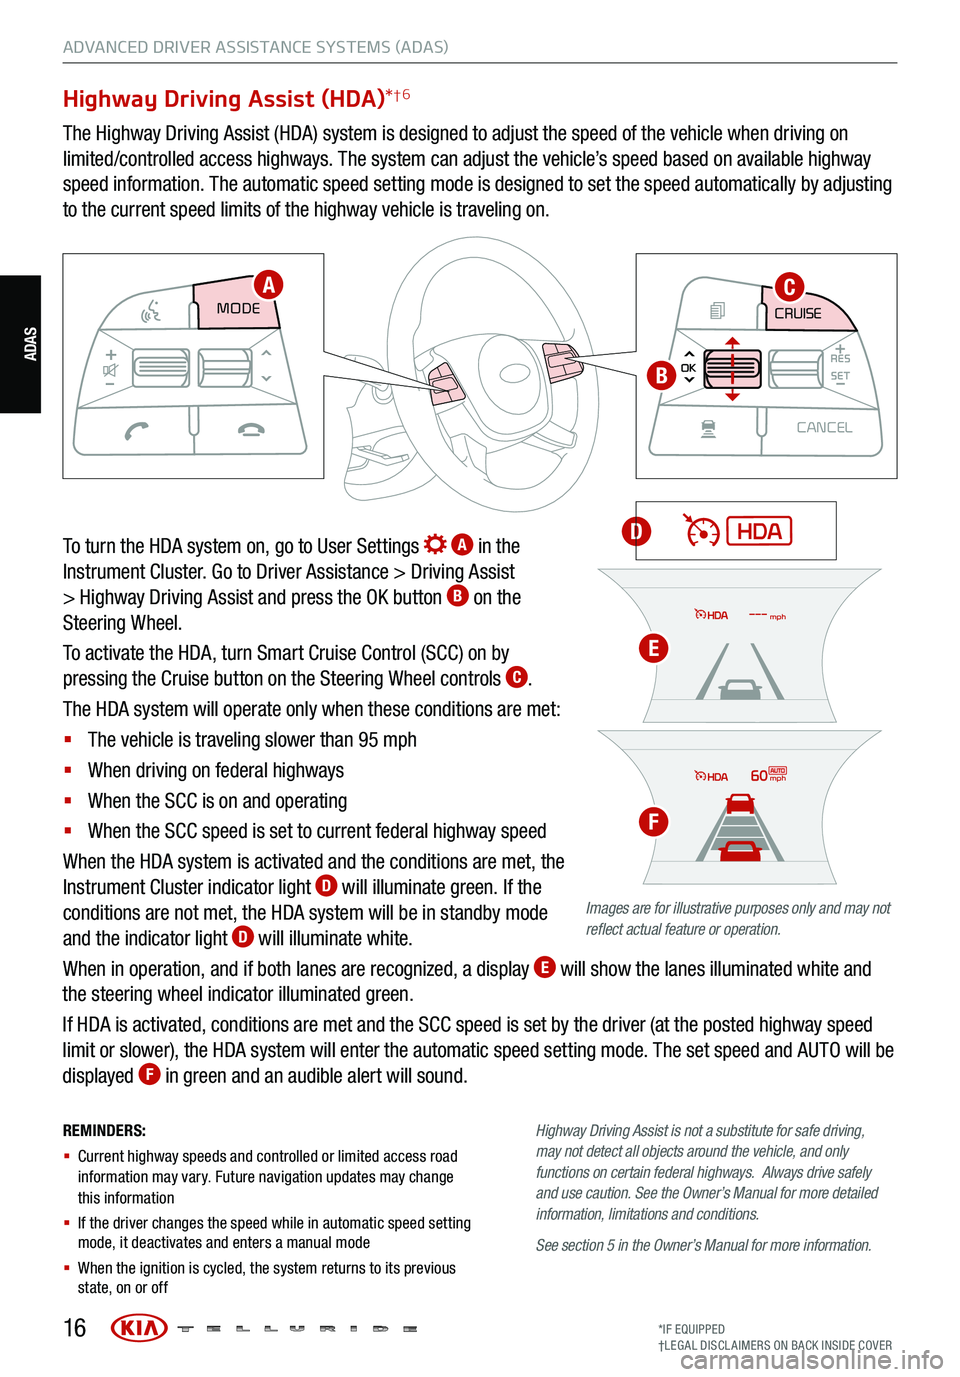
To turn the HDA system on, go to User Settings
A in the
Instrument Cluster. Go to Driver Assistance > Driving Assist
> Highway Driving Assist and press the OK button
B on the
Steering Wheel.
To activate the HDA, turn Smart Cruise Control (SCC) on by
pressing the Cruise button on the Steering Wheel controls
C.
The HDA system will operate only when these conditions are met:
§ The vehicle is traveling slower than 95 mph
§ When driving on federal highways
§ When the SCC is on and operating
§ When the SCC speed is set to current federal highway speed
When the HDA system is activated and the conditions are met, the
Instrument Cluster indicator light
D will illuminate green. If the
conditions are not met, the HDA system will be in standby mode
and the indicator light
D will illuminate white.
When in operation, and if both lanes are recognized, a display
E will show the lanes illuminated white and
the steering wheel indicator illuminated green.
If HDA is activated, conditions are met and the SCC speed is set by the driver (at the posted highway speed
limit or slower), the HDA system will enter the automatic speed setting mode. The set speed and AUTO will be
displayed
F in green and an audible alert will sound.
CRUISE
MODE CRUISE
CANCEL
RES
OK SET
CRUISE
CANCEL
RES
OK SET
MODE CRUISE
CANCEL
RES
OK SET
MODE
CANCEL
RES
OK SET
MODECRUISE
CANCEL
RES
OK SET
CRUISE
CANCEL
RES
OK SET
CRUISE
CANCEL
RES
OK SET
AC
B
D
Images are for illustrative purposes only and may not
reflect actual feature or operation.
60mph
mph
E
F
ADVANCED DRIVER ASSISTANCE SYSTEMS (ADAS)
ADAS
*IF EQUIPPED
†LEG AL DISCL AIMERS ON BACK INSIDE COVER
Page 22 of 70
20*IF EQUIPPED
†LEG AL DISCL AIMERS ON BACK INSIDE COVER
ADAS
ADVANCED DRIVER ASSISTANCE SYSTEMS (ADAS)
Your vehicle’s steering wheel buttons may
differ from those in the illustrations.
See section 5 in the Owner’s Manual for more
information.
Smart Cruise Control (SCC) with Stop & Go†6
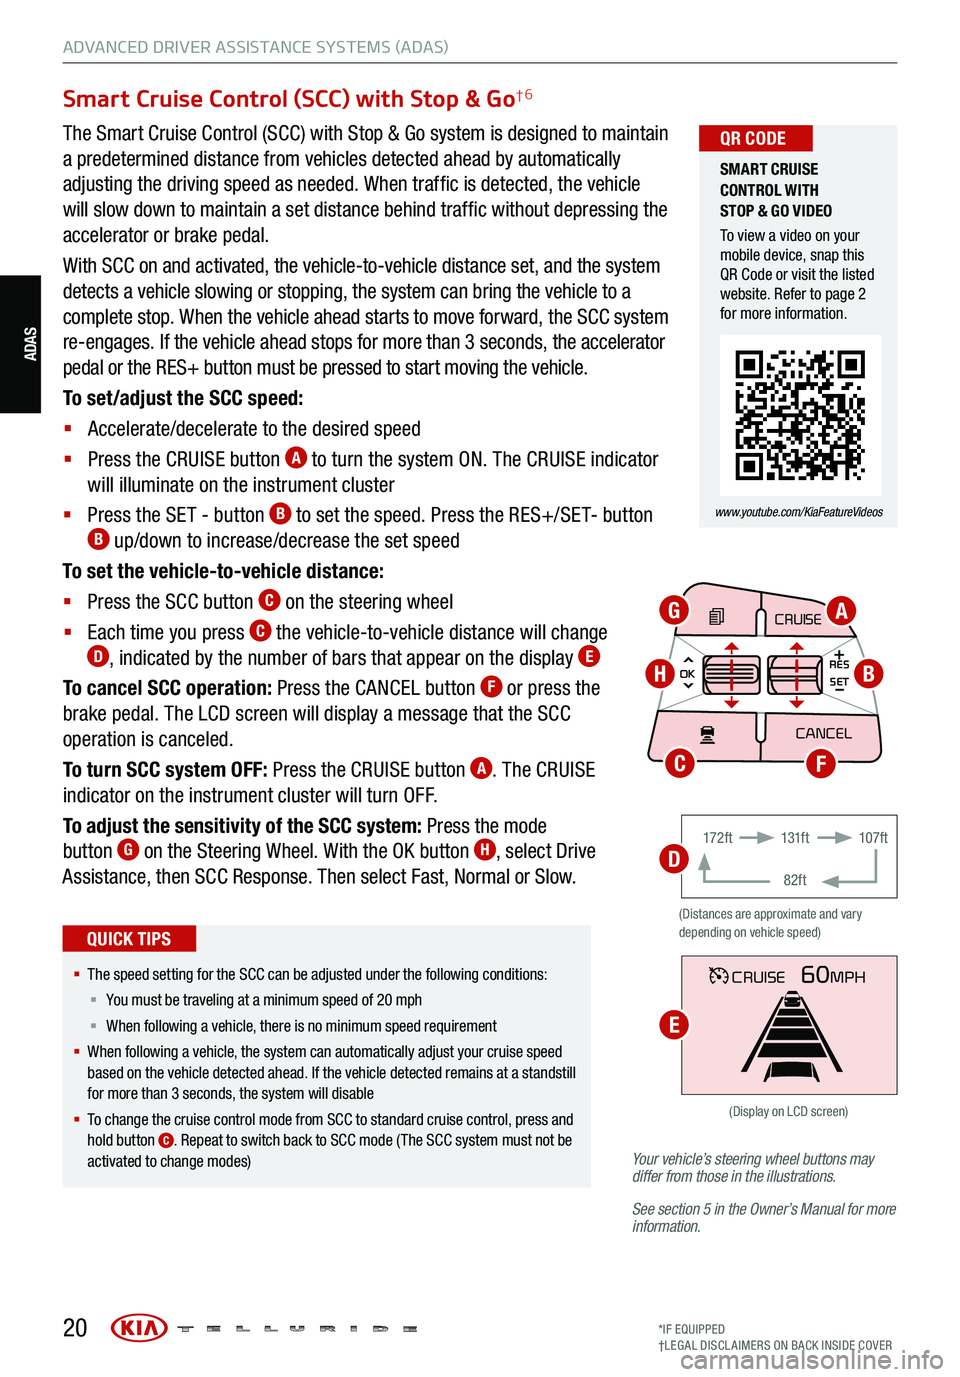
The Smart Cruise Control (SCC) with Stop & Go system is designed to maintain
a predetermined distance from vehicles detected ahead by automatically
adjusting the driving speed as needed. When traffic is detected, the vehicle
will slow down to maintain a set distance behind traffic without depressing the
accelerator or brake pedal.
With SCC on and activated, the vehicle-to-vehicle distance set, and the system
detects a vehicle slowing or stopping, the system can bring the vehicle to a
complete stop. When the vehicle ahead starts to move forward, the SCC system
re-engages. If the vehicle ahead stops for more than 3 seconds, the accelerator
pedal or the RES+ button must be pressed to start moving the vehicle.
To set/adjust the SCC speed:
§ Accelerate/decelerate to the desired speed
§ Press the CRUISE button
A to turn the system ON. The CRUISE indicator
will illuminate on the instrument cluster
§ Press the SET - button
B to set the speed. Press the RES+/SET- button B up/down to increase/decrease the set speed
To set the vehicle-to-vehicle distance:
§ Press the SCC button
C on the steering wheel
§ Each time you press
C the vehicle-to-vehicle distance will change D, indicated by the number of bars that appear on the display E
To cancel SCC operation: Press the CANCEL button F or press the
brake pedal. The LCD screen will display a message that the SCC
operation is canceled.
To turn SCC system OFF: Press the CRUISE button
A. The CRUISE
indicator on the instrument cluster will turn OFF.
To adjust the sensitivity of the SCC system: Press the mode
button
G on the Steering Wheel. With the OK button H, select Drive
Assistance, then SCC Response. Then select Fast, Normal or Slow.
§ The speed setting for the SCC can be adjusted under the following conditions:
§ You must be traveling at a minimum speed of 20 mph
§ When following a vehicle, there is no minimum spee d requirement
§ When following a vehicle, the system can automatically adjust your cruise speed
based on the vehicle detected ahead. If the vehicle detected remains at a standstill
for more than 3 seconds, the system will disable
§ To change the cruise control mode from SCC to standard cruise control, press and
hold button
C. Repeat to switch back to SCC mode ( The SCC system must not be
activated to change modes)
QUICK TIPS
(Distances are approximate and vary
depending on vehicle speed)
17 2 f t 131f t
82ft 107f t
CRUISE60MPH
(Display on LCD screen)
CRUISE
MODE
CRUISE
CANCEL
RES
OK SET
CRUISE
CANCEL
RES
OK SET
MODE CRUISE
CANCEL
RES
OK SET
MODE
CANCEL
RES
OK SET
MODECRUISE
CANCEL
RES
OK SET
CRUISE
CANCEL
RES
OK SET
AG
HB
FC
D
E
SMART CRUISE
CONTROL WITH
STOP & GO VIDEO
To view a video on your
mobile device, snap this
QR Code or visit the listed
website. Refer to page 2
for more information.
www.youtube.com/KiaFeatureVideos
QR CODE
Page 23 of 70
21ALWAYS CHECK THE OWNER’S MANUAL FOR COMPLE TE
OPERATING INFORMATION AND SAFETY WARNINGS. *IF EQUIPPED
†LEG AL DISCL AIMERS ON BACK INSIDE COVER
ADAS
ADVANCED DRIVER ASSISTANCE SYSTEMS (ADAS)
Smart Cruise Control (SCC) with Stop & Go†6 (Continued)
REMINDERS:
§
CRUISE indicator must be ON in order to operate SCC
§
The cruise control system will not activate until the brake pedal has been depressed at least once after the ignition is ON or
engine starting
§
The SCC system remains ON when ignition is cycled. The speed setting will need to be reset when ignition is cycled
§ When following a vehicle, the system will automatically adjust your cruise speed based on the vehicle detected in front
§
The SCC is also canceled when the driver’s door is opened, gear shift is changed out of D (Drive), EPB is activated and various
other conditions. See the Owner’s Manual for other conditions
§ If the SCC system is left on, it can be activated inadvertently. Keep the system off when not in use to avoid setting a speed which
the driver is not aware of
§ The SCC system is a supplemental system and is not a substitute for safe driving. It is the responsibility of the driver to always
check the speed and distance to the vehicle ahead
Use switch or pedal to accelerate
RES +
SET -
The Leading Vehicle Departure Alert system is not a substitute for safe and proper driving. Always drive safely and use caution.
Images are for illustrative purposes only and may not reflect actual feature or operation.
See section 5 in the Owner’s Manual for more information.
REMINDERS:
§
When the ignition is cycled, the system returns to its previous state, on or off
§ Always check the front of the vehicle and road conditions before departure
Leading vehicle
is driving away
RES +
SET -
Leading Vehicle Departure Alert (LVDA) *†6
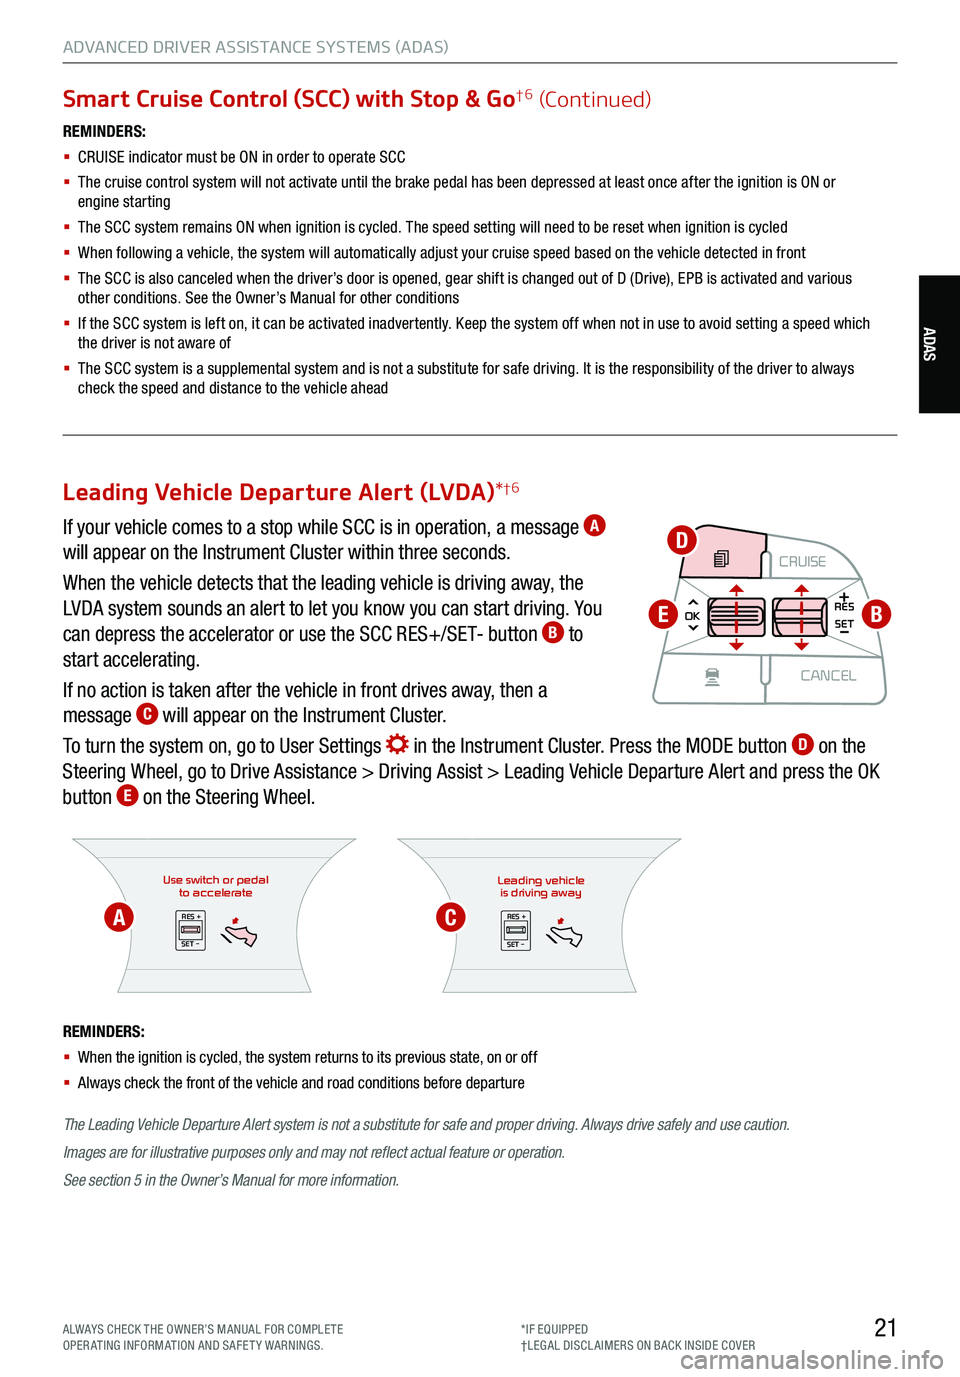
If your vehicle comes to a stop while SCC is in operation, a message A
will appear on the Instrument Cluster within three seconds.
When the vehicle detects that the leading vehicle is driving away, the
LVDA system sounds an alert to let you know you can start driving. You
can depress the accelerator or use the SCC RES+/SET- button
B to
start accelerating.
If no action is taken after the vehicle in front drives away, then a
message
C will appear on the Instrument Cluster.
To turn the system on, go to User Settings
in the Instrument Cluster. Press the MODE button D on the
Steering Wheel, go to Drive Assistance > Driving Assist > Leading Vehicle Departure Alert and press the OK
button
E on the Steering Wheel.
CRUISE
MODE CRUISE
CANCEL
RES
OK SET
CRUISE
CANCEL
RES
OK SET
MODE CRUISE
CANCEL
RES
OK SET
MODE
CANCEL
RES
OK SET
MODECRUISE
CANCEL
RES
OK SET
CRUISE
CANCEL
RES
OK SETB
D
E
AC