lock KIA TELLURIDE 2021 Features and Functions Guide
[x] Cancel search | Manufacturer: KIA, Model Year: 2021, Model line: TELLURIDE, Model: KIA TELLURIDE 2021Pages: 70, PDF Size: 8.41 MB
Page 4 of 70
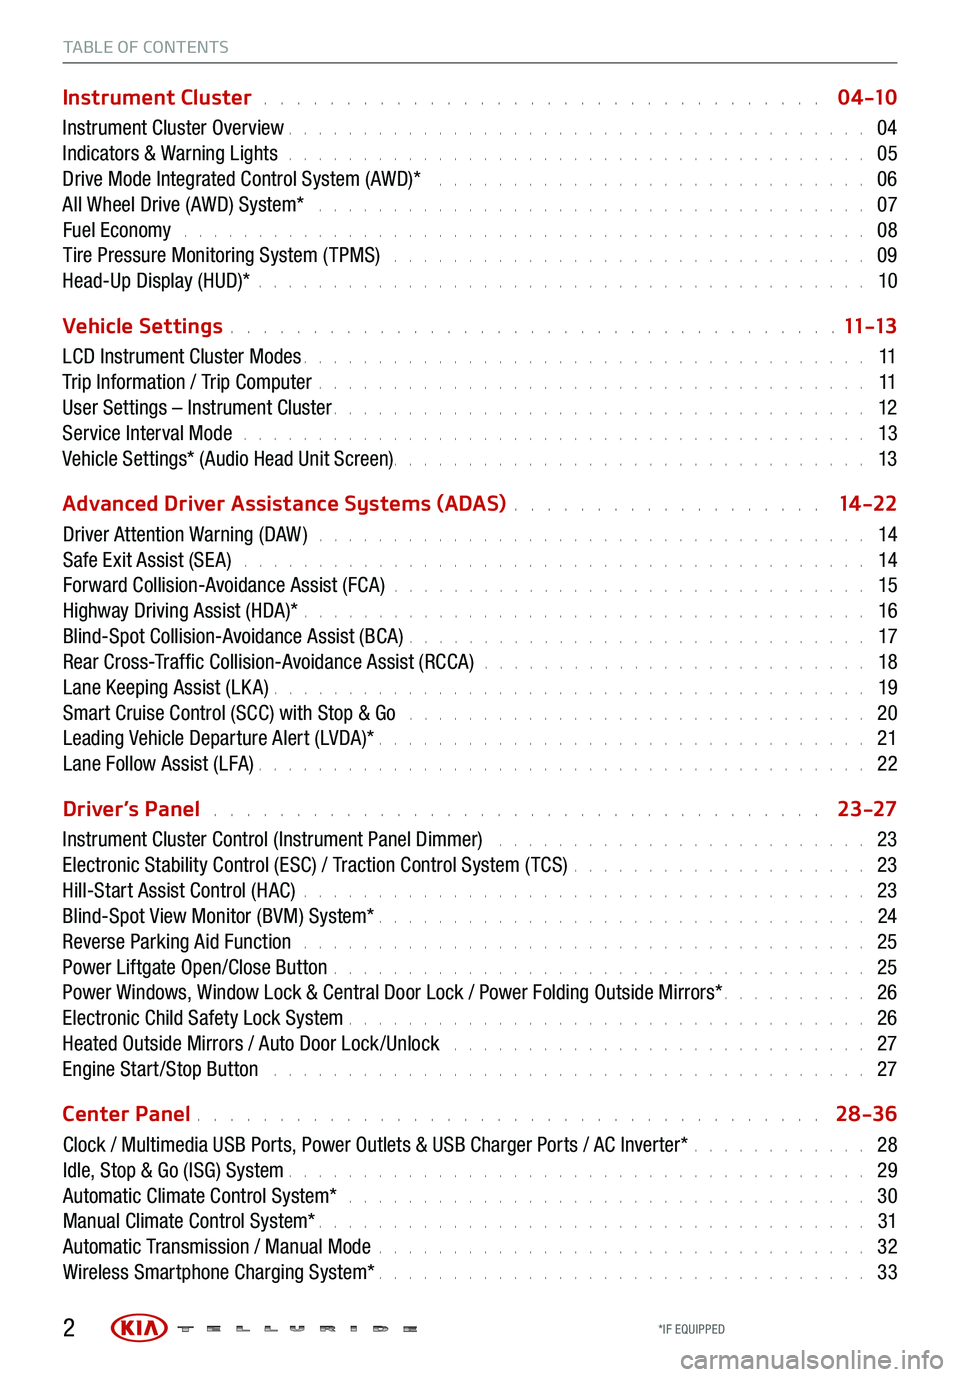
TABLE OF CONTENTS
Instrument Cluster . . . . . . . . . . . . . . . . . . . . . . . . . . . . . . . . . . 0 4 -10
Instrument Cluster Overview . . . . . . . . . . . . . . . . . . . . . . . . . . . . . . . . . . . . \
. . . 04
Indicators & Warning Lights . . . . . . . . . . . . . . . . . . . . . . . . . . . . . . . . . . . . \
. . . 05
Drive Mode Integrated Control System (AWD)* . . . . . . . . . . . . . . . . . . . . . . . . . . . . . 06
All Wheel Drive (AWD) System* . . . . . . . . . . . . . . . . . . . . . . . . . . . . . . . . . . . . . 07
Fuel Economy . . . . . . . . . . . . . . . . . . . . . . . . . . . . . . . . . . . . \
. . . . . . . . . . 08
Tire Pressure Monitoring System ( TPMS) . . . . . . . . . . . . . . . . . . . . . . . . . . . . . . . . 09
Head-Up Display (HUD)* . . . . . . . . . . . . . . . . . . . . . . . . . . . . . . . . . . . . \
. . . . . 10
Vehicle Settings
. . . . . . . . . . . . . . . . . . . . . . . . . . . . . . . . . . . . \
. 11 -13
LCD Instrument Cluster Modes . . . . . . . . . . . . . . . . . . . . . . . . . . . . . . . . . . . . \
. . 11
Trip Information / Trip Computer . . . . . . . . . . . . . . . . . . . . . . . . . . . . . . . . . . . . \
. 11
User Settings – Instrument Cluster . . . . . . . . . . . . . . . . . . . . . . . . . . . . . . . . . . . . \
12
Service Interval Mode . . . . . . . . . . . . . . . . . . . . . . . . . . . . . . . . . . . . . . . . . . 13
Vehicle Settings* (Audio Head Unit Screen) . . . . . . . . . . . . . . . . . . . . . . . . \
. . . . . . . . 13
Advanced Driver Assistance Systems (ADAS)
. . . . . . . . . . . . . . . . . . . 14 -22
Driver Attention Warning (DAW ) . . . . . . . . . . . . . . . . . . . . . . . . . . . . . . . . . . . . . 14
Safe Exit Assist (SE A) . . . . . . . . . . . . . . . . . . . . . . . . . . . . . . . . . . . . . . . . . . 14
Forward Collision-Avoidance Assist (FCA) . . . . . . . . . . . . . . . . . . . . . . . . . . . . . . . . 15
Highway Driving Assist (HDA)* . . . . . . . . . . . . . . . . . . . . . . . . . . . . . . . . . . . . \
. . 16
Blind-Spot Collision-Avoidance Assist (BCA) . . . . . . . . . . . . . . . . . . . . . . . . . . . . . . . 17
Rear Cross-Traffic Collision-Avoidance Assist (RCCA) . . . . . . . . . . . . . . . . . . . . . . . . . . 18
Lane Keeping Assist (LK A) . . . . . . . . . . . . . . . . . . . . . . . . . . . . . . . . . . . . \
. . . . 19
Smart Cruise Control (SCC) with Stop & Go . . . . . . . . . . . . . . . . . . . . . . . . . . . . . . . 20
Leading Vehicle Departure Alert (LVDA)* . . . . . . . . . . . . . . . . . . . . . . . . . . . . . . . . . 21
Lane Follow Assist (LFA) . . . . . . . . . . . . . . . . . . . . . . . . . . . . . . . . . . . . \
. . . . . 22
Driver’s Panel
. . . . . . . . . . . . . . . . . . . . . . . . . . . . . . . . . . . . . 23-27
Instrument Cluster Control (Instrument Panel Dimmer) . . . . . . . . . . . . . . . . . . . . . . . . . 23
Electronic Stability Control (ESC) / Traction Control System ( TCS) . . . . . . . . . . . . . . . . . . . . 23
Hill-Start Assist Control (HAC) . . . . . . . . . . . . . . . . . . . . . . . . . . . . . . . . . . . . \
. . 23
Blind-Spot View Monitor (BVM) System* . . . . . . . . . . . . . . . . . . . . . . . . . . . . . . . . . 24
Reverse Parking Aid Function . . . . . . . . . . . . . . . . . . . . . . . . . . . . . . . . . . . . \
. . 25
Power Liftgate Open/Close Button . . . . . . . . . . . . . . . . . . . . . . . . . . . . . . . . . . . . 25
Power Windows, Window Lock & Central Door Lock / Power Folding Outside Mirrors* . . . . . . . . . . 26
Electronic Child Safety Lock System . . . . . . . . . . . . . . . . . . . . . . . . . . . . . . . . . . . 26
Heated Outside Mirrors / Auto Door Lock /Unlock . . . . . . . . . . . . . . . . . . . . . . . . . . . . 27
Engine Start /Stop Button . . . . . . . . . . . . . . . . . . . . . . . . . . . . . . . . . . . . \
. . . . 27
Center Panel
. . . . . . . . . . . . . . . . . . . . . . . . . . . . . . . . . . . . \
. . 28-36
Clock / Multimedia USB Ports, Power Outlets & USB Charger Ports / AC Inverter* . . . . . . . . . . . . 28
Idle, Stop & Go (ISG) System . . . . . . . . . . . . . . . . . . . . . . . . . . . . . . . . . . . . \
. . . 29
Automatic Climate Control System* . . . . . . . . . . . . . . . . . . . . . . . . . . . . . . . . . . . 30
Manual Climate Control System* . . . . . . . . . . . . . . . . . . . . . . . . . . . . . . . . . . . . \
. 31
Automatic Transmission / Manual Mode . . . . . . . . . . . . . . . . . . . . . . . . . . . . . . . . . 32
Wireless Smartphone Charging System* . . . . . . . . . . . . . . . . . . . . . . . . . . . . . . . . . 33
2*IF EQUIPPED
Page 6 of 70
4
EPB
AUTOLOCK
08
CH
12
3
4
5
6
7
x1000rpm
160
00
20
40
60
200
220
240
260
80
180
100
160
1
20 140
E F
2040
60
80
100
12 0
1 4 0
MPH
km/h
EPB
AUTO
0 8
CH
12
3
4
5
6
7
x1000rpm
AUTO
HOLD
160
00
20
40
60
200
220
240
260
80
180
100
160
1
20 140
E F
2040
60
80
100
12 0
1 4 0
MPH
km/h
(Type B instrument cluster shown)(Type A instrument cluster shown)
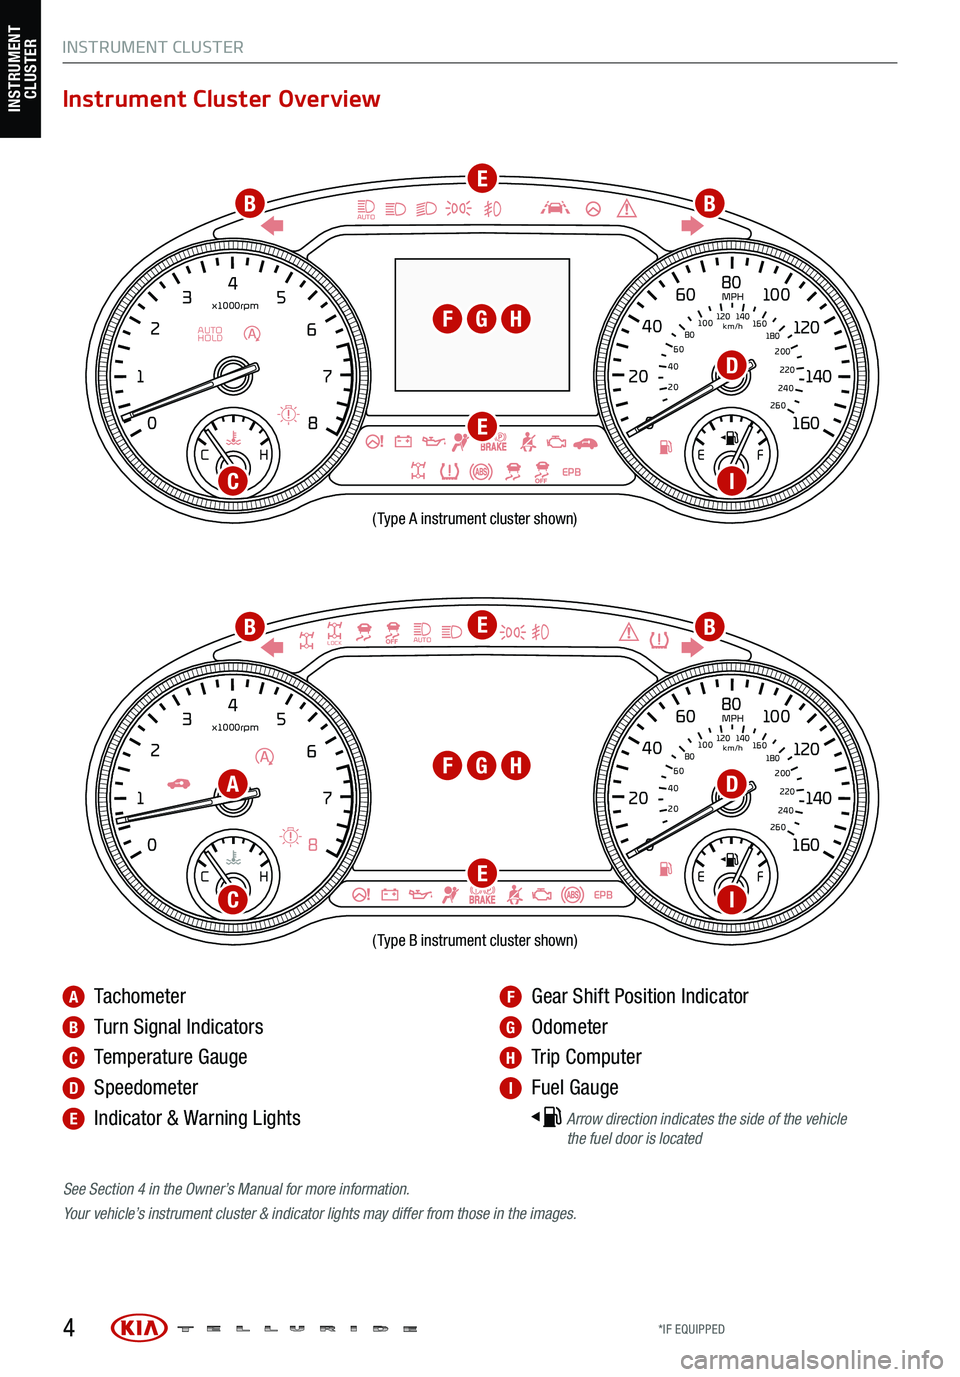
Instrument Cluster Overview
See Section 4 in the Owner’s Manual for more information.
Your vehicle’s instrument cluster & indicator lights may differ from those in the images.
A Tachometer
B Turn Signal Indicators
C Temperature Gauge
D Speedometer
E Indicator & Warning Lights
F Gear Shift Position Indicator
G Odometer
H Trip Computer
I Fuel Gauge
Arrow direction indicates the side of the vehicle
the fuel door is located
INSTRUMENT CLUSTER
A
D
D
C
C
I
I
B
B
E
E
E
E
G
G
H
H
F
F
B
B
INSTRUMENT
CLUSTER
*IF EQUIPPED
Page 7 of 70
5
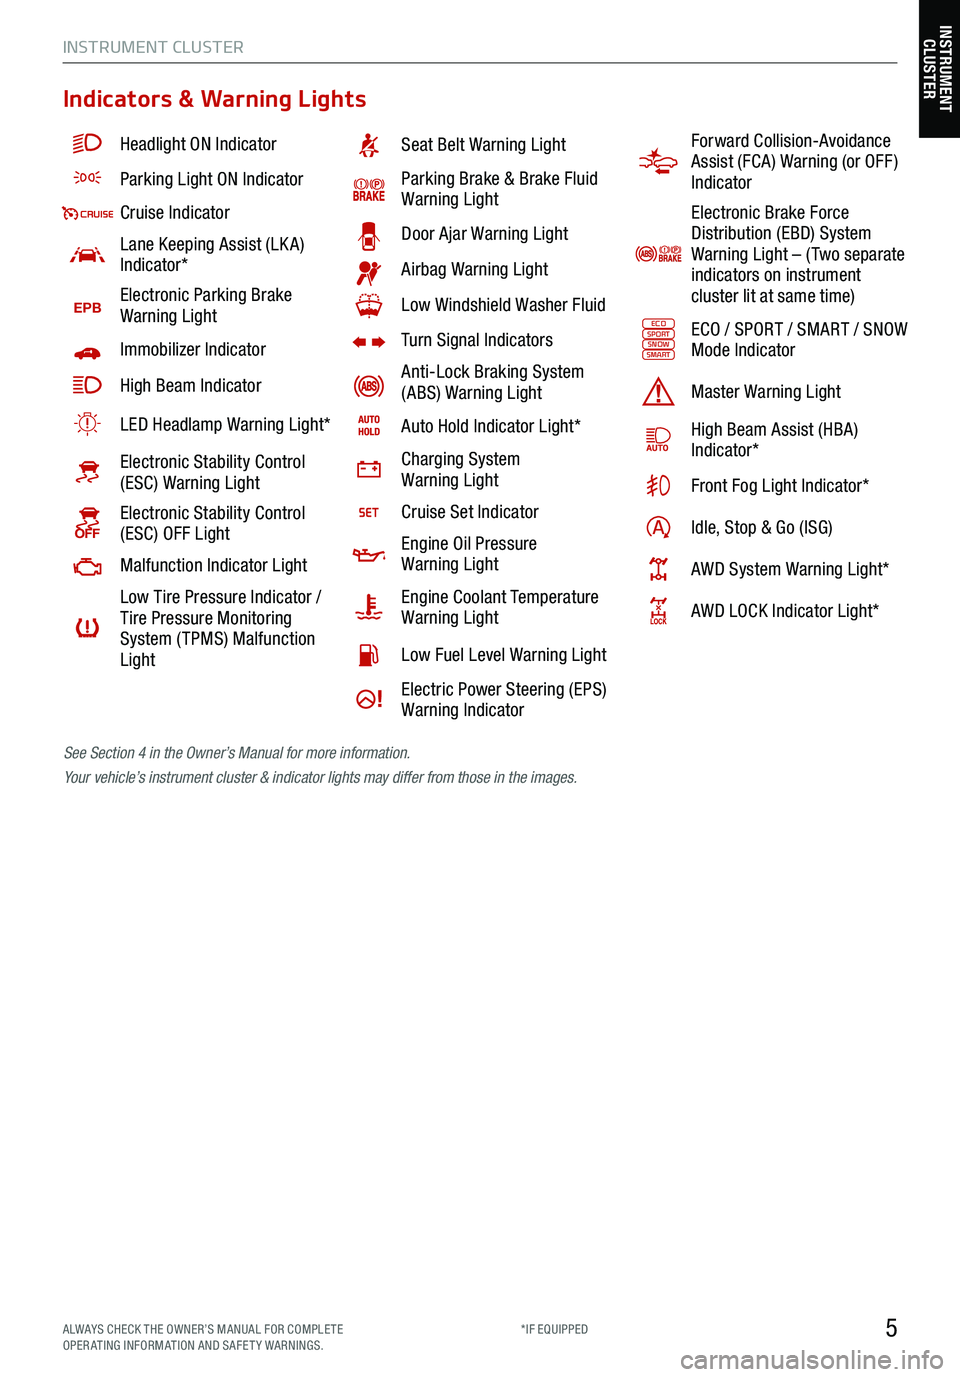
Indicators & Warning Lights
Headlight ON Indicator
Parking Light ON Indicator
Cruise Indicator
Lane Keeping Assist (LK A)
Indicator*
EPBElectronic Parking Brake
Warning Light
Immobilizer Indicator
High Beam Indicator
LED Headlamp Warning Light*
Electronic Stability Control
(ESC) Warning Light
Electronic Stability Control
(ESC) OFF Light
Malfunction Indicator Light
Low Tire Pressure Indicator /
Tire Pressure Monitoring
System ( TPMS) Malfunction
Light
Seat Belt Warning Light
Parking Brake & Brake Fluid
Warning Light
Door Ajar Warning Light
Airbag Warning Light
Low Windshield Washer Fluid
Turn Signal Indicators
Anti-Lock Braking System
(ABS) Warning Light
Auto Hold Indicator Light*
Charging System
Warning Light
Cruise Set Indicator
Engine Oil Pressure
Warning Light
Engine Coolant Temperature
Warning Light
Low Fuel Level Warning Light
Electric Power Steering (EPS)
Warning Indicator
Forward Collision-Avoidance
Assist (FCA) Warning (or OFF )
Indicator
Electronic Brake Force
Distribution (EBD) System
Warning Light – ( Two separate
indicators on instrument
cluster lit at same time)
ECOSPORTSNOWSMARTECO / SPORT / SMART / SNOW
Mode Indicator
Master Warning Light
High Beam Assist (HBA)
Indicator*
Front Fog Light Indicator*
Idle, Stop & Go (ISG)
AWD System Warning Light*
AWD LOCK Indicator Light*
See Section 4 in the Owner’s Manual for more information.
Your vehicle’s instrument cluster & indicator lights may differ from those in the images.
INSTRUMENT CLUSTER
INSTRUMENT
CLUSTER
ALWAYS CHECK THE OWNER’S MANUAL FOR COMPLE TE
OPERATING INFORMATION AND SAFETY WARNINGS. *IF EQUIPPED
Page 8 of 70
Drive Mode Integrated Control System (AWD)*
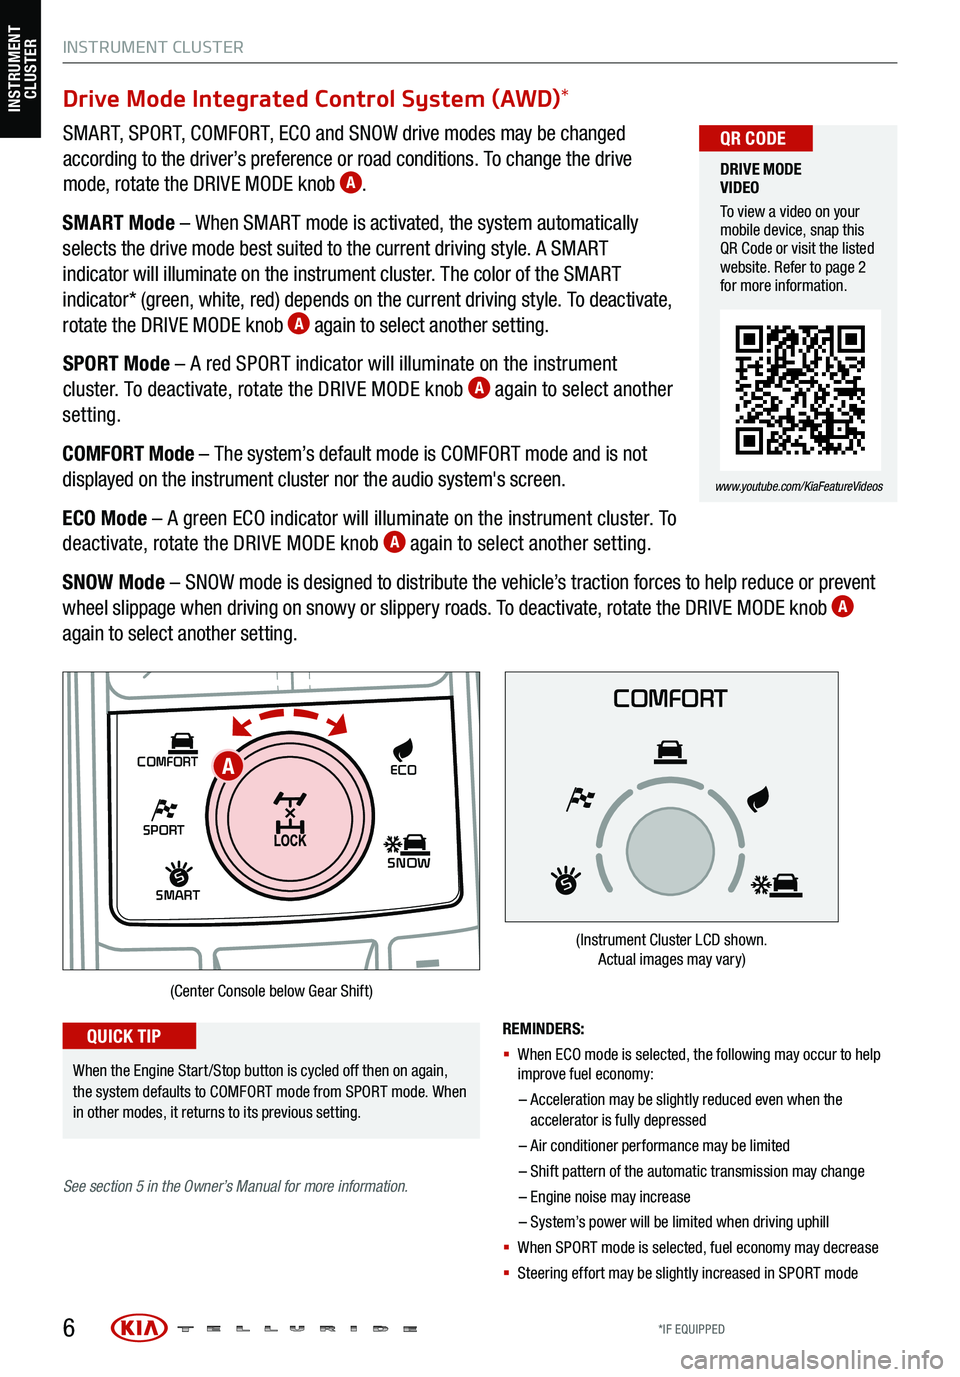
SMART, SPORT, COMFORT, ECO and SNOW drive modes may be changed
according to the driver’s preference or road conditions. To change the drive
mode, rotate the DRIVE MODE knob
A.
SMART Mode – When SMART mode is activated, the system automatically
selects the drive mode best suited to the current driving style. A SMART
indicator will illuminate on the instrument cluster. The color of the SMART
indicator* (green, white, red) depends on the current driving style. To deactivate,
rotate the DRIVE MODE knob
A again to select another setting.
SPORT Mode – A red SPORT indicator will illuminate on the instrument
cluster. To deactivate, rotate the DRIVE MODE knob
A again to select another
setting.
COMFORT Mode – The system’s default mode is COMFORT mode and is not
displayed on the instrument cluster nor the audio system's screen.
ECO Mode – A green ECO indicator will illuminate on the instrument cluster. To
deactivate, rotate the DRIVE MODE knob
A again to select another setting.
SNOW Mode – SNOW mode is designed to distribute the vehicle’s traction forces to help reduce or prevent
wheel slippage when driving on snowy or slippery roads. To deactivate, rotate the DRIVE MODE knob
A
again to select another setting.
6
DRIVE MODE
VIDEO
To view a video on your
mobile device, snap this
QR Code or visit the listed
website. Refer to page 2
for more information.
www.youtube.com/KiaFeatureVideos
QR CODE
SHIFT
LOCK
RELEASE
P•
R•
N•
D•
+
•
-
SPORT
SMART
COMFORT
SNOW
ECO
REMINDERS:
§ When ECO mode is selected, the following may occur to help
improve fuel economy:
– Acceleration may be slightly reduced even when the
accelerator is fully depressed
– Air conditioner performance may be limited
– Shift pattern of the automatic trans mission may change
– Engine noise may increase
– System’s power will be limited when driving uphill
§ When SPORT mode is selected, fuel economy may decrease
§ Steering effort may be slightly increased in SPORT mode
(Center Console below Gear Shift)
When the Engine Start /Stop button is cycled off then on again,
the system defaults to COMFORT mode from SPORT mode. When
in other modes, it returns to its previous setting.
QUICK TIP
COMFORT
(Instrument Cluster LCD shown.
Actual images may vary)
See section 5 in the Owner’s Manual for more information.
INSTRUMENT CLUSTER
A
INSTRUMENT
CLUSTER
*IF EQUIPPED
Page 9 of 70
7
INSTRUMENT CLUSTER
SHIFT
LOCK
RELEASE
P•
R•
N•
D•
+
•
-
SPORT
SMART
COMFORT
SNOW
ECO
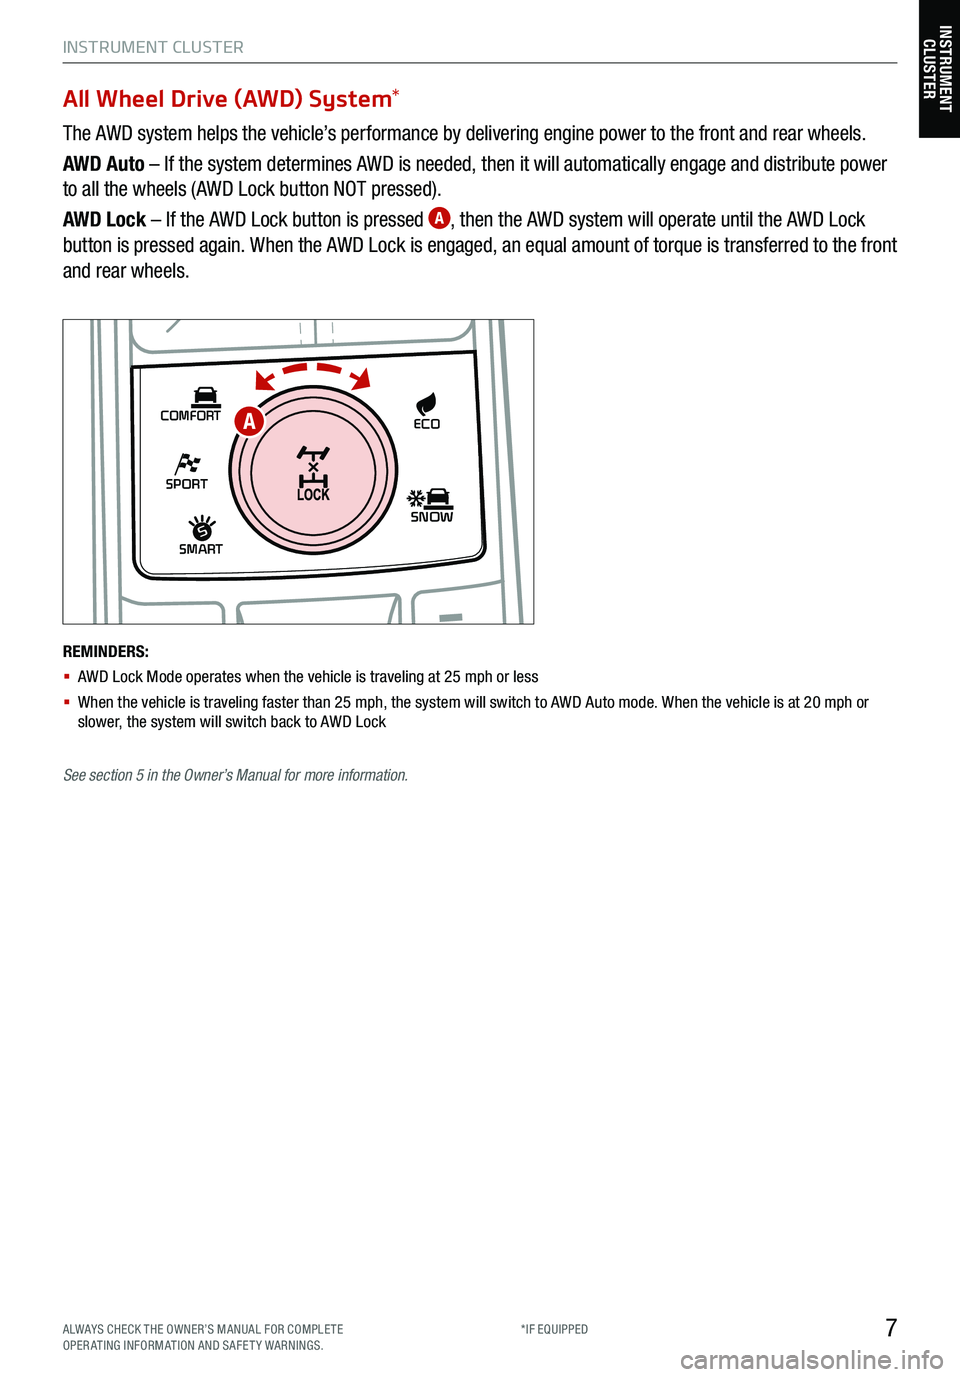
All Wheel Drive (AWD) System *
The AWD system helps the vehicle’s performance by delivering engine power to the front and rear wheels.
AWD Auto – If the system determines AWD is needed, then it will automatically engage and distribute power
to all the wheels (AWD Lock button NOT pressed).
AWD Lock – If the AWD Lock button is pressed
A, then the AWD system will operate until the AWD Lock
button is pressed again. When the AWD Lock is engaged, an equal amount of torque is transferred to the front
and rear wheels.
REMINDERS:
§ AWD Lock Mode operates when the vehicle is traveling at 25 mph or less
§ When the vehicle is traveling faster than 25 mph, the system will switch to AWD Auto mode. W hen the vehicle is at 20 mph or
slower, the system will switch back to AWD Lock
A
INSTRUMENT CLUSTER
See section 5 in the Owner’s Manual for more information.
ALWAYS CHECK THE OWNER’S MANUAL FOR COMPLE TE
OPERATING INFORMATION AND SAFETY WARNINGS. *IF EQUIPPED
Page 14 of 70
12
VEHICLE SET TINGS
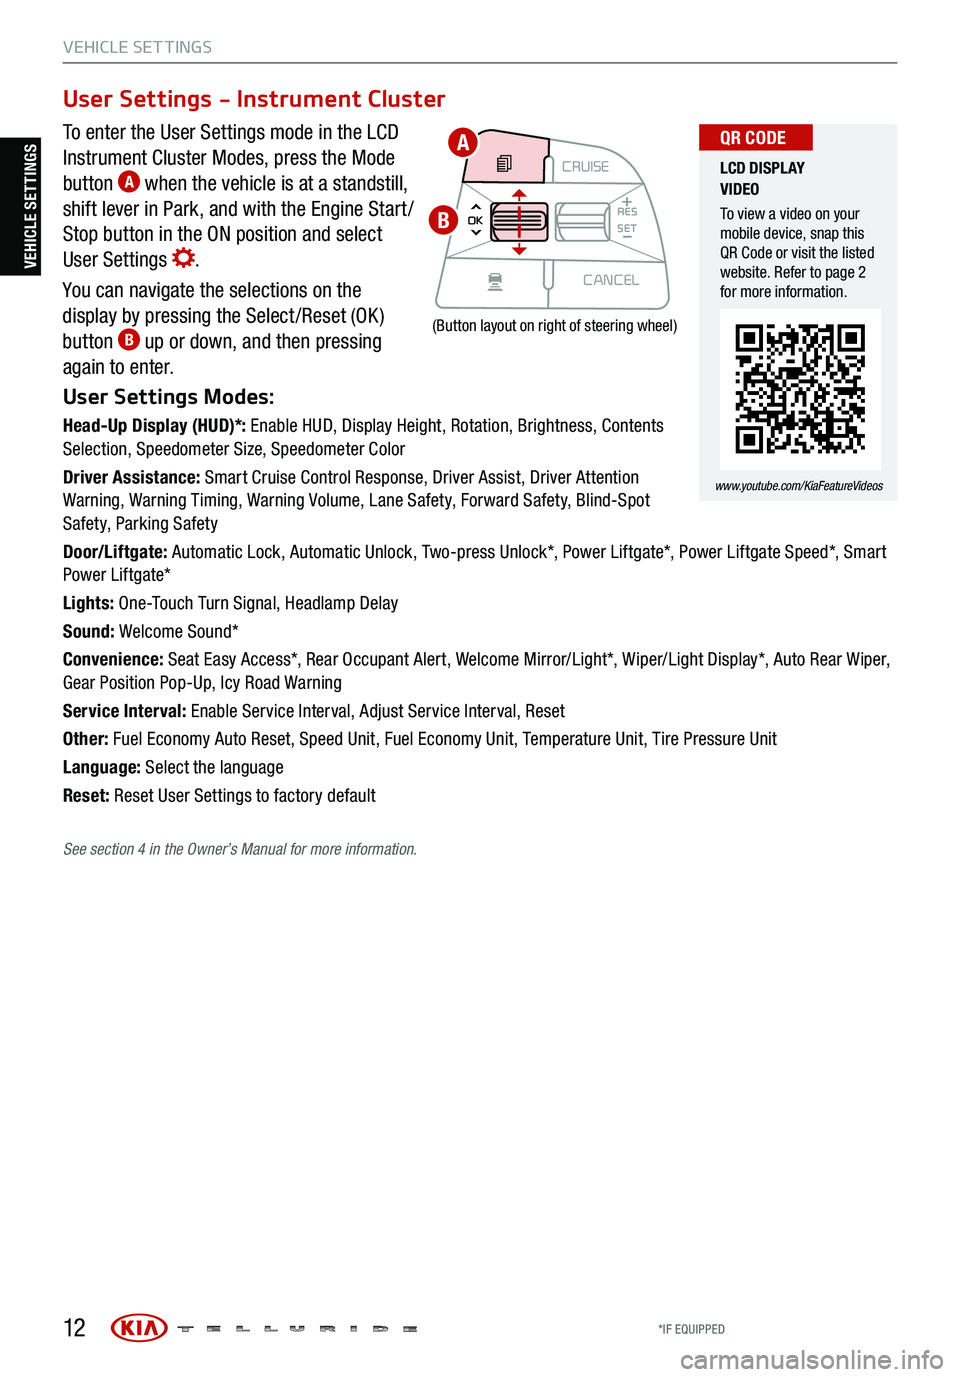
To enter the User Settings mode in the LCD
Instrument Cluster Modes, press the Mode
button
A when the vehicle is at a standstill,
shift lever in Park, and with the Engine Start /
Stop button in the ON position and select
User Settings
.
You can navigate the selections on the
display by pressing the Select /Reset (OK )
button
B up or down, and then pressing
again to enter.
User Settings Modes:
Head-Up Display (HUD)*: Enable HUD, Display Height, Rotation, Brightness, Contents
Selection, Speedometer Size, Speedometer Color
Driver Assistance: Smart Cruise Control Response, Driver Assist, Driver Attention
Warning, Warning Timing, Warning Volume, Lane Safety, Forward Safety, Blind-Spot
Safety, Parking Safety
Door/Liftgate: Automatic Lock, Automatic Unlock, Two-press Unlock*, Power Liftgate*, Power Liftgate Speed*, Smart
Power Liftgate*
Lights: One-Touch Turn Signal, Headlamp Delay
Sound: Welcome Sound*
Convenience: Seat Easy Access*, Rear Occupant Alert, Welcome Mirror/Light*, Wiper/Light Display*, Auto Rear Wiper,
Gear Position Pop-Up, Icy Road Warning
Service Interval: Enable Service Interval, Adjust Service Interval, Reset
Other: Fuel Economy Auto Reset, Speed Unit, Fuel Economy Unit, Temperature Unit, Tire Pressure Unit
Language: Select the language
Reset: Reset User Settings to factory default
User Settings - Instrument Cluster
CRUISE
MODE CRUISE
CANCEL
RES
OK SET
CRUISE
CANCEL
RES
OK SET
MODE CRUISE
CANCEL
RES
OK SET
MODE
CANCEL
RES
OK SET
MODECRUISE
CANCEL
RES
OK SET
CRUISE
CANCEL
RES
OK SET
(Button layout on right of steering wheel)
LCD DISPLAY
VIDEO
To view a video on your
mobile device, snap this
QR Code or visit the listed
website. Refer to page 2
for more information.
www.youtube.com/KiaFeatureVideos
QR CODEA
B
VEHICLE SETTINGS
See section 4 in the Owner’s Manual for more information.
*IF EQUIPPED
Page 28 of 70
26
REMINDER: When you press C,
the rear window controls for the
Rear Passenger Windows are
disabled .
Button configuration may vary
depending on vehicle model .
See section 4 in the Owner’s
Manual for more information.
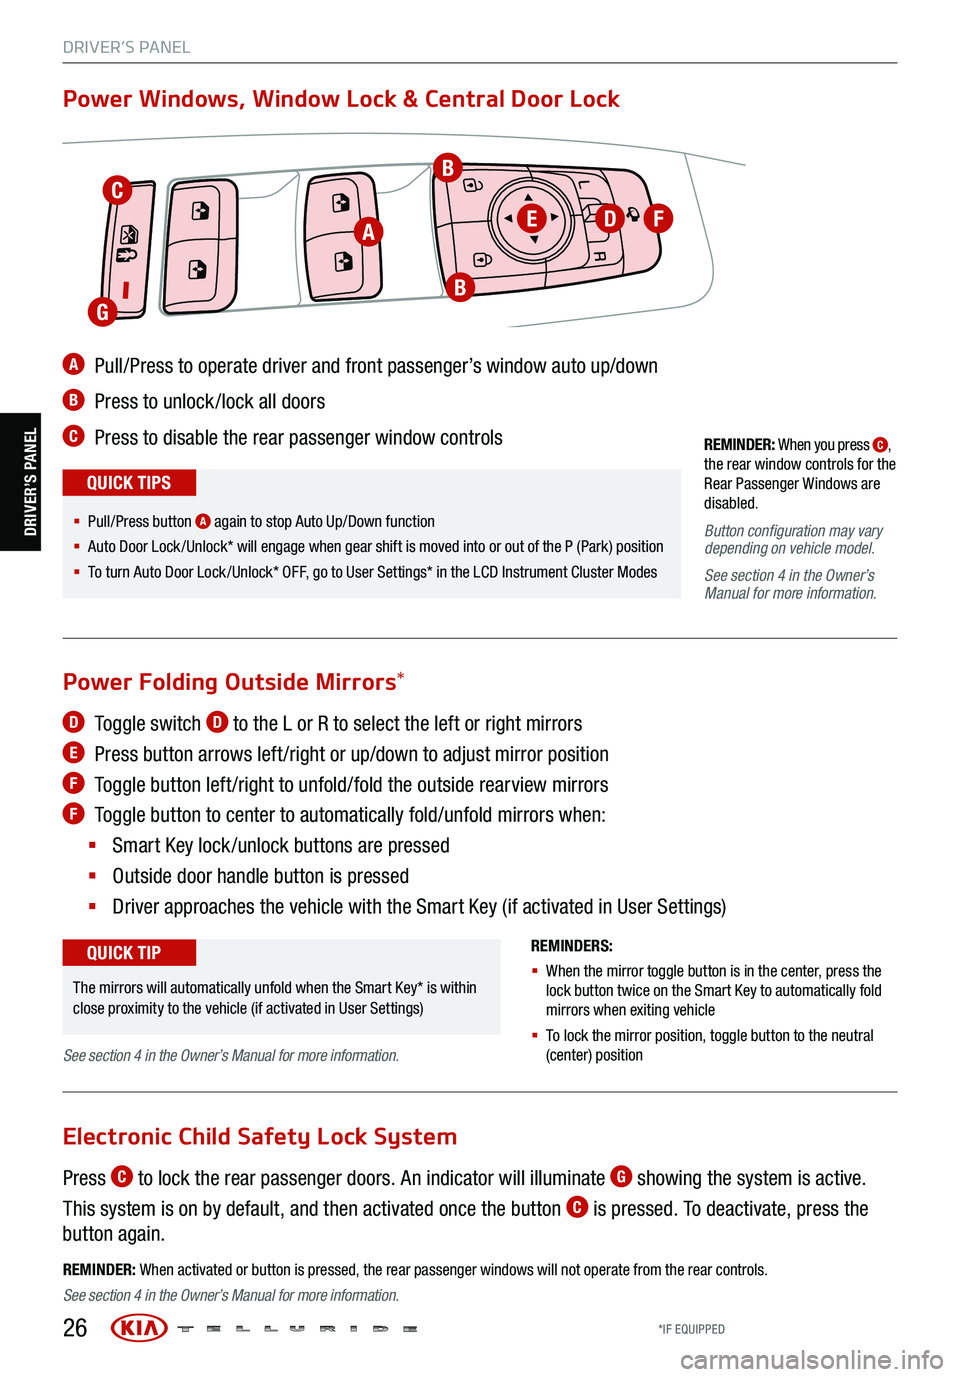
A Pull/Press to operate driver and front passenger’s window auto up/down
B Press to unlock /lock all doors
C Press to disable the rear passenger window controls
Power Windows, Window Lock & Central Door Lock
REMINDER: When activated or button is pressed, the rear passenger windows will not operate from the rear controls .
R
L
§ Pull/P ress button A again to stop Auto Up/Down function
§ Auto Door Lock /Unlock* will engage when gear shift is moved into or out of the P (Park) position
§ To turn Auto Door Lock /Unlock* OFF, go to User Settings* in the LCD Instrument Cluster Modes
QUICK TIPS
D Toggle switch D to the L or R to select the left or right mirrors
E Press button arrows left /right or up/down to adjust mirror position
F
Toggle button left /right to unfold/fold the outside rearview mirrors
F Toggle button to center to automatically fold/unfold mirrors when:
§ Smart Key lock /unlock buttons are pressed
§ Outside door handle button is pressed
§ Driver approaches the vehicle with the Smart Key (if activated in User Settings)
REMINDERS:
§ When the mirror toggle button is in the center, press the
lock button twice on the Smart Key to automatically fold
mirrors when exiting vehicle
§ To lock the mirror position , toggle button to the neutral
(center) position
Power Folding Outside Mirrors *
Press C to lock the rear passenger doors. An indicator will illuminate G showing the system is active.
This system is on by default, and then activated once the button
C is pressed. To deactivate, press the
button again.
Electronic Child Safety Lock System
The mirrors will automatically unfold when the Smart Key* is within
close proximity to the vehicle (if activated in User Settings)
QUICK TIP
C
A
B
EDF
B
G
DRIVER’S PANEL
DRIVER’S PANEL
See section 4 in the Owner’s Manual for more information.
See section 4 in the Owner’s Manual for more information.
*IF EQUIPPED
Page 29 of 70
27
DRIVER’S PANEL
DRIVER’S PANEL
Heated Outside Mirrors
Mirror heaters automatically turn ON/OFF at the same time the Rear Window Defroster is turned ON/OFF.
Rear Window Defroster button is located on the climate control system panel.
See section 4 in the Owner’s Manual for more information.
Auto Door Lock/Unlock
Auto Door Lock /Unlock will engage when the gear shift is moved into or out of the P (Park) position. Refer
to the User Settings on how to turn Auto Door Lock /Unlock ON/OFF.
See section 4 in the Owner’s Manual for more information.
REMINDERS:
§ If the Smart Key fob battery is dead, you can still start the engine by pressing the ENGINE START/STOP button with the Lock-button
end of the Smart Key. The Smart Key must contact the ENGINE START/STOP button directly, at a right angle
§ In an emergency situation while the vehicle is in motion, you are able to turn the engine off and to the ACC position by pressing the
ENGINE START/STOP button for more than 2 seconds or 3 times successively within 3 seconds
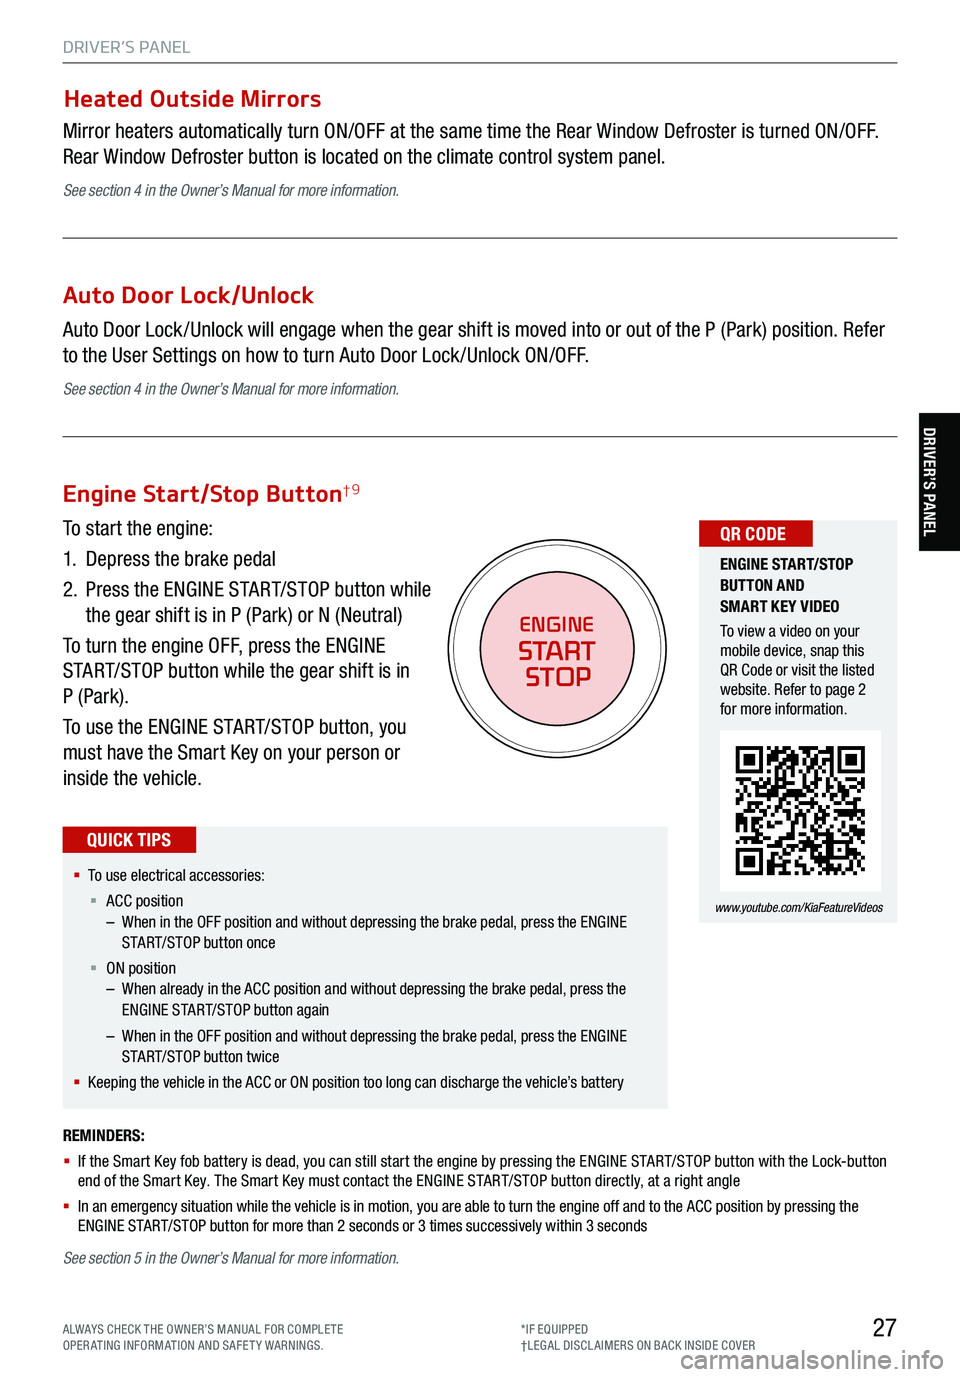
Engine Start/Stop Button†9
To start the engine:
1. Depress the brake pedal
2.
Press the ENGINE START/STOP button while
the gear shift is in P (Park) or N (Neutral)
To turn the engine OFF, press the ENGINE
START/STOP button while the gear shift is in
P (Park).
To use the ENGINE START/STOP button, you
must have the Smart Key on your person or
inside the vehicle.
§ To use electrical accessories:
§ ACC position
– When in the OFF position and without depressing the brake pedal, press the ENGINE
START/STOP button once
§ ON position
– When already in the ACC position and without depressing the brake pedal, press the
ENGINE START/STOP button again
– When in the OFF position and without depressing the brake pedal, press the ENGINE
START/STOP button twice
§ Keeping the vehicle in the ACC or ON position too long can discharge the vehicle’s battery
QUICK TIPS
ENGINE
START
STOP
ENGINE STA RT/STOP
BUTTON AND
SMART KEY VIDEO
To view a video on your
mobile device, snap this
QR Code or visit the listed
website. Refer to page 2
for more information.
www.youtube.com/KiaFeatureVideos
QR CODE
See section 5 in the Owner’s Manual for more information.
ALWAYS CHECK THE OWNER’S MANUAL FOR COMPLE TE
OPERATING INFORMATION AND SAFETY WARNINGS. *IF EQUIPPED
†LEG AL DISCL AIMERS ON BACK INSIDE COVER
Page 30 of 70
28
CENTER PANEL
Select the SETUP key on audio head unit. Select General, then scroll to and select DATE / TIME, and adjust.
REMINDERS:
§ Daylight Savings must be enabled or disabled o n the Clock Settings screen
§ To access manual date and time setting, turn GPS Time OFF in the Clock Settings (UVO link with Navigation*)
Refer to the Car Infotainment System Quick Reference Guide for more information.
Clock
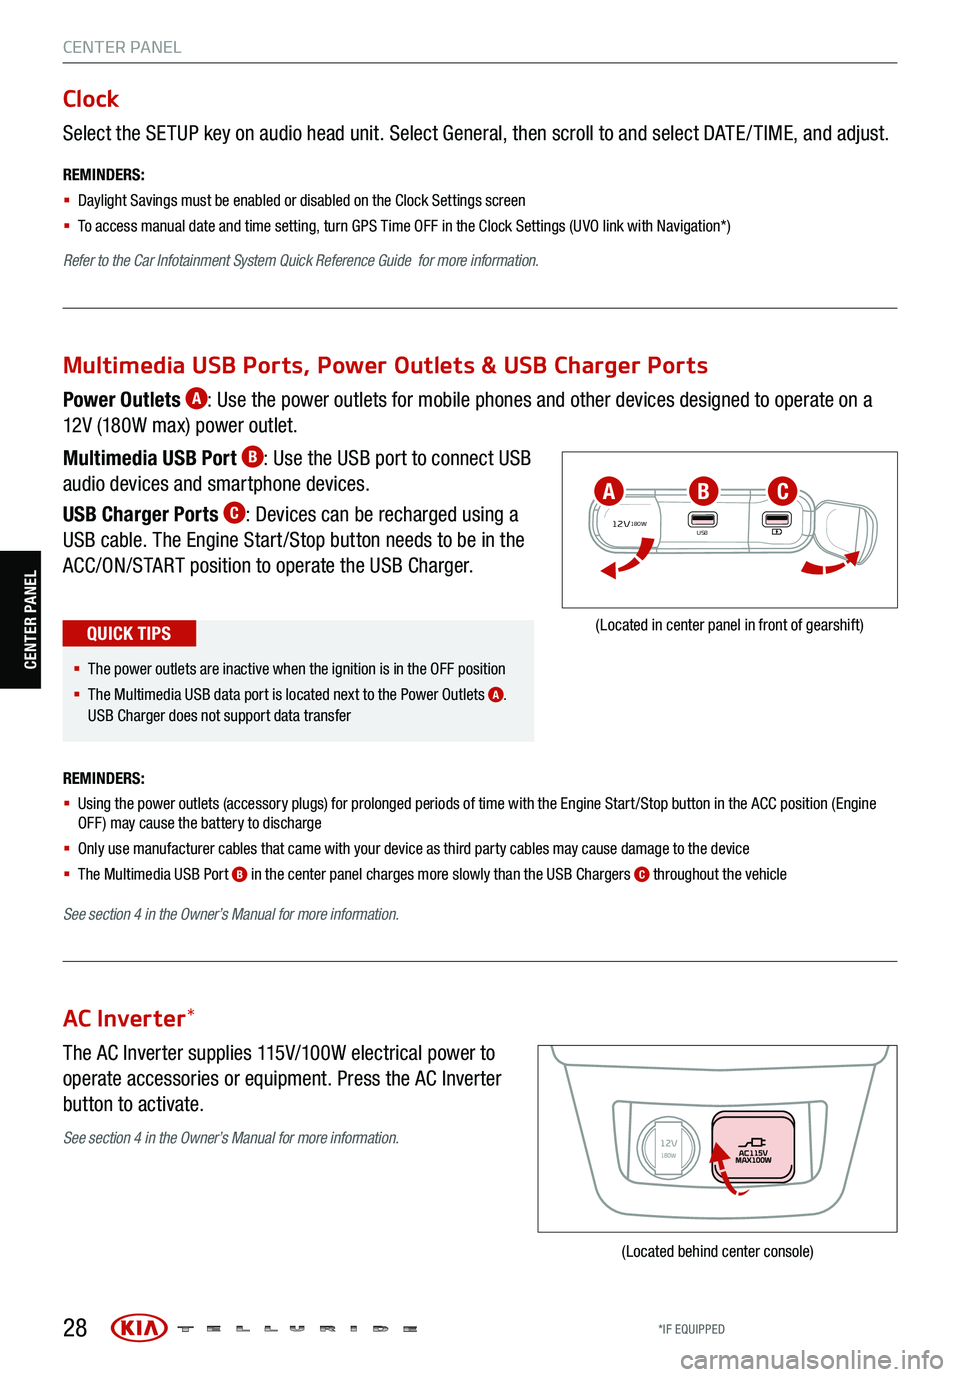
The AC Inverter supplies 115V/100W electrical power to
operate accessories or equipment. Press the AC Inverter
button to activate.
AC Inverter *
(Located behind center console)
Power Outlets A: Use the power outlets for mobile phones and other devices designed to operate on a
12V (180W max) power outlet.
Multimedia USB Port
B: Use the USB port to connect USB
audio devices and smartphone devices.
USB Charger Ports
C: Devices can be recharged using a
USB cable. The Engine Start /Stop button needs to be in the
ACC/ON/START position to operate the USB Charger.
REMINDERS:
§ Using the power outlets (accessory plugs) for prolonged periods of time with the Engine Start /Stop button in the ACC position (Engine
OFF ) may cause the battery to discharge
§ Only use manufacturer cables that came with your device as third party cables may cause damage to the device
§ The Multimedia USB Port
B in the center panel charges more slowly than the USB Chargers C throughout the vehicle
See section 4 in the Owner’s Manual for more information.
12V180WUSB
(Located in center panel in front of gearshift)
Multimedia USB Ports, Power Outlets & USB Charger Ports
§ The power outlets are inactive when the ignition is in the OFF position
§ The Multimedia USB data port is located next to the Power Outlets
A.
USB Charger does not support data transfer
QUICK TIPS
ABC
See section 4 in the Owner’s Manual for more information.
CENTER PANEL
*IF EQUIPPED
Page 34 of 70
32
CENTER PANEL
CENTER PANELREMINDERS:
§ When in P (Park), if the Release button is not pressed while
shifting, the transmission does not shift
§ If going through a car wash, remind the attendant to keep the
vehicle in Neutral (N) and keep the engine running. Also, disable
the power liftgate lid control, turn off the auto rain sensing
wipers and fold in the mirrors
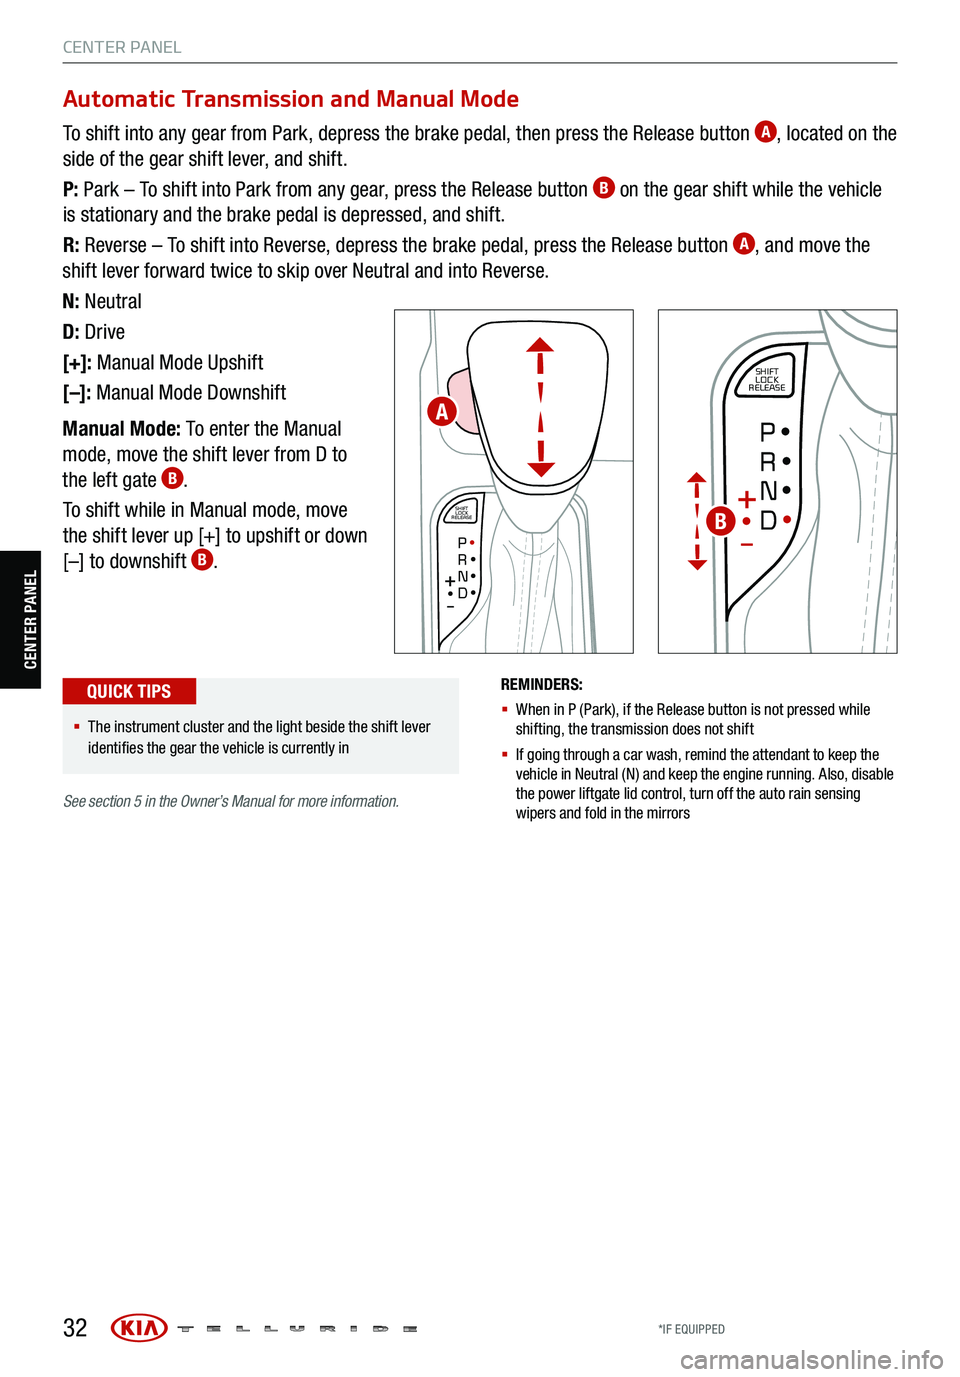
To shift into any gear from Park, depress the brake pedal, then press the Release button A, located on the
side of the gear shift lever, and shift.
P: Park – To shift into Park from any gear, press the Release button
B on the gear shift while the vehicle
is stationary and the brake pedal is depressed, and shift.
R: Reverse – To shift into Reverse, depress the brake pedal, press the Release button
A, and move the
shift lever forward twice to skip over Neutral and into Reverse.
N: Neutral
D: Drive
[+]: Manual Mode Upshift
[–]: Manual Mode Downshift
Manual Mode: To enter the Manual
mode, move the shift lever from D to
the left gate
B.
To shift while in Manual mode, move
the shift lever up [+] to upshift or down
[–] to downshift
B.
SHIFT
LOCK
RELEASE
P•R•N•D•
+
•-
SHIFT
LOCK
RELEASE
P•
R•
N•
D•
+
•
-
Automatic Transmission and Manual Mode
§ The instrument cluster and the light beside the shift lever
identifies the gear the vehicle is currently in
QUICK TIPS
A
B
See section 5 in the Owner’s Manual for more information .
*IF EQUIPPED