service interval KIA TELLURIDE 2021 Features and Functions Guide
[x] Cancel search | Manufacturer: KIA, Model Year: 2021, Model line: TELLURIDE, Model: KIA TELLURIDE 2021Pages: 70, PDF Size: 8.41 MB
Page 4 of 70
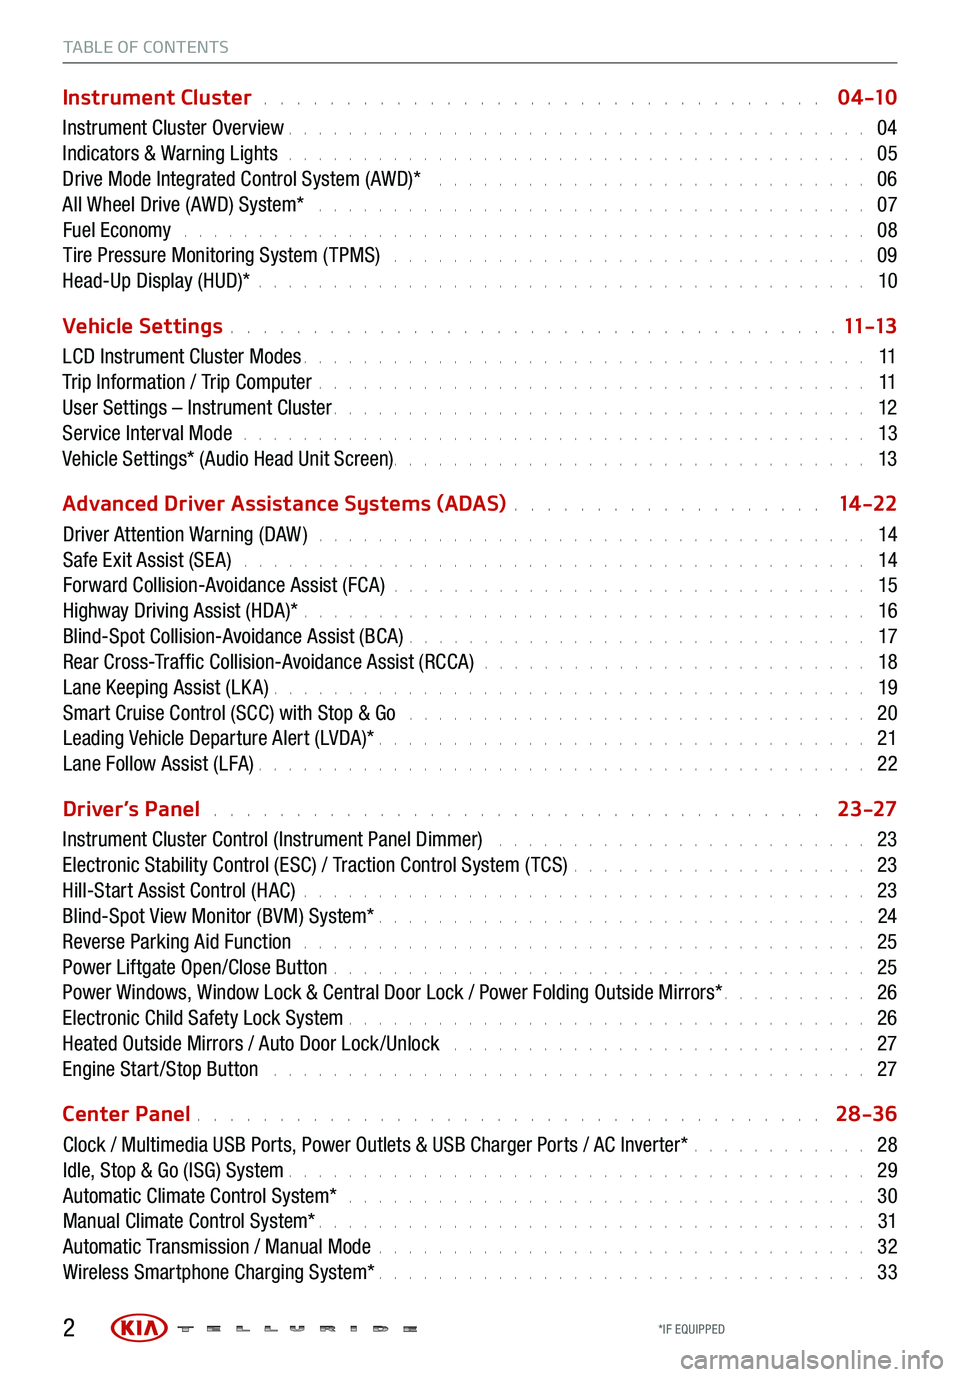
TABLE OF CONTENTS
Instrument Cluster . . . . . . . . . . . . . . . . . . . . . . . . . . . . . . . . . . 0 4 -10
Instrument Cluster Overview . . . . . . . . . . . . . . . . . . . . . . . . . . . . . . . . . . . . \
. . . 04
Indicators & Warning Lights . . . . . . . . . . . . . . . . . . . . . . . . . . . . . . . . . . . . \
. . . 05
Drive Mode Integrated Control System (AWD)* . . . . . . . . . . . . . . . . . . . . . . . . . . . . . 06
All Wheel Drive (AWD) System* . . . . . . . . . . . . . . . . . . . . . . . . . . . . . . . . . . . . . 07
Fuel Economy . . . . . . . . . . . . . . . . . . . . . . . . . . . . . . . . . . . . \
. . . . . . . . . . 08
Tire Pressure Monitoring System ( TPMS) . . . . . . . . . . . . . . . . . . . . . . . . . . . . . . . . 09
Head-Up Display (HUD)* . . . . . . . . . . . . . . . . . . . . . . . . . . . . . . . . . . . . \
. . . . . 10
Vehicle Settings
. . . . . . . . . . . . . . . . . . . . . . . . . . . . . . . . . . . . \
. 11 -13
LCD Instrument Cluster Modes . . . . . . . . . . . . . . . . . . . . . . . . . . . . . . . . . . . . \
. . 11
Trip Information / Trip Computer . . . . . . . . . . . . . . . . . . . . . . . . . . . . . . . . . . . . \
. 11
User Settings – Instrument Cluster . . . . . . . . . . . . . . . . . . . . . . . . . . . . . . . . . . . . \
12
Service Interval Mode . . . . . . . . . . . . . . . . . . . . . . . . . . . . . . . . . . . . . . . . . . 13
Vehicle Settings* (Audio Head Unit Screen) . . . . . . . . . . . . . . . . . . . . . . . . \
. . . . . . . . 13
Advanced Driver Assistance Systems (ADAS)
. . . . . . . . . . . . . . . . . . . 14 -22
Driver Attention Warning (DAW ) . . . . . . . . . . . . . . . . . . . . . . . . . . . . . . . . . . . . . 14
Safe Exit Assist (SE A) . . . . . . . . . . . . . . . . . . . . . . . . . . . . . . . . . . . . . . . . . . 14
Forward Collision-Avoidance Assist (FCA) . . . . . . . . . . . . . . . . . . . . . . . . . . . . . . . . 15
Highway Driving Assist (HDA)* . . . . . . . . . . . . . . . . . . . . . . . . . . . . . . . . . . . . \
. . 16
Blind-Spot Collision-Avoidance Assist (BCA) . . . . . . . . . . . . . . . . . . . . . . . . . . . . . . . 17
Rear Cross-Traffic Collision-Avoidance Assist (RCCA) . . . . . . . . . . . . . . . . . . . . . . . . . . 18
Lane Keeping Assist (LK A) . . . . . . . . . . . . . . . . . . . . . . . . . . . . . . . . . . . . \
. . . . 19
Smart Cruise Control (SCC) with Stop & Go . . . . . . . . . . . . . . . . . . . . . . . . . . . . . . . 20
Leading Vehicle Departure Alert (LVDA)* . . . . . . . . . . . . . . . . . . . . . . . . . . . . . . . . . 21
Lane Follow Assist (LFA) . . . . . . . . . . . . . . . . . . . . . . . . . . . . . . . . . . . . \
. . . . . 22
Driver’s Panel
. . . . . . . . . . . . . . . . . . . . . . . . . . . . . . . . . . . . . 23-27
Instrument Cluster Control (Instrument Panel Dimmer) . . . . . . . . . . . . . . . . . . . . . . . . . 23
Electronic Stability Control (ESC) / Traction Control System ( TCS) . . . . . . . . . . . . . . . . . . . . 23
Hill-Start Assist Control (HAC) . . . . . . . . . . . . . . . . . . . . . . . . . . . . . . . . . . . . \
. . 23
Blind-Spot View Monitor (BVM) System* . . . . . . . . . . . . . . . . . . . . . . . . . . . . . . . . . 24
Reverse Parking Aid Function . . . . . . . . . . . . . . . . . . . . . . . . . . . . . . . . . . . . \
. . 25
Power Liftgate Open/Close Button . . . . . . . . . . . . . . . . . . . . . . . . . . . . . . . . . . . . 25
Power Windows, Window Lock & Central Door Lock / Power Folding Outside Mirrors* . . . . . . . . . . 26
Electronic Child Safety Lock System . . . . . . . . . . . . . . . . . . . . . . . . . . . . . . . . . . . 26
Heated Outside Mirrors / Auto Door Lock /Unlock . . . . . . . . . . . . . . . . . . . . . . . . . . . . 27
Engine Start /Stop Button . . . . . . . . . . . . . . . . . . . . . . . . . . . . . . . . . . . . \
. . . . 27
Center Panel
. . . . . . . . . . . . . . . . . . . . . . . . . . . . . . . . . . . . \
. . 28-36
Clock / Multimedia USB Ports, Power Outlets & USB Charger Ports / AC Inverter* . . . . . . . . . . . . 28
Idle, Stop & Go (ISG) System . . . . . . . . . . . . . . . . . . . . . . . . . . . . . . . . . . . . \
. . . 29
Automatic Climate Control System* . . . . . . . . . . . . . . . . . . . . . . . . . . . . . . . . . . . 30
Manual Climate Control System* . . . . . . . . . . . . . . . . . . . . . . . . . . . . . . . . . . . . \
. 31
Automatic Transmission / Manual Mode . . . . . . . . . . . . . . . . . . . . . . . . . . . . . . . . . 32
Wireless Smartphone Charging System* . . . . . . . . . . . . . . . . . . . . . . . . . . . . . . . . . 33
2*IF EQUIPPED
Page 13 of 70
11ALWAYS CHECK THE OWNER’S MANUAL FOR COMPLE TE
OPERATING INFORMATION AND SAFETY WARNINGS. *IF EQUIPPED
VEHICLE SET TINGS
Trip Information / Trip Computer
The Trip Computer is a driver information system that displays information
related to driving when the Engine Start /Stop button is in the ON position.
To cycle through the LCD Instrument Cluster modes, press the Mode
button
A on the right side of the steering wheel.
When in the Trip Computer mode
, press the Select /Reset (OK ) button B to cycle through the menu. When displaying TRIP A or TRIP B screens,
press and hold the OK button B to reset the Tripmeter to zero.
REMINDERS:
§ Appearance of Trip Computer display may differ as equipped
§ All stored driving information (except Odometer and Range) is reset if the battery is
disconnectedDrive Info• Tr ipme t e r
• Average Fuel Economy
• Timer
Accumulated Info• Tr ipme t e r
• Average Fuel Economy
• Timer
Consumption Info• Average Fuel Economy
• Instant Fuel Economy
Drive Mode
Digital Speedometer
Trip Computer modes:
LCD Instrument Cluster Modes
*
The LCD Instrument Cluster modes can be changed by using the mode button A on the right side of the
steering wheel.
Trip Computer Mode: Displays the fuel
economy, drive and accumulated info,
speedometer and drive mode
Turn-by-Turn Mode*: Displays the route
guidance and destination info
Assist Mode: Displays the Lane Safety, Driver
Attention Warning, AWD and TPMS info
User Settings Mode: Change settings of the
Head-Up Display, Driver Assistance, doors,
lights, sound, convenience, service interval,
other features, language and reset
Master Warning Mode: Displays warning
messages related to the vehicle when one or
more systems is not operating normally
Your vehicle’s steering wheel buttons and
LCD modes may differ from those in the
illustrations.
Driving while distracted is dangerous and
should be avoided. Drivers should remain
attentive to driving and always exercise
caution when using the steering-wheel-
mounted controls while driving.
CRUISE
MODE CRUISE
CANCEL
RES
OK SET
CRUISE
CANCEL
RES
OK SET
MODE CRUISE
CANCEL
RES
OK SET
MODE
CANCEL
RES
OK SET
MODECRUISE
CANCEL
RES
OK SET
CRUISE
CANCEL
RES
OK SET
A
B
See section 4 in the Owner’s Manual for more information.
See section 4 in the Owner’s Manual for more information.
VEHICLE SETTINGS
Page 14 of 70
12
VEHICLE SET TINGS
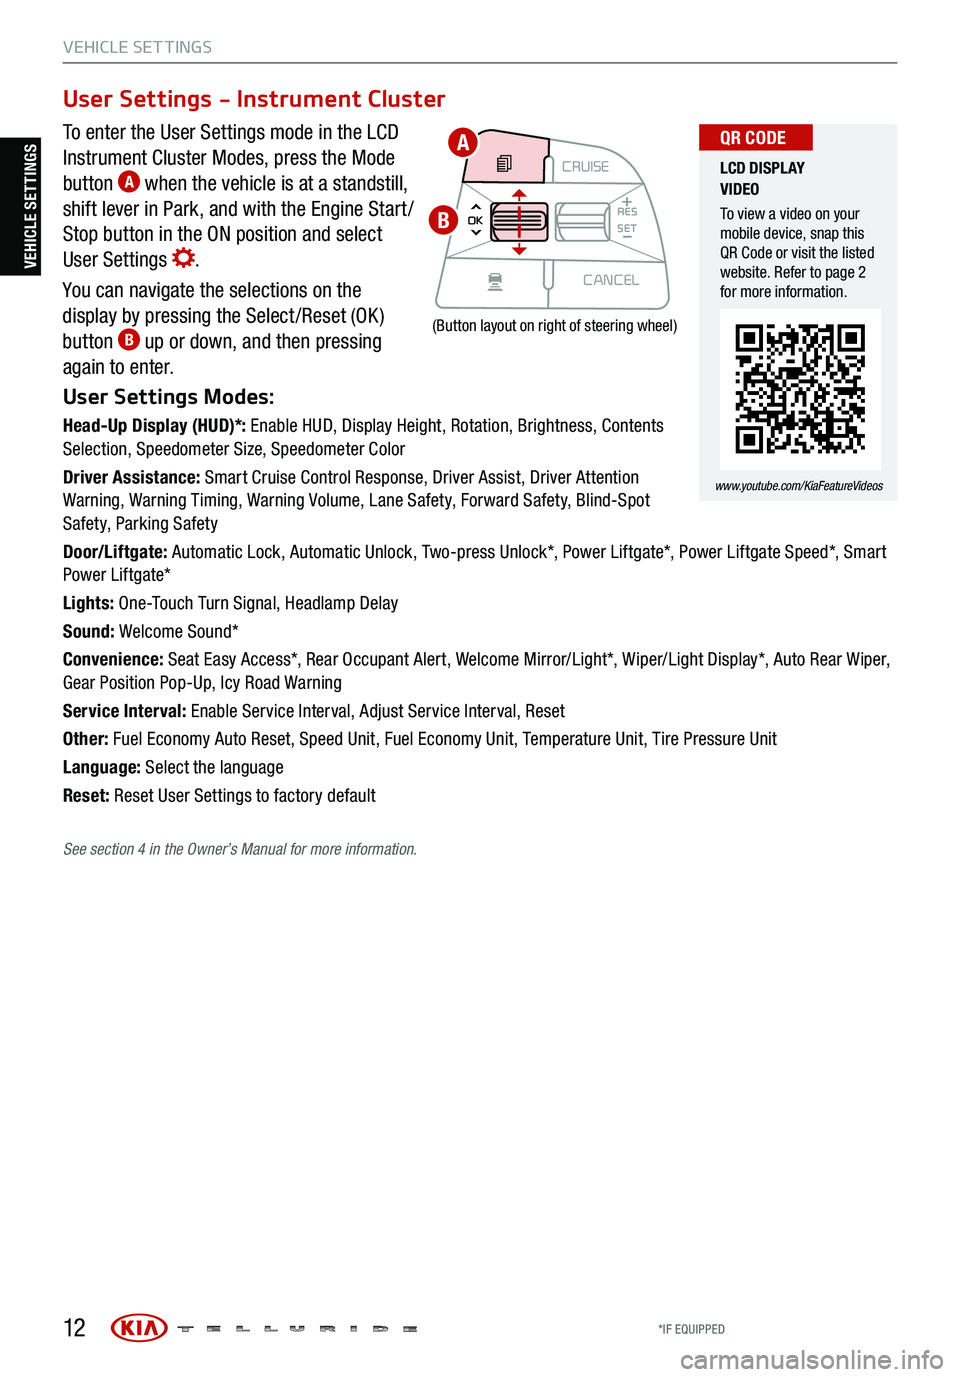
To enter the User Settings mode in the LCD
Instrument Cluster Modes, press the Mode
button
A when the vehicle is at a standstill,
shift lever in Park, and with the Engine Start /
Stop button in the ON position and select
User Settings
.
You can navigate the selections on the
display by pressing the Select /Reset (OK )
button
B up or down, and then pressing
again to enter.
User Settings Modes:
Head-Up Display (HUD)*: Enable HUD, Display Height, Rotation, Brightness, Contents
Selection, Speedometer Size, Speedometer Color
Driver Assistance: Smart Cruise Control Response, Driver Assist, Driver Attention
Warning, Warning Timing, Warning Volume, Lane Safety, Forward Safety, Blind-Spot
Safety, Parking Safety
Door/Liftgate: Automatic Lock, Automatic Unlock, Two-press Unlock*, Power Liftgate*, Power Liftgate Speed*, Smart
Power Liftgate*
Lights: One-Touch Turn Signal, Headlamp Delay
Sound: Welcome Sound*
Convenience: Seat Easy Access*, Rear Occupant Alert, Welcome Mirror/Light*, Wiper/Light Display*, Auto Rear Wiper,
Gear Position Pop-Up, Icy Road Warning
Service Interval: Enable Service Interval, Adjust Service Interval, Reset
Other: Fuel Economy Auto Reset, Speed Unit, Fuel Economy Unit, Temperature Unit, Tire Pressure Unit
Language: Select the language
Reset: Reset User Settings to factory default
User Settings - Instrument Cluster
CRUISE
MODE CRUISE
CANCEL
RES
OK SET
CRUISE
CANCEL
RES
OK SET
MODE CRUISE
CANCEL
RES
OK SET
MODE
CANCEL
RES
OK SET
MODECRUISE
CANCEL
RES
OK SET
CRUISE
CANCEL
RES
OK SET
(Button layout on right of steering wheel)
LCD DISPLAY
VIDEO
To view a video on your
mobile device, snap this
QR Code or visit the listed
website. Refer to page 2
for more information.
www.youtube.com/KiaFeatureVideos
QR CODEA
B
VEHICLE SETTINGS
See section 4 in the Owner’s Manual for more information.
*IF EQUIPPED
Page 15 of 70
13
VEHICLE SET TINGS
VEHICLE SETTINGS
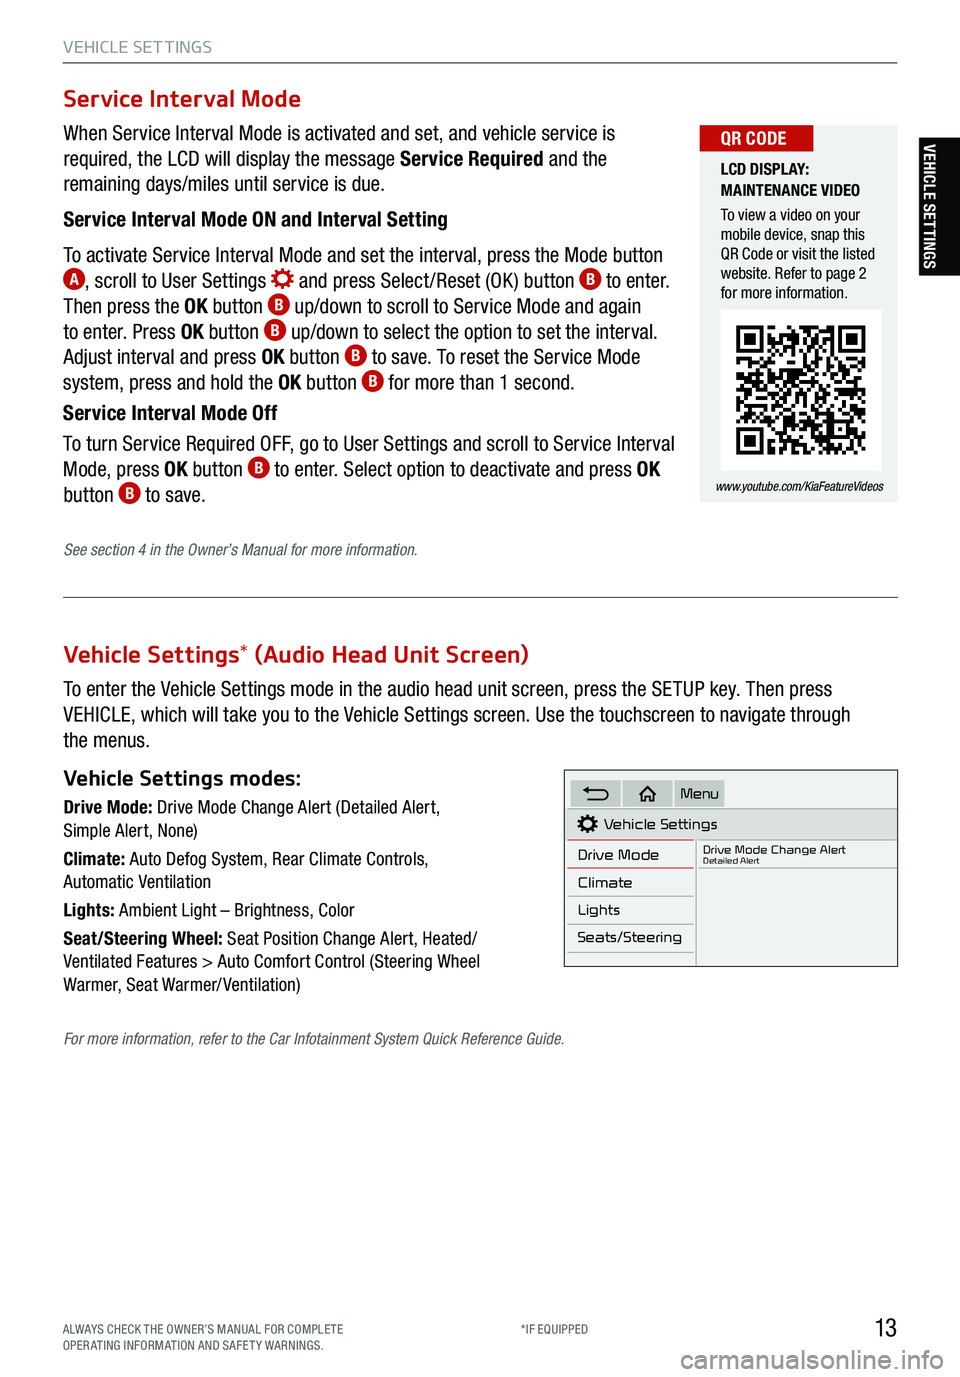
Vehicle Settings* (Audio Head Unit Screen)
To enter the Vehicle Settings mode in the audio head unit screen, press the SETUP key. Then press
VEHICLE, which will take you to the Vehicle Settings screen. Use the touchscreen to navigate through
the menus.
Vehicle Settings modes:
Drive Mode: Drive Mode Change Alert (Detailed Alert,
Simple Alert, None)
Climate: Auto Defog System, Rear Climate Controls,
Automatic Ventilation
Lights: Ambient Light – Brightness, Color
Seat/Steering Wheel: Seat Position Change Alert, Heated/
Ventilated Features > Auto Comfort Control (Steering Wheel
Warmer, Seat Warmer/ Ventilation)Vehicle Settings
Drive Mode
Drive Mode Change AlertDetailed Alert
Climate
Lights
Seats/Steering
Menu
When Service Interval Mode is activated and set, and vehicle service is
required, the LCD will display the message Service Required and the
remaining days/miles until service is due.
Service Interval Mode ON and Interval Setting
To activate Service Interval Mode and set the interval, press the Mode button
A, scroll to User Settings and press Select /Reset (OK ) button B to enter.
Then press the OK button B up/down to scroll to Service Mode and again
to enter. Press OK button B up/down to select the option to set the interval.
Adjust interval and press OK button B to save. To reset the Service Mode
system, press and hold the OK button B for more than 1 second.
Service Interval Mode Off
To turn Service Required OFF, go to User Settings and scroll to Service Interval
Mode, press OK button
B to enter. Select option to deactivate and press OK
button B to save.
Service Interval Mode
LCD DISPLAY:
MAINTENANCE VIDEO
To view a video on your
mobile device, snap this
QR Code or visit the listed
website. Refer to page 2
for more information.
www.youtube.com/KiaFeatureVideos
QR CODE
See section 4 in the Owner’s Manual for more information.
For more information, refer to the Car Infotainment System Quick Reference Guide.
ALWAYS CHECK THE OWNER’S MANUAL FOR COMPLE TE
OPERATING INFORMATION AND SAFETY WARNINGS. *IF EQUIPPED
Page 41 of 70
39
STEERING WHEEL CONTROLS
Headlight position
Parking Light position
AUTOAuto Light /DRL /
High Beam Assist*
OFFOFF position
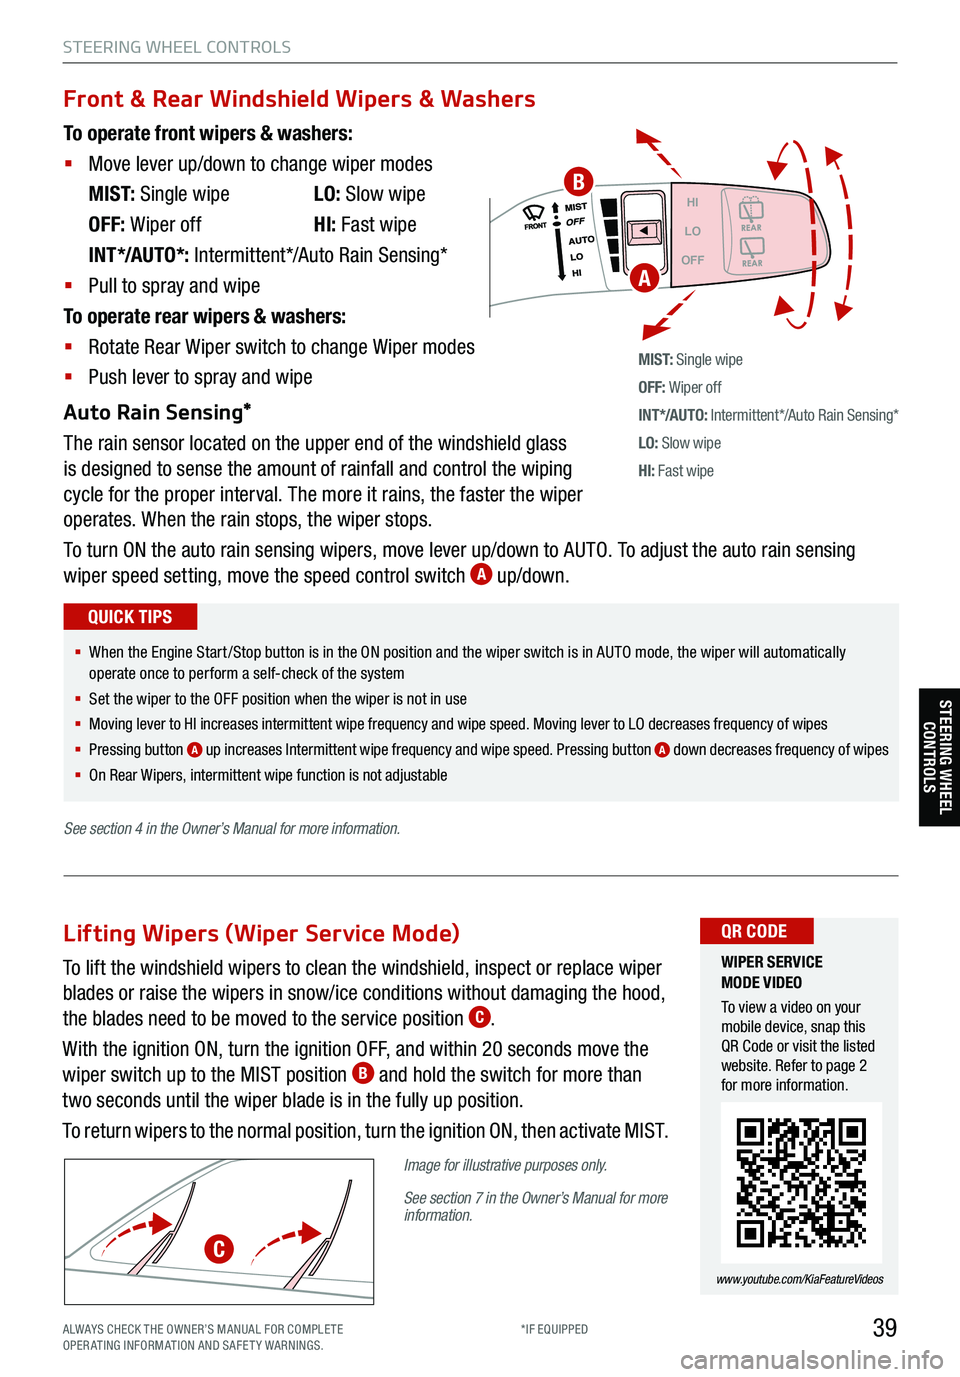
To operate front wipers & washers:
§ Move lever up/down to change wiper modes
M I S T: Single wipe LO: Slow wipe
OFF: Wiper off HI: Fast wipe
INT*/AUTO*: Intermittent*/Auto Rain Sensing*
§ Pull to spray and wipe
To operate rear wipers & washers:
§ Rotate Rear Wiper switch to change Wiper modes
§ Push lever to spray and wipe
Auto Rain Sensing*
The rain sensor located on the upper end of the windshield glass
is designed to sense the amount of rainfall and control the wiping
cycle for the proper interval. The more it rains, the faster the wiper
operates. When the rain stops, the wiper stops.
To turn ON the auto rain sensing wipers, move lever up/down to AUTO. To adjust the auto rain sensing
wiper speed setting, move the speed control switch
A up/down.
M I S T: Single wipe
OFF: Wiper off
IN T */AU TO: Intermittent*/Auto Rain Sensing*
LO: Slow wipe
HI: Fast wipe
HI
LO
OFF
Front & Rear Windshield Wipers & Washers
§ When the Engine Start /Stop button is in the ON position and the wiper switch is in AUTO mode, the wiper will automatically
operate once to perform a self-check of the system
§ Set the wiper to the OFF position when the wiper is not in use
§
Moving lever to HI increases intermittent wipe frequency and wipe speed. Moving lever to LO decreases frequency of wipes
§ Pressing button
A up increases Intermittent wipe frequency and wipe speed. Pressing button A down decreases frequency of wipes
§ On Rear Wipers, intermittent wipe function is not adjustable
QUICK TIPS
WIPER SERVICE
MODE VIDEO
To view a video on your
mobile device, snap this
QR Code or visit the listed
website. Refer to page 2
for more information.
www.youtube.com/KiaFeatureVideos
QR CODE
A
To lift the windshield wipers to clean the windshield, inspect or replace wiper
blades or raise the wipers in snow/ice conditions without damaging the hood,
the blades need to be moved to the service position
C.
With the ignition ON, turn the ignition OFF, and within 20 seconds move the
wiper switch up to the MIST position
B and hold the switch for more than
two seconds until the wiper blade is in the fully up position.
To return wipers to the normal position, turn the ignition ON, then activate MIST.
Image for illustrative purposes only.
See section 7 in the Owner’s Manual for more
information.
Lifting Wipers (Wiper Service Mode)
C
B
STEERING WHEEL CONTROLS
See section 4 in the Owner’s Manual for more information.
ALWAYS CHECK THE OWNER’S MANUAL FOR COMPLE TE
OPERATING INFORMATION AND SAFETY WARNINGS. *IF EQUIPPED
Page 66 of 70
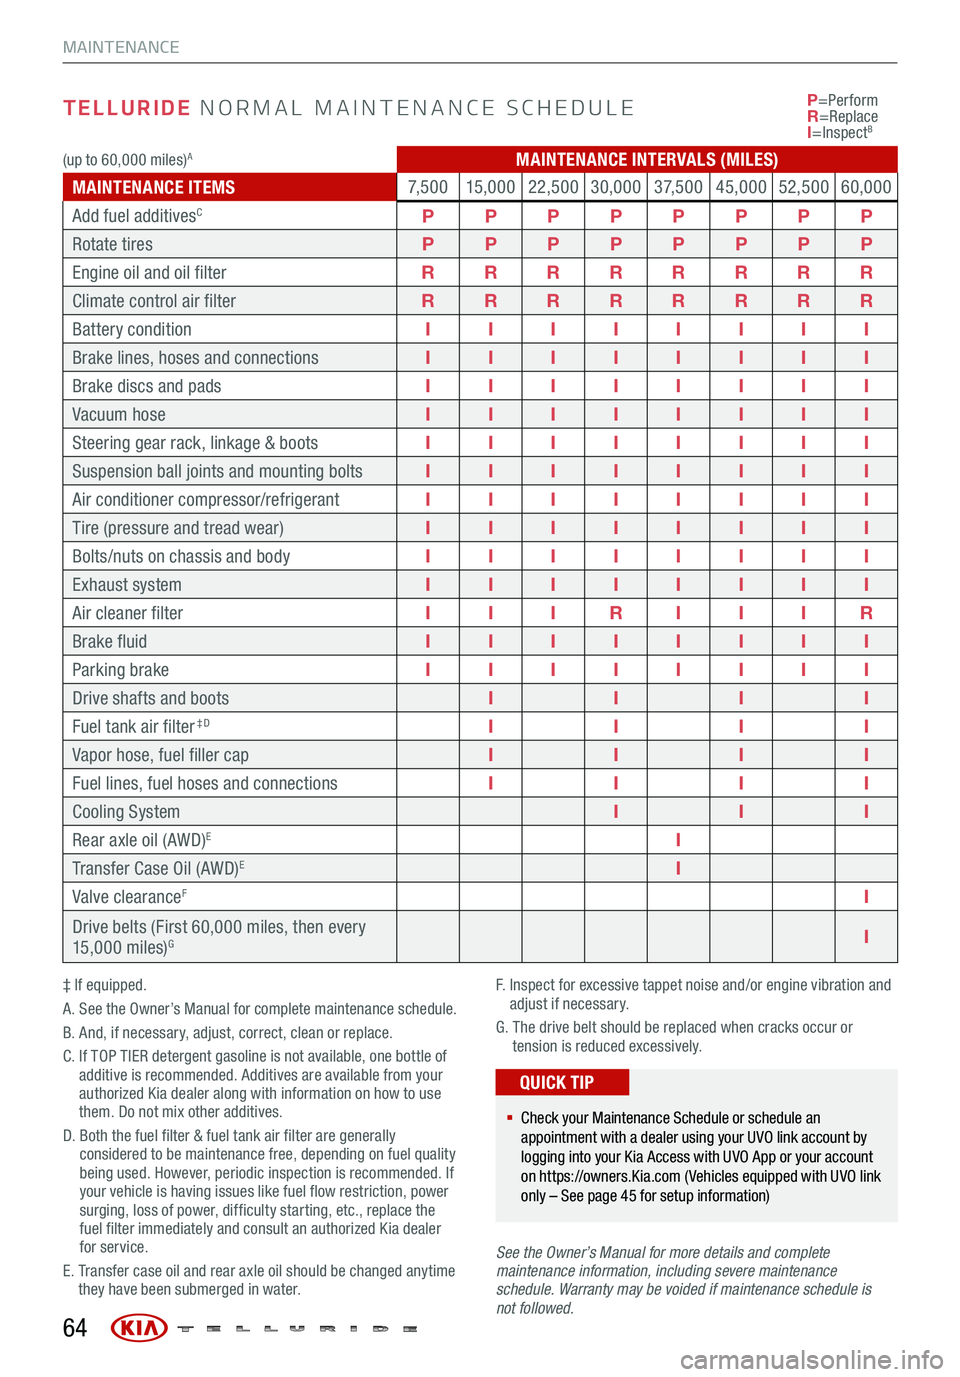
TELLURIDE NORMAL MAINTENANCE SCHEDULE
‡ If equipped.
A. See the Owner’s Manual for complete maintenance schedule.
B. And, if necessary, adjust, correct, clean or replace.
C. If TOP TIER detergent gasoline is not available, one bottle of
additive is recommended. Additives are available from your
authorized Kia dealer along with information on how to use
them. Do not mix other additives.
D. Both the fuel filter & fuel tank air filter are generally
considered to be maintenance free, depending on fuel quality
being used. However, periodic inspection is recommended. If
your vehicle is having issues like fuel flow restriction, power
surging, loss of power, difficulty starting, etc., replace the
fuel filter immediately and consult an authorized Kia dealer
for service.
E. Transfer case oil and rear axle oil should be changed anytime
they have been submerged in water. F.
Inspect for excessive tappet noise and/or engine vibration and
adjust if necessary.
G. The drive belt should be replaced when cracks occur or
tension is reduced excessively.
See the Owner’s Manu al for more details and complete
maintenance information, including severe maintenance
schedule. Warranty may be voided if maintenance schedule is
not followed. P
=Perform
R =Replace
I =Inspect
B
§ Check your Maintenance Schedule or schedule an
appointment with a dealer using your UVO link account by
logging into your Kia Access with UVO App or your account
on https://owners.Kia.com ( Vehicles equipped with UVO link
only – See page 45 for setup information)
QUICK TIP
64
MAINTENANCE
(up to 60,000 miles)AMAINTENANCE INTERVALS (MILES)
MAINTENANCE ITEMS 7, 5 0 0
15,000 22,500 30,000 3 7, 5 0 045,000 52,50060,000
Add fuel additives
CP PPPPPPP
Rotate tires PPPPPPPP
Engine oil and oil filter RRRRRRRR
Climate control air filter RRRRRRRR
Battery condition IIIIIIII
Brake lines, hoses and connections IIIIIIII
Brake discs and pads IIIIIIII
Vacuum hose IIIIIIII
Steering gear rack, linkage & boots IIIIIIII
Suspension ball joints and mounting bolts IIIIIIII
Air conditioner compressor/refrigerant IIIIIIII
Tire (pressure and tread wear) IIIIIIII
Bolts/nuts on chassis and body IIIIIIII
Exhaust system IIIIIIII
Air cleaner filter IIIR IIIR
Brake fluid IIIIIIII
Parking brake IIIIIIII
Drive shafts and boots IIII
Fuel tank air filte r