center console KIA TELLURIDE 2022 Features and Functions Guide
[x] Cancel search | Manufacturer: KIA, Model Year: 2022, Model line: TELLURIDE, Model: KIA TELLURIDE 2022Pages: 70, PDF Size: 5.27 MB
Page 8 of 70
INSTRUMENT CLUSTER
For illustrative purposes only . Your actual display, buttons and/or features may vary .
Refer to section 5 in the Owner’s Manual for more information .
INSTRUMENT CLUSTER
REMINDERS:
•
When ECO mode is selected, the following may occur to help improve fuel economy:
–
Acceleration may be slightly reduced even when the accelerator is fully depressed
–
Air conditioner per formance may be limited
–
Shift pat tern of the automatic transmission may change
–
Engine noise may increase
–
System’s power will be limited when driving uphill
•
When SPORT mode is selected, fuel economy may decrease
•
Steering effor t may be slightly increased in Spor t mode
Drive Mode Integrated Control System (AWD)*
Refer to the inside front cover for more information on QR codes .www .youtube .com/KiaFeatureVideos
Drive Mode Integrated Control System
QR CODE
*IF EQUIPPED6TELLURIDE FEATURES & FUNCTIONS GUIDE
•When the Engine Star t/Stop but ton is cycled off then on again, the system defaults to Comfor t mode from Spor t mode . When in other modes, it returns to its previous set ting .
QUICK TIP
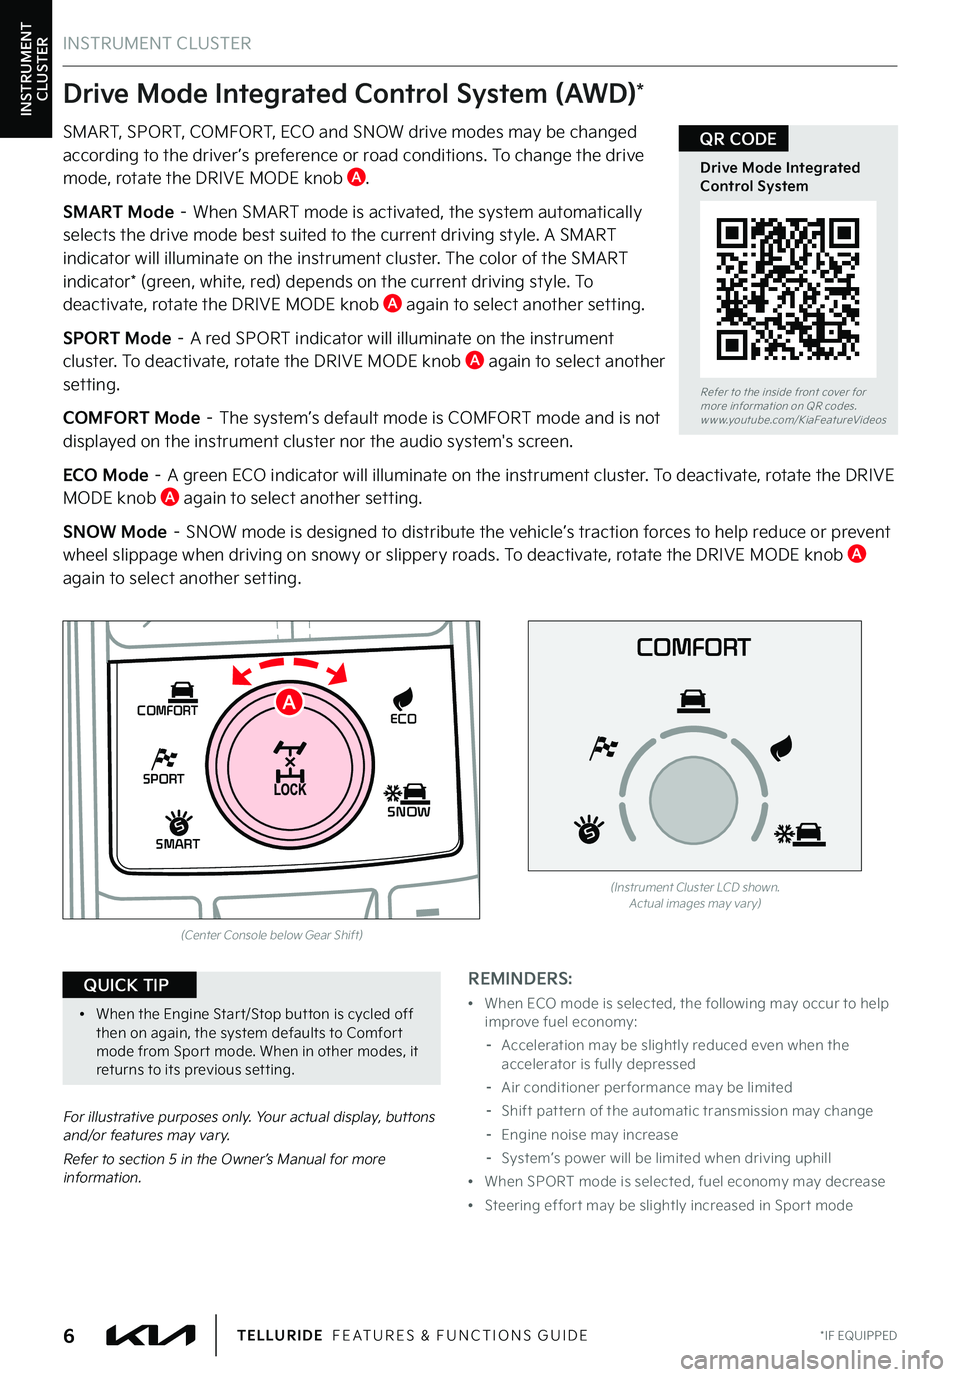
SMART, SPORT, COMFORT, ECO and SNOW drive modes may be changed according to the driver ’s preference or road conditions . To change the drive mode, rotate the DRIVE MODE knob A .
SMART Mode – When SMART mode is activated, the system automatically selects the drive mode best suited to the current driving style . A SMART indicator will illuminate on the instrument cluster . The color of the SMART indicator* (green, white, red) depends on the current driving style . To deactivate, rotate the DRIVE MODE knob A again to select another setting .
SPORT Mode – A red SPORT indicator will illuminate on the instrument cluster . To deactivate, rotate the DRIVE MODE knob A again to select another setting .
COMFORT Mode – The system’s default mode is COMFORT mode and is not displayed on the instrument cluster nor the audio system's screen .
ECO Mode – A green ECO indicator will illuminate on the instrument cluster . To deactivate, rotate the DRIVE MODE knob A again to select another setting .
SNOW Mode – SNOW mode is designed to distribute the vehicle’s traction forces to help reduce or prevent wheel slippage when driving on snowy or slippery roads . To deactivate, rotate the DRIVE MODE knob A again to select another setting .
SHIFT
LOCK
RELEASE
P•
R•
N•
D•
+
•
-
SPORT
SMART
COMFORT
SNOW
ECO
(Center Console below Gear Shift)
COMFORT
(Instrument Cluster LCD shown . Actual images may var y)
A
Page 28 of 70
ADAS
ADVANCED DRIVER ASSISTANCE SYSTEMS (ADAS)
†LEGAL DISCL AIMERS ON BACK INSIDE COVER*IF EQUIPPED26TELLURIDE FEATURES & FUNCTIONS GUIDE
Forward/Reverse Parking Distance Warning (PDW)†4
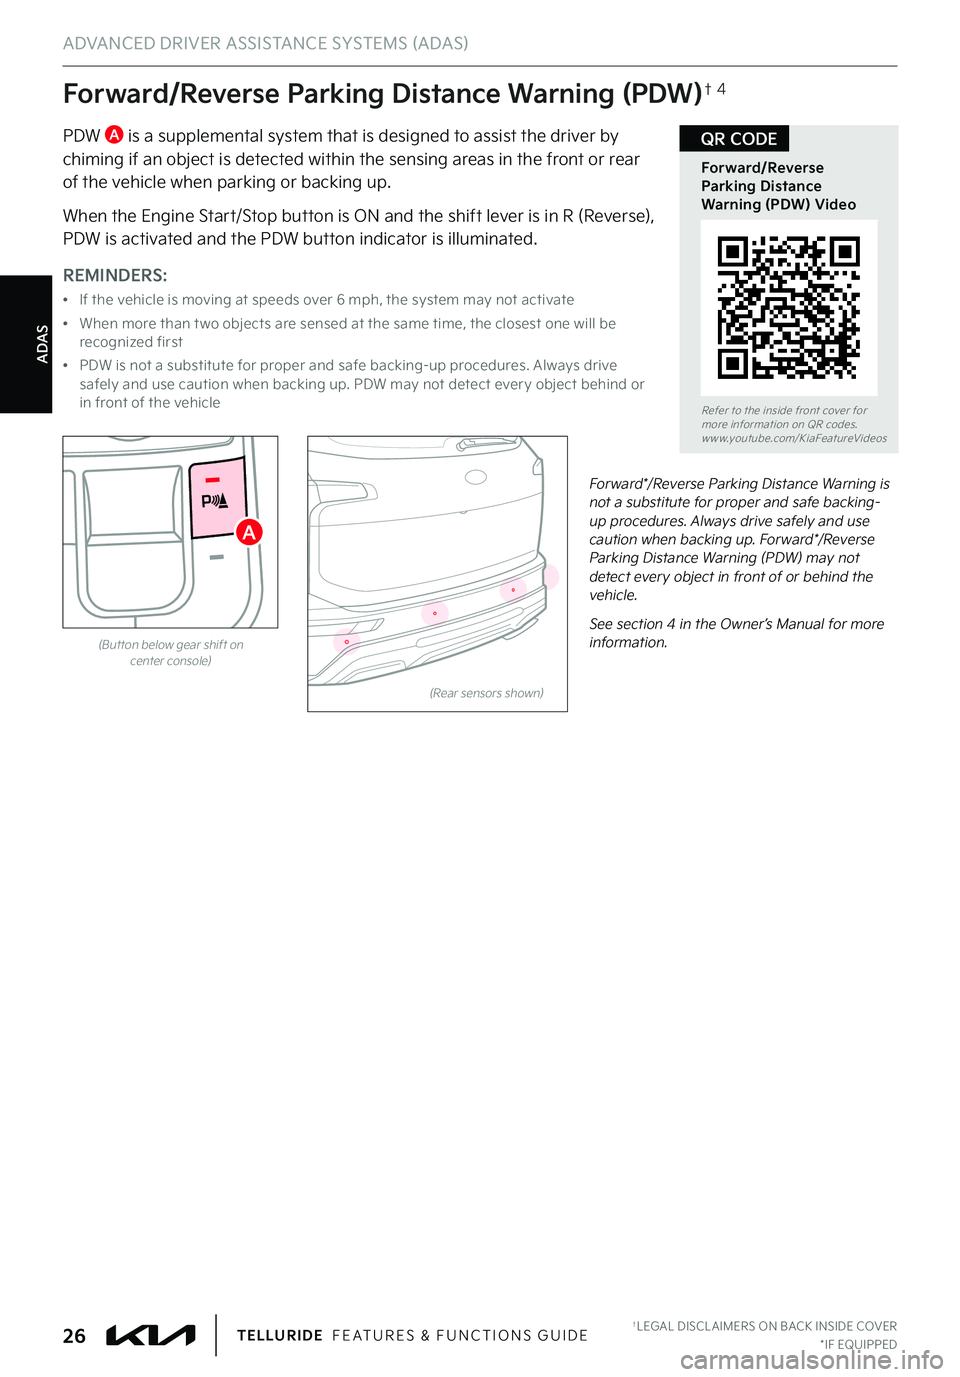
PDW A is a supplemental system that is designed to assist the driver by chiming if an object is detected within the sensing areas in the front or rear of the vehicle when parking or backing up .
When the Engine Start/Stop button is ON and the shift lever is in R (Reverse), PDW is activated and the PDW button indicator is illuminated .
(Rear sensors shown)
Forward*/Reverse Parking Distance Warning is not a substitute for proper and safe backing-up procedures . Always drive safely and use caution when backing up . Forward*/Reverse Parking Distance Warning (PDW) may not detect every object in front of or behind the vehicle .
See section 4 in the Owner’s Manual for more information .
Refer to the inside front cover for more information on QR codes .www .youtube .com/KiaFeatureVideos
Forward/Reverse Parking Distance Warning (PDW) Video
QR CODE
REMINDERS:
•
If the vehicle is moving at speeds over 6 mph, the system may not activate
•
When more than t wo objects are sensed at the same time, the closest one will be recognized first
•
PDW is not a substitute for proper and safe backing-up procedures . Always drive safely and use caution when backing up . PDW may not detect ever y object behind or in front of the vehicle
A
(But ton below gear shift oncenter console)
Page 44 of 70
CENTER PANEL
CENTER PANEL
*IF EQUIPPED42TELLURIDE FEATURES & FUNCTIONS GUIDE
Press the SETUP key on the audio head unit, then press the GENER AL button then date/time button to enter the clock settings . Then use the onscreen buttons to navigate through setup and return to exit .
REMINDERS:
•
Daylight Saving must be enabled or disabled in the Clock Set tings screen
•To access manual date and time set ting, turn GPS Time OFF in the Clock Set tings (UVO link with Navigation*)
Refer to the Car Infotainment System Quick Reference Guide for more information .
Clock
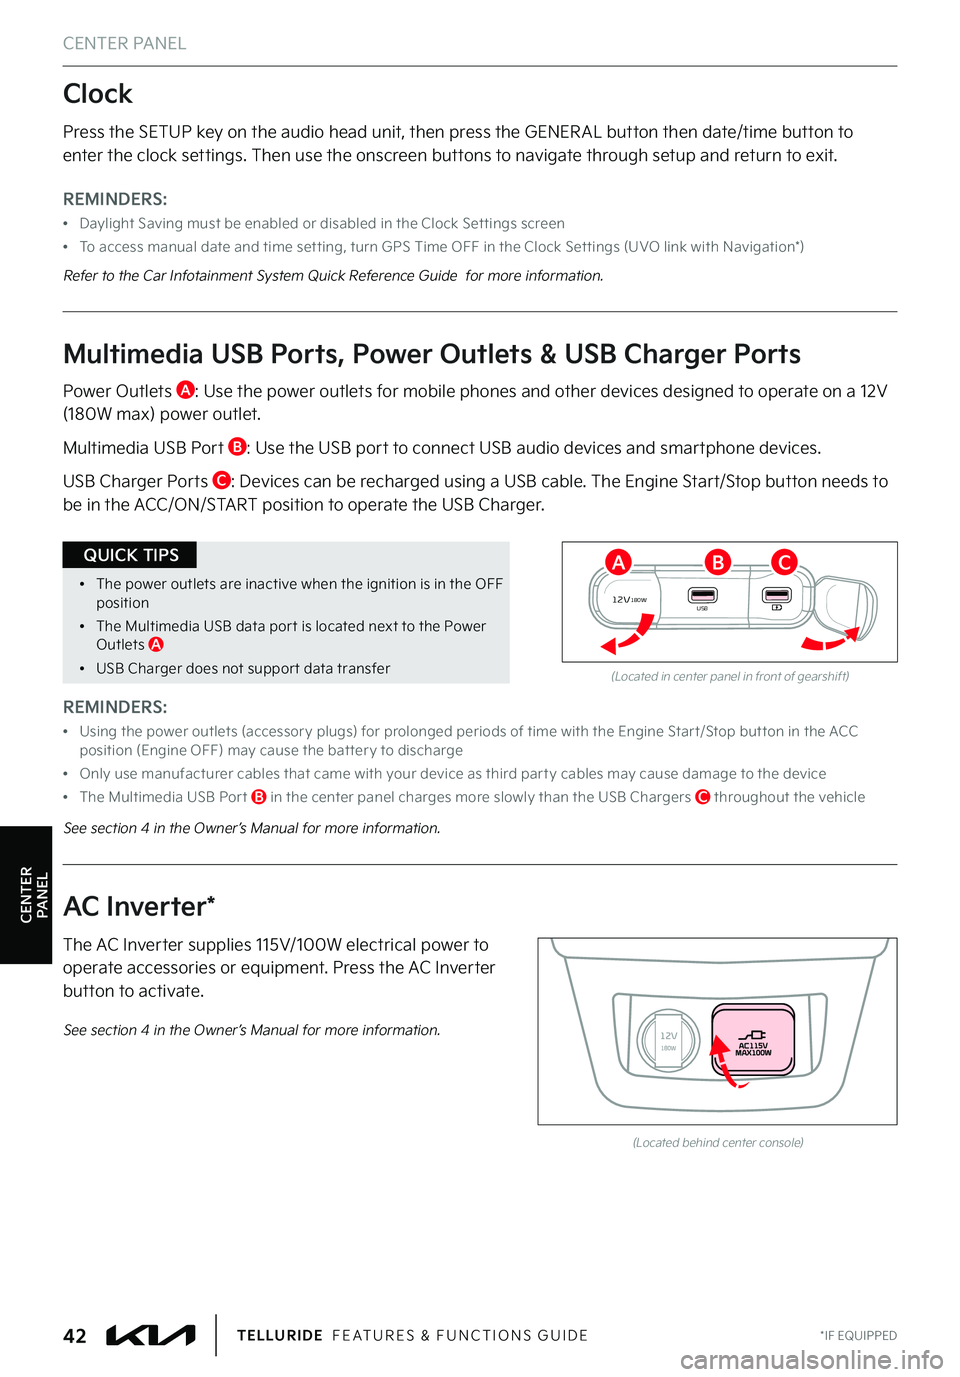
The AC Inverter supplies 115V/100W electrical power to operate accessories or equipment . Press the AC Inverter button to activate .
AC Inverter*
(Located behind center console)
See section 4 in the Owner’s Manual for more information .
•The power outlets are inactive when the ignition is in the OFF position
•The Multimedia USB data por t is located next to the Power Outlets A
•USB Charger does not suppor t data transfer
QUICK TIPS
REMINDERS:
•
Using the power outlets (accessor y plugs) for prolonged periods of time with the Engine Star t/Stop but ton in the ACC position (Engine OFF) may cause the bat ter y to discharge
•Only use manufacturer cables that came with your device as third par t y cables may cause damage to the device
•The Multimedia USB Por t B in the center panel charges more slowly than the USB Chargers C throughout the vehicle
Power Outlets A : Use the power outlets for mobile phones and other devices designed to operate on a 12V (180W max) power outlet .
Multimedia USB Port B : Use the USB port to connect USB audio devices and smartphone devices .
USB Charger Ports C : Devices can be recharged using a USB cable . The Engine Start/Stop button needs to be in the ACC/ON/START position to operate the USB Charger .
12V180WUSB
(Located in center panel in front of gearshift)
Multimedia USB Ports, Power Outlets & USB Charger Ports
CBA
See section 4 in the Owner’s Manual for more information .
Page 45 of 70
CENTER PANEL
CENTER PANEL
Refer to the inside front cover for more information on QR codes .www .youtube .com/KiaFeatureVideos
Wireless Charging Video
QR CODE
ALWAYS CHECK THE OWNER ’S MANUAL FOR COMPLETE OPER ATING INFORMATION AND SAFET Y WARNINGS . *IF EQUIPPED43
•For wireless charging to occur, all doors (excluding rear hatch) must be closed and the Smar tKey Fob must be detected inside the vehicle
•For best results, place the smar tphone on the center of the charging pad
•If wireless charging does not work, move the smar tphone around the pad until the charging indicator turns amber
•Avoid placing other metal items in the bin while charging as to not impede the charging area
QUICK TIPS
REMINDERS:
•If any door is opened, charging will be disabled
•The smar tphone must be a compatible phone with QI function available
•Avoid placing other metal items in the bin while charging as to not impede the charging area
•
This vehicle is equipped with wireless charging technology which allows for a device to be charged using inductive charging; however, device compatibilit y varies . See the Owner ’s Manual for more detailed information and the back page for legal disclaimers
•
Inductive charging systems are less ef ficient than conventional charging through cable . As a result, higher device operating temperatures may be experienced during use
•
Charging Per formance – Your device’s position on the wireless charging system can affect charging per formance . Other factors that may affect the charging rate includes foreign objects, such as coins or pens, and phone case thickness
CB
A
Wireless Smartphone Charging System*
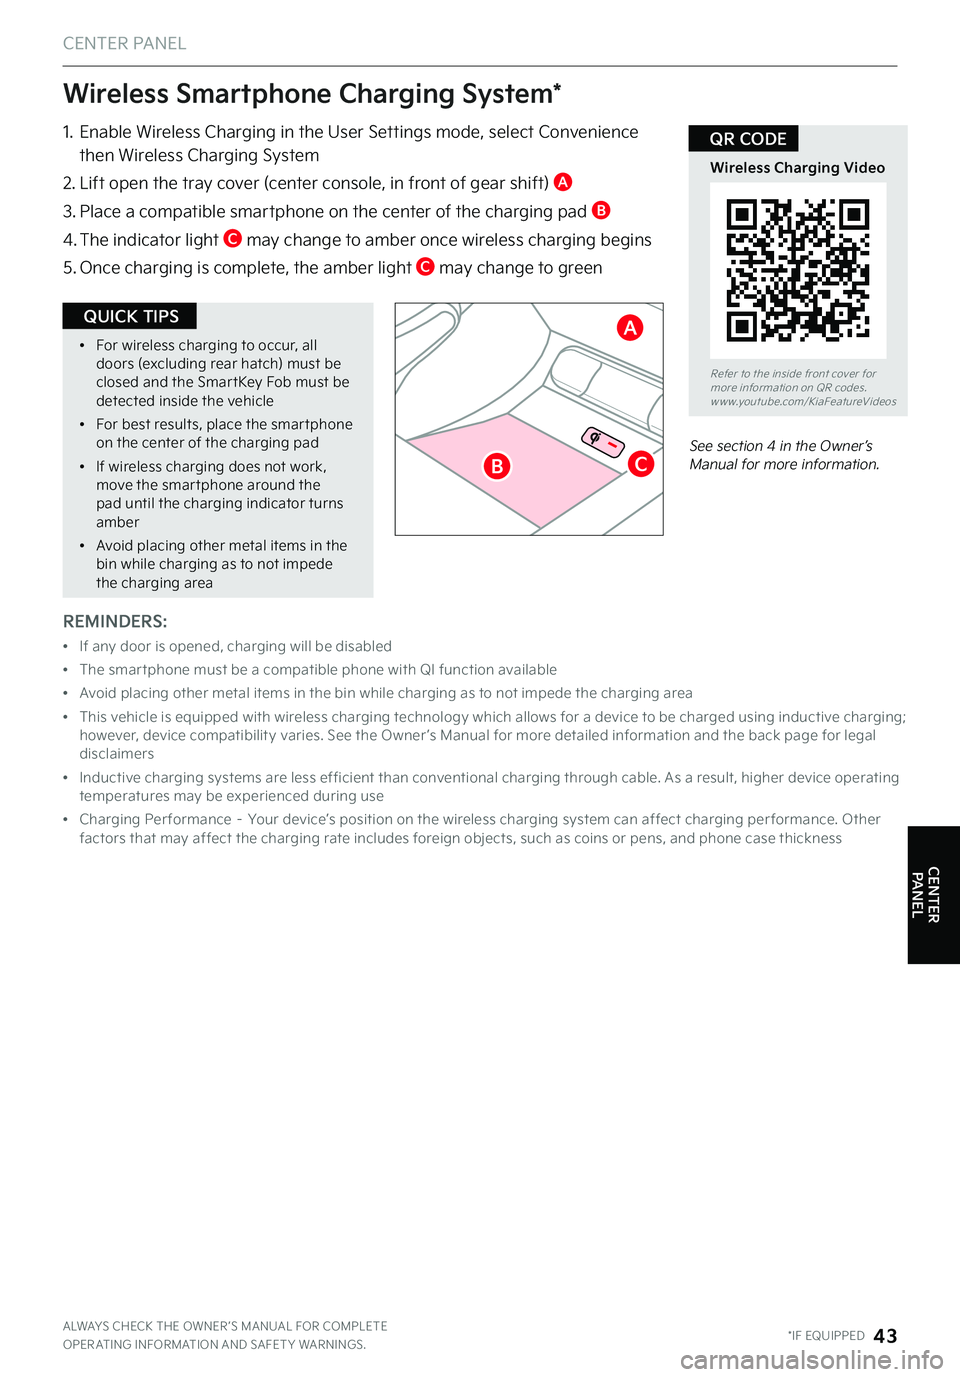
1 .
Enable Wireless Charging in the User Settings mode, select Convenience then Wireless Charging System
2 . Lift open the tray cover (center console, in front of gear shift) A
3 .
Place a compatible smartphone on the center of the charging pad B
4 .
The indicator light C may change to amber once wireless charging begins
5 .
Once charging is complete, the amber light C may change to green
See section 4 in the Owner’s Manual for more information .
Page 51 of 70
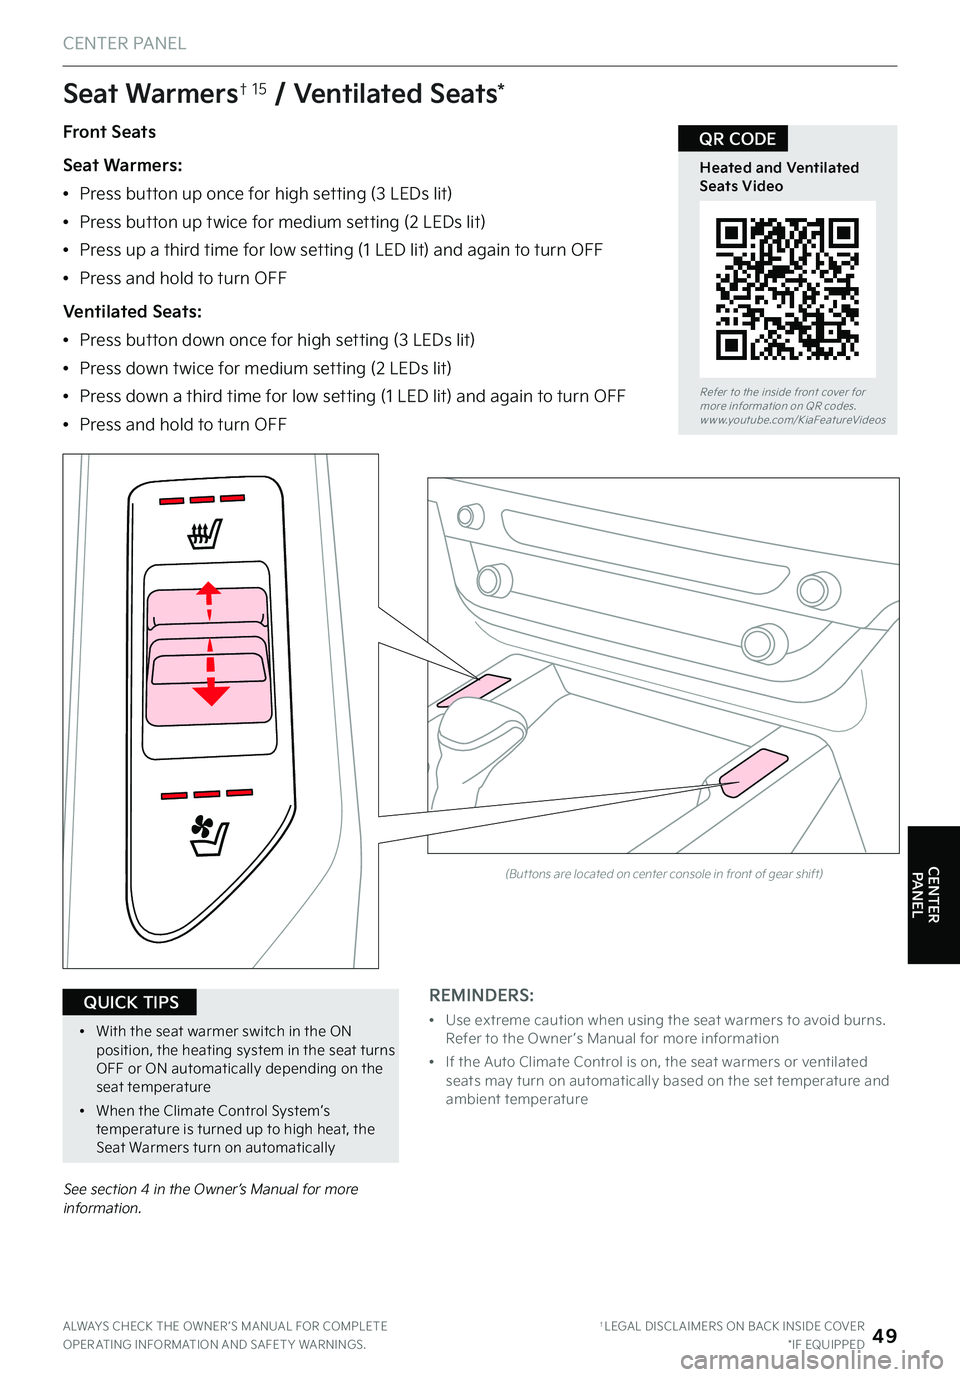
Front Seats
Seat Warmers:
•Press button up once for high setting (3 LEDs lit)
•Press button up twice for medium setting (2 LEDs lit)
•Press up a third time for low setting (1 LED lit) and again to turn OFF
•Press and hold to turn OFF
Ventilated Seats:
•Press button down once for high setting (3 LEDs lit)
•Press down twice for medium setting (2 LEDs lit)
•Press down a third time for low setting (1 LED lit) and again to turn OFF
•Press and hold to turn OFF
Seat Warmers† 15 / Ventilated Seats*
See section 4 in the Owner’s Manual for more information .
Refer to the inside front cover for more information on QR codes .www .youtube .com/KiaFeatureVideos
Heated and Ventilated Seats Video
QR CODE
ALWAYS CHECK THE OWNER ’S MANUAL FOR COMPLETE OPER ATING INFORMATION AND SAFET Y WARNINGS . †LEGAL DISCL AIMERS ON BACK INSIDE COVER*IF EQUIPPED49
•With the seat warmer switch in the ON position, the heating system in the seat turns OFF or ON automatically depending on the seat temperature
•
When the Climate Control System’s temperature is turned up to high heat, the Seat Warmers turn on automatically
QUICK TIPS
(But tons are located on center console in front of gear shift)
REMINDERS:
•
Use extreme caution when using the seat warmers to avoid burns . Refer to the Owner ’s Manual for more information
•
If the Auto Climate Control is on, the seat warmers or ventilated seats may turn on automatically based on the set temperature and ambient temperature
CENTER PANEL
CENTER PANEL