gearbox Lancia Delta 2012 Owner handbook (in English)
[x] Cancel search | Manufacturer: LANCIA, Model Year: 2012, Model line: Delta, Model: Lancia Delta 2012Pages: 295, PDF Size: 8.29 MB
Page 117 of 295
1
KNOWING YOUR CAR115
Failure indications
System failure is indicated by warning light
álighting
up in the instrument panel together with a dedicated mes-
sage appearing in the reconfigurable multifunction dis-
play; see “Instrument panel warning lights” chapter.
IMPORTANT The Hill Holder system is not a parking
brake; therefore, never leave the car without having en-
gaged the handbrake, turned the engine off and engaged
first gear.
The Advanced ESP system continues to oper-
ate if the space-saver wheel is fitted. Always
remember that the space-saver wheel, being
smaller than the original wheel provides less grip.
For the correct operation of the Advanced ESP and
ASR systems, the tyres must absolutely be the same
make and type on all wheels, in perfect conditions
and, above all, of the type, make and size specified.
HILL HOLDER SYSTEM
This is an integral part of the Advanced ESP system and
automatically cuts in in the following conditions:
❍uphill: car at a standstill on a road with a gradient
higher than 5%, engine running, clutch and brake
pedal pressed, gearbox in neutral or engaged gear
other than reverse.
❍downhill: car at a standstill on a road with a gradi-
ent higher than 5%, engine running, clutch and brake
pedal pressed and reverse gear engaged.
When setting off, the Advanced ESP system control unit
will keep braking pressure on the wheels until reaching
the required power for starting or, in any case, for a max-
imum of 2 seconds in order to move the right foot from
the brake pedal to the accelerator pedal easily.
When two seconds have elapsed, without starting, the
system is automatically deactivated, gradually releasing
the braking pressure. During this release stage, the typi-
cal mechanical brake release noise can be heard, indi-
cating that the car is about to move.
Page 123 of 295
1
KNOWING YOUR CAR121
START&STOP SYSTEM
(for versions/markets where provided)
The Start&Stop system automatically stops the engine
each time the vehicle is stationary and starts it again
when the driver wants to move off. In this way, the ve-
hicle efficiency is increased, by reducing consumption,
dangerous gas emissions and sound pollution.
The system is active every time the engine is started.
OPERATING MODES
Engine stopping mode
With the car stopped, the engine stops with gearbox in
neutral and clutch pedal released.
NOTE The engine can only be stopped automatically
over about 10 km/h, to prevent the engine from being re-
peatedly stopped when driving at walking pace.
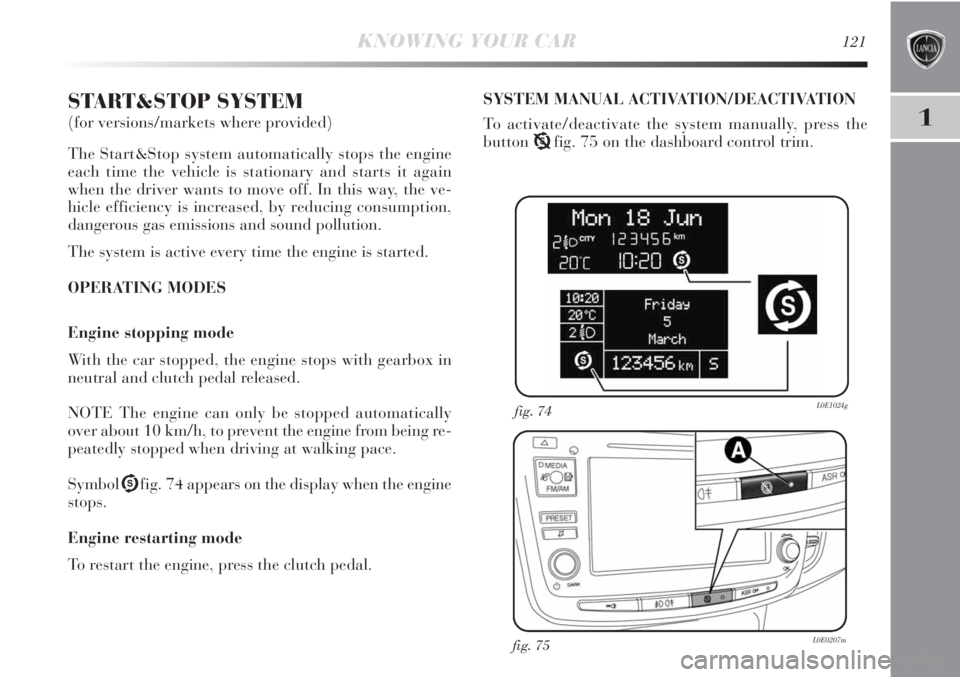
SymbolUfig. 74 appears on the display when the engine
stops.
Engine restarting mode
To restart the engine, press the clutch pedal.SYSTEM MANUAL ACTIVATION/DEACTIVATION
To activate/deactivate the system manually, press the
buttonTfig. 75 on the dashboard control trim.
fig. 74L0E1024g
fig. 75L0E0207m
Page 127 of 295
1
KNOWING YOUR CAR125
EMERGENCY STARTING
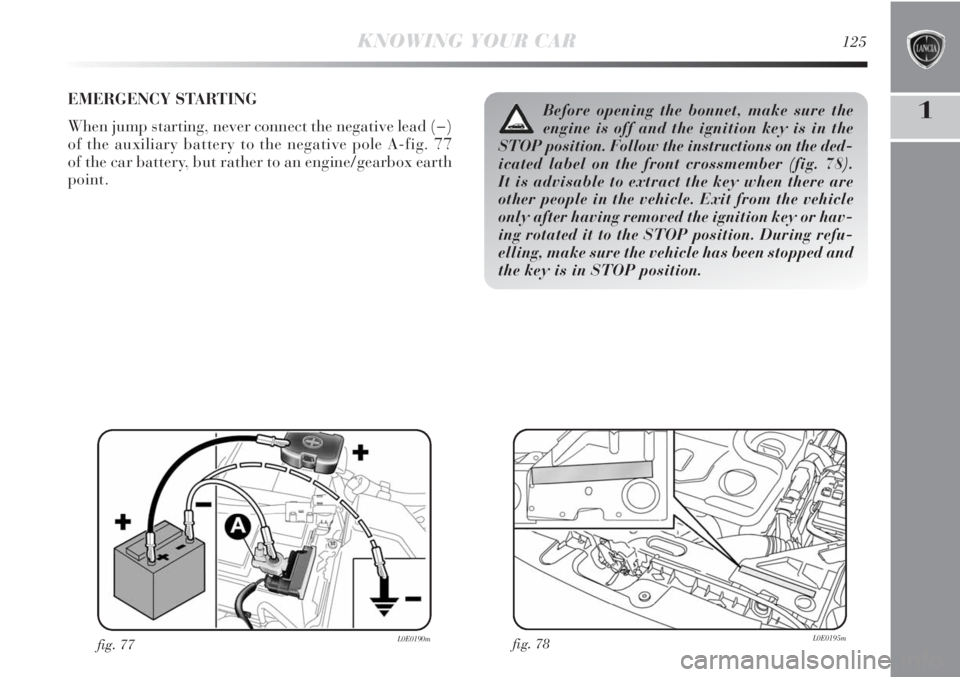
When jump starting, never connect the negative lead (−)
of the auxiliary battery to the negative pole A-fig. 77
of the car battery, but rather to an engine/gearbox earth
point.
fig. 77L0E0190mfig. 78L0E0195m
Before opening the bonnet, make sure the
engine is off and the ignition key is in the
STOP position. Follow the instructions on the ded-
icated label on the front crossmember (fig. 78).
It is advisable to extract the key when there are
other people in the vehicle. Exit from the vehicle
only after having removed the ignition key or hav-
ing rotated it to the STOP position. During refu-
elling, make sure the vehicle has been stopped and
the key is in STOP position.
Page 140 of 295
138KNOWING YOUR CAR
❍Identification: if the system identifies a free park-
ing space that is a suitable size for the vehicle, it signals
its presence and indicates the actions required for start-
ing the manoeuvre.
❍Manoeuvre: the driver is asked to engage reverse gear
and release the steering wheel and manage the accelera-
tor, brake and clutch (in the case of manual gearbox) or
accelerator and brake (in the case of automatic gearbox).
During the reverse parking manoeuvre, the system man-
ages the steering wheel automatically.
It suggests that the manoeuvre be concluded in reverse
gear (if the conditions permit) when the continuous
sound of the buzzer for the rear sensors is heard.
IMPORTANT The MANOEUVRE stage in the system
logic is deactivated after about 3 mins if the parking ma-
noeuvre has not been completed.❍Manoeuvre end: if the parking space is sufficient, the
parking manoeuvre is completed by the system is a sin-
gle movement; the further intervention of the driver is not
required to position the vehicle. If further corrective ma-
noeuvres are required, the system gives back control to
the driver who must complete parking manually.
IMPORTANT Steering will be realigned after reversing
when reverse gear is disengaged. The driver must com-
plete the manoeuvre manually.
The operation of the parking assistance is
based on different components:
❍front and rear parking sensors;
❍side sensors;
❍steering;
❍wheels and braking system;
❍instrument panel.
It is necessary to bear in mind that a malfunction
in one of these systems could compromise the op-
eration of the Magic Parking system.
Page 143 of 295
1
KNOWING YOUR CAR141
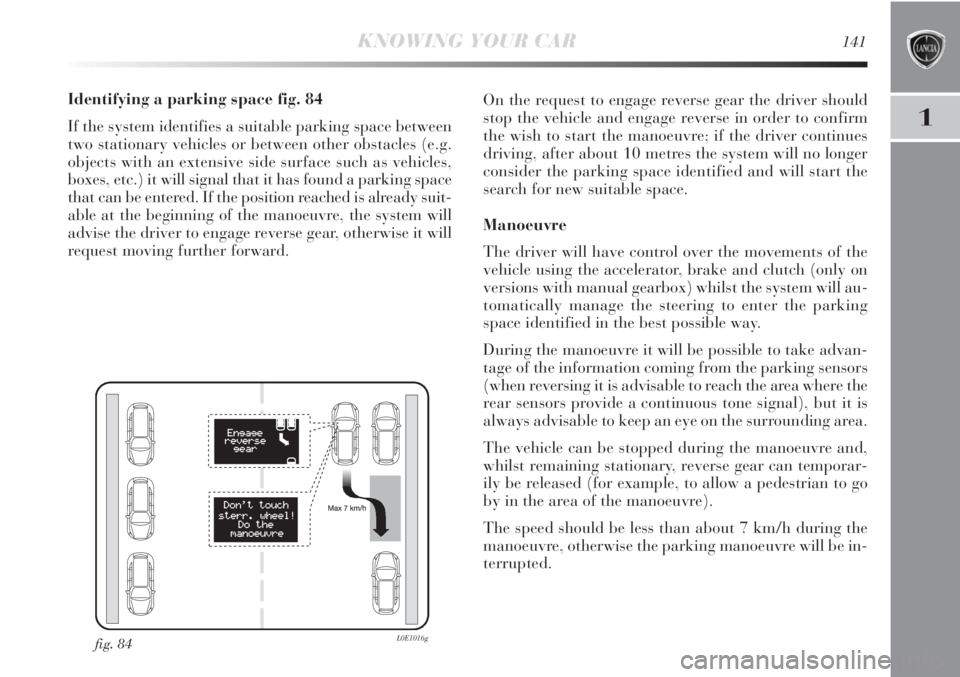
Identifying a parking space fig. 84
If the system identifies a suitable parking space between
two stationary vehicles or between other obstacles (e.g.
objects with an extensive side surface such as vehicles,
boxes, etc.) it will signal that it has found a parking space
that can be entered. If the position reached is already suit-
able at the beginning of the manoeuvre, the system will
advise the driver to engage reverse gear, otherwise it will
request moving further forward.On the request to engage reverse gear the driver should
stop the vehicle and engage reverse in order to confirm
the wish to start the manoeuvre; if the driver continues
driving, after about 10 metres the system will no longer
consider the parking space identified and will start the
search for new suitable space.
Manoeuvre
The driver will have control over the movements of the
vehicle using the accelerator, brake and clutch (only on
versions with manual gearbox) whilst the system will au-
tomatically manage the steering to enter the parking
space identified in the best possible way.
During the manoeuvre it will be possible to take advan-
tage of the information coming from the parking sensors
(when reversing it is advisable to reach the area where the
rear sensors provide a continuous tone signal), but it is
always advisable to keep an eye on the surrounding area.
The vehicle can be stopped during the manoeuvre and,
whilst remaining stationary, reverse gear can temporar-
ily be released (for example, to allow a pedestrian to go
by in the area of the manoeuvre).
The speed should be less than about 7 km/h during the
manoeuvre, otherwise the parking manoeuvre will be in-
terrupted.
fig. 84L0E1016g
Page 179 of 295

STARTING AND DRIVING177
3
Engine starting ............................................................................178
Handbrake ..................................................................................181
Using the manual gearbox ...........................................................182
Fuel savings ................................................................................183
Towing trailers ............................................................................185
Snow tyres ..................................................................................186
Snow chains ................................................................................187
Car inactivity ..............................................................................187
Page 184 of 295
182STARTING AND DRIVING
USING THE MANUAL GEARBOX
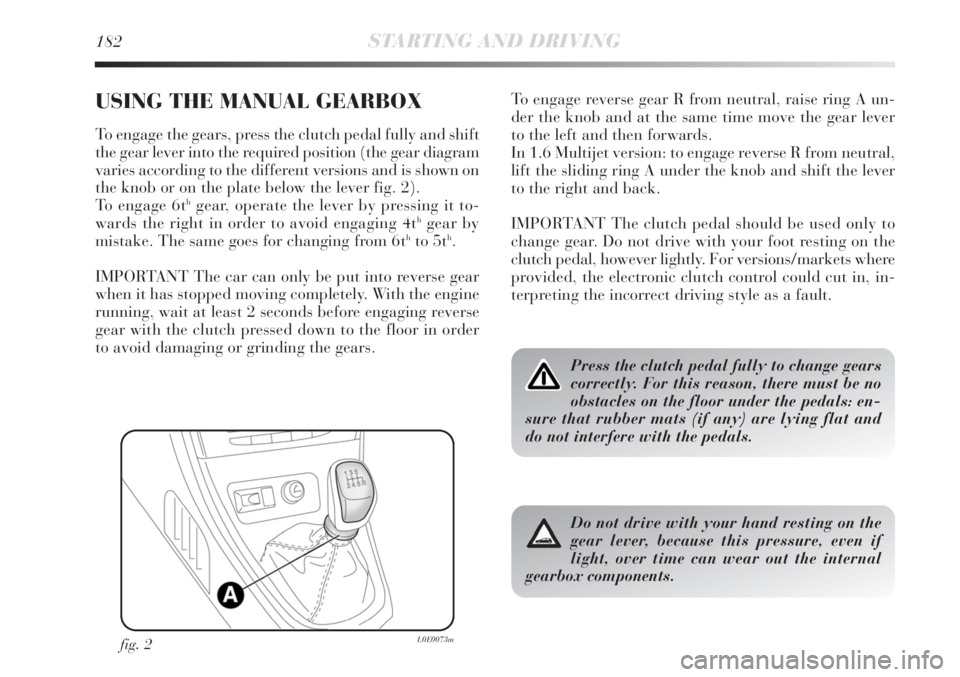
To engage the gears, press the clutch pedal fully and shift
the gear lever into the required position (the gear diagram
varies according to the different versions and is shown on
the knob or on the plate below the lever fig. 2).
To engage 6t
hgear, operate the lever by pressing it to-
wards the right in order to avoid engaging 4thgear by
mistake. The same goes for changing from 6thto 5th.
IMPORTANT The car can only be put into reverse gear
when it has stopped moving completely. With the engine
running, wait at least 2 seconds before engaging reverse
gear with the clutch pressed down to the floor in order
to avoid damaging or grinding the gears.
fig. 2L0E0073m
To engage reverse gear R from neutral, raise ring A un-
der the knob and at the same time move the gear lever
to the left and then forwards.
In 1.6 Multijet version: to engage reverse R from neutral,
lift the sliding ring A under the knob and shift the lever
to the right and back.
IMPORTANT The clutch pedal should be used only to
change gear. Do not drive with your foot resting on the
clutch pedal, however lightly. For versions/markets where
provided, the electronic clutch control could cut in, in-
terpreting the incorrect driving style as a fault.
Press the clutch pedal fully to change gears
correctly. For this reason, there must be no
obstacles on the floor under the pedals: en-
sure that rubber mats (if any) are lying flat and
do not interfere with the pedals.
Do not drive with your hand resting on the
gear lever, because this pressure, even if
light, over time can wear out the internal
gearbox components.
Page 193 of 295
IN AN EMERGENCY191
4
Proceed as follows to start the car:
❍connect the positive terminals (+ sign close to the ter-
minal) of both batteries using a lead;
❍with a second lead, connect the negative terminal (–)
of the auxiliary battery to an earthing point E
on the
engine or the gearbox of the car to be started;
❍start the engine;
❍when the engine has been started, follow the sequence
above in reverse order to remove the leads.
For versions with Start&Stop system, in case of starting
by booster battery, refer to the paragraph “Start&Stop
system” in the chapter “1”.
If after a few attempts the engine does not start, do not
persist but contact a Lancia Dealership.
IMPORTANT Do not directly connect the negative termi-
nals of the two batteries: any sparks may ignite the explo-
sive gas which could come out of the battery. If the auxil-
iary battery is installed on another car, prevent any contact
between metal parts of the cars and the flat battery.BUMP STARTING
Never bump start the engine by pushing, towing or dri-
ving downhill.
This could cause a flow of fuel into the catalytic converter
and damage it beyond repair.
IMPORTANT Remember that the brake servo and elec-
trical power steering system (where provided) are not op-
erational until the engine is started, a greater effort will
therefore be required to press the brake pedal or turn the
steering wheel.
Page 221 of 295
IN AN EMERGENCY219
4
REPLACING FUSES
GENERAL INFORMATION
Fuses protect the electric system: they cut in (i.e. they
blow) in the event of a failure or improper action on the
system. Check the state of the corresponding fuse when
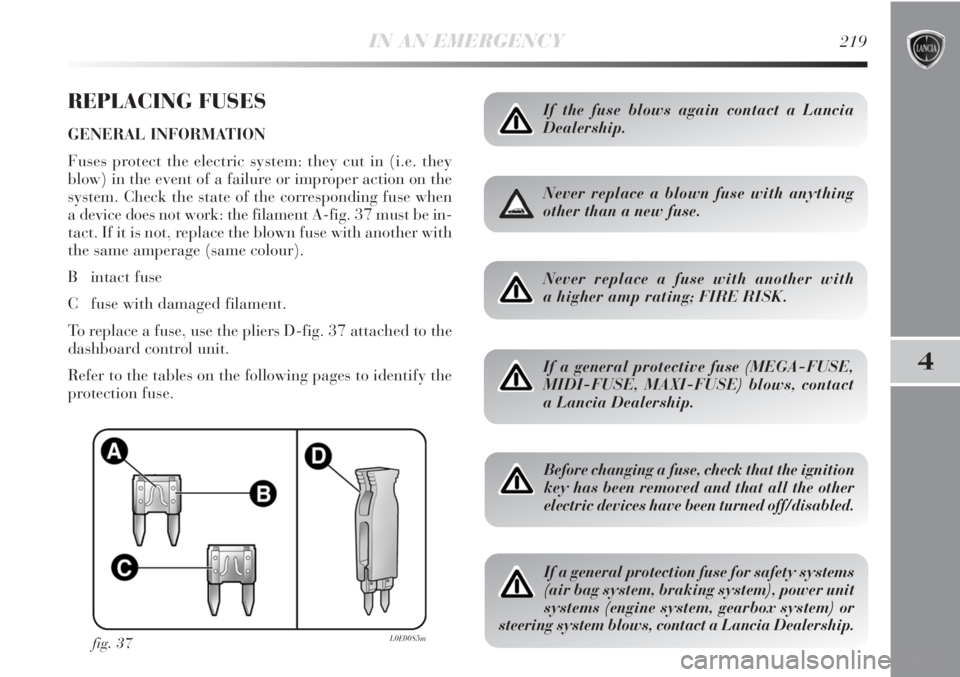
a device does not work: the filament A-fig. 37 must be in-
tact. If it is not, replace the blown fuse with another with
the same amperage (same colour).
B intact fuse
C fuse with damaged filament.
To replace a fuse, use the pliers D-fig. 37 attached to the
dashboard control unit.
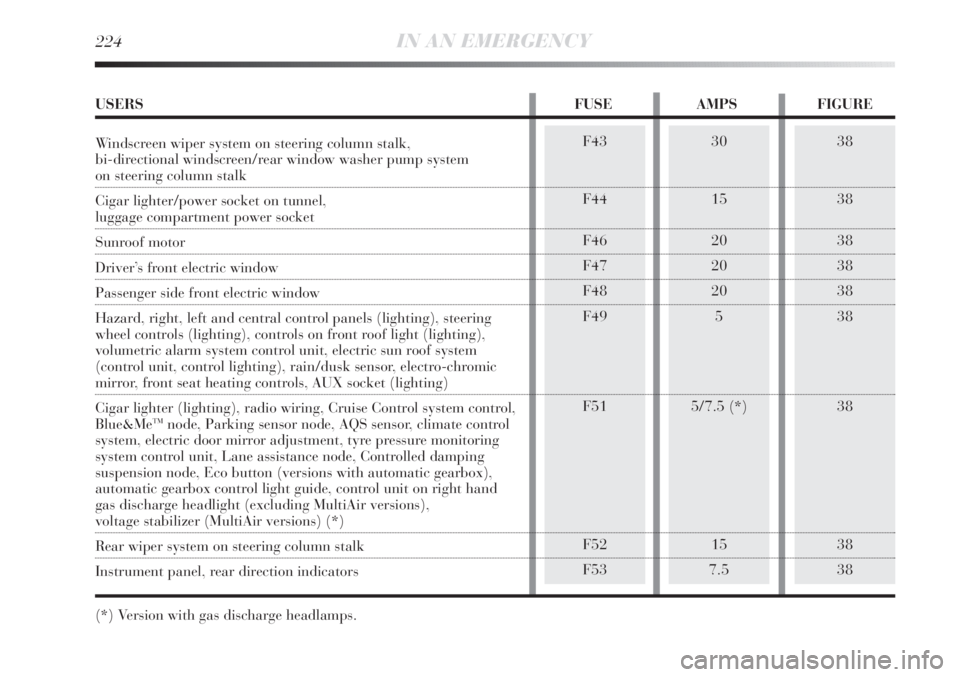
Refer to the tables on the following pages to identify the
protection fuse.
fig. 37L0E0085m
If the fuse blows again contact a Lancia
Dealership.
Never replace a blown fuse with anything
other than a new fuse.
Never replace a fuse with another with
a higher amp rating; FIRE RISK.
If a general protective fuse (MEGA-FUSE,
MIDI-FUSE, MAXI-FUSE) blows, contact
a Lancia Dealership.
Before changing a fuse, check that the ignition
key has been removed and that all the other
electric devices have been turned off/disabled.
If a general protection fuse for safety systems
(air bag system, braking system), power unit
systems (engine system, gearbox system) or
steering system blows, contact a Lancia Dealership.
Page 226 of 295
224IN AN EMERGENCY
38
38
38
38
38
38
38
38
38F43
F44
F46
F47
F48
F49
F51
F52
F5330
15
20
20
20
5
5/7.5 (*)
15
7.5
USERS FUSE AMPS FIGURE
Windscreen wiper system on steering column stalk,
bi-directional windscreen/rear window washer pump system
on steering column stalk
Cigar lighter/power socket on tunnel,
luggage compartment power socket
Sunroof motor
Driver’s front electric window
Passenger side front electric window
Hazard, right, left and central control panels (lighting), steering
wheel controls (lighting), controls on front roof light (lighting),
volumetric alarm system control unit, electric sun roof system
(control unit, control lighting), rain/dusk sensor, electro-chromic
mirror, front seat heating controls, AUX socket (lighting)
Cigar lighter (lighting), radio wiring, Cruise Control system control,
Blue&Me
TMnode, Parking sensor node, AQS sensor, climate control
system, electric door mirror adjustment, tyre pressure monitoring
system control unit, Lane assistance node, Controlled damping
suspension node, Eco button (versions with automatic gearbox),
automatic gearbox control light guide, control unit on right hand
gas discharge headlight (excluding MultiAir versions),
voltage stabilizer (MultiAir versions) (*)
Rear wiper system on steering column stalk
Instrument panel, rear direction indicators
(*) Version with gas discharge headlamps.