ESP Lancia Flavia 2012 Owner handbook (in English)
[x] Cancel search | Manufacturer: LANCIA, Model Year: 2012, Model line: Flavia, Model: Lancia Flavia 2012Pages: 233, PDF Size: 2.61 MB
Page 36 of 233
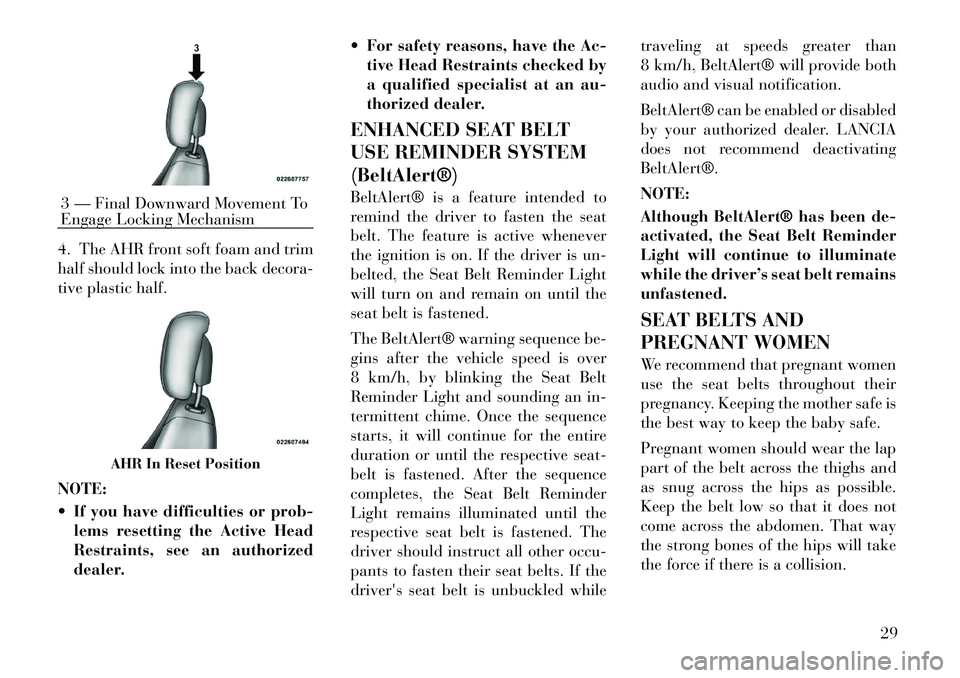
4. The AHR front soft foam and trim
half should lock into the back decora-
tive plastic half.
NOTE:
If you have difficulties or prob-lems resetting the Active Head
Restraints, see an authorized
dealer. For safety reasons, have the Ac-
tive Head Restraints checked by
a qualified specialist at an au-
thorized dealer.
ENHANCED SEAT BELT
USE REMINDER SYSTEM
(BeltAlert®)
BeltAlert® is a feature intended to
remind the driver to fasten the seat
belt. The feature is active whenever
the ignition is on. If the driver is un-
belted, the Seat Belt Reminder Light
will turn on and remain on until the
seat belt is fastened.
The BeltAlert® warning sequence be-
gins after the vehicle speed is over
8 km/h, by blinking the Seat Belt
Reminder Light and sounding an in-
termittent chime. Once the sequence
starts, it will continue for the entire
duration or until the respective seat-
belt is fastened. After the sequence
completes, the Seat Belt Reminder
Light remains illuminated until the
respective seat belt is fastened. The
driver should instruct all other occu-
pants to fasten their seat belts. If the
driver's seat belt is unbuckled while traveling at speeds greater than
8 km/h, BeltAlert® will provide both
audio and visual notification.
BeltAlert® can be enabled or disabled
by your authorized dealer. LANCIA
does not recommend deactivating
BeltAlert®.
NOTE:
Although BeltAlert® has been de-
activated, the Seat Belt Reminder
Light will continue to illuminate
while the driver’s seat belt remains
unfastened.
SEAT BELTS AND
PREGNANT WOMEN
We recommend that pregnant women
use the seat belts throughout their
pregnancy. Keeping the mother safe is
the best way to keep the baby safe.
Pregnant women should wear the lap
part of the belt across the thighs and
as snug across the hips as possible.
Keep the belt low so that it does not
come across the abdomen. That way
the strong bones of the hips will take
the force if there is a collision.3 — Final Downward Movement To
Engage Locking Mechanism
AHR In Reset Position
29
Page 40 of 233
check, the Air Bag Warning Light will
turn off. If the ORC detects a mal-
function in any part of the system, it
turns on the Air Bag Warning Light,
either momentarily or continuously. A
single chime will sound if the light
comes on again after initial startup.
It also includes diagnostics that will
illuminate the instrument cluster Air
Bag Warning Light if a malfunction is
noted that could affect the air bag
system. The diagnostics also record
the nature of the malfunction.WARNING!
Ignoring the Air Bag Warning Light
in your instrument panel could
mean you won't have the air bags to
protect you in a collision. If the light
does not come on as a bulb check
when the ignition is first turned on,
stays on after you start the vehicle,
or if it comes on as you drive, have
an authorized dealer service the air
bag system immediately.Driver And Passenger Advanced
Front Air Bag Inflator Units
The Driver and Passenger Advanced
Front Air Bag Inflator Units are lo-
cated in the center of the steering
wheel and on the right side of the
instrument panel. When the ORC de-
tects a collision requiring the Ad-
vanced Front Air Bags, it signals the
inflator units. A large quantity of non-
toxic gas is generated to inflate the
Advanced Front Air Bags. Different
air bag inflation rates are possible,
based on the collision type and sever-
ity. The steering wheel hub trim cover
and the upper right side of the instru-
ment panel separate and fold out of
the way as the air bags inflate to their
full size. The air bags fully inflate in
about 50 to 70 milliseconds. This is
about half of the time it takes to blink
your eyes. The air bags then quickly
deflate while helping to restrain the
driver and front passenger.
The Advanced Front Air Bag gas is
vented through the vent holes in the
sides of the air bag. In this way, the air
bags do not interfere with your con-
trol of the vehicle. Supplemental Seat-Mounted Side
Air Bag (SAB) Inflator Units
The Supplemental Seat-Mounted
Side Air Bags (SAB) are designed to
activate only in certain side collisions.
The ORC determines if a side collision
requires the side air bags to inflate,
based on several factors, including the
severity and type of collision.
Based on several factors, including
the severity and type of collision, the
side air bag inflator on the crash side
of the vehicle may be triggered, re-
leasing a quantity of non-toxic gas.
The inflating SAB exits through the
seat seam into the space between the
occupant and the door. The SAB fully
inflate in about 10 milliseconds. The
side air bag moves at a very high
speed and with such a high force that
it could injure you if you are not
seated properly, or if items are posi-
tioned in the area where the side air
bag inflates. This especially applies to
children.
33
Page 41 of 233
SAB air bags are a supplement to the
seat belt restraint system. Occupants,
including children who are up against
or very close to SAB air bags can be
seriously injured or killed. Occupants,
especially children, should not lean on
or sleep against the door, side win-
dows, or area where the SAB air bags
inflate, even if they are in an infant or
child restraint. Always sit upright as
possible with your back against the
seat back, use the seat belts properly,
and use the appropriate sized child
restraint, infant restraint or booster
seat recommended for the size and
weight of the child.
Front And Side Impact Sensors
In front and side impacts, impact sen-
sors can aid the ORC in determining
appropriate response to impact
events.Enhanced Accident Response
System
In the event of an impact causing air
bag deployment, if the communica-
tion network remains intact, and the
power remains intact, depending on
the nature of the event the ORC will
determine whether to have the En-
hanced Accident Response System
perform the following functions:
Cut off fuel to the engine.
Flash hazard lights as long as the
battery has power or until the igni-
tion key is turned off.
Turn on the interior lights, which remain on as long as the battery has
power or until the ignition key is
removed.
Unlock the doors automatically.
In order to reset the Enhanced Acci-
dent Response System functions after
an event, the ignition switch must be
changed from IGN ON to IGN OFF.
If A Deployment Occurs
The Advanced Front Air Bags are de-
signed to deflate immediately after
deployment. NOTE:
Front and/or side air bags will not
deploy in all collisions. This does
not mean something is wrong with
the air bag system.
If you do have a collision, which de-
ploys the air bags, any or all of the
following may occur:
The nylon air bag material may
sometimes cause abrasions and/or
skin reddening to the driver and
front passenger as the air bags de-
ploy and unfold. The abrasions are
similar to friction rope burns or those
you might get sliding along a carpet
or gymnasium floor. They are not
caused by contact with chemicals.
They are not permanent and nor-
mally heal quickly. However, if you
haven't healed significantly within a
few days, or if you have any blister-
ing, see your doctor immediately.
34
Page 44 of 233

manufacturer, other parties, such as
law enforcement, that have the spe-
cial equipment, can read the informa-
tion if they have access to the vehicle
or the EDR.
CHILD RESTRAINTS
Everyone in your vehicle needs to be
buckled up all the time, including ba-
bies and children.
Children 12 years or younger should
ride properly buckled up in a rear
seat, if available. According to crash
statistics, children are safer when
properly restrained in the rear seats,
rather than in the front.
WARNING!
In a collision, an unrestrainedchild, even a tiny baby, can be-
come a projectile inside the ve-
hicle. The force required to hold
even an infant on your lap could
become so great that you could
not hold the child, no matter how
strong you are. The child and oth-
ers could be badly injured. Any
child riding in your vehicle should
be in a proper restraint for the
child's size.
(Continued)
WARNING!(Continued)
Occupants, especially children,
should not lean on or sleep against
the door, side windows, or area
where the SAB air bags inflate,
even if they are in an infant or
child restraint.
There are different sizes and types of
restraints for children from newborn
size to the child almost large enough
for an adult safety belt. Always check
the child seat owner's manual to en-
sure you have the correct seat for your
child. Use the restraint that is correct
for your child.
Universal Child Seating Position Chart
Mass Group Front PassengerRear Outboard
Group up to 10 kg XU
Group 0+ up to 13 kg XU
Group I 9 to 18 kg XU
Group II 15 to 25 kg XU
Group III 22 to 36 kg XU
Key of letters used in the table above
U = Suitable for “universal” category restraints approved for use in this mass group.
X = Seat position not suitable for children in this mass group.
37
Page 62 of 233

CAUTION!(Continued)
Make sure the convertible top is
dry before lowering it into the
stowage compartment. Lowering
the top when damp, wet, or dirty
can cause stains, mildew, and
damage to the inside of your ve-
hicle.
Make sure there is sufficient clear-
ance of at least 2.2 m for the top to
move up.
To prevent striking a low ceiling
or automatic door opener with the
top, it is strongly recommended
that you do not operate the power
top inside a garage or parking
structure.
Failure to follow these cautions can
cause damage to the convertible top
components, trunk contents, and the
vehicle interior.CAUTION!
Do not operate the power top with
the hydraulic pump valve open.
(Continued)
CAUTION!(Continued)
Do not allow the top to remain in
the suspended position. After ap-
proximately 10 minutes in the
suspended position, the hydraulic
pressure will release, which will
allow the top and the trunk lid to
lower. Pressing the power top
switch will cancel this operation.
Always use a normal ice scraper to
remove snow or ice from the rear
window. Use of a sharp object or
other tools could scratch the pan-
els (hard top) or tear the fabric
(soft top) when removing snow or
ice.
Always close the top when leaving
your vehicle so as not to leave the
interior exposed to potentially
damaging outdoor conditions.
Do not leave the top lowered for
several weeks at a time. Close it
occasionally to prevent discolor-
ation in the folds of the fabric and
to allow the creases to smooth out.
This is especially important if the
top was stowed when not com-
pletely dry.
(Continued)
CAUTION!(Continued)
Failure to follow these cautions can
cause damage to the convertible top
components, trunk contents, and the
vehicle interior:WARNING!
Failure to follow these warnings can
result in injuries that are serious or
fatal to you, your passengers, and
others around you:
Before operating the power top,
make sure that no moving parts of
the convertible top can injure a
person or animal.
Never place any extremities
(hands, feet, etc.) near the con-
vertible top components, the up-
per windshield area, the shelf area
behind the rear seats, or the con-
vertible top stowage area while
raising or lowering the convertible
top.
When using the power top button
on RKE transmitter, if potential
danger exists while lowering the
top, release the button immedi-
ately to interrupt the operation.
(Continued)
55
Page 71 of 233

OUTSIDE MIRRORS
To receive maximum benefit, adjust
the outside mirrors to center on the
adjacent lane of traffic and a slight
overlap of the view obtained from the
inside mirror.
NOTE:
The passenger side convex outside
mirror will give a much wider view
to the rear, and especially of the
lane next to your vehicle.WARNING!
Vehicles and other objects seen in
the passenger side convex mirror
will look smaller and farther away
than they really are. Relying too
much on your passenger side convex
mirror could cause you to collide
with another vehicle or other object.
Use your inside mirror when judging
the size or distance of a vehicle seen
in the passenger side convex mirror.POWER MIRRORS
The power mirror switch is located on
the driver's door trim. A rotary knob
selects the left mirror, right mirror or
off position.
After selecting a mirror, move the
knob in the same direction you want
the mirror to move. When finished,
return the knob to the center “O”
(Off) position to guard against acci-
dentally moving a mirror position.
HEATED MIRRORS
These mirrors are heated to
melt frost or ice. This feature is
activated whenever you turn
on the rear window defroster. Refer to
“Rear Window Features” in “Under-
standing The Features Of Your Ve-
hicle” for further information.
VANITY MIRROR
A vanity mirror is attached to the
inside face of the sun visor. To use the
mirror, rotate the sun visor downward
and flip the mirror cover upward.
Power Mirror SwitchMirror Directions
Vanity Mirror
64
Page 75 of 233
The system will prompt you to saythe number you want to call.
For example, you can say “151- 1234-5555.”
The Uconnect™ Phone will con- firm the phone number and then
dial. The number will appear in the
display of certain radios.
Call By Saying A Name
Press the
button to begin.
After the “Ready” prompt and the following beep, say “Call.”
The system will prompt you to say the name of the person you want to
call.
After the “Ready” prompt and the following beep, say the name of the
person you want to call. For ex-
ample, you can say “John Doe”,
where John Doe is a previously
stored name entry in the
Uconnect™ Phonebook or down-
loaded phonebook. To learn how to
store a name in the phonebook ,
refer to “Add Names to Your
Uconnect™ Phonebook”. The Uconnect™ Phone will con-
firm the name and then dial the
corresponding phone number,
which may appear in the display of
certain radios.
Add Names To Your Uconnect™
Phonebook
NOTE:
Adding names to the Uconnect™
Phonebook is recommended when
the vehicle is not in motion.
Press the
button to begin.
After the “Ready” prompt and the following beep, say “Phonebook
New Entry”.
When prompted, say the name of the new entry. Use of long names
helps the Voice Command and it is
recommended. For example, say
“Robert Smith” or “Robert” in-
stead of “Bob”.
When prompted, enter the number designation (e.g., “Home”,
“Work”, “Mobile”, or “Other”).
This will allow you to store multiple
numbers for each phonebook entry,
if desired. When prompted, recite the phone
number for the phonebook entry
that you are adding.
After you are finished adding an entry
into the phonebook, you will be given
the opportunity to add more phone
numbers to the current entry or to
return to the main menu.
The Uconnect™ Phone will allow you
to enter up to 32 names in the phone-
book with each name having up to
four associated phone numbers and
designations. Each language has a
separate 32-name phonebook acces-
sible only in that language. In addi-
tion, for versions/markets, where pro-
vided, and supported by your phone,
Uconnect™ Phone automatically
downloads your mobile phone’s
phonebook.
Phonebook Download —
Automatic Phonebook Transfer
From Mobile Phone
For versions/markets, where pro-
vided and specifically supported by
your phone, Uconnect™ Phone auto-
matically downloads names (text
names) and number entries from your
68
Page 80 of 233

If the phone is not reachable and the
Uconnect™ Phone is operational, you
may reach the emergency number as
follows:
Press the
button to begin.
After the “Ready” prompt and the following beep, say “Emergency”
and the Uconnect™ Phone will in-
struct the paired mobile phone to
call the emergency number.
NOTE:
The default number is 112. The number dialed may not be ap-
plicable with the available mo-
bile service and area.
If supported, this number may be programmable on some sys-
tems. To do this, press the
button and say “Setup”, fol-
lowed by “Emergency”.
The Uconnect™ Phone does slightly lower your chances of
successfully making a phone
call as to that for the mobile
phone directly.
WARNING!
To use your Uconnect™ Phone Sys-
tem in an emergency, your mobile
phone must be:
turned on,
paired to the Uconnect™ System,
and have network coverage.
Breakdown Service (for
versions/markets, where
provided)
If you need Breakdown service:
Press the
button to begin.
After the “Ready” prompt and the following beep, say “Breakdown
service”.
NOTE:
The Breakdown service number
has to be setup before using. To
setup, press the
button and say
“Setup, Breakdown Service” and
follow prompts.
Paging
To learn how to page refer to “Work-
ing with Automated Systems”. Paging
works properly except for pagers of
certain companies which time out a
little too soon to work properly with
the Uconnect™ Phone. Voice Mail Calling
To learn how to access your voice
mail, refer to “Working with Auto-
mated Systems”.
Working With Automated Systems
This method is used in instances
where one generally has to press num-
bers on the mobile phone keypad
while navigating through an auto-
mated telephone system.
You can use your Uconnect™ Phone
to access a voice mail system or an
automated service, such as a paging
service or automated customer ser-
vice. Some services require immediate
response selection. In some instances,
that may be too quick for use of the
Uconnect™ Phone.
When calling a number with your
Uconnect™ Phone that normally re-
quires you to enter in a touch-tone
sequence on your mobile phone key-
pad, you can press the
button
and say the sequence you wish to en-
ter followed by the word “Send”. For
example, if required to enter your PIN
followed with a hash, (3 7 4 6 #), you
can press the
button and say, “3
73
Page 81 of 233
7 4 6 # Send”. Saying a number, or
sequence of numbers, followed by
“Send”, is also to be used for navigat-
ing through an automated customer
service center menu structure, and to
leave a number on a pager.
You can also send stored Uconnect™
Phonebook entries as tones for fast
and easy access to voice mail and
pager entries. To use this feature, dial
the number you wish to call and then
press the
button and say
“Send.” The system will prompt you
to enter the name or number and say
the name of the phonebook entry you
wish to send. The Uconnect™ Phone
will then send the corresponding
phone number associated with the
phonebook entry, as tones over the
phone.
NOTE:
You may not hear all of the tones due to mobile phone network
configurations; this is normal.
Some paging and voice mail sys- tems have system time out set-
tings that are too short and may
not allow the use of this feature. Barge In — Overriding Prompts
The “Voice Command” button can be
used when you wish to skip part of a
prompt and issue your voice com-
mand immediately. For example, if a
prompt is asking “Would you like to
pair a phone, clear a…,” you could
press the
button and say, “Pair
a Phone” to select that option without
having to listen to the rest of the voice
prompt.
Turning Confirmation Prompts
On/Off
Turning confirmation prompts off
will stop the system from confirming
your choices (e.g., the Uconnect™
Phone will not repeat a phone number
before you dial it).
Press thebutton to begin.
After the “Ready” prompt and the following beep, say:
� “Setup Confirmations Prompts On”
� “Setup Confirmations Prompts Off” Phone And Network Status
Indicators
If available on the radio and/or on a
premium display such as the
instru-
ment panel cluster, and supported by
your mobile phone, the Uconnect™
Phone will provide notification to in-
form you of your phone and network
status when you are attempting to
make a phone call using Uconnect™
Phone. The status is given for network
signal strength, phone battery
strength, etc.
Dialing Using The Mobile Phone
Keypad
You can dial a phone number with
your mobile phone keypad and still
use the Uconnect™ Phone (while di-
aling via the mobile phone keypad,
the user must exercise caution and
take precautionary safety measures).
By dialing a number with your paired
Bluetooth® mobile phone, the audio
will be played through your vehicle's
audio system. The Uconnect™ Phone
will work the same as if you dialed the
number using a Voice Command.
74
Page 89 of 233
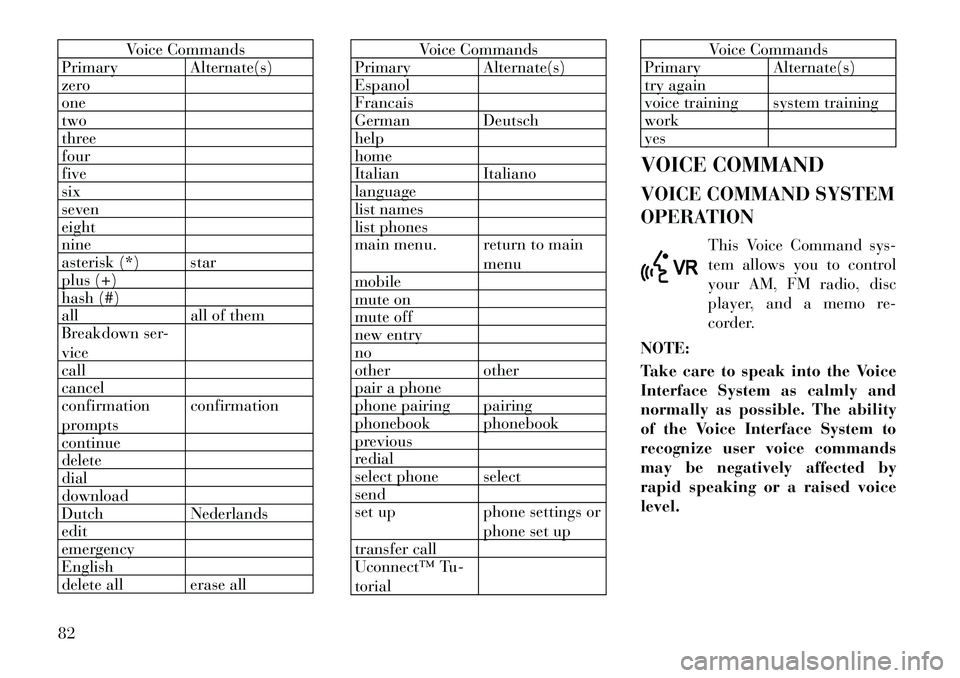
Voice Commands
Primary Alternate(s)
zero
one
two
three
four
five
six
seven
eight
nine
asterisk (*) star
plus (+)
hash (#)
all all of them
Breakdown ser-
vice
call
cancel
confirmation
prompts confirmation
continue
delete
dial
download
Dutch Nederlands
edit
emergency
English
delete all erase all
Voice Commands
Primary Alternate(s)
Espanol
Francais
German Deutsch
help
home
Italian Italiano
language
list names
list phones
main menu. return to main
menu
mobile
mute on
mute off
new entry
no
other other
pair a phone
phone pairing pairing
phonebook phonebook
previous
redial
select phone select
send
set up phone settings or
phone set up
transfer call
Uconnect™ Tu-
torial
Voice Commands
Primary Alternate(s)
try again
voice training system training
work
yes
VOICE COMMAND
VOICE COMMAND SYSTEM
OPERATION This Voice Command sys-
tem allows you to control
your AM, FM radio, disc
player, and a memo re-
corder.
NOTE:
Take care to speak into the Voice
Interface System as calmly and
normally as possible. The ability
of the Voice Interface System to
recognize user voice commands
may be negatively affected by
rapid speaking or a raised voice
level.
82