service Lancia Flavia 2012 Owner handbook (in English)
[x] Cancel search | Manufacturer: LANCIA, Model Year: 2012, Model line: Flavia, Model: Lancia Flavia 2012Pages: 233, PDF Size: 2.61 MB
Page 3 of 233
We really know your ca\dr because we inven\dted\f designed and built it: we really know every s\dingle detail. \bt
Lancia Service aut\phorised workshops you can find
technicians directly trained by us\d\f offering quality \dand professionalism for \dall service operat\dions.
Lancia workshops a\dre always close to \dyou for the regular servicing o\dperations\f season c\dhecks and practical recommendations by o\dur experts.
\fith Genuine Parts y\pou keep the re\biabi\p\bity,
comfort and perform\pance features of yo\pur new car unchanged in time:\p that’s why you bought it\p for.\blways ask for Genu\dine Parts for the \dcomponents
used on our cars; w\de recommend them becau\dse they come from our steady commi\dtment in research and development of high\dly innovative tech\dnologies.
For all these reasons: re\by on Genuine Par\pts, because they are the on\by on\pes designed for you\pr car.
WHY CHOOSING
GENUINE P\bRTS
Page 6 of 233
Dear Customer,
We would like to congratulate and thank you for choosing LANCIA.
We have written this handbook to help you get to know all the features of your car and use it in the best possible way.
You are recommended to read it right through before taking to the road for the first time.
It contains important information, advice and instructions for the use of the car which will help you get the very best out of
your LANCIA. This booklet also provides a description of special features, essential information for the correct care and
maintenance of your LANCIA as well as safe driving tips.
The enclosed Warranty Booklet lists the services that LANCIA offers to its Customers:
the Warranty Certificate with terms and conditions for maintaining its validity;
the range of additional services available to LANCIA Customers.
We are sure that these will help you get in touch with your new car and further appreciate it and the care provided by the
people at LANCIA.
Enjoy reading. Happy motoring!
This Owner Handbook describes all the versions of the LANCIA Flavia. As a consequence, you should onlyconsider the information which is related to the trim level, engine and version that you have purchased.
All data contained in this publication are purely indicative. Fiat Group Automobiles can modify the specifi- cations of the vehicle model described in this publication at any time, for technical or marketing purposes. For further information, contact a Lancia Dealership.
Page 11 of 233
INTRODUCTION
Congratulations on selecting your
new LANCIA vehicle. Be assured that
it represents precision workmanship,
distinctive styling, and high quality -
all essentials that are traditional to
our vehicles.
Before you start to drive this vehicle,
read this Owner's Manual and all the
supplements. Be sure you are familiar
with all vehicle controls, particularly
those used for braking, steering, and
transmission shifting. Learn how your
vehicle handles on different road sur-
faces. Your driving skills will improve
with experience, but as in driving any
vehicle, take it easy as you begin. Al-
ways observe local laws wherever you
drive.
NOTE:
After reviewing the owner infor-
mation, it should be stored in the
vehicle for convenient referencing
and remain with the vehicle when
sold.
Failure to operate this vehicle cor-
rectly may result in loss of control or a
collision.Operating this vehicle at excessive
speeds or while intoxicated may result
in loss of control, collision with other
vehicles or objects, going off the road,
or overturning; any of which may lead
to serious injury or death. Also, failure
to use seat belts subjects the driver
and passengers to a greater risk of
injury or death.
To keep your vehicle running at its
best, have your vehicle serviced at
recommended intervals by an autho-
rized dealer who has the qualified per-
sonnel, special tools, and equipment
to perform all service.
The manufacturer and its distributors
are vitally interested in your complete
satisfaction with this vehicle. If you
encounter a service or warranty prob-
lem, which is not resolved to your
satisfaction, discuss the matter with
your dealer's management.
Your authorized dealer will be happy
to assist you with any questions about
your vehicle.
IMPORTANT NOTICE
ALL MATERIAL CONTAINED IN
THIS PUBLICATION IS BASED ON
THE LATEST INFORMATION
AVAILABLE AT TIME OF PUBLI-
CATION APPROVAL. THE RIGHT
IS RESERVED TO PUBLISH REVI-
SIONS AT ANY TIME.
This Owner's Manual has been pre-
pared with the assistance of service
and engineering specialists to ac-
quaint you with the operation and
maintenance of your new vehicle. It is
supplemented by a Warranty Infor-
mation Booklet and various
customer-oriented documents. You
are urged to read these publications
carefully. Following the instructions
and recommendations in this Owner's
Manual will help assure safe and en-
joyable operation of your vehicle.
After you have read the Owner’s
Manual, it should be stored in the
vehicle for convenient reference and
remain with the vehicle when sold.
4
Page 12 of 233
The manufacturer reserves the right
to make changes in design and speci-
fications, and/or to make additions to
or improvements in its products with-
out imposing any obligations upon it-
self to install them on products previ-
ously manufactured.
The Owner's Manual illustrates and
describes the features that are stan-
dard or available as extra cost op-
tions. Therefore, some of the equip-
ment and accessories in this
publication may not appear on your
vehicle.
NOTE:
Be sure to read the Owner's
Manual first before driving your
vehicle and before attaching or in-
stalling parts/accessories or mak-
ing other modifications to the ve-
hicle.
In view of the many replacement parts
and accessories from various manu-
facturers available on the market, the
manufacturer cannot be certain thatthe driving safety of your vehicle will
not be impaired by the attachment or
installation of such parts. Even if such
parts are officially-approved (for ex-
ample, by a general operating permit
for the part or by constructing the
part in an officially approved design),
or if an individual operating permit
was issued for the vehicle after the
attachment or installation of such
parts, it cannot be implicitly assumed
that the driving safety of your vehicle
is unimpaired. Therefore, neither ex-
perts nor official agencies are liable.
The manufacturer only assumes re-
sponsibility when parts, which are ex-
pressly authorized or recommended
by the manufacturer, are attached or
installed at an authorized dealer. The
same applies when modifications to
the original condition are subse-
quently made on the manufacturer's
vehicles.
Your warranties do not cover any part
that the manufacturer did not supply.
Nor do they cover the cost of anyrepairs or adjustments that might be
caused or needed because of the in-
stallation or use of non-manufacturer
parts, components, equipment, mate-
rials, or additives. Nor do your war-
ranties cover the costs of repairing
damage or conditions caused by any
changes to your vehicle that do not
comply with the manufacturers speci-
fications.
Original parts and accessories and
other products approved by the
manufacturer, including qualified ad-
vice, are available at your authorized
dealer.
When it comes to service, remember
that your authorized dealer knows
your vehicle best, has the factory-
trained technicians and genuine
parts, and is interested in your satis-
faction.
Copyright
© 2012 FIAT Group Auto-
mobiles S.p.A.
5
Page 19 of 233
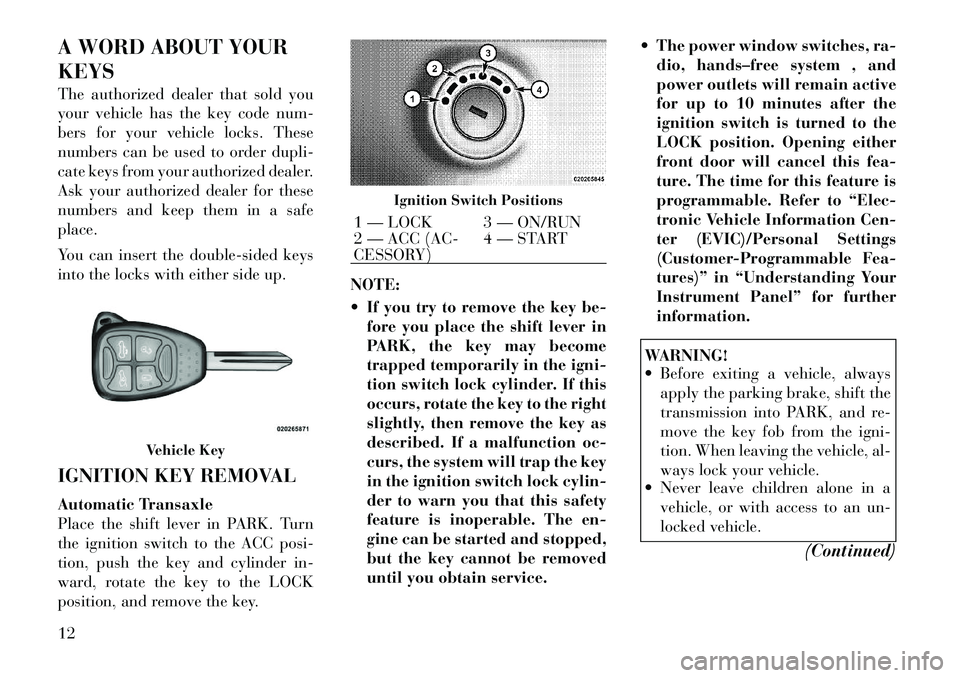
A WORD ABOUT YOUR
KEYS
The authorized dealer that sold you
your vehicle has the key code num-
bers for your vehicle locks. These
numbers can be used to order dupli-
cate keys from your authorized dealer.
Ask your authorized dealer for these
numbers and keep them in a safe
place.
You can insert the double-sided keys
into the locks with either side up.
IGNITION KEY REMOVAL
Automatic Transaxle
Place the shift lever in PARK. Turn
the ignition switch to the ACC posi-
tion, push the key and cylinder in-
ward, rotate the key to the LOCK
position, and remove the key.NOTE:
If you try to remove the key be-
fore you place the shift lever in
PARK, the key may become
trapped temporarily in the igni-
tion switch lock cylinder. If this
occurs, rotate the key to the right
slightly, then remove the key as
described. If a malfunction oc-
curs, the system will trap the key
in the ignition switch lock cylin-
der to warn you that this safety
feature is inoperable. The en-
gine can be started and stopped,
but the key cannot be removed
until you obtain service. The power window switches, ra-
dio, hands–free system , and
power outlets will remain active
for up to 10 minutes after the
ignition switch is turned to the
LOCK position. Opening either
front door will cancel this fea-
ture. The time for this feature is
programmable. Refer to “Elec-
tronic Vehicle Information Cen-
ter (EVIC)/Personal Settings
(Customer-Programmable Fea-
tures)” in “Understanding Your
Instrument Panel” for further
information.
WARNING!
Before exiting a vehicle, alwaysapply the parking brake, shift the
transmission into PARK, and re-
move the key fob from the igni-
tion. When leaving the vehicle, al-
ways lock your vehicle.
Never leave children alone in a
vehicle, or with access to an un-
locked vehicle.
(Continued)
Vehicle Key
Ignition Switch Positions
1 — LOCK 3 — ON/RUN
2 — ACC (AC-
CESSORY)4 — START
12
Page 21 of 233

indicates that someone used an in-
valid key to start the engine. Either of
these conditions will result in the en-
gine being shut off after two seconds.
If the Vehicle Security Light turns on
during normal vehicle operation (ve-
hicle running for longer than 10 sec-
onds), it indicates that there is a fault
in the electronics. Should this occur,
have the vehicle serviced as soon as
possible by an authorized dealer.CAUTION!
The Sentry Key® Immobilizer sys-
tem is not compatible with some
after-market remote starting sys-
tems. Use of these systems may re-
sult in vehicle starting problems and
loss of security protection.
All of the keys provided with your new
vehicle have been programmed to the
vehicle electronics.
REPLACEMENT KEYS
NOTE:
Only keys that have been pro-
grammed to the vehicle electronics
can be used to start the vehicle.
Once a Sentry Key® has been pro- grammed to a vehicle, it cannot be
programmed to any other vehicle.
CAUTION!
Always remove Sentry Keys from the
vehicle and lock all doors when leav-
ing the vehicle unattended.
At the time of purchase, the original
owner is provided with a four-digit
Personal Identification Number
(PIN). Keep the PIN in a secure loca-
tion. This number is required for au-
thorized dealer replacement of keys.
Duplication of keys consists of pro-
gramming a blank key to the vehicle
electronics. A blank key is one which
has never been programmed. See your
authorized dealer if you require re-
placement or additional keys for your
vehicle.
NOTE:
When having the Sentry Key® Im-
mobilizer System serviced, bring
all vehicle keys with you to the
authorized dealer. CUSTOMER KEY
PROGRAMMING
See your authorized dealer if you re-
quire replacement or additional keys
for your vehicle.
GENERAL INFORMATION
The Sentry Key® operates on a car-
rier frequency of 433.92 MHz.
Operation is subject to the following
conditions:
This device may not cause harmful
interference.
This device must accept any inter- ference that may be received, in-
cluding interference that may cause
undesired operation.
VEHICLE SECURITY
ALARM
The Vehicle Security Alarm monitors
the doors, and trunk for unauthorized
entry and ignition switch for unau-
thorized operation.
While the Vehicle Security Alarm is
armed, interior switches for door
locks and decklid release are disabled.
14
Page 25 of 233
DOOR LOCKS
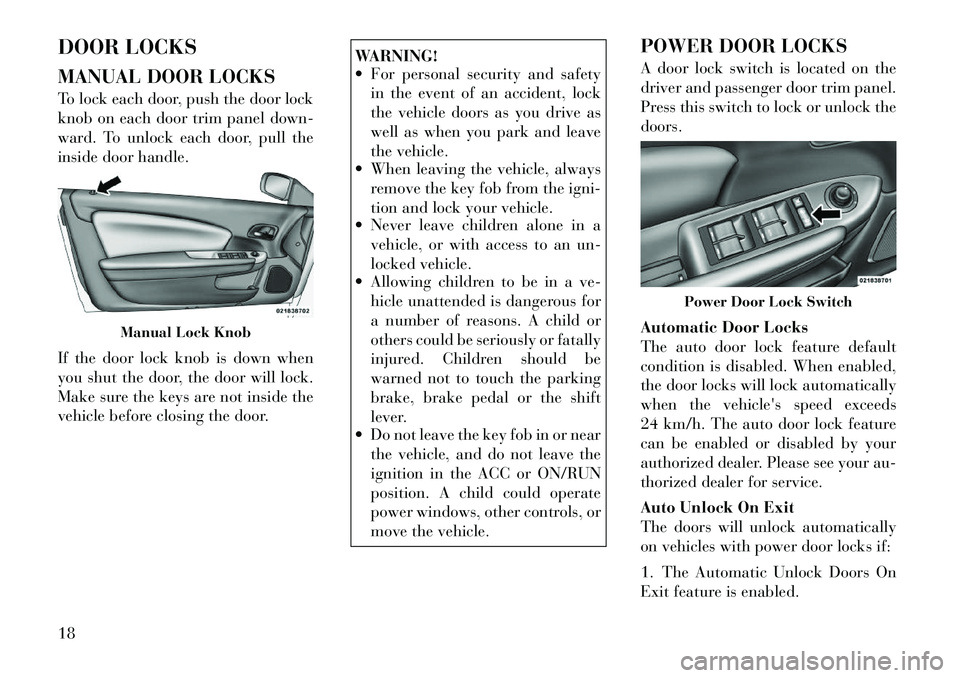
MANUAL DOOR LOCKS
To lock each door, push the door lock
knob on each door trim panel down-
ward. To unlock each door, pull the
inside door handle.
If the door lock knob is down when
you shut the door, the door will lock.
Make sure the keys are not inside the
vehicle before closing the door.
WARNING!
For personal security and safetyin the event of an accident, lock
the vehicle doors as you drive as
well as when you park and leave
the vehicle.
When leaving the vehicle, always
remove the key fob from the igni-
tion and lock your vehicle.
Never leave children alone in a
vehicle, or with access to an un-
locked vehicle.
Allowing children to be in a ve-
hicle unattended is dangerous for
a number of reasons. A child or
others could be seriously or fatally
injured. Children should be
warned not to touch the parking
brake, brake pedal or the shift
lever.
Do not leave the key fob in or near
the vehicle, and do not leave the
ignition in the ACC or ON/RUN
position. A child could operate
power windows, other controls, or
move the vehicle. POWER DOOR LOCKS
A door lock switch is located on the
driver and passenger door trim panel.
Press this switch to lock or unlock the
doors.
Automatic Door Locks
The auto door lock feature default
condition is disabled. When enabled,
the door locks will lock automatically
when the vehicle's speed exceeds
24 km/h. The auto door lock feature
can be enabled or disabled by your
authorized dealer. Please see your au-
thorized dealer for service.
Auto Unlock On Exit
The doors will unlock automatically
on vehicles with power door locks if:
1. The Automatic Unlock Doors On
Exit feature is enabled.
Manual Lock Knob
Power Door Lock Switch
18
Page 34 of 233
WARNING!
The belt and retractor assemblymust be replaced if the seat belt
assembly Automatic Locking Re-
tractor (ALR) feature or any other
seat belt function is not working
properly when checked according
to the procedures in the Service
Manual.
Failure to replace the belt and re-
tractor assembly could increase
the risk of injury in collisions.
ENERGY MANAGEMENT
FEATURE
This vehicle has a safety belt system
with an Energy Management feature
in the front seating positions to help
further reduce the risk of injury in the
event of a head-on collision. This
safety belt system has a retractor as-
sembly that is designed to release
webbing in a controlled manner. This
feature is designed to help reduce the
belt force acting on the occupant’s
chest. SEAT BELT
PRETENSIONERS
The seat belts for both front seating
positions are equipped with preten-
sioning devices that are designed to
remove slack from the seat belt in the
event of a collision. These devices may
improve the performance of the seat
belt by assuring that the belt is tight
about the occupant early in a colli-
sion. Pretensioners work for all size
occupants, including those in child
restraints.
NOTE:
These devices are not a substitute
for proper seat belt placement by
the occupant. The seat belt still
must be worn snugly and posi-
tioned properly.
The pretensioners are triggered by the
Occupant Restraint Controller
(ORC). Like the air bags, the preten-
sioners are single use items. A de-
ployed pretensioner or a deployed air
bag must be replaced immediately.
SUPPLEMENTAL ACTIVE
HEAD RESTRAINTS (AHR)
These head restraints are passive, de-
ployable components, and vehicles
with this equipment cannot be readily
identified by any markings, only
through visual inspection of the head
restraint. The head restraint will be
split in two halves, with the front half
being soft foam and trim, the back
half being decorative plastic.
How The Active Head Restraints
(AHR) Work
The Occupant Restraint Controller
(ORC) determines whether the sever-
ity, or type of rear impact will require
the Active Head Restraints (AHR) to
deploy. If a rear impact requires de-
ployment, both the driver and front
passenger seat AHRs will be deployed.When AHRs deploy during a rear im-
pact, the front half of the head re-
straint extends forward to minimize
the gap between the back of the occu-
pant’s head and the AHR. This system
is designed to help prevent or reduce
the extent of injuries to the driver and
front passenger in certain types of
rear impacts.
27
Page 40 of 233
check, the Air Bag Warning Light will
turn off. If the ORC detects a mal-
function in any part of the system, it
turns on the Air Bag Warning Light,
either momentarily or continuously. A
single chime will sound if the light
comes on again after initial startup.
It also includes diagnostics that will
illuminate the instrument cluster Air
Bag Warning Light if a malfunction is
noted that could affect the air bag
system. The diagnostics also record
the nature of the malfunction.WARNING!
Ignoring the Air Bag Warning Light
in your instrument panel could
mean you won't have the air bags to
protect you in a collision. If the light
does not come on as a bulb check
when the ignition is first turned on,
stays on after you start the vehicle,
or if it comes on as you drive, have
an authorized dealer service the air
bag system immediately.Driver And Passenger Advanced
Front Air Bag Inflator Units
The Driver and Passenger Advanced
Front Air Bag Inflator Units are lo-
cated in the center of the steering
wheel and on the right side of the
instrument panel. When the ORC de-
tects a collision requiring the Ad-
vanced Front Air Bags, it signals the
inflator units. A large quantity of non-
toxic gas is generated to inflate the
Advanced Front Air Bags. Different
air bag inflation rates are possible,
based on the collision type and sever-
ity. The steering wheel hub trim cover
and the upper right side of the instru-
ment panel separate and fold out of
the way as the air bags inflate to their
full size. The air bags fully inflate in
about 50 to 70 milliseconds. This is
about half of the time it takes to blink
your eyes. The air bags then quickly
deflate while helping to restrain the
driver and front passenger.
The Advanced Front Air Bag gas is
vented through the vent holes in the
sides of the air bag. In this way, the air
bags do not interfere with your con-
trol of the vehicle. Supplemental Seat-Mounted Side
Air Bag (SAB) Inflator Units
The Supplemental Seat-Mounted
Side Air Bags (SAB) are designed to
activate only in certain side collisions.
The ORC determines if a side collision
requires the side air bags to inflate,
based on several factors, including the
severity and type of collision.
Based on several factors, including
the severity and type of collision, the
side air bag inflator on the crash side
of the vehicle may be triggered, re-
leasing a quantity of non-toxic gas.
The inflating SAB exits through the
seat seam into the space between the
occupant and the door. The SAB fully
inflate in about 10 milliseconds. The
side air bag moves at a very high
speed and with such a high force that
it could injure you if you are not
seated properly, or if items are posi-
tioned in the area where the side air
bag inflates. This especially applies to
children.
33
Page 42 of 233
As the air bags deflate, you may seesome smoke-like particles. The
particles are a normal by-product
of the process that generates the
non-toxic gas used for air bag infla-
tion. These airborne particles may
irritate the skin, eyes, nose, or
throat. If you have skin or eye irri-
tation, rinse the area with cool wa-
ter. For nose or throat irritation,
move to fresh air. If the irritation
continues, see your doctor. If these
particles settle on your clothing,
follow the garment manufacturer's
instructions for cleaning.
Do not drive your vehicle after the air
bags have deployed. If you are in-
volved in another collision, the air
bags will not be in place to protect
you.
WARNING!
Deployed air bags and seat belt pre-
tensioners cannot protect you in an-
other collision. Have the air bags,
seat belt pretensioners, and the front
seat belt retractor assemblies re-
placed by an authorized dealer im-
mediately. Also, have the Occupant
Restraint Controller System serviced
as well.
Maintaining Your Air Bag SystemWARNING!
Modifications to any part of the air bag system could cause it to
fail when you need it. You could
be injured if the air bag system is
not there to protect you. Do not
modify the components or wiring,
including adding any kind of
badges or stickers to the steering
wheel hub trim cover or the upper
right side of the instrument panel.
Do not modify the front bumper,
vehicle body structure, or add af-
termarket side steps or running
boards.
(Continued)
WARNING!(Continued)
It is dangerous to try to repair any
part of the air bag system your-
self. Be sure to tell anyone who
works on your vehicle that it has
an air bag system.
Do not attempt to modify any part
of your air bag system. The air
bag may inflate accidentally or
may not function properly if
modifications are made. Take
your vehicle to an authorized
dealer for any air bag system ser-
vice. If your seat including your
trim cover and cushion needs to
be serviced in any way (including
removal or loosening/tightening
of seat attachment bolts), take the
vehicle to your authorized dealer.
Only manufacturer approved seat
accessories may be used. If it is
necessary to modify the air bag
system for persons with disabili-
ties, contact your authorized
dealer.
35