stop start Lancia Flavia 2012 Owner handbook (in English)
[x] Cancel search | Manufacturer: LANCIA, Model Year: 2012, Model line: Flavia, Model: Lancia Flavia 2012Pages: 233, PDF Size: 2.61 MB
Page 19 of 233
A WORD ABOUT YOUR
KEYS
The authorized dealer that sold you
your vehicle has the key code num-
bers for your vehicle locks. These
numbers can be used to order dupli-
cate keys from your authorized dealer.
Ask your authorized dealer for these
numbers and keep them in a safe
place.
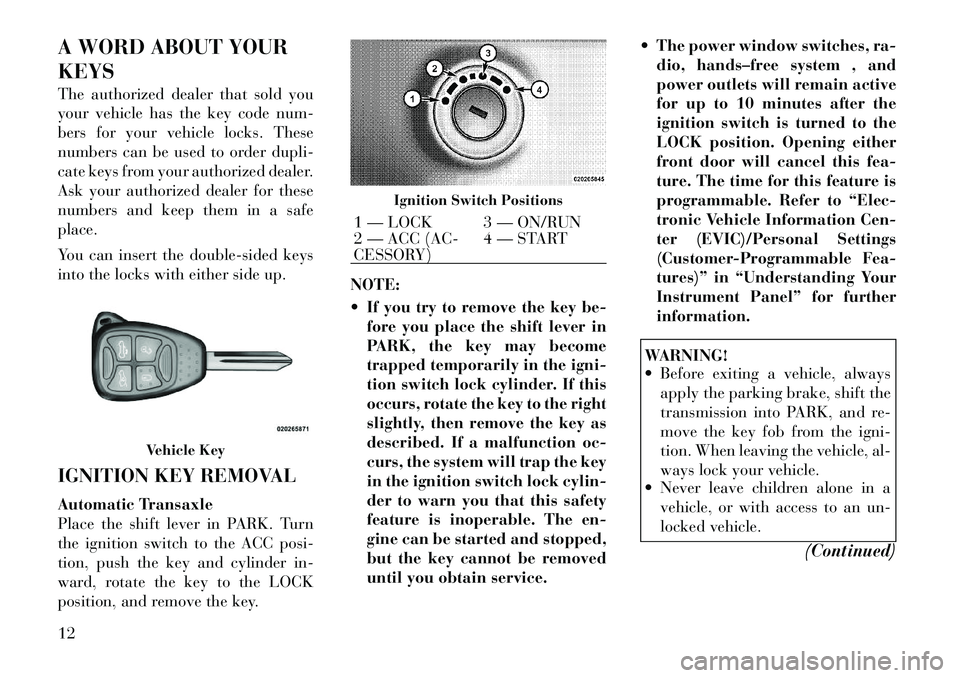
You can insert the double-sided keys
into the locks with either side up.
IGNITION KEY REMOVAL
Automatic Transaxle
Place the shift lever in PARK. Turn
the ignition switch to the ACC posi-
tion, push the key and cylinder in-
ward, rotate the key to the LOCK
position, and remove the key.NOTE:
If you try to remove the key be-
fore you place the shift lever in
PARK, the key may become
trapped temporarily in the igni-
tion switch lock cylinder. If this
occurs, rotate the key to the right
slightly, then remove the key as
described. If a malfunction oc-
curs, the system will trap the key
in the ignition switch lock cylin-
der to warn you that this safety
feature is inoperable. The en-
gine can be started and stopped,
but the key cannot be removed
until you obtain service. The power window switches, ra-
dio, hands–free system , and
power outlets will remain active
for up to 10 minutes after the
ignition switch is turned to the
LOCK position. Opening either
front door will cancel this fea-
ture. The time for this feature is
programmable. Refer to “Elec-
tronic Vehicle Information Cen-
ter (EVIC)/Personal Settings
(Customer-Programmable Fea-
tures)” in “Understanding Your
Instrument Panel” for further
information.
WARNING!
Before exiting a vehicle, alwaysapply the parking brake, shift the
transmission into PARK, and re-
move the key fob from the igni-
tion. When leaving the vehicle, al-
ways lock your vehicle.
Never leave children alone in a
vehicle, or with access to an un-
locked vehicle.
(Continued)
Vehicle Key
Ignition Switch Positions
1 — LOCK 3 — ON/RUN
2 — ACC (AC-
CESSORY)4 — START
12
Page 27 of 233
To open the window part way, push
the window switch to the first detent
and release it when you want the win-
dow to stop.To cancel the Auto-Down movement,
operate the switch either in the up or
down direction and release the switch.
The power window switches will re-
main active for up to 10 minutes after
the ignition switch is turned to the
LOCK position. Opening either door
will cancel this feature. The time for
this feature is programmable. Refer to
“Electronic Vehicle Information Center
(EVIC)/Personal Settings (Customer-
Programmable Features)” in “Under-
standing Your Instrument Panel” for
further information.Reset Window Smart Glass
Feature for Opening/Closing the
Door
If the vehicle battery goes dead, the
window Smart Glass Feature for
opening and closing the door will be
disabled. To reactivate the window
Smart Glass Feature, perform the fol-
lowing steps after vehicle power is
restored.1. Lowering all four windows to the
full open position.
2. Press and hold the Power Top
Switch in the Close direction. Once
the Power Top becomes fully closed,
all four windows will start closing.
3. Continue to hold the Power Top
Switch an additional two seconds af-
ter the windows are fully closed.
4. Push all the window switches
down firmly to open the windows
completely and continue to hold the
switch down for an additional two
seconds after the window is fully
open.
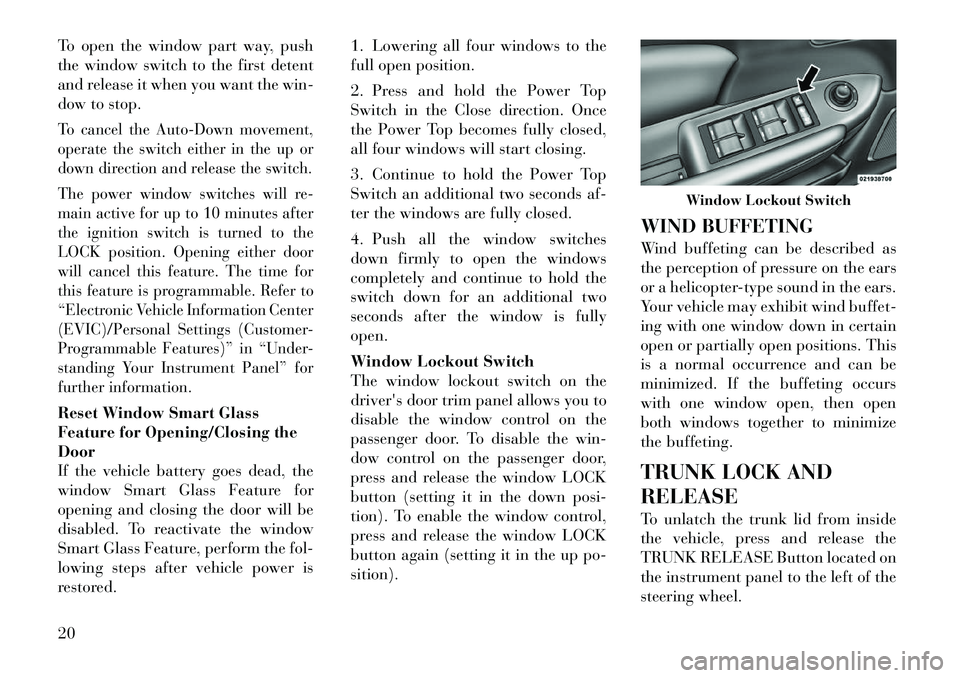
Window Lockout Switch
The window lockout switch on the
driver's door trim panel allows you to
disable the window control on the
passenger door. To disable the win-
dow control on the passenger door,
press and release the window LOCK
button (setting it in the down posi-
tion). To enable the window control,
press and release the window LOCK
button again (setting it in the up po-
sition).
WIND BUFFETING
Wind buffeting can be described as
the perception of pressure on the ears
or a helicopter-type sound in the ears.
Your vehicle may exhibit wind buffet-
ing with one window down in certain
open or partially open positions. This
is a normal occurrence and can be
minimized. If the buffeting occurs
with one window open, then open
both windows together to minimize
the buffeting.
TRUNK LOCK AND
RELEASE
To unlatch the trunk lid from inside
the vehicle, press and release the
TRUNK RELEASE Button located on
the instrument panel to the left of the
steering wheel.
Window Lockout Switch
20
Page 85 of 233
will be made to notify you that you
have a new text message. If you wish
to hear the new message:
Press the
button.
After the “Ready” prompt and the following beep, say “SMS Read” or
“Read Messages”.
Uconnect™ Phone will play the new text message for you.
After reading a message, you can “Re-
ply” or “Forward” the message using
Uconnect™ Phone.
Send Messages:
You can send messages using
Uconnect™ Phone. To send a new
message:
Press thebutton.
After the “Ready” prompt and the following beep, say “SMS Send” or
“Send Messages”.
You can either say the message you
wish to send or say “List Messages.”
There are 20 preset messages.To send a message, press thebutton while the system is listing the
message and say “Send.” Uconnect™ Phone will prompt you to
say the name or number of the person
you wish to send the message to.
List of Preset Messages:
1. Yes
2. No
3. Where are you?
4. I need more direction.
5. L O L
6. Why
7. I love you
8. Call me
9. Call me later
10. Thanks
11. See You in 15 minutes
12. I am on my way
13. I’ll be late
14. Are you there yet?
15. Where are we meeting?
16. Can this wait?
17. Bye for now
18. When can we meet
19. Send number to call20. Start without me
Turn SMS Incoming Announcement
ON/OFF
Turning the SMS Incoming An-
nouncement OFF will stop the system
from announcing the new incoming
messages.
Press the
button.
After the “Ready” prompt and the following beep, say “Setup, Incom-
ing Message Announcement”, you
will then be given a choice to
change it.
Bluetooth® Communication Link
Mobile phones have been found to
lose connection to the Uconnect™
Phone. When this happens, the con-
nection can generally be reestablished
by switching the phone off/on. Your
mobile phone is recommended to re-
main in Bluetooth® ON mode.
Power-Up
After switching the ignition key from
OFF to either ON or ACC position, or
after a language change, you must
wait at least 15 seconds prior to using
the system.
78
Page 96 of 233

For comfort the Active Head Re-
straints can be tilted forward and
rearward. To tilt the head restraint
closer to the back of your head, pull
forward on the bottom of the head
restraint. Push rearward on the bot-
tom of the head restraint to move the
head restraint away from your head.NOTE:
The head restraints should only
be removed by qualified techni-
cians, for service purposes only.
If either of the head restraints
require removal, see your autho-
rized dealer.
In the event of deployment of an Active Head Restraint, refer to
“Resetting Active Head Re-
straints (AHR)” in “Supplemen-
tal Active Head Restraints
(AHR)” in “Things to Know Be-
fore Starting Your Vehicle” sec-
tion for further information.
WARNING!
Do not place items over the top of
the Active Head Restraint, such as
coats, seat covers or portable DVD
players. These items may interfere
with the operation of the Active
Head Restraint in the event of a
collision and could result in seri-
ous injury or death.
(Continued)
WARNING!(Continued)
Active Head Restraints may be
deployed if they are struck by an
object such as a hand, foot or loose
cargo. To avoid accidental deploy-
ment of the Active Head Restraint
ensure that all cargo is secured, as
loose cargo could contact the Ac-
tive Head Restraint during sud-
den stops. Failure to follow this
warning could cause personal in-
jury if the Active Head Restraint is
deployed.
Head Restraints — Rear Seats
The rear seat head restraints are fixed
and cannot be adjusted. For proper
routing of a Child Seat Tether refer to
“Occupant Restraints” in “Things To
Know Before Starting Your Vehicle”
for further information.
Active Head Restraint (Normal Position)Active Head Restraint (Tilted)
89
Page 114 of 233
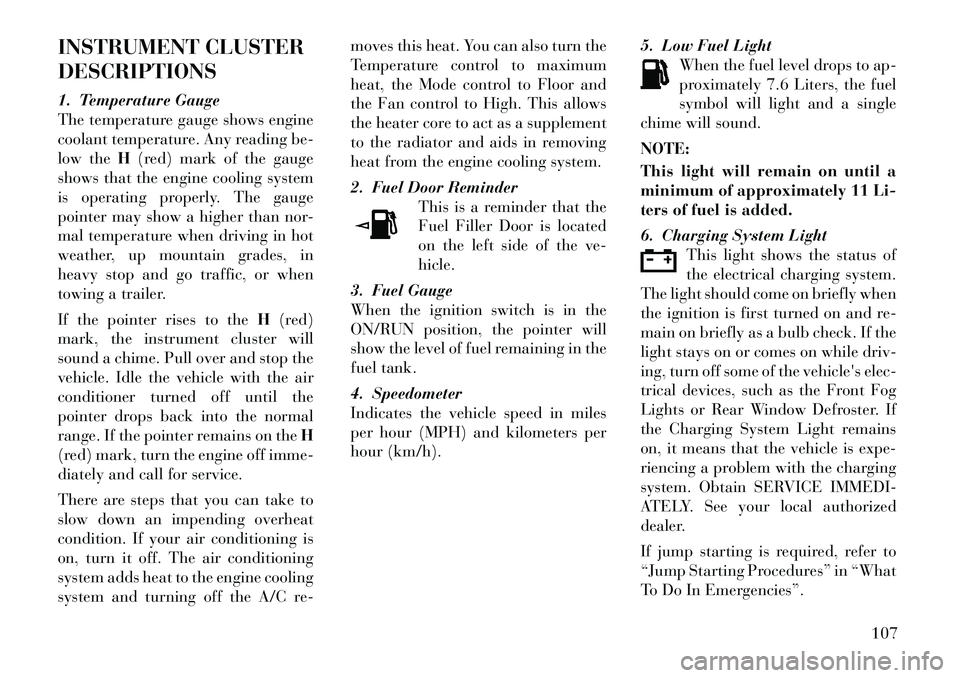
INSTRUMENT CLUSTER
DESCRIPTIONS
1. Temperature Gauge
The temperature gauge shows engine
coolant temperature. Any reading be-
low theH(red) mark of the gauge
shows that the engine cooling system
is operating properly. The gauge
pointer may show a higher than nor-
mal temperature when driving in hot
weather, up mountain grades, in
heavy stop and go traffic, or when
towing a trailer.
If the pointer rises to the H(red)
mark, the instrument cluster will
sound a chime. Pull over and stop the
vehicle. Idle the vehicle with the air
conditioner turned off until the
pointer drops back into the normal
range. If the pointer remains on the H
(red) mark, turn the engine off imme-
diately and call for service.
There are steps that you can take to
slow down an impending overheat
condition. If your air conditioning is
on, turn it off. The air conditioning
system adds heat to the engine cooling
system and turning off the A/C re- moves this heat. You can also turn the
Temperature control to maximum
heat, the Mode control to Floor and
the Fan control to High. This allows
the heater core to act as a supplement
to the radiator and aids in removing
heat from the engine cooling system.
2. Fuel Door Reminder
This is a reminder that the
Fuel Filler Door is located
on the left side of the ve-
hicle.
3. Fuel Gauge
When the ignition switch is in the
ON/RUN position, the pointer will
show the level of fuel remaining in the
fuel tank.
4. Speedometer
Indicates the vehicle speed in miles
per hour (MPH) and kilometers per
hour (km/h). 5. Low Fuel Light
When the fuel level drops to ap-
proximately 7.6 Liters, the fuel
symbol will light and a single
chime will sound.
NOTE:
This light will remain on until a
minimum of approximately 11 Li-
ters of fuel is added.
6. Charging System Light This light shows the status of
the electrical charging system.
The light should come on briefly when
the ignition is first turned on and re-
main on briefly as a bulb check. If the
light stays on or comes on while driv-
ing, turn off some of the vehicle'selec-
trical devices, such as the Front Fog
Lights or Rear Window Defroster. If
the Charging System Light remains
on, it means that the vehicle is expe-
riencing a problem with the charging
system. Obtain SERVICE IMMEDI-
ATELY. See your local authorized
dealer.
If jump starting is required, refer to
“Jump Starting Procedures” in “What
To Do In Emergencies”.
107
Page 115 of 233
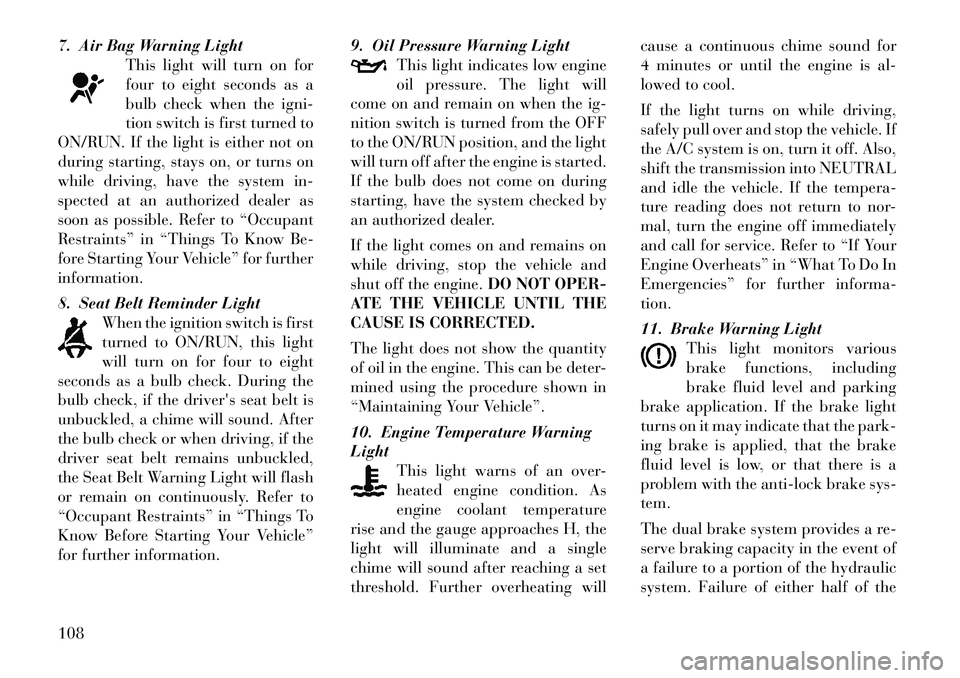
7. Air Bag Warning LightThis light will turn on for
four to eight seconds as a
bulb check when the igni-
tion switch is first turned to
ON/RUN. If the light is either not on
during starting, stays on, or turns on
while driving, have the system in-
spected at an authorized dealer as
soon as possible. Refer to “Occupant
Restraints” in “Things To Know Be-
fore Starting Your Vehicle” for further
information.
8. Seat Belt Reminder Light
When the ignition switch is first
turned to ON/RUN, this light
will turn on for four to eight
seconds as a bulb check. During the
bulb check, if the driver's seat belt is
unbuckled, a chime will sound. After
the bulb check or when driving, if the
driver seat belt remains unbuckled,
the Seat Belt Warning Light will flash
or remain on continuously. Refer to
“Occupant Restraints” in “Things To
Know Before Starting Your Vehicle”
for further information. 9. Oil Pressure Warning Light
This light indicates low engine
oil pressure. The light will
come on and remain on when the ig-
nition switch is turned from the OFF
to the ON/RUN position, and the light
will turn off after the engine is started.
If the bulb does not come on during
starting, have the system checked by
an authorized dealer.
If the light comes on and remains on
while driving, stop the vehicle and
shut off the engine. DO NOT OPER-
ATE THE VEHICLE UNTIL THE
CAUSE IS CORRECTED.
The light does not show the quantity
of oil in the engine. This can be deter-
mined using the procedure shown in
“Maintaining Your Vehicle”.
10. Engine Temperature Warning
Light This light warns of an over-
heated engine condition. As
engine coolant temperature
rise and the gauge approaches H, the
light will illuminate and a single
chime will sound after reaching a set
threshold. Further overheating will cause a continuous chime sound for
4 minutes or until the engine is al-
lowed to cool.
If the light turns on while driving,
safely pull over and stop the vehicle. If
the A/C system is on, turn it off. Also,
shift the transmission into NEUTRAL
and idle the vehicle. If the tempera-
ture reading does not return to nor-
mal, turn the engine off immediately
and call for service. Refer to “If Your
Engine Overheats” in “What To Do In
Emergencies” for further informa-
tion.
11. Brake Warning Light
This light monitors various
brake functions, including
brake fluid level and parking
brake application. If the brake light
turns on it may indicate that the park-
ing brake is applied, that the brake
fluid level is low, or that there is a
problem with the anti-lock brake sys-
tem.
The dual brake system provides a re-
serve braking capacity in the event of
a failure to a portion of the hydraulic
system. Failure of either half of the108
Page 119 of 233
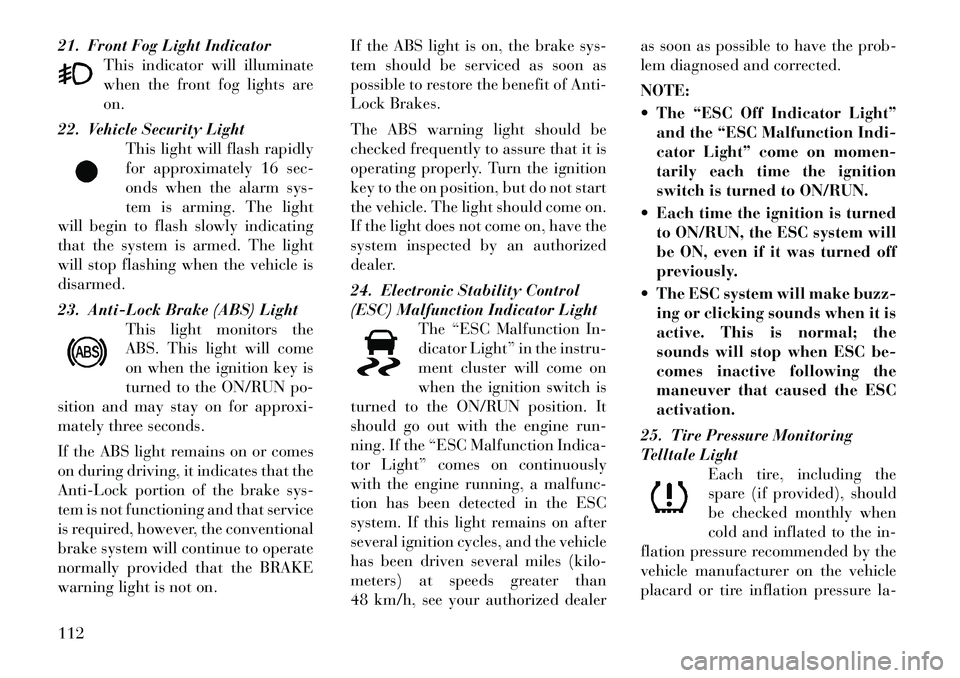
21. Front Fog Light IndicatorThis indicator will illuminate
when the front fog lights are
on.
22. Vehicle Security Light This light will flash rapidly
for approximately 16 sec-
onds when the alarm sys-
tem is arming. The light
will begin to flash slowly indicating
that the system is armed. The light
will stop flashing when the vehicle is
disarmed.
23. Anti-Lock Brake (ABS) Light This light monitors the
ABS. This light will come
on when the ignition key is
turned to the ON/RUN po-
sition and may stay on for approxi-
mately three seconds.
If the ABS light remains on or comes
on during driving, it indicates that the
Anti-Lock portion of the brake sys-
tem is not functioning and that service
is required, however, the conventional
brake system will continue to operate
normally provided that the BRAKE
warning light is not on. If the ABS light is on, the brake sys-
tem should be serviced as soon as
possible to restore the benefit of Anti-
Lock Brakes.
The ABS warning light should be
checked frequently to assure that it is
operating properly. Turn the ignition
key to the on position, but do not start
the vehicle. The light should come on.
If the light does not come on, have the
system inspected by an authorized
dealer.
24. Electronic Stability Control
(ESC) Malfunction Indicator Light
The “ESC Malfunction In-
dicator Light” in the instru-
ment cluster will come on
when the ignition switch is
turned to the ON/RUN position. It
should go out with the engine run-
ning. If the “ESC Malfunction Indica-
tor Light” comes on continuously
with the engine running, a malfunc-
tion has been detected in the ESC
system. If this light remains on after
several ignition cycles, and the vehicle
has been driven several miles (kilo-
meters) at speeds greater than
48 km/h, see your authorized dealer as soon as possible to have the prob-
lem diagnosed and corrected.
NOTE:
The “ESC Off Indicator Light”
and the “ESC Malfunction Indi-
cator Light” come on momen-
tarily each time the ignition
switch is turned to ON/RUN.
Each time the ignition is turned to ON/RUN, the ESC system will
be ON, even if it was turned off
previously.
The ESC system will make buzz- ing or clicking sounds when it is
active. This is normal; the
sounds will stop when ESC be-
comes inactive following the
maneuver that caused the ESC
activation.
25. Tire Pressure Monitoring
Telltale Light Each tire, including the
spare (if provided), should
be checked monthly when
cold and inflated to the in-
flation pressure recommended by the
vehicle manufacturer on the vehicle
placard or tire inflation pressure la-112
Page 120 of 233
bel. (If your vehicle has tires of a
different size than the size indicated
on the vehicle placard or tire inflation
pressure label, you should determine
the proper tire inflation pressure for
those tires.)
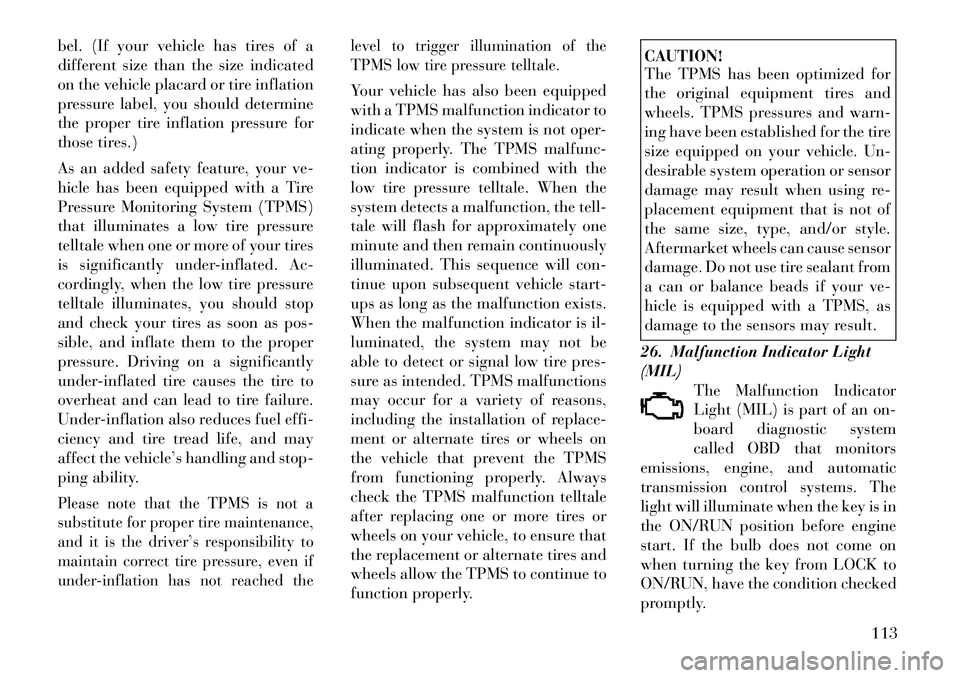
As an added safety feature, your ve-
hicle has been equipped with a Tire
Pressure Monitoring System (TPMS)
that illuminates a low tire pressure
telltale when one or more of your tires
is significantly under-inflated. Ac-
cordingly, when the low tire pressure
telltale illuminates, you should stop
and check your tires as soon as pos-
sible, and inflate them to the proper
pressure. Driving on a significantly
under-inflated tire causes the tire to
overheat and can lead to tire failure.
Under-inflation also reduces fuel effi-
ciency and tire tread life, and may
affect the vehicle’s handling and stop-
ping ability.Please note that the TPMS is not a
substitute for proper tire maintenance,
and it is the driver’s responsibility to
maintain correct tire pressure, even if
under-inflation has not reached thelevel to trigger illumination of the
TPMS low tire pressure telltale.
Your vehicle has also been equipped
with a TPMS malfunction indicator to
indicate when the system is not oper-
ating properly. The TPMS malfunc-
tion indicator is combined with the
low tire pressure telltale. When the
system detects a malfunction, the tell-
tale will flash for approximately one
minute and then remain continuously
illuminated. This sequence will con-
tinue upon subsequent vehicle start-
ups as long as the malfunction exists.
When the malfunction indicator is il-
luminated, the system may not be
able to detect or signal low tire pres-
sure as intended. TPMS malfunctions
may occur for a variety of reasons,
including the installation of replace-
ment or alternate tires or wheels on
the vehicle that prevent the TPMS
from functioning properly. Always
check the TPMS malfunction telltale
after replacing one or more tires or
wheels on your vehicle, to ensure that
the replacement or alternate tires and
wheels allow the TPMS to continue to
function properly.
CAUTION!
The TPMS has been optimized for
the original equipment tires and
wheels. TPMS pressures and warn-
ing have been established for the tire
size equipped on your vehicle. Un-
desirable system operation or sensor
damage may result when using re-
placement equipment that is not of
the same size, type, and/or style.
Aftermarket wheels can cause sensor
damage. Do not use tire sealant from
a can or balance beads if your ve-
hicle is equipped with a TPMS, as
damage to the sensors may result.
26. Malfunction Indicator Light
(MIL) The Malfunction Indicator
Light (MIL) is part of an on-
board diagnostic system
called OBD that monitors
emissions, engine, and automatic
transmission control systems. The
light will illuminate when the key is in
the ON/RUN position before engine
start. If the bulb does not come on
when turning the key from LOCK to
ON/RUN, have the condition checked
promptly.
113
Page 121 of 233
Certain conditions, such as a loose or
missing gas cap, poor fuel quality,
etc., may illuminate the light after
engine start. The vehicle should be
serviced if the light stays on through
several of your typical driving cycles.
In most situations, the vehicle will
drive normally and will not require
towing.CAUTION!
Prolonged driving with the MIL on
could cause damage to the engine
control system. It also could affect
fuel economy and drivability. If the
MIL is flashing, severe catalytic con-
verter damage and power loss will
soon occur. Immediate service is re-
quired.
WARNING!
A malfunctioning catalytic con-
verter, as referenced above, can
reach higher temperatures than in
normal operating conditions. This
can cause a fire if you drive slowly or
park over flammable substances
such as dry plants, wood, cardboard,
etc. This could result in death or
serious injury to the driver, occu-
pants or others.
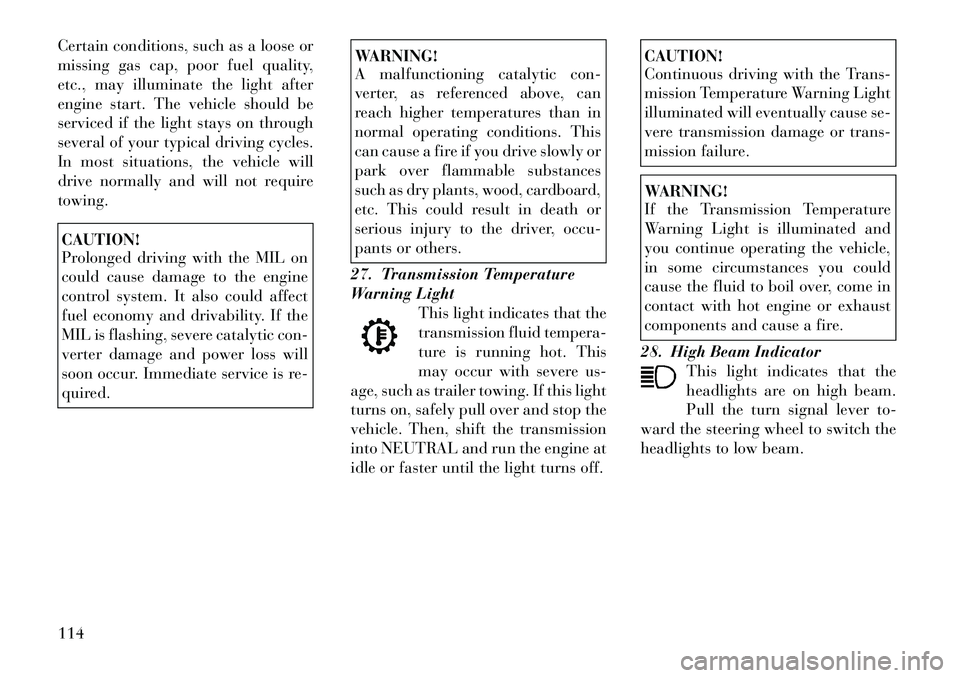
27. Transmission Temperature
Warning Light This light indicates that the
transmission fluid tempera-
ture is running hot. This
may occur with severe us-
age, such as trailer towing. If this light
turns on, safely pull over and stop the
vehicle. Then, shift the transmission
into NEUTRAL and run the engine at
idle or faster until the light turns off.
CAUTION!
Continuous driving with the Trans-
mission Temperature Warning Light
illuminated will eventually cause se-
vere transmission damage or trans-
mission failure.WARNING!
If the Transmission Temperature
Warning Light is illuminated and
you continue operating the vehicle,
in some circumstances you could
cause the fluid to boil over, come in
contact with hot engine or exhaust
components and cause a fire.
28. High Beam Indicator This light indicates that the
headlights are on high beam.
Pull the turn signal lever to-
ward the steering wheel to switch the
headlights to low beam.
114
Page 142 of 233

If the engine fails to start after you
have followed the “Normal Starting”
procedure, it may be flooded. To clear
any excess fuel, push the accelerator
pedal all the way to the floor and hold
it. Then, turn the ignition switch to
the START position and release it as
soon as the starter engages. The
starter motor will disengage auto-
matically in 10 seconds. Once this
occurs, release the accelerator pedal,
turn the ignition switch to the LOCK
position, wait 10 to 15 seconds, then
repeat the “Normal Starting” proce-
dure.CAUTION!
To prevent damage to the starter,
wait 10 to 15 seconds before trying
again.
AFTER STARTING
The idle speed will automatically de-
crease as the engine warms up. AUTOMATIC
TRANSMISSION
CAUTION!
Damage to the transmission may oc-
cur if the following precautions are
not observed:
Shift into PARK only after the ve-
hicle has come to a complete stop.
Shift into or out of REVERSE
only after the vehicle has come to
a complete stop and the engine is
at idle speed.
Do not shift between PARK, RE-
VERSE, NEUTRAL, or DRIVE
when the engine is above idle
speed.
Before shifting into any gear,
make sure your foot is firmly
pressing on the brake pedal.
NOTE:
You MUST press and hold the
brake pedal while shifting out of
PARK.
WARNING!
It is dangerous to move the shift lever out of PARK or NEUTRAL if
the engine speed is higher than
idle speed. If your foot is not
firmly pressing on the brake
pedal, the vehicle could accelerate
quickly forward or in reverse. You
could lose control of the vehicle
and hit someone or something.
Only shift into gear when the en-
gine is idling normally and when
your foot is firmly pressing on the
brake pedal.
(Continued)
135