stop start Lancia Flavia 2012 Owner handbook (in English)
[x] Cancel search | Manufacturer: LANCIA, Model Year: 2012, Model line: Flavia, Model: Lancia Flavia 2012Pages: 233, PDF Size: 2.61 MB
Page 143 of 233

WARNING!(Continued)
Unintended movement of a ve-
hicle could injure those in and
near the vehicle. As with all ve-
hicles, you should never exit a ve-
hicle while the engine is running.
Before exiting a vehicle, always
apply the parking brake, shift the
transmission into PARK, and re-
move the ignition key. Once the
key is removed, the shift lever is
locked in the PARK position, se-
curing the vehicle against un-
wanted movement. Furthermore,
you should never leave children
alone in a vehicle, or with access
to an unlocked vehicle. Allowing
children to be in a vehicle unat-
tended is dangerous for a number
of reasons. A child or others could
be seriously or fatally injured.
Children should be warned not to
touch the parking brake, brake
pedal or the shift lever.
(Continued)
WARNING!(Continued)
Do not leave the key fob in or near
the vehicle, and do not leave a
vehicle equipped with Keyless
Enter-N-Go in the ACC or ON/
RUN mode. A child could operate
power windows, other controls, or
move the vehicle.
AUTOMATIC
TRANSMISSION IGNITION
INTERLOCK SYSTEMS
These systems prevent the key fob
from being removed unless the shift
lever is in PARK. They also prevent
shifting out of PARK unless the igni-
tion switch is in the ON/RUN position
and the brake pedal is applied.
KEY IGNITION PARK
INTERLOCK
This vehicle is equipped with a Key
Ignition Park Interlock which re-
quires the shift lever to be placed in
PARK before the ignition switch can
be turned to the LOCK/OFF position.
The key fob can only be removed from
the ignition when the ignition is in the LOCK/OFF position and once re-
moved the shift lever is locked in
PARK.
NOTE:
If a malfunction occurs, the system
will trap the key in the ignition
cylinder to warn you that this
safety feature is inoperable. The
engine can be started and stopped,
but the key cannot be removed un-
til you obtain service.
BRAKE/TRANSMISSION
INTERLOCK SYSTEM
This vehicle is equipped with a Brake
Transmission Shift Interlock (BTSI)
that holds the shift lever in the PARK
position unless the brakes are applied.
To move the shift lever out of the
PARK position, the ignition switch
must be turned to the ON/RUN or
START position (engine running or
not) and the brake pedal must be
pressed.
136
Page 144 of 233

SIX-SPEED AUTOMATIC
TRANSMISSION
The shift lever position display (lo-
cated in the instrument panel cluster)
indicates the transmission gear range.
You must press the brake pedal to
move the shift lever out of the PARK
position (refer to “Brake/
Transmission Shift Interlock System”
in this section). To drive, move the
shift lever from PARK or NEUTRAL
to the DRIVE position.
The electronically-controlled trans-
mission provides a precise shift sched-
ule. The transmission electronics are
self-calibrating; therefore, the first
few shifts on a new vehicle may be
somewhat abrupt. This is a normal
condition, and precision shifts will de-
velop within a few hundred kilome-
ters.
Shifting from DRIVE to PARK or RE-
VERSE should be done only after the
accelerator pedal is released and the
vehicle is stopped. Be sure to keep
your foot on the brake pedal when
moving the shift lever between these
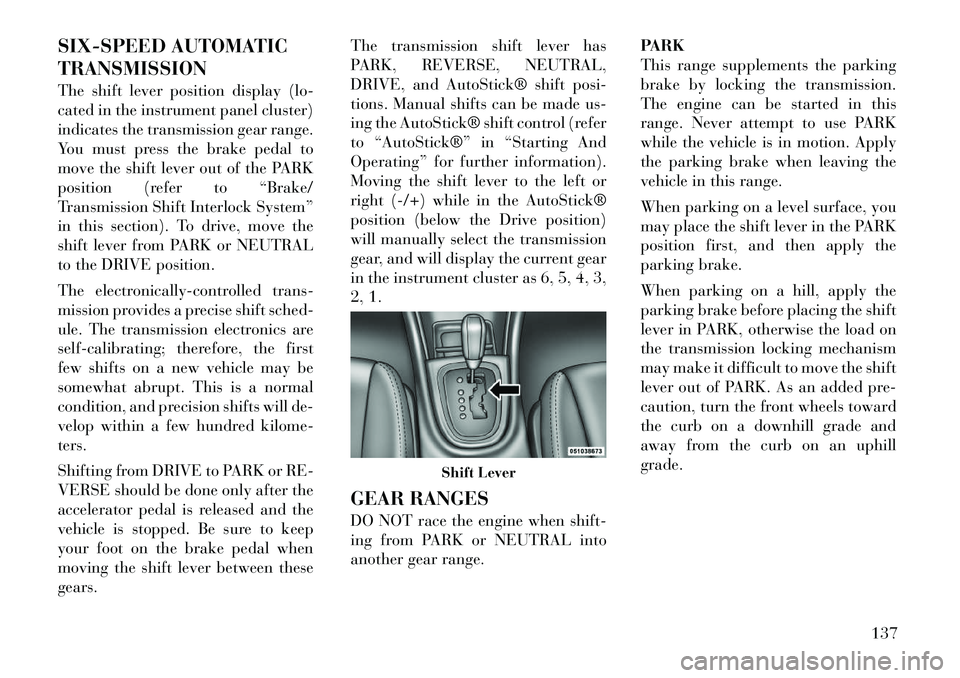
gears.The transmission shift lever has
PARK, REVERSE, NEUTRAL,
DRIVE, and AutoStick® shift posi-
tions. Manual shifts can be made us-
ing the AutoStick® shift control (refer
to “AutoStick®” in “Starting And
Operating” for further information).
Moving the shift lever to the left or
right (-/+) while in the AutoStick®
position (below the Drive position)
will manually select the transmission
gear, and will display the current gear
in the instrument cluster as 6, 5, 4, 3,
2, 1.
GEAR RANGES
DO NOT race the engine when shift-
ing from PARK or NEUTRAL into
another gear range.
PARK
This range supplements the parking
brake by locking the transmission.
The engine can be started in this
range. Never attempt to use PARK
while the vehicle is in motion. Apply
the parking brake when leaving the
vehicle in this range.
When parking on a level surface, you
may place the shift lever in the PARK
position first, and then apply the
parking brake.
When parking on a hill, apply the
parking brake before placing the shift
lever in PARK, otherwise the load on
the transmission locking mechanism
may make it difficult to move the shift
lever out of PARK. As an added pre-
caution, turn the front wheels toward
the curb on a downhill grade and
away from the curb on an uphill
grade.
Shift Lever
137
Page 146 of 233

CAUTION!
Before moving the shift lever outof PARK, you must turn the igni-
tion switch from the LOCK/OFF
position to the ON/RUN position,
and also press the brake pedal.
Otherwise, damage to the shift le-
ver could result.
DO NOT race the engine when
shifting from PARK or NEUTRAL
into another gear range, as this
can damage the drivetrain.
The following indicators should be
used to ensure that you have engaged
the shift lever into the PARK position:
When shifting into PARK, move the shift lever all the way forward and
to the left until it stops and is fully
seated.
Look at the shift lever position dis- play and verify that it indicates the
PARK position.
With brake pedal released, verify that the shift lever will not move out
of PARK. REVERSE
This range is for moving the vehicle
backward. Shift into REVERSE only
after the vehicle has come to a com-
plete stop.
NEUTRAL
Use this range when vehicle is stand-
ing for prolonged periods with engine
running. The engine may be started in
this range. Set the parking brake and
shift the transmission into PARK if
you must leave the vehicle.
WARNING!
Do not coast in NEUTRAL and
never turn off the ignition to coast
down a hill. These are unsafe prac-
tices that limit your response to
changing traffic or road conditions.
You might lose control of the vehicle
and have a collision.
CAUTION!
Towing the vehicle, coasting, or
driving for any other reason with the
transmission in NEUTRAL can re-
sult in severe transmission damage.
Refer to “Recreational Towing” in
“Starting And Operating” and
“Towing A Disabled Vehicle” in
What To Do In Emergencies” for
further information.
DRIVE
This range should be used for most
city and highway driving. It provides
the smoothest upshifts and down-
shifts, and the best fuel economy. The
transmission automatically upshifts
through underdrive first, second,
third, and fourth gears, direct fifth
gear and overdrive sixth gear. The
DRIVE position provides optimum
driving characteristics under all nor-
mal operating conditions.
When frequent transmission shifting
occurs (such as when operating the
vehicle under heavy loading condi-
tions, in hilly terrain, traveling into
strong head winds, or while towing
heavy trailers), use the AutoStick®
139
Page 147 of 233

mode (refer to “AutoStick®” in
“Starting And Operating” for further
information) to select a lower gear.
Under these conditions, using a lower
gear will improve performance and
extend transmission life by reducing
excessive shifting and heat buildup.
During cold temperatures, transmis-
sion operation may be modified de-
pending on engine and transmission
temperature as well as vehicle speed.
This feature improves warm up time
of the engine and transmission to
achieve maximum efficiency. Engage-
ment of the torque converter clutch is
inhibited until the transmission fluid
is warm (refer to the “Note” under
“Torque Converter Clutch” in this
section). During extremely cold tem-
peratures (27°C or below), operation
may briefly be limited to third gear
only. Normal operation will resume
once the transmission temperature
has risen to a suitable level.
Transmission Limp Home Mode
Transmission function is monitored
electronically for abnormal condi-
tions. If a condition is detected that
could result in transmission damage,Transmission Limp Home Mode is ac-
tivated. In this mode, the transmis-
sion remains in third gear regardless
of which forward gear is selected.
PARK, REVERSE, and NEUTRAL
will continue to operate. The Mal-
function Indicator Light (MIL) may
be illuminated. Limp Home Mode al-
lows the vehicle to be driven to an
authorized dealer for service without
damaging the transmission.
In the event of a momentary problem,
the transmission can be reset to regain
all forward gears by performing the
following steps:
1. Stop the vehicle.
2. Shift the transmission into PARK.
3. Turn the ignition switch to the
LOCK/OFF position.
4. Wait approximately 10 seconds.
5. Restart the engine.
6. Shift into the desired gear range. If
the problem is no longer detected, the
transmission will return to normal op-
eration.
NOTE:
Even if the transmission can be
reset, we recommend that you visit
an authorized dealer at your earli-
est possible convenience. Your au-
thorized dealer has diagnostic
equipment to determine if the
problem could recur.
If the transmission cannot be reset,
authorized dealer service is required.
Overdrive Operation
The automatic transmission includes
an electronically controlled Overdrive
(sixth gear). The transmission will
automatically shift into the Overdrive
gear if the following conditions are
present:
the shift lever is in the DRIVE po-
sition,
the transmission fluid has reached an adequate temperature,
the engine coolant has reached an adequate temperature,
vehicle speed is sufficiently high, and
the driver is not heavily pressing the accelerator.
140
Page 148 of 233

Torque Converter Clutch
A feature designed to improve fuel
economy has been included in the au-
tomatic transmission on your vehicle.
A clutch within the torque converter
engages automatically at calibrated
speeds. This may result in a slightly
different feeling or response during
normal operation in the upper gears.
When the vehicle speed drops or dur-
ing some accelerations, the clutch au-
tomatically disengages.
NOTE:
The torque converter clutch will
not engage until the transmission
fluid and engine coolant are warm
[usually after 2 to 5 km of driving].
Because the engine speed is higher
when the torque converter clutch
is not engaged, it may seem as if the
transmission is not shifting into
Overdrive when cold. This is nor-
mal. Using the AutoStick® feature,
when the transmission is suffi-
ciently warm, will demonstrate
that the transmission is able to
shift into and out of Overdrive.AUTOSTICK®
AutoStick® is a driver-interactive
feature providing manual shift con-
trol, giving you more control of the
vehicle. AutoStick® allows you to
maximize engine braking, eliminate
undesirable upshifts and downshifts,
and improve overall vehicle perfor-
mance. This system can also provide
you with more control during passing,
city driving, cold slippery conditions,
mountain driving, and many other
situations.
OPERATION
When the shift lever is in the
AutoStick® position (below the
DRIVE position), it can be moved
from side to side. This allows the
driver to manually select the trans-
mission gear being used. Moving the
shift lever to the left (-) triggers a
downshift and to the right (+) an up-
shift. The gear position will display in
the instrument cluster on the trans-
mission range indicator.
NOTE:
In AutoStick® mode, the transmis-
sion will only shift up or down
when the driver moves the shift
lever to the right (+) or left (-), or as
described below.
AutoStick® is deactivated when the
shift lever is moved from the
AutoStick (+/-) position into the
DRIVE position.
GENERAL INFORMATION
You can start out, from a stop, in
any gear except sixth. The system
will ignore attempts to upshift at
too low of a vehicle speed.
If a ratio other than first gear is selected, and the vehicle is brought
to a stop, the transmission control
logic will automatically select the
first gear ratio.
Starting out in second gear is help- ful in snowy or icy conditions. To
select second gear after the vehicle
is brought to a stop, tap the shift
lever to the right (+) once.
Avoid using speed control when AutoStick® is engaged.
141
Page 154 of 233

Brake (ABS) and Electronic Brake
Force Distribution (EBD) Systems are
not functioning. Immediate repair to
the ABS system is required. See your
authorized dealer.
When the vehicle is driven over
11 km/h, you may hear a slight click-
ing sound as well as some related mo-
tor noises. These noises are the system
performing its self-check cycle to en-
sure that the ABS system is working
properly. This self check occurs each
time the vehicle is started and accel-
erated past 11 km/h.
ABS is activated during braking un-
der certain road or stopping condi-
tions. ABS-inducing conditions can
include ice, snow, gravel, bumps, rail-
road tracks, loose debris, or panic
stops.
You also may experience the following
when the brake system goes into anti-
lock:
The ABS motor running (it maycontinue to run for a short time
after the stop),
the clicking sound of solenoid valves, brake pedal pulsations,
and a slight drop or fall away of the
brake pedal at the end of the stop.
These are all normal characteristics of
ABS.
WARNING!
The Anti-Lock Brake System con-
tains sophisticated electronic equip-
ment that may be susceptible to in-
terference caused by improperly
installed or high output radio trans-
mitting equipment. This interfer-
ence can cause possible loss of anti-
lock braking capability. Installation
of such equipment should be per-
formed by qualified professionals.
All vehicle wheels and tires must be
the same size and type, and tires must
be properly inflated to produce accu-
rate signals for the computer. ELECTRONIC BRAKE
CONTROL SYSTEM
Your vehicle may be equipped with an
optional advanced electronic brake
control system that includes Anti-
Lock Brake System (ABS), Traction
Control System (TCS), Brake Assist
System (BAS), and Electronic Stabil-
ity Control (ESC). All systems work
together to enhance vehicle stability
and control in various driving condi-
tions and are commonly referred to as
ESC.
ANTI-LOCK BRAKE
SYSTEM (ABS)
This system aids the driver in main-
taining vehicle control under adverse
braking conditions. The system con-
trols hydraulic brake pressure to pre-
vent wheel lock-up and help avoid
skidding on slippery surfaces during
braking. Refer to “Anti-Lock Brake
System” in “Starting and Operating”
for further information.
147
Page 182 of 233

CAUTION!
Racing the engine or spinning the
wheels may lead to transmission
overheating and failure. Allow the
engine to idle with the shift lever in
NEUTRAL for at least one minute
after every five rocking-motion
cycles. This will minimize overheat-
ing and reduce the risk of transmis-
sion failure during prolonged efforts
to free a stuck vehicle.
NOTE:
If your vehicle is equipped with
Electronic Stability Control (ESC),
turn the system to Partial OFF be-
fore attempting to “rock” the ve-
hicle. Refer to “Electronic Brake
Control” in “Starting And Operat-
ing” for further information.CAUTION!
When “rocking” a stuck vehicle by moving between DRIVE and
REVERSE, do not spin the wheels
faster than 24 km/h, or drivetrain
damage may result.
(Continued)
CAUTION!(Continued)
Revving the engine or spinning
the wheels too fast may lead to
transmission overheating and
failure. It can also damage the
tires. Do not spin the wheels above
48 km/h while in gear (no trans-
mission shifting occurring).WARNING!
Fast spinning tires can be danger-
ous. Forces generated by excessive
wheel speeds may cause damage, or
even failure, of the axle and tires. A
tire could explode and injure some-
one. Do not spin your vehicle's
wheels faster than 48 km/h or for
longer than 30 seconds continuously
without stopping when you are stuck
and do not let anyone near a spin-
ning wheel, no matter what the
speed.
SHIFT LEVER
OVERRIDE
If a malfunction occurs and the shift
lever cannot be moved out of the
PARK position, you can use the fol- lowing procedure to temporarily
move the shift lever:
1. Firmly apply the parking brake.
2. Remove the cupholder liner.
3. Turn the ignition to the ON/RUN
position without starting the engine.
4. Press and maintain firm pressure
on the brake pedal.
5. Insert a screwdriver or similar tool
into the hole at the front of the cup-
holder and push and hold the override
lever forward.
6. Move the shift lever into the NEU-
TRAL position.
7. The vehicle may then be started in
NEUTRAL.
8. Reinstall the cupholder liner.
Shift Lever Override
175
Page 193 of 233

AIR CONDITIONER
MAINTENANCE
For best possible performance, your
air conditioner should be checked and
serviced by an authorized dealer at
the start of each warm season. This
service should include cleaning of the
condenser fins and a performance
test. Drive belt tension should also be
checked at this time.CAUTION!
Do not use chemical flushes in your
air conditioning system as the
chemicals can damage your air con-
ditioning components. Such damage
is not covered by the New Vehicle
Limited Warranty.
WARNING!
Use only refrigerants and com-pressor lubricants approved by
the manufacturer for your air con-
ditioning system. Some unap-
proved refrigerants are flammable
and can explode, injuring you.
Other unapproved refrigerants or
lubricants can cause the system to
fail, requiring costly repairs.
The air conditioning system con-
tains refrigerant under high pres-
sure. To avoid risk of personal in-
jury or damage to the system,
adding refrigerant or any repair
requiring lines to be disconnected
should be done by an experienced
technician.
Refrigerant Recovery And
Recycling
R-134a air conditioning refrigerant is
a hydrofluorocarbon (HFC) that is
endorsed by the Environmental Pro-
tection Agency and is an ozone-saving
product. However, the manufacturer
recommends that air conditioning
service be performed by authorized dealers or other service facilities using
recovery and recycling equipment.
NOTE:
Use only manufacturer approved
A/C System Sealers, Stop Leak
Products, Seal Conditioners, Com-
pressor Oil, and Refrigerants.
A/C AIR FILTER
Refer to the “Maintenance Schedule”
for the proper maintenance intervals.
CAUTION!
Car maintenance should be done at
a LANCIA Dealership. For routine
and minor maintenance operations
you wish to carry out yourself, we do
recommend you have the proper
equipment, genuine LANCIA spare
parts and the necessary fluids; do
not however carry out these opera-
tions if you have no experience.WARNING!
Do not remove the A/C Air Filter
while the blower is operating or per-
sonal injury may result.
186
Page 197 of 233

In unusual situations involving
grossly malfunctioning engine opera-
tion, a scorching odor may suggest
severe and abnormal catalyst over-
heating. If this occurs, stop the ve-
hicle, turn off the engine and allow it
to cool. Service, including a tune-up
to manufacturer's specifications,
should be obtained immediately.
To minimize the possibility of cata-
lytic converter damage:
Do not shut off the engine or inter- rupt the ignition, when the trans-
mission is in gear and the vehicle is
in motion.
Do not try to start the engine by pushing or towing the vehicle.
Do not idle the engine with any spark plug wires disconnected or
removed, such as when diagnostic
testing, or for prolonged periods
during very rough idle or malfunc-
tioning operating conditions. COOLING SYSTEM
WARNING!
When working near the radiator
cooling fan, disconnect the fan
motor lead or turn the ignition
switch to the LOCK position. The
fan is temperature controlled and
can start at anytime the ignition
switch is in the ON position.
You or others can be badly burned
by hot engine coolant (antifreeze)
or steam from your radiator. If
you see or hear steam coming
from under the hood, do not open
the hood until the radiator has
had time to cool. Never try to open
a cooling system pressure cap
when the radiator is hot.
CAUTION!
Car maintenance should be done at
a LANCIA Dealership. For routine
and minor maintenance operations
you wish to carry out yourself, we do
recommend you have the proper
equipment, genuine LANCIA spare
parts and the necessary fluids; do
not however carry out these opera-
tions if you have no experience.
Coolant ChecksCheck engine coolant (antifreeze) pro-
tection every 12 months (before the on-
set of freezing weather, where appli-
cable). If the engine coolant (antifreeze)
is dirty or rusty in appearance, the sys-
tem should be drained, flushed, and re-
filled with fresh engine coolant (anti-
freeze). Check the front of the A/C
condenser for any accumulation of bugs,
leaves, etc. If dirty, clean by gently
spraying water from a garden hose ver-
tically down the face of the condenser.Check the coolant recovery bottle
tubing for brittle rubber, cracking,
tears, cuts, and tightness of the con-
nection at the bottle and radiator. In-
spect the entire system for leaks.
190
Page 210 of 233

VEHICLE STORAGE
If you will not be using your vehicle
for more than 21 days, you may want
to take steps to preserve your battery.
Disengage the mini-fuse in thePower Distribution Center labeled
IOD (Ignition Off-Draw).
Or disconnect the negative cable from the battery. Refer to “Prepa-
ration for Jump Start” in “Jump-
Starting” to identify the location of
the negative post.
Anytime you store your vehicle, or keep it out of service (i.e., vacation)
for two weeks or more, run the air
conditioning system at idle for
about five minutes in the fresh air
and high blower setting. This will
ensure adequate system lubrication
to minimize the possibility of com-
pressor damage when the system is
started again.
REPLACEMENT BULBS
All the inside bulbs are brass or glass
wedge base. Aluminum base bulbs are
not approved and should not be used
for replacement. LIGHT BULBS – Interior Bulb No.
Front Courtesy/Reading
Lamp . . . . . . . . . . . . . . 578/W5W
Center Courtesy/Reading
Lamp . . . . . . . . . . . . . . 578/W5W
Glove Box Lamp . . . . . . . . . . . 194
Shift Indicator Lamp . . IKLE14140
Rear Compartment (Trunk)
Lamp . . . . . . . . . . . . . . . . . . . 579
NOTE:
For lighted switches, see your au-
thorized dealer for replacement.
LIGHT BULBS – Exterior Bulb No.
Bi-Halogen Headlamp . . . . . . HIR2
Front Turn Signal Lamp . . 3157NAKFront Park Lamp . . . . . . . . . . LED
(Serviced at Authorized Dealer)
Side Repeater Lamp . . . . . . WY5W
Front Fog Lamp . . . . . . . . . . . H11
Center High Mounted Stop
(CHMSL) Lamp . . . . . . . . . . LED
(Serviced at Authorized Dealer)
Rear Tail/Stop Lamp . . . . . . . LED
(Serviced at Authorized Dealer)
Rear Turn Signal Lamp . . . . W16W
Rear Fog Lamp . . . . . . . . . . . LED
(Serviced at Authorized Dealer)
Backup Lamp . . . . . . . . . . . W16W
License Lamp. . . . . . . . . . . . W5W BULB REPLACEMENT
HEADLAMP
CAUTION!
Where possible, it is advisable to
have bulbs changed at a LANCIA
Dealership. Proper operation and
orientation of the external lights are
essential for driving safety and com-
plying with the law.
1. Raise and prop open the hood. Lo-
cate the connector behind the head-
lamp.
NOTE:
It may be necessary to remove the
air cleaner filter housing and po-
sition the totally integrated power
module aside prior to replacing
the low beam headlamp on the
driver's side of the vehicle.
203