child lock Lancia Flavia 2013 Owner handbook (in English)
[x] Cancel search | Manufacturer: LANCIA, Model Year: 2013, Model line: Flavia, Model: Lancia Flavia 2013Pages: 244, PDF Size: 2.87 MB
Page 18 of 244
A WORD ABOUT YOUR
KEYSThe authorized dealer that sold you
your vehicle has the key code numbers
for your vehicle locks. These numbers
can be used to order duplicate keys
from your authorized dealer. Ask your
authorized dealer for these numbers
and keep them in a safe place.You can insert the double-sided keys
into the locks with either side up.
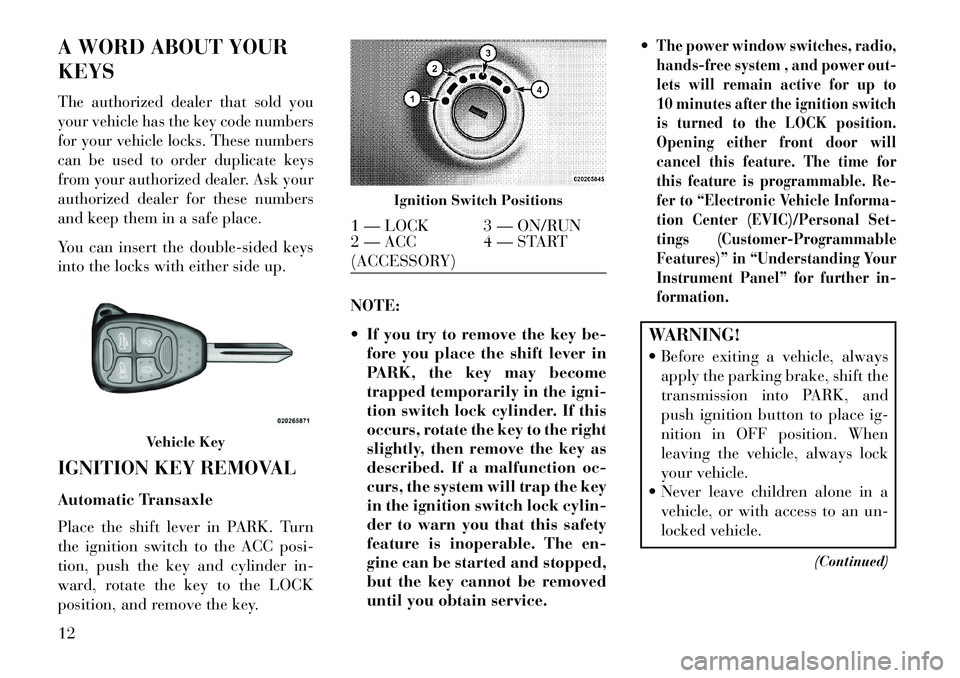
IGNITION KEY REMOVAL
Automatic Transaxle
Place the shift lever in PARK. Turn
the ignition switch to the ACC posi-
tion, push the key and cylinder in-
ward, rotate the key to the LOCK
position, and remove the key.NOTE:
If you try to remove the key be-
fore you place the shift lever in
PARK, the key may become
trapped temporarily in the igni-
tion switch lock cylinder. If this
occurs, rotate the key to the right
slightly, then remove the key as
described. If a malfunction oc-
curs, the system will trap the key
in the ignition switch lock cylin-
der to warn you that this safety
feature is inoperable. The en-
gine can be started and stopped,
but the key cannot be removed
until you obtain service.
The power window switches, radio,
hands-free system , and power out-
lets will remain active for up to
10 minutes after the ignition switch
is turned to the LOCK position.
Opening either front door will
cancel this feature. The time for
this feature is programmable. Re-
fer to “Electronic Vehicle Informa-
tion Center (EVIC)/Personal Set-
tings (Customer-Programmable
Features)” in “Understanding Your
Instrument Panel” for further in-
formation.WARNING!
Before exiting a vehicle, always
apply the parking brake, shift the
transmission into PARK, and
push ignition button to place ig-
nition in OFF position. When
leaving the vehicle, always lock
your vehicle.
Never leave children alone in a vehicle, or with access to an un-
locked vehicle.
(Continued)
Vehicle Key
Ignition Switch Positions
1 — LOCK 3 — ON/RUN
2 — ACC
(ACCESSORY)4 — START
12
Page 19 of 244

WARNING!(Continued)
Allowing children to be in a ve- hicle unattended is dangerous for
a number of reasons. A child or
others could be seriously or fa-
tally injured. Children should be
warned not to touch the parking
brake, brake pedal or the shift
lever.
Do not leave the Key Fob in or
near the vehicle, or in a location
accessible to children, and do not
leave the ignition in the ACC or
ON/RUN position. A child could
operate power windows, other
controls, or move the vehicle.
Do not leave children or animals
inside parked vehicles in hot
weather. Interior heat build-up
may cause serious injury or
death.CAUTION!
An unlocked car is an invitation to
thieves. Always remove key from
the ignition and lock all doors when
leaving the vehicle unattended. KEY-IN-IGNITION
REMINDER
Opening the driver's door when the
key is in the ignition sounds a signal to
remind you to remove the key.
NOTE:
The Key-In-Ignition reminder
only sounds when the ignition
key is placed in the LOCK or
ACC position.
With either/both front doors open and a key in the ignition,
the power door lock buttons on
the interior trim panel are dis-
abled. This is an attempt to limit
locking the keys in the vehicle.
LOCKING THE DOORS
WITH THE KEY
There is only one external door lock
cylinder which is located in the driv-
er's door.
You can insert the key with either side
up. To lock the door, turn the key
clockwise. To unlock the door, turn
the key counterclockwise. For door lock lubrication, see “Maintenance
Procedures” in “Maintaining Your Ve-
hicle” of this manual.
SENTRY KEY®
The Sentry Key® Immobilizer System
prevents unauthorized vehicle opera-
tion by disabling the engine. The sys-
tem does not need to be armed or
activated. Operation is automatic, re-
gardless of whether the vehicle is
locked or unlocked.
The system uses ignition keys which
have an embedded electronic chip
(transponder) to prevent unauthor-
ized vehicle operation. Therefore,
only keys that are programmed to the
vehicle can be used to start and oper-
ate the vehicle. The system will shut
the engine off in two seconds if some-
one uses an invalid key to start the
engine.
NOTE: A key which has not been
programmed is also considered an
invalid key, even if it is cut to fit the
ignition switch lock cylinder for
that vehicle.
13
Page 24 of 244

BATTERY REPLACEMENT
The recommended replacement bat-
tery is CR2032.
1. With the RKE transmitter buttons
facing down, use a flat blade to pry
the two halves of the RKE transmitter
apart. Make sure not to damage the
seal during removal.
2. Remove and replace the battery.
Avoid touching the new battery with
your fingers. Skin oils may cause bat-
tery deterioration. If you touch a bat-
tery, clean it with rubbing alcohol.
3. To assemble the RKE transmitter
case, snap the two halves together.DOOR LOCKS
MANUAL DOOR LOCKS
To lock each door, push the door lock
knob on each door trim panel down-
ward. To unlock each door, pull the
inside door handle.
If the door lock knob is down when
you shut the door, the door will lock.
Make sure the keys are not inside the
vehicle before closing the door.
WARNING!
For personal security and safety
in the event of an collision, lock
the vehicle doors as you drive as
well as when you park and leave
the vehicle.
(Continued)
WARNING!(Continued)
When leaving the vehicle, always remove the key fob from the igni-
tion and lock your vehicle.
Never leave children alone in a vehicle, or with access to an un-
locked vehicle.
Allowing children to be in a ve- hicle unattended is dangerous for
a number of reasons. A child or
others could be seriously or fa-
tally injured. Children should be
warned not to touch the parking
brake, brake pedal or the shift
lever.
Do not leave the key fob in or near the vehicle, or in a location acces-
sible to children, and do not leave
the ignition in the ACC or ON/
RUN position. A child could oper-
ate power windows, other con-
trols, or move the vehicle.
Separating RKE Transmitter Halves
Manual Lock Knob
18
Page 26 of 244

NOTE:
If a fluttering noise is heard fromthe rear seat belts while driving
with the windows down, safely
bring the vehicle to a stop and
buckle the rear seat belts over
the empty seats. This will keep
tension on the seat belts and re-
move the fluttering condition.WARNING!Never leave children in a vehicle,
with the keys in the ignition switch.
Occupants, particularly unattended
children, can become entrapped by
the windows while operating the
power window switches. Such en-
trapment may result in serious in-
jury or death.Smart Glass Feature
The door window will lower slightly if
the window is fully up when opening
the door. The window will return to its
full up position after closing the door.
This action allows the door to open
without resistance and prevents win-
dow and top seal damage. Auto Window Down
The front window controls on the
driver and passenger door trim panels
have an Auto-Down feature. These
switches are labeled AUTO to indicate
this capability. Push the window
switch past the first detent, release,
and the window will go down auto-
matically.To open the window part way, push
the window switch to the first detent
and release it when you want the win-
dow to stop.
To cancel the Auto-Down movement,
operate the switch either in the up or
down direction and release the switch.The power window switches will remain
active for up to 10 minutes after the
ignition switch is turned to the LOCK
position. Opening either door will can-
cel this feature. The time for this feature
is programmable. Refer to “Electronic
Vehicle Information Center (EVIC)/
Personal Settings (Customer-Program-
mable Features)” in “Understanding
Your Instrument Panel” for further in-
formation.
Reset Window Smart Glass
Feature for Opening/Closing the
Door
If the vehicle battery goes dead, the
window Smart Glass Feature for
opening and closing the door will be
disabled. To reactivate the window
Smart Glass Feature, perform the fol-
lowing steps after vehicle power is
restored.
1. Lower all four windows to the full
open position.
2. Press and hold the Power Top
Switch in the Close direction. Once
the Power Top becomes fully closed,
all four windows will start closing.
3. Continue to hold the Power Top
Switch an additional two seconds
after the windows are fully closed.
4. Push all the window switches
down firmly to open the windows
completely and continue to hold the
switch down for an additional two
seconds after the window is fully
open.
20
Page 28 of 244
TRUNK SAFETY
WARNINGWARNING!
Do not allow children to have ac-
cess to the trunk, either by climbing
into the trunk from outside, or
through the inside of the vehicle.
Always close the trunk lid when
your vehicle is unattended. Once in
the trunk, young children may not
be able to escape, even if they en-
tered through the rear seat. If
trapped in the trunk, children can
die from suffocation or heat stroke.
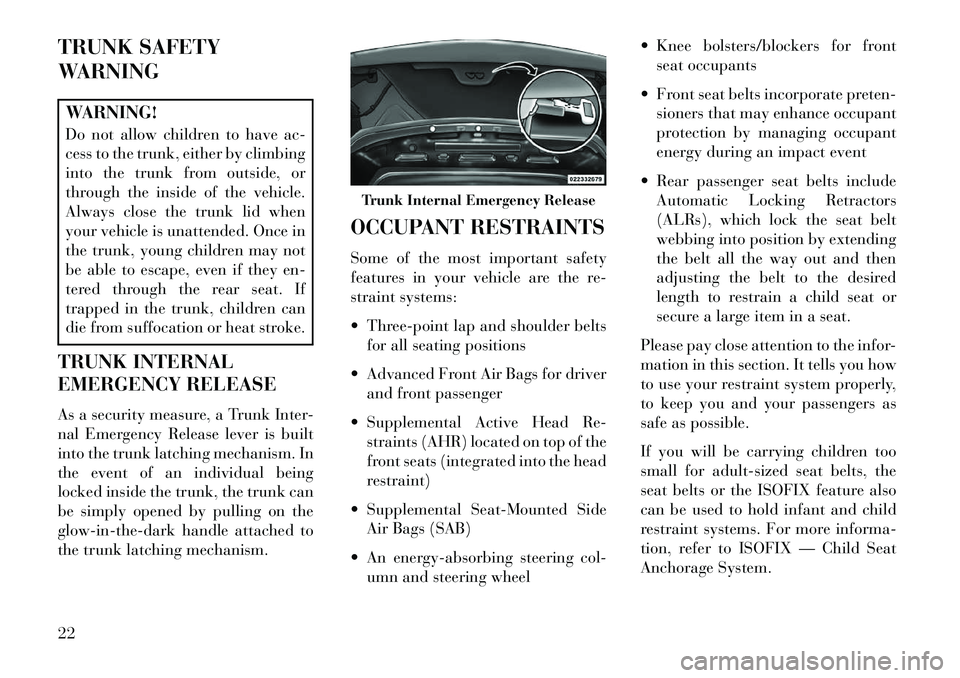
TRUNK INTERNAL
EMERGENCY RELEASE
As a security measure, a Trunk Inter-
nal Emergency Release lever is built
into the trunk latching mechanism. In
the event of an individual being
locked inside the trunk, the trunk can
be simply opened by pulling on the
glow-in-the-dark handle attached to
the trunk latching mechanism. OCCUPANT RESTRAINTS
Some of the most important safety
features in your vehicle are the re-
straint systems:
Three-point lap and shoulder belts
for all seating positions
Advanced Front Air Bags for driver and front passenger
Supplemental Active Head Re- straints (AHR) located on top of the
front seats (integrated into the head
restraint)
Supplemental Seat-Mounted Side Air Bags (SAB)
An energy-absorbing steering col- umn and steering wheel Knee bolsters/blockers for front
seat occupants
Front seat belts incorporate preten- sioners that may enhance occupant
protection by managing occupant
energy during an impact event
Rear passenger seat belts include Automatic Locking Retractors
(ALRs), which lock the seat belt
webbing into position by extending
the belt all the way out and then
adjusting the belt to the desired
length to restrain a child seat or
secure a large item in a seat.
Please pay close attention to the infor-
mation in this section. It tells you how
to use your restraint system properly,
to keep you and your passengers as
safe as possible.
If you will be carrying children too
small for adult-sized seat belts, the
seat belts or the ISOFIX feature also
can be used to hold infant and child
restraint systems. For more informa-
tion, refer to ISOFIX — Child Seat
Anchorage System.
Trunk Internal Emergency Release
22
Page 33 of 244

SEAT BELTS IN
PASSENGER SEATING
POSITIONS
The seat belts in the rear passenger
seating positions are equipped with
Automatic Locking Retractors (ALR)
which are used to secure a child re-
straint system. For additional infor-
mation, refer to “Installing Child Re-
straints Using The Vehicle Seat Belt”
under the “Child Restraints” section.
The chart below defines the type of
feature for each seating position.
Driver Cen-terPas-
senger
First
Row N/A N/A N/A
Second
Row ALR N/A ALR
N/A — Not Applicable
ALR — Automatic Locking Retractor
If the passenger seating position is
equipped with an ALR and is being
used for normal usage:
Only pull the belt webbing out far
enough to comfortably wrap around
the occupant's mid-section so as to
not activate the ALR. If the ALR is
activated, you will hear a ratcheting
sound as the belt retracts. Allow the
webbing to retract completely in this
case and then carefully pull out only
the amount of webbing necessary to
comfortably wrap around the occu-
pant's mid-section. Slide the latch
plate into the buckle until you hear a
"click."
AUTOMATIC LOCKING
RETRACTOR MODE (ALR)
In this mode, the shoulder belt is au-
tomatically pre-locked. The belt will
still retract to remove any slack in the
shoulder belt. The Automatic Locking
Mode is available on rear passenger-
seating positions with a combination
lap/shoulder belt. Use the Automatic
Locking Mode anytime a child safety seat is installed in a seating position
that has a belt with this feature. Chil-
dren 12 years old and under should
always be properly restrained in the
rear seat.
How To Engage The Automatic
Locking Mode
1. Buckle the combination lap and
shoulder belt.
2. Grasp the shoulder portion and
pull downward until the entire belt is
extracted.
3. Allow the belt to retract. As the
belt retracts, you will hear a clicking
sound. This indicates the safety belt is
now in the Automatic Locking Mode.
How To Disengage The Automatic
Locking Mode
Unbuckle the combination lap/
shoulder belt and allow it to retract
completely to disengage the Automatic
Locking Mode and activate the vehicle
sensitive (emergency) locking mode.
27
Page 34 of 244

WARNING!
The belt and retractor assemblymust be replaced if the seat belt
assembly Automatic Locking Re-
tractor (ALR) feature or any
other seat belt function is not
working properly when checked
according to the procedures in the
Service Manual.
Failure to replace the belt and retractor assembly could increase
the risk of injury in collisions.
ENERGY MANAGEMENT
FEATURE
This vehicle has a safety belt system
with an Energy Management feature
in the front seating positions to help
further reduce the risk of injury in the
event of a head-on collision. This
safety belt system has a retractor as-
sembly that is designed to release
webbing in a controlled manner. This
feature is designed to help reduce the
belt force acting on the occupant’s
chest. SEAT BELT
PRETENSIONERS
The seat belts for both front seating
positions are equipped with preten-
sioning devices that are designed to
remove slack from the seat belt in the
event of a collision. These devices may
improve the performance of the seat
belt by assuring that the belt is tight
about the occupant early in a colli-
sion. Pretensioners work for all size
occupants, including those in child
restraints.
NOTE: These devices are not a
substitute for proper seat belt
placement by the occupant. The
seat belt still must be worn snugly
and positioned properly.
The pretensioners are triggered by the
Occupant Restraint Controller
(ORC). Like the air bags, the preten-
sioners are single use items. A de-
ployed pretensioner or a deployed air
bag must be replaced immediately.
SUPPLEMENTAL ACTIVE
HEAD RESTRAINTS (AHR)
These head restraints are passive, de-
ployable components, and vehicles
with this equipment cannot be readily
identified by any markings, only
through visual inspection of the head
restraint. The head restraint will be
split in two halves, with the front half
being soft foam and trim, the back
half being decorative plastic.
How The Active Head Restraints
(AHR) Work
The Occupant Restraint Controller
(ORC) determines whether the sever-
ity, or type of rear impact will require
the Active Head Restraints (AHR) to
deploy. If a rear impact requires de-
ployment, both the driver and front
passenger seat AHRs will be deployed.When AHRs deploy during a rear im-
pact, the front half of the head re-
straint extends forward to minimize
the gap between the back of the occu-
pant’s head and the AHR. This system
is designed to help prevent or reduce
28
Page 48 of 244

Children Too Large For Booster
Seats
Children who are large enough to
wear the shoulder belt comfortably,
and whose legs are long enough to
bend over the front of the seat when
their back is against the seatback,
should use the lap/shoulder belt in a
rear seat.
Make sure that the child is uprightin the seat.
The lap portion should be low on the hips and as snug as possible.
Check belt fit periodically. A child's squirming or slouching can move
the belt out of position.
If the shoulder belt contacts the face or neck, move the child closer
to the center of the vehicle. Never
allow a child to put the shoulder
belt under an arm or behind their
back.
WARNING!
Improper installation can lead tofailure of an infant or child re-
straint. It could come loose in a
collision. The child could be
badly injured or killed. Follow
the manufacturer's directions ex-
actly when installing an infant or
child restraint.
A rearward-facing child restraint should only be used in a rear seat.
A rearward-facing child restraint
in the front seat may be struck by
a deploying passenger air bag,
which may cause severe or fatal
injury to the infant.
Here are some tips on getting the
most out of your child restraint:
Children who are large enough to wear the shoulder belt comfortably,
and whose legs are long enough to
bend over the front of the seat when
their back is against the seatback,
should use the lap/shoulder belt in
a rear seat. Before buying any restraint system,
make sure that it has a label certi-
fying that it meets all applicable
Safety Standards. LANCIA also
recommends that you make sure
that you can install the child re-
straint in the vehicle where you will
use it, before you buy it.
The restraint must be appropriate for your child's weight and height.
Check the label on the restraint for
weight and height limits.
Carefully follow the instructions that come with the restraint. If you
install the restraint improperly, it
may not work when you need it.
All passenger seating positions con- tain automatic locking retractors.
However, any seat belt system will
loosen with time, so check the belt
occasionally and pull it tight if
necessary.
Buckle the child into the seat ac- cording to the child restraint manu-
facturer's directions.
42
Page 51 of 244

to the anchor. Be careful to route the
tether strap to provide the most direct
path between the anchor and the child
restraint. Finally, tighten all three
straps as you push the child restraint
rearward and downward into the seat,
removing slack in the straps accord-
ing to the child restraint manufactur-
er's instructions.
NOTE: When using the ISOFIX
attaching system to install a child
restraint, please ensure that all
seat belts not being used for occu-
pant restraints are stowed and out
of reach of children. It is recom-
mended that before installing the
child restraint, buckle the seat belt
so the seat belt is tucked behind
the child restraint and out of
reach. If the buckled seat belt in-
terferes with the child restraint in-
stallation, instead of tucking the
seat belt behind the child re-
straint, route the seat belt throughthe child restraint belt path and
then buckle it. This should stow
the seat belt out of the reach of an
inquisitive child. Remind all chil-
dren in the vehicle that the seat
belts are not toys and should not be
played with, and never leave your
child unattended in the vehicle.
WARNING!
Improper installation of a child re-
straint to the ISOFIX anchorages
can lead to failure of an infant or
child restraint. The child could be
badly injured or killed. Follow the
manufacturer's directions exactly
when installing an infant or child
restraint.
Installing Child Restraints Using
The Vehicle Seat Belts
The seat belts in the rear passenger
seating positions are equipped with
an Automatic Locking Retractor
(ALR) to secure a Child Restraint System (CRS). These types of seat
belts are designed to keep the lap por-
tion of the seat belt tight around the
child restraint so that it is not neces-
sary to use a locking clip. The ALR
will make a ratcheting noise if you
extract the entire belt from the retrac-
tor and then allow the belt to retract
into the retractor. For additional in-
formation on ALR, refer to “Auto-
matic Locking Mode”. The chart be-
low defines the seating positions with
an Automatic Locking Retractor
(ALR) or a cinching latch plate.
Driver
Center
Pas-
senger
First
Row N/A N/A N/A
Second
Row ALR N/A ALR
N/A — Not Applicable
ALR — Automatic Locking Retractor
45
Page 52 of 244

Installing a Child Restraint with an
ALR:
1. To install a child restraint with
ALR, first, pull enough of the seat belt
webbing from the retractor to route it
through the belt path of the child re-
straint. Slide the latch plate into the
buckle until you hear a “click.” Next,
extract all the seat belt webbing out of
the retractor and then allow the belt to
retract into the retractor. As the belt
retracts, you will hear a ratcheting
sound. This indicates the safety belt is
now in the Automatic Locking mode.
2. Finally, pull on any excess web-
bing to tighten the lap portion around
the child restraint. Any seat belt sys-
tem will loosen with time, so check the
belt occasionally, and pull it tight if
necessary.
In the rear seat, you may havetrouble tightening the lap/shoulder
belt on the child restraint because
the buckle or latch plate is too close
to the belt path opening on the re-
straint. Disconnect the latch plate from the buckle and twist the short
buckle-end belt several times to
shorten it. Insert the latch plate into
the buckle with the release button
facing out.
If the belt still can’t be tightened, or if pulling and pushing on the re-
straint loosens the belt, disconnect
the latch plate from the buckle,
turn the buckle around, and insert
the latch plate into the buckle
again. If you still can’t make the
child restraint secure, try a differ-
ent seating position.
To attach a child restraint tether
strap:
1.
If lowered, raise the convertible top.
NOTE: The convertible top must
be in the UP position to access the
tether anchor.
2. Open the access port cover (A) be-
hind the seat where you are placing
the child restraint. 3. Push the tether strap and hook (B)
through the access port and down into
the trunk.
NOTE: Route the tether strap to
provide the most direct path from
the child seat to the anchor.
4. Open the access cover (C) on the
carpet covering the back of the seat
and attach the tether strap hook (D)
to the anchor.
Child Tether Access Port Cover
Child Tether Anchor
46