tow Lancia Musa 2011 Owner handbook (in English)
[x] Cancel search | Manufacturer: LANCIA, Model Year: 2011, Model line: Musa, Model: Lancia Musa 2011Pages: 218, PDF Size: 3.91 MB
Page 140 of 218
139
WARNING
LIGHTS AND
MESSAGES
MAINTENANCE
AND CARE
TECHNICAL
SPECIFICA-
TIONS
INDEX
DASHBOARD
AND
CONTROLS
SAFETY
STARTING
AND DRIVING
IN AN
EMERGENCY
fig. 3L0D0361m
fig. 4L0D0362m
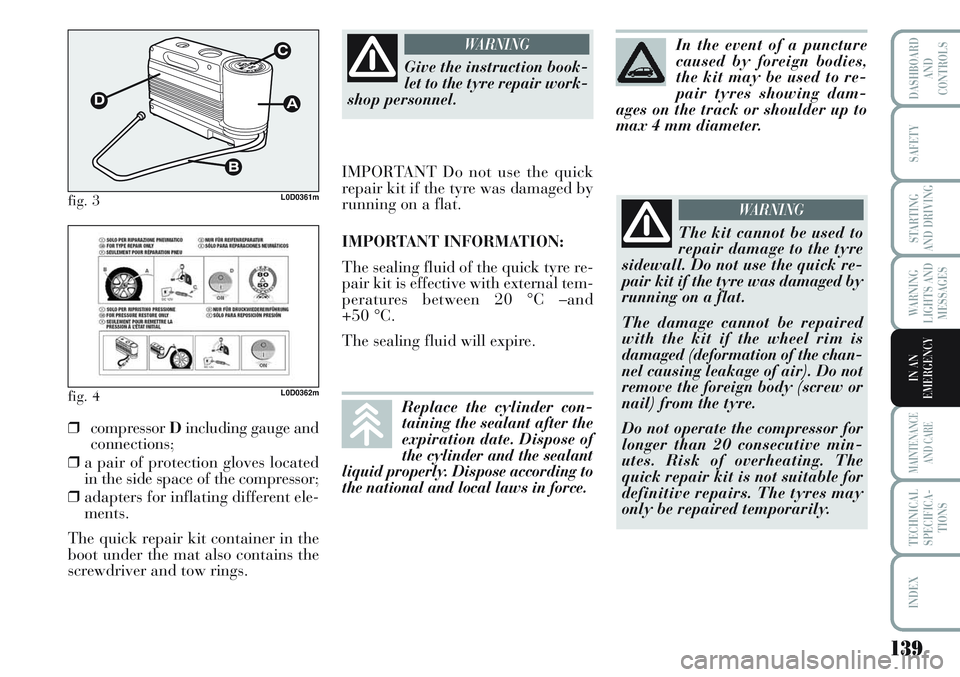
❒compressor Dincluding gauge and
connections;
❒a pair of protection gloves located
in the side space of the compressor;
❒adapters for inflating different ele-
ments.
The quick repair kit container in the
boot under the mat also contains the
screwdriver and tow rings.
Give the instruction book-
let to the tyre repair work-
shop personnel.
WARNING
IMPORTANT Do not use the quick
repair kit if the tyre was damaged by
running on a flat.
IMPORTANT INFORMATION:
The sealing fluid of the quick tyre re-
pair kit is effective with external tem-
peratures between 20 °C –and
+50 °C.
The sealing fluid will expire.
The kit cannot be used to
repair damage to the tyre
sidewall. Do not use the quick re-
pair kit if the tyre was damaged by
running on a flat.
The damage cannot be repaired
with the kit if the wheel rim is
damaged (deformation of the chan-
nel causing leakage of air). Do not
remove the foreign body (screw or
nail) from the tyre.
Do not operate the compressor for
longer than 20 consecutive min-
utes. Risk of overheating. The
quick repair kit is not suitable for
definitive repairs. The tyres may
only be repaired temporarily.
WARNING
In the event of a puncture
caused by foreign bodies,
the kit may be used to re-
pair tyres showing dam-
ages on the track or shoulder up to
max 4 mm diameter.
Replace the cylinder con-
taining the sealant after the
expiration date. Dispose of
the cylinder and the sealant
liquid properly. Dispose according to
the national and local laws in force.
Page 148 of 218
147
WARNING
LIGHTS AND
MESSAGES
MAINTENANCE
AND CARE
TECHNICAL
SPECIFICA-
TIONS
INDEX
DASHBOARD
AND
CONTROLS
SAFETY
STARTING
AND DRIVING
IN AN
EMERGENCY
Versions with alloy rims
❒Check that the hub contact sur-
faces are clean;
❒fit the normal wheel centring it on
the pins, lead in the fastening
screws and tighten them using the
wrench provided;
❒lower the car and remove the jack;
❒using the wrench provided, fully
tighten the bolts in the sequence
shown in fig. 15.
❒snap fit the wheel cup on the hub.When you have finished
❒stow the spare wheel in the space
provided in the boot;
❒fit the jack partially open in its
box forcing it lightly to prevent it
from vibrating when travelling;
❒put the tools back into their places
in the container;
❒arrange the container and tools in
the spare wheel and secure the fas-
tening device;
❒rearrange the preformed boot
cover correctly. WHEN NEEDING
TO CHANGE A
BULB
GENERAL INSTRUCTIONS
❒When a bulb is not working, check
that the corresponding fuse is in-
tact before replacing it: refer to the
“If a fuse blows” paragraph in this
chapter for fuse location.
❒before changing a bulb check the
contacts for oxidation;
❒burnt bulbs must be replaced by
others of the same type and power;
❒always check the height of the
headlight beam after changing a
bulb.
Halogen lamps must be
handled holding the metal-
lic part only. Touching the
transparent part of the bulb
with your fingers may reduce the in-
tensity of the emitted light and even
compromise duration of the lamp it-
self.
Page 149 of 218
148
WARNING
LIGHTS AND
MESSAGES
MAINTENANCE
AND CARE
TECHNICAL
SPECIFICA-
TIONS
INDEX
DASHBOARD
AND
CONTROLS
SAFETY
STARTING
AND DRIVING
IN AN
EMERGENCY
Modifications or repairs to
the fuel feed system that
are not carried out properly or do
not take the system’s technical
specifications into account can
cause malfunctions leading to the
risk of fire.
WARNING
Halogen bulbs contain
pressurised gas which, if
broken, may cause small frag-
ments of glass to be projected out-
wards.
WARNING
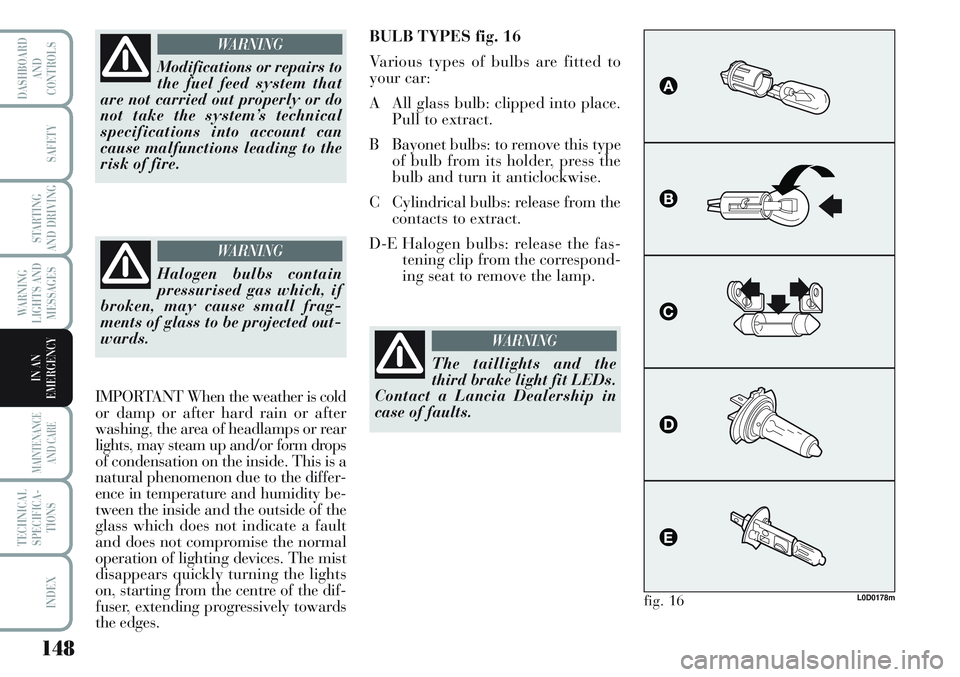
BULB TYPES fig. 16
Various types of bulbs are fitted to
your car:
A All glass bulb: clipped into place.
Pull to extract.
B Bayonet bulbs: to remove this type
of bulb from its holder, press the
bulb and turn it anticlockwise.
C Cylindrical bulbs: release from the
contacts to extract.
D-E Halogen bulbs: release the fas-
tening clip from the correspond-
ing seat to remove the lamp.
L0D0178mfig. 16
The taillights and the
third brake light fit LEDs.
Contact a Lancia Dealership in
case of faults.
WARNING
IMPORTANT When the weather is cold
or damp or after hard rain or after
washing, the area of headlamps or rear
lights, may steam up and/or form drops
of condensation on the inside. This is a
natural phenomenon due to the differ-
ence in temperature and humidity be-
tween the inside and the outside of the
glass which does not indicate a fault
and does not compromise the normal
operation of lighting devices. The mist
disappears quickly turning the lights
on, starting from the centre of the dif-
fuser, extending progressively towards
the edges.
Page 163 of 218
162
WARNING
LIGHTS AND
MESSAGES
MAINTENANCE
AND CARE
TECHNICAL
SPECIFICA-
TIONS
INDEX
DASHBOARD
AND
CONTROLS
SAFETY
STARTING
AND DRIVING
IN AN
EMERGENCY
TOWING THE CAR
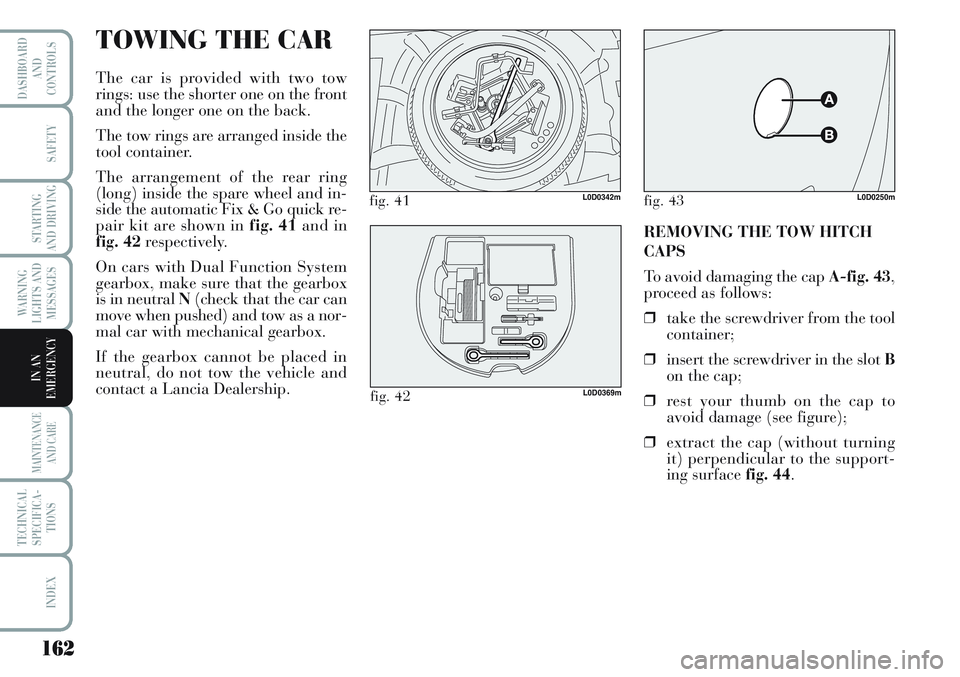
The car is provided with two tow
rings: use the shorter one on the front
and the longer one on the back.
The tow rings are arranged inside the
tool container.
The arrangement of the rear ring
(long) inside the spare wheel and in-
side the automatic Fix & Go quick re-
pair kit are shown in fig. 41 and in
fig. 42 respectively.
On cars with Dual Function System
gearbox, make sure that the gearbox
is in neutral N(check that the car can
move when pushed) and tow as a nor-
mal car with mechanical gearbox.
If the gearbox cannot be placed in
neutral, do not tow the vehicle and
contact a Lancia Dealership.
fig. 41L0D0342m
fig. 42L0D0369m
REMOVING THE TOW HITCH
CAPS
To avoid damaging the cap A-fig. 43,
proceed as follows:
❒take the screwdriver from the tool
container;
❒insert the screwdriver in the slot B
on the cap;
❒rest your thumb on the cap to
avoid damage (see figure);
❒extract the cap (without turning
it) perpendicular to the support-
ing surface fig. 44.
fig. 43L0D0250m
Page 164 of 218
163
WARNING
LIGHTS AND
MESSAGES
MAINTENANCE
AND CARE
TECHNICAL
SPECIFICA-
TIONS
INDEX
DASHBOARD
AND
CONTROLS
SAFETY
STARTING
AND DRIVING
IN AN
EMERGENCY
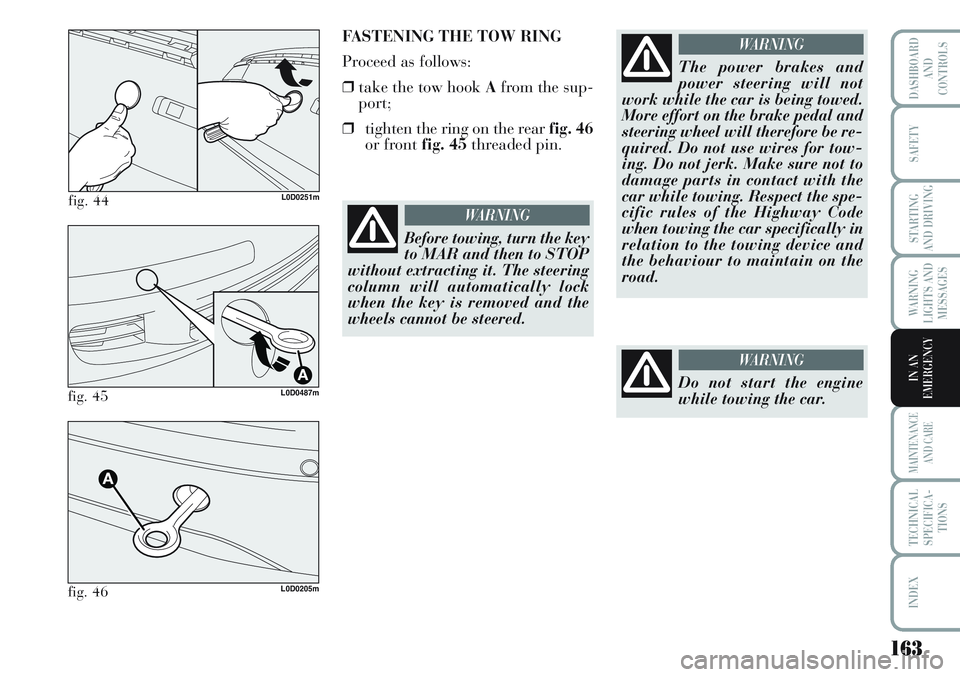
fig. 44L0D0251m
FASTENING THE TOW RING
Proceed as follows:
❒take the tow hook Afrom the sup-
port;
❒tighten the ring on the rear fig. 46
or front fig. 45threaded pin.
fig. 45L0D0487m
fig. 46L0D0205m
The power brakes and
power steering will not
work while the car is being towed.
More effort on the brake pedal and
steering wheel will therefore be re-
quired. Do not use wires for tow-
ing. Do not jerk. Make sure not to
damage parts in contact with the
car while towing. Respect the spe-
cific rules of the Highway Code
when towing the car specifically in
relation to the towing device and
the behaviour to maintain on the
road.
WARNING
Before towing, turn the key
to MAR and then to STOP
without extracting it. The steering
column will automatically lock
when the key is removed and the
wheels cannot be steered.
WARNING
Do not start the engine
while towing the car.
WARNING
Page 165 of 218
164
WARNING
LIGHTS AND
MESSAGES
MAINTENANCE
AND CARE
TECHNICAL
SPECIFICA-
TIONS
INDEX
DASHBOARD
AND
CONTROLS
SAFETY
STARTING
AND DRIVING
IN AN
EMERGENCY
Before fitting the hook, clean
accurately its threaded seat.
Before starting to tow, make sure to
have tighten the hook.
WARNINGThe front and rear tow
hooks must only be used for
emergency situations on the
road. The vehicle may be
towed for short distances when a
dedicated device is used in compli-
ance with the Highway Code (rigid
bar), in order to move the vehicle on
the road in preparation for towing
by a tow truck Tow hooks MUST
NOT be used to tow vehicles off the
road or where there are obstacles
and/or for towing operations using
cables or other non-rigid devices.
Respecting the above conditions,
towing must only take place with
two vehicles (one towing, the other
towed) travelling as far as possible
in alignment along the same centre-
line.
Page 167 of 218
166
WARNING
LIGHTS AND
MESSAGES
TECHNICAL
SPECIFICA-
TIONS
INDEX
DASHBOARD
AND
CONTROLS
SAFETY
STARTING
AND DRIVING
IN
EMERGENZA
MAINTENANCE
AND CARE
SCHEDULED
SERVICING
Correct maintenance is essential for
ensuring long car life under the best
conditions.
This is why Lancia has planned a se-
ries of checks and maintenance oper-
ations every 20,000 km.
Scheduled servicing will not however
fully cover all of the need of your car:
It is however important to remember
that scheduled servicing does not
completely cover all the car’s require-
ments: also in the initial period before
20.000 km service coupon and later,
between one coupon and another, or-
dinary care is still required such as for
example routine check and topping
up the level of fluids, tyre pressure
check, etc.IMPORTANT Scheduled service
coupons are required by the manu-
facturer. Default may cancel the war-
ranty.
Scheduled Servicing is performed by
all Lancia Dealerships at pre-estab-
lished times.If during each operation, in addition
to the ones programmed, the need
arises for further replacements or re-
pairs, these may only be carried out
with the explicit agreement of the
Customer.
IMPORTANT You are advised to con-
tact Lancia Dealership in the event of
any minor operating faults, without
waiting for the next service coupon.
If your car is used frequently for tow-
ing, the interval between one service
coupon and the other must be re-
duced.
Page 169 of 218
168
WARNING
LIGHTS AND
MESSAGES
TECHNICAL
SPECIFICA-
TIONS
INDEX
DASHBOARD
AND
CONTROLS
SAFETY
STARTING
AND DRIVING
IN
EMERGENZA
MAINTENANCE
AND CARE
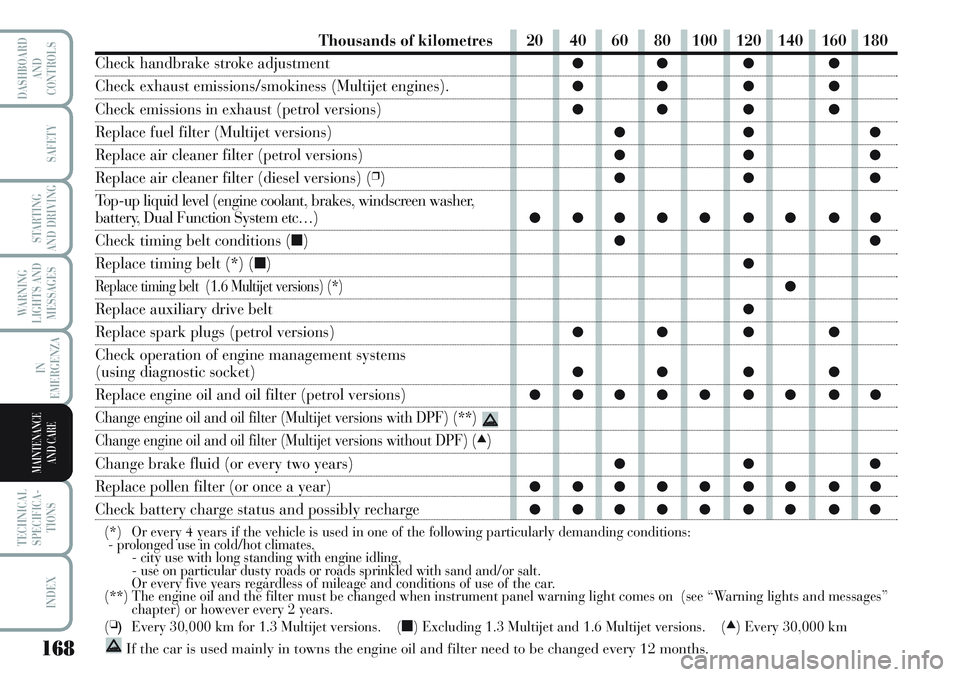
Thousands of kilometres
Check handbrake stroke adjustment
Check exhaust emissions/smokiness (Multijet engines).
Check emissions in exhaust (petrol versions)
Replace fuel filter (Multijet versions)
Replace air cleaner filter (petrol versions)
Replace air cleaner filter (diesel versions) (❒)
Top-up liquid level (engine coolant, brakes, windscreen washer,
battery, Dual Function System etc…)
Check timing belt conditions (■)
Replace timing belt (*) (■)
Replace timing belt (1.6 Multijet versions) (*)
Replace auxiliary drive belt
Replace spark plugs (petrol versions)
Check operation of engine management systems
(using diagnostic socket)
Replace engine oil and oil filter (petrol versions)
Change engine oil and oil filter (Multijet versions with DPF) (**)
Change engine oil and oil filter (Multijet versions without DPF) (▲)
Change brake fluid (or every two years)
Replace pollen filter (or once a year)
Check battery charge status and possibly recharge
(*) Or every 4 years if the vehicle is used in one of the following particularly demanding conditions:
- prolonged use in cold/hot climates,
- city use with long standing with engine idling,
- use on particular dusty roads or roads sprinkled with sand and/or salt.
Or every five years regardless of mileage and conditions of use of the car.
(**) The engine oil and the filter must be changed when instrument panel warning light comes on (see “Warning lights and messages”
chapter) or however every 2 years.
(
❏)Every 30,000 km for 1.3 Multijet versions. (■) Excluding 1.3 Multijet and 1.6 Multijet versions. (▲) Every 30,000 km
If the car is used mainly in towns the engine oil and filter need to be changed every 12 months.
20 40 60 80 100 120 140 160 180
●● ● ●
●● ● ●
●● ● ●
●●●
●●●
●●●
●●●●● ●●●●
●●
●
●
●
●● ● ●
●● ● ●
●●●●● ●●●●
●●●
●●●●● ●●●●
●●●●● ●●●●
Page 170 of 218
169
WARNING
LIGHTS AND
MESSAGES
TECHNICAL
SPECIFICA-
TIONS
INDEX
DASHBOARD
AND
CONTROLS
SAFETY
STARTING
AND DRIVING
IN AN
EMERGENCY
MAINTENANCE
AND CARE
YEARLY
INSPECTION PLAN
The following yearly inspection plan
is recommended for cars clocking less
than 20,000 km a year (e.g. approx-
imately 15.000 km):
❒check tyre conditions/wear and
pressure (included spare wheel)
❒check lighting system operation
(headlights, direction indicators,
hazard lights, boot, passenger
compartment, instrument panel
warning lights, etc.)
❒check windscreen wiper/washer
(nozzle direction and blade wear)
❒check front disk brake pad condi-
tions and wear;
❒visually inspect: engine, gearbox,
transmission, flexible and stiff pip-
ing (exhaust, fuel feed, brakes),
rubber parts (boots, sleeves, bush-
ings, etc.);❒check cleanness of locks, bonnet
and boot and lever cleanness and
lubrication;
❒check battery charge;
❒visually inspect the accessory drive
belt conditions;
❒check and top up liquids if re-
quired (engine coolant, brakes,
windscreen washer, battery, etc.);
❒engine oil replacement;
❒replace engine oil filter;
❒replace pollen filter (for versions/
markets, where provided).
ADDITIONAL
INTERVENTIONS
Every 1,000 km or before long jour-
neys, check and, if necessary, top up:
❒engine coolant fluid level;
❒brake fluid level;
❒brake fluid level;
❒tyre pressure and conditions.
Every 3,000 km check the following
and top-up, if required: engine oil
level.
You are recommended to use
PETRONAS LUBRICANTS products,
designed and produced specifically for
Lancia cars (see table “Capacities” in
section “Technical specifications”).
IMPORTANT - Engine oil
Should prevailing use of the car be
under one of the following specially
heavy conditions:
❒trailer or caravan towing;
❒dusty roads;
Page 201 of 218

1.48V(▲)-1.416V
1155
500
940
805
1655
1000
400
75
601.3 Multijet
1200
500
940
805
1700
1000
400
75
601.6 Multijet
1275
500
1000
805
1775
1100
500
75
60
WEIGHTS
Weights (kg)
Unladen weight (with all liquids,
fuel tank filled to 90 % and
without optional equipment):
Payload (*)
including the driver:
Maximum permissible loads
(**)
– front axle:
– rear axle:
– total:
Towable loads:
– trailer with brakes:
– trailer without brakes:
Maximum load on roof:
Maximum load on tow hitch
(trailer with brakes):
(*)If special equipment is fitted (sun roof, tow hook, etc.) the unladen weight increases and consequently the payload will
decrease in relation to the maximum permitted loads.
(**) Loads not be exceeded. The driver is responsible for arranging goods in the luggage compartment and/on load carrying platform
within the maximum permitted loads.
(
▲) Engine version for some versions/markets only
200
WARNING
LIGHTS AND
MESSAGES
INDEX
DASHBOARD
AND
CONTROLS
SAFETY
STARTING
AND DRIVING
IN AN
EMERGENCY
MAINTENANCE
AND CARE
TECHNICAL
SPECIFICA-
TIONS