audio Lancia Thema 2012 Owner handbook (in English)
[x] Cancel search | Manufacturer: LANCIA, Model Year: 2012, Model line: Thema, Model: Lancia Thema 2012Pages: 316, PDF Size: 3.85 MB
Page 95 of 316
At any point, if the system does not
recognize one of your commands, you
will be prompted to repeat it.
To hear available commands, press
the Uconnect™ Voice Command
button and say “Help”. You will
hear available commands for the
screen displayed.
Natural Speech
Natural speech allows the user to
speak commands in phrases or com-
plete sentences. The system filters out
certain non-word utterances and
sounds such as “ah” and “eh”. The
system handles fill-in words such as “I
would like to”.
The system handles multiple inputs in
the same phrase or sentence such as
“make a phone call” and “to Kelly
Smith”. For multiple inputs in the
same phrase or sentence, the system
identifies the topic or context and pro-
vides the associated follow-up prompt
such as “Who do you want to call?” in the case where a phone call was re-
quested but the specific name was not
recognized.
The system utilizes continuous dialog;
when the system requires more infor-
mation from the user it will ask a
question to which the user can re-
spond without pressing the
Uconnect™ Voice Command
button.
Uconnect™ Voice
Commands
The Uconnect™ Voice Command sys-
tem understands two types of com-
mands. Universal commands are
available at all times. Local com-
mands are available if the supported
radio mode is active.
Start a dialogue by pressing the
Uconnect™ Voice Commandbutton.
Changing the Volume
1. Start a dialogue by pressing the
Voice Command
button.2. Say a command (e.g., “Help”).
3. Use the ON/OFF VOLUME rotary
knob to adjust the volume to a com-
fortable level while the Voice Com-
mand system is speaking. Please note
the volume setting for Voice Com-
mand is different than the audio sys-
tem.
Starting Voice Recognition (VR)
Session in Radio/Player Modes
In this mode, you can say the follow-
ing commands:
NOTE:
The commands can be said on any
screen when a call is not active
after pushing the Uconnect™
Voice Command
button.
Disc
To switch to the disc mode, say
“Change source to Disc”. This com-
mand can be given in any mode or
screen:
“Track” (#) (to change the track)
89
Page 98 of 316
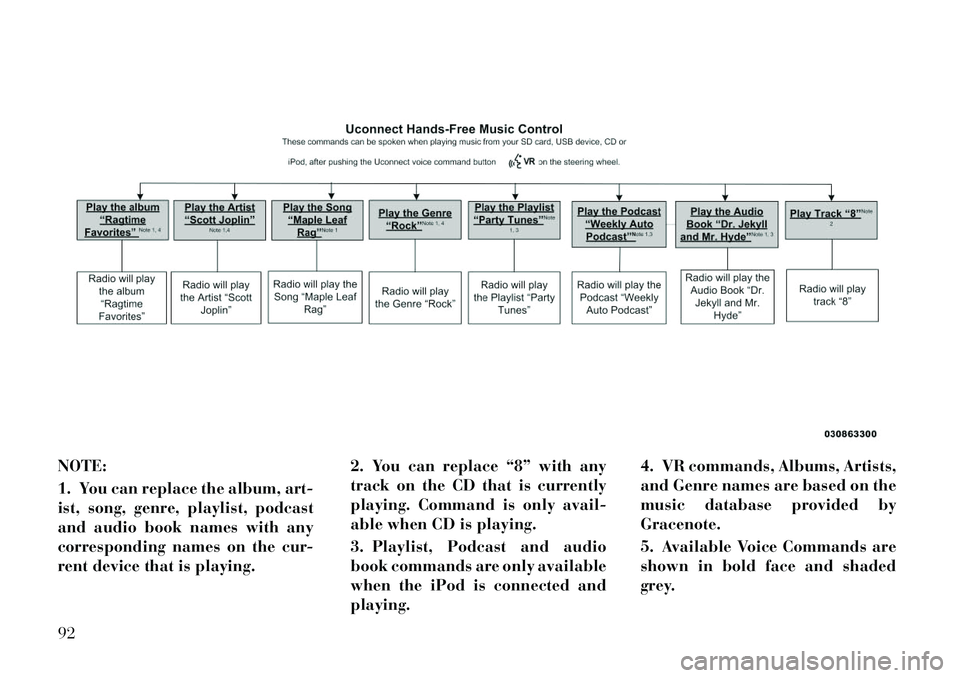
NOTE:
1. You can replace the album, art-
ist, song, genre, playlist, podcast
and audio book names with any
corresponding names on the cur-
rent device that is playing.2. You can replace “8” with any
track on the CD that is currently
playing. Command is only avail-
able when CD is playing.
3. Playlist, Podcast and audio
book commands are only available
when the iPod is connected and
playing.4. VR commands, Albums, Artists,
and Genre names are based on the
music database provided by
Gracenote.
5. Available Voice Commands are
shown in bold face and shaded
grey.92
Page 140 of 316

PARKVIEW® REAR
BACK UP CAMERA (for
versions/markets, where
provided)
Your vehicle may be equipped with
the ParkView® Rear Back Up Cam-
era that allows you to see an on-screen
image of the rear surroundings of
your vehicle whenever the shift lever
is put into REVERSE. The image will
be displayed on the radio touchscreendisplay along with a caution note to
“check entire surroundings” across
the top of the screen. After five sec-
onds this note will disappear. The
ParkView® camera is located on the
rear of the vehicle above the rear Li-
cense plate.
When the vehicle is shifted out of RE-
VERSE, the rear camera mode is ex-
ited and the navigation or audio
screen appears again.
When displayed, static grid lines will
illustrate the width of the vehicle
while a dashed center-line will indi-
cate the center of the vehicle to assist
with parking or aligning to a hitch/
receiver. The static grid lines will
show separate zones that will help
indicate the distance to the rear of the
vehicle. The following table shows the
approximate distances for each zone:
Zone
Distance to the rear of the vehicle
Red 0 - 30 cm
Yellow 30 cm - 1 m
Green 1 m or greater
WARNING!
Drivers must be careful when back-
ing up even when using the
ParkView® Rear Back Up Camera.
Always check carefully behind your
vehicle, and be sure to check for
pedestrians, animals, other vehicles,
obstructions, or blind spots before
backing up. You are responsible for
the safety of your surroundings and
must continue to pay attention while
backing up. Failure to do so can
result in serious injury or death.
CAUTION!
To avoid vehicle damage,
ParkView® should only be used as a
parking aid. The ParkView® cam-
era is unable to view every obstacle
or object in your drive path.
(Continued)
CAUTION!(Continued)
To avoid vehicle damage, the ve-
hicle must be driven slowly when
using ParkView® to be able to stop
in time when an obstacle is seen. It
is recommended that the driver look
frequently over his/her shoulder
when using ParkView®.
134
Page 156 of 316
MESSAGES # . . . . . . . . . . . . . . . . . . . . . . . . . 167
TURN MENU OFF . . . . . . . . . . . . . . . . . . . . . 167
Uconnect Touch™ SETTINGS . . . . . . . . . . . . . . 167 HARD-KEYS . . . . . . . . . . . . . . . . . . . . . . . . . 167
SOFT-KEYS . . . . . . . . . . . . . . . . . . . . . . . . . . 167
CUSTOMER PROGRAMMABLE FEATURES— Uconnect Touch™ SYSTEM 8.4
SETTINGS . . . . . . . . . . . . . . . . . . . . . . . . . . . 168
SOUND SYSTEMS . . . . . . . . . . . . . . . . . . . . . . . 177
NAVIGATION SYSTEM (for versions/markets, where provided) . . . . . . . . . . . . . . . . . . . . . . . . . 177
SETTING THE ANALOG CLOCK . . . . . . . . . . . . 178
iPod®/USB/MP3 CONTROL (for vehicles/ markets, where provided) . . . . . . . . . . . . . . . . . 178
HARMAN KARDON® Logic7® HIGH PERFORMANCE MULTICHANNEL
SURROUND SOUND SYSTEM WITH
DRIVER-SELECTABLE SURROUND (DSS) (for
versions/markets, where required) . . . . . . . . . . . 178
STEERING WHEEL AUDIO CONTROLS . . . . . . 179 Radio Operation . . . . . . . . . . . . . . . . . . . . . . 179
CD Player . . . . . . . . . . . . . . . . . . . . . . . . . . . 179
CD/DVD DISC MAINTENANCE . . . . . . . . . . . . . 179
RADIO OPERATION AND MOBILE PHONES . . . 180
CLIMATE CONTROLS . . . . . . . . . . . . . . . . . . . . 180 GENERAL OVERVIEW . . . . . . . . . . . . . . . . . 180
150
Page 174 of 316
CUSTOMER
PROGRAMMABLE
FEATURES — Uconnect
Touch™ SYSTEM 8.4
SETTINGS
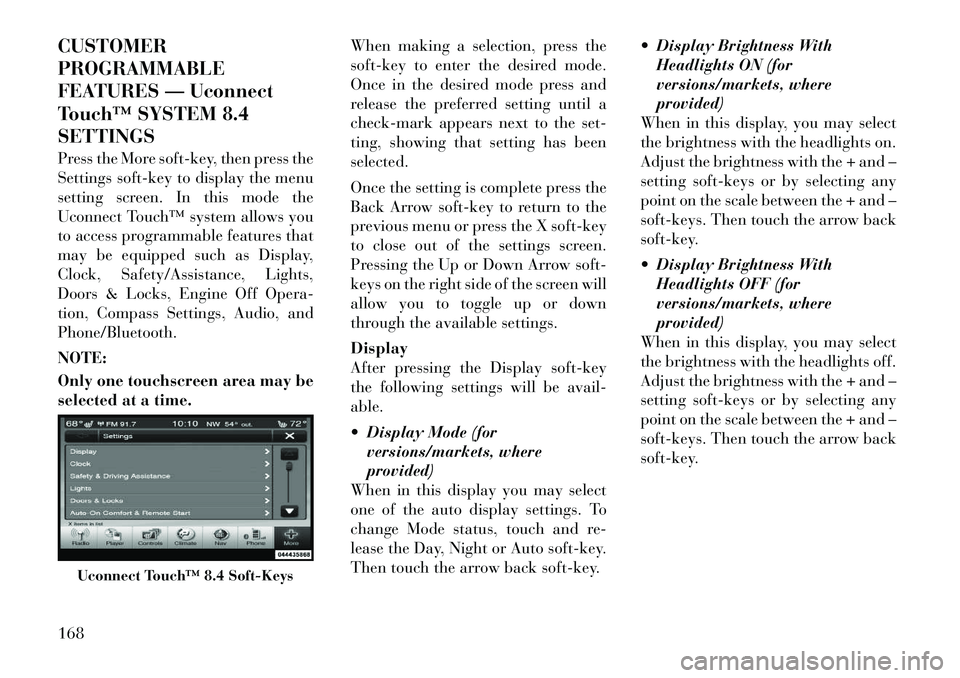
Press the More soft-key, then press the
Settings soft-key to display the menu
setting screen. In this mode the
Uconnect Touch™ system allows you
to access programmable features that
may be equipped such as Display,
Clock, Safety/Assistance, Lights,
Doors & Locks, Engine Off Opera-
tion, Compass Settings, Audio, and
Phone/Bluetooth.
NOTE:
Only one touchscreen area may be
selected at a time.When making a selection, press the
soft-key to enter the desired mode.
Once in the desired mode press and
release the preferred setting until a
check-mark appears next to the set-
ting, showing that setting has been
selected.
Once the setting is complete press the
Back Arrow soft-key to return to the
previous menu or press the X soft-key
to close out of the settings screen.
Pressing the Up or Down Arrow soft-
keys on the right side of the screen will
allow you to toggle up or down
through the available settings.
Display
After pressing the Display soft-key
the following settings will be avail-
able.
Display Mode (for
versions/markets, where
provided)
When in this display you may select
one of the auto display settings. To
change Mode status, touch and re-
lease the Day, Night or Auto soft-key.
Then touch the arrow back soft-key. Display Brightness With
Headlights ON (for
versions/markets, where
provided)
When in this display, you may select
the brightness with the headlights on.
Adjust the brightness with the + and –
setting soft-keys or by selecting any
point on the scale between the + and –
soft-keys. Then touch the arrow back
soft-key.
Display Brightness With Headlights OFF (for
versions/markets, where
provided)
When in this display, you may select
the brightness with the headlights off.
Adjust the brightness with the + and –
setting soft-keys or by selecting any
point on the scale between the + and –
soft-keys. Then touch the arrow back
soft-key.
Uconnect Touch™ 8.4 Soft-Keys
168
Page 183 of 316
Audio
After pressing the Audio soft-key the
following settings will be available.
Balance/Fade (forversions/markets, where
provided)
When in this display you may adjust
the Balance and Fade settings.
Equalizer (for versions/markets, where provided)
When in this display you may adjust
the Bass, Mid and Treble settings. Ad-
just the settings with the + and –
setting soft-keys or by selecting any
point on the scale between the + and –
soft-keys. Then touch the arrow back
soft-key.
NOTE:
Bass/Mid/Treble allow you to sim-
ply slide your finger up or down to
change the setting as well as touch
directly on the desired setting. Speed Adjusted Volume (for
versions/markets, where
provided)
This feature increases or decreases
volume relative to vehicle speed. To
change the Speed Adjusted Volume
touch the Off, 1, 2 or 3 soft-key. Then
touch the arrow back soft-key.
Music Info Cleanup (for versions/markets, where
provided)
This feature helps organize music files
for optimized music navigation. To
make your selection, touch the Music
Info Cleanup soft-key, select On or Off
followed by pressing the arrow back
soft-key.
Surround Sound (for versions/markets, where
provided)
This feature provides simulated sur-
round sound mode. To make your se-
lection, touch the Surround Sound soft-key, select On or Off followed by
pressing the arrow back soft-key.
Phone/Bluetooth
After pressing the Phone/Bluetooth
soft-key the following settings will be
available.
Paired Devices (for
versions/markets, where
provided)
This feature shows which phones are
paired to the Phone/Bluetooth sys-
tem. For further information, refer to
the Uconnect Touch™ Supplement.
SOUND SYSTEMS
Refer to your Sound Systems Booklet.
NAVIGATION SYSTEM
(for versions/markets,
where provided)
Refer to your Uconnect Touch™ User
Manual.
177
Page 184 of 316
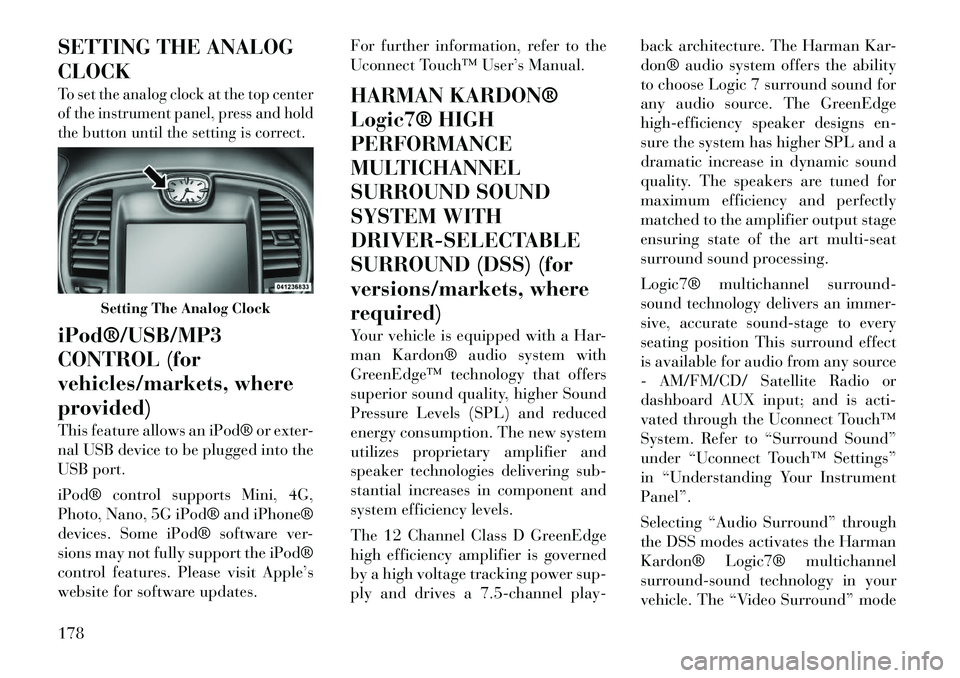
SETTING THE ANALOG
CLOCKTo set the analog clock at the top center
of the instrument panel, press and hold
the button until the setting is correct.iPod®/USB/MP3
CONTROL (for
vehicles/markets, where
provided)
This feature allows an iPod® or exter-
nal USB device to be plugged into the
USB port.
iPod® control supports Mini, 4G,
Photo, Nano, 5G iPod® and iPhone®
devices. Some iPod® software ver-
sions may not fully support the iPod®
control features. Please visit Apple’s
website for software updates.For further information, refer to the
Uconnect Touch™ User’s Manual.
HARMAN KARDON®
Logic7® HIGH
PERFORMANCE
MULTICHANNEL
SURROUND SOUND
SYSTEM WITH
DRIVER-SELECTABLE
SURROUND (DSS) (for
versions/markets, where
required)
Your vehicle is equipped with a Har-
man Kardon® audio system with
GreenEdge™ technology that offers
superior sound quality, higher Sound
Pressure Levels (SPL) and reduced
energy consumption. The new system
utilizes proprietary amplifier and
speaker technologies delivering sub-
stantial increases in component and
system efficiency levels.
The 12 Channel Class D GreenEdge
high efficiency amplifier is governed
by a high voltage tracking power sup-
ply and drives a 7.5-channel play-back architecture. The Harman Kar-
don® audio system offers the ability
to choose Logic 7 surround sound for
any audio source. The GreenEdge
high-efficiency speaker designs en-
sure the system has higher SPL and a
dramatic increase in dynamic sound
quality. The speakers are tuned for
maximum efficiency and perfectly
matched to the amplifier output stage
ensuring state of the art multi-seat
surround sound processing.
Logic7® multichannel surround-
sound technology delivers an immer-
sive, accurate sound-stage to every
seating position This surround effect
is available for audio from any source
- AM/FM/CD/ Satellite Radio or
dashboard AUX input; and is acti-
vated through the Uconnect Touch™
System. Refer to “Surround Sound”
under “Uconnect Touch™ Settings”
in “Understanding Your Instrument
Panel”.
Selecting “Audio Surround” through
the DSS modes activates the Harman
Kardon® Logic7® multichannel
surround-sound technology in your
vehicle. The “Video Surround” mode
Setting The Analog Clock
178
Page 185 of 316
is described under Driver-Selectable
Surround (DSS). The Video Surround
Mode will only be available for video
media sources (DVDs, Video CDs, or
other video media supported by the
radio). Some audio will sound better
in DSS modes, others in Stereo mode.
When in “Audio Surround” mode,
balance is set automatically. Fader
control is available in surround mode
but should be set to the center position
for optimal surround performance.
STEERING WHEEL
AUDIO CONTROLS
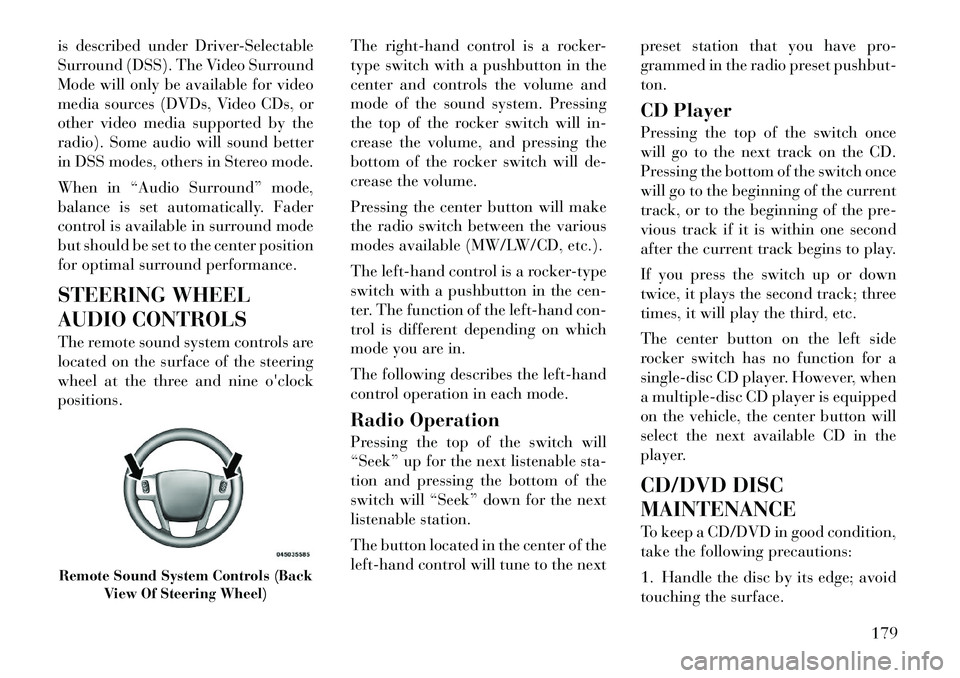
The remote sound system controls are
located on the surface of the steering
wheel at the three and nineo'clock
positions. The
right-hand control is a rocker-
type switch with a pushbutton in the
center and controls the volume and
mode of the sound system. Pressing
the top of the rocker switch will in-
crease the volume, and pressing the
bottom of the rocker switch will de-
crease the volume.
Pressing the center button will make
the radio switch between the various
modes available (MW/LW/CD, etc.).
The left-hand control is a rocker-type
switch with a pushbutton in the cen-
ter. The function of the left-hand con-
trol is different depending on which
mode you are in.
The following describes the left-hand
control operation in each mode.
Radio Operation
Pressing the top of the switch will
“Seek” up for the next listenable sta-
tion and pressing the bottom of the
switch will “Seek” down for the next
listenable station.
The button located in the center of the
left-hand control will tune to the next preset station that you have pro-
grammed in the radio preset pushbut-
ton.
CD Player
Pressing the top of the switch once
will go to the next track on the CD.
Pressing the bottom of the switch once
will go to the beginning of the current
track, or to the beginning of the pre-
vious track if it is within one second
after the current track begins to play.
If you press the switch up or down
twice, it plays the second track; three
times, it will play the third, etc.
The center button on the left side
rocker switch has no function for a
single-disc CD player. However, when
a multiple-disc CD player is equipped
on the vehicle, the center button will
select the next available CD in the
player.
CD/DVD DISC
MAINTENANCE
To keep a CD/DVD in good condition,
take the following precautions:
1. Handle the disc by its edge; avoid
touching the surface.Remote Sound System Controls (Back
View Of Steering Wheel)
179
Page 311 of 316

Service Engine Soon Light
(Malfunction Indicator) . . . . . 156
Setting the Clock . . . . . . . . . . 178
Shift Lever Override . . . . . . . 249
Shifting . . . . . . . . . . . . . . . . 195Automatic Transmission . . . 195
Shoulder Belt Upper
Anchorage . . . . . . . . . . . . . . . 28
Shoulder Belts . . . . . . . . . . . . . 26
Side Airbag . . . . . . . . . . . . . . . 39
Side View Mirror Adjustment . . 63
Signals, Turn . . . . . . . 53,107,154
Slippery Surfaces, Driving On . 204
SmartBeams . . . . . . . . . . . . . 106
Snow Chains (Tire Chains) . . . 218
Sound System Kicker . . . . . . . . . . . . . . . . 178
Sound Systems . . . . . . . . . . . 177
Sound Systems (Radio) . . . . . 177
Spare Tire . . . . . . . . . . . . . . . 216
Spark Plugs . . . . . . . . . . . . . 284
Specifications Fuel (Gasoline) . . . . . . 223,284
Oil . . . . . . . . . . . . . . . 259,284
Speed Control
(Cruise Control) . . . . . . . 115,117
Speedometer . . . . . . . . . . . . . 156
Starting . . . . . . . . . . . . . . . . 191 Automatic Transmission . . . 191 Cold Weather . . . . . . . . . . . 192
Engine Fails to Start . . . . . . 192
Starting and Operating . . . . . . 191
Starting Procedures . . . . . . . . 191
Steering Column Controls . . . . . . . . 107
Column Lock . . . . . . . . . . . 112
Power . . . . . . . . . . . . . . . . 206
Tilt Column . . . . . . . . . 112,113
Wheel, Heated . . . . . . . . . . 114
Wheel, Tilt . . . . . . . . . 112,113
Steering Wheel Audio
Controls . . . . . . . . . . . . . . . . 179
Steering Wheel Mounted Sound
System Controls . . . . . . . . . . . 179
Storage . . . . . . . . . . . . . 143,279
Storage, Vehicle . . . . . . . 185,279
Storing Your Vehicle . . . . . . . . 279
Stuck, Freeing . . . . . . . . . . . . 248
Sun Roof . . . . . . . . . . . . 136,138
Sunglasses Storage . . . . . . . . . 135
Supplemental Restraint System
- Airbag . . . . . . . . . . . . . . . . . 33
Sway Control, Trailer . . . . . . . 229
Synthetic Engine Oil . . . . . . . 259
System, Navigation
(Uconnect™ gps) . . . . . . . . . . 177
Tachometer . . . . . . . . . . . . . . 154 Telescoping Steering
Column . . . . . . . . . . . . . 112,113
Temperature Control,
Automatic (ATC) . . . . . . . . . . 184
Temperature Gauge, Engine
Coolant . . . . . . . . . . . . . 159,240
Tether Anchor, Child Restraint
. . 46
Tilt Steering Column . . . . 112,113
Time Delay, Headlight . . . . . . 105
Tires . . . . . . . . . . . . . . . . 53,214 Aging (Life of Tires) . . . . . . 217
Air Pressure . . . . . . . . . . . . 214
Chains . . . . . . . . . . . . . . . . 218
Compact Spare . . . . . . . . . . 216
General Information . . . . . . 214
High Speed . . . . . . . . . . . . 215
Inflation Pressures . . . . . . . 214
Life of Tires . . . . . . . . . . . . 217
Pressure Monitor System
(TPMS) . . . . . . . . . . . . . . . 219
Pressure Warning Light . . . . 155
Radial . . . . . . . . . . . . . . . . 215
Replacement . . . . . . . . . . . 217
Rotation . . . . . . . . . . . . . . 219
Safety . . . . . . . . . . . . . . . . 214
Spinning . . . . . . . . . . . . . . 216
Trailer Towing . . . . . . . . . . 232
Tread Wear Indicators . . . . . 217
305