check engine light Lancia Thema 2012 Owner handbook (in English)
[x] Cancel search | Manufacturer: LANCIA, Model Year: 2012, Model line: Thema, Model: Lancia Thema 2012Pages: 316, PDF Size: 3.85 MB
Page 19 of 316
IGNITION OR ACCESSORY
ON MESSAGE
Opening the driver's door when the
ignition is in ACC or ON (engine not
running), a chime will sound to re-
mind you to cycle the ignition to OFF.
In addition to the chime, the ignition
or accessory on message will display
in the cluster.
NOTE:
With the Uconnect Touch™ sys-
tem, the power window switches,
radio, power sunroof (for versions/
markets, where provided), and
power outlets will remain active
for up to 10 minutes after the igni-
tion is cycled to the OFF position.
Opening either front door will can-
cel this feature. The time for this
feature is programmable. Refer to
“Uconnect Touch™ Settings” in
“Understanding Your Instrument
Panel” for further information.
WARNING!
When leaving the vehicle, alwaysremove the key fob and lock your
vehicle.
Never leave children alone in a
vehicle, or with access to an un-
locked vehicle.
Allowing children to be in a ve-
hicle unattended is dangerous for
a number of reasons. A child or
others could be seriously or fatally
injured. Children should be
warned not to touch the parking
brake, brake pedal or the shift
lever.
Do not leave the key fob in or near
the vehicle, and do not leave Key-
less Enter-N-Go in the ACC or
ON/RUN mode. A child could op-
erate power windows, other con-
trols, or move the vehicle.
Do not leave children or animals
inside parked vehicles in hot
weather. Interior heat build-up
may cause serious injury or death.
CAUTION!
An unlocked car is an invitation to
thieves. Always remove the Key Fob
from vehicle, cycle the ignition OFF
and lock all doors when leaving the
vehicle unattended.
SENTRY KEY®
The Sentry Key® Immobilizer System
prevents unauthorized vehicle opera-
tion by disabling the engine. The sys-
tem does not need to be armed or
activated. Operation is automatic, re-
gardless of whether the vehicle is
locked or unlocked.
The system uses a Key Fob with Re-
mote Keyless Entry (RKE) transmit-
ter, a Keyless Ignition Node (KIN) and
a RF receiver to prevent unauthorized
vehicle operation. Therefore, only
Key Fobs that are programmed to the
vehicle can be used to start and oper-
ate the vehicle.
After placing the ignition in the ON/
RUN position, the Vehicle Security
Light will turn on for three seconds
for a bulb check. If the light remains
on after the bulb check, it indicates
13
Page 47 of 316
WARNING!(Continued)
It is dangerous to try to repair any
part of the air bag system your-
self. Be sure to tell anyone who
works on your vehicle that it has
an air bag system.
Do not attempt to modify any part
of your air bag system. The air
bag may inflate accidentally or
may not function properly if
modifications are made. Take
your vehicle to an authorized
dealer for any air bag system ser-
vice. If your seat including your
trim cover and cushion needs to
be serviced in any way (including
removal or loosening/tightening
of seat attachment bolts), take the
vehicle to your authorized dealer.
Only manufacturer approved seat
accessories may be used. If it is
necessary to modify the air bag
system for persons with disabili-
ties, contact your authorized
dealer. Air Bag Warning Light
You will want to have the
air bags ready to inflate for
your protection in a colli-
sion. The Air Bag Warning
Light monitors the internal circuits
and interconnecting wiring associated
with air bag system electrical compo-
nents. While the air bag system is
designed to be maintenance free, if
any of the following occurs, have an
authorized dealer service the air bag
system immediately.
The Air Bag Warning Light does not come on for approximately four
to eight seconds when the ignition
switch is first turned to the ON/
RUN position.
The Air Bag Warning Light remains on after the approximate four to
eight-second interval.
The Air Bag Warning Light comes on intermittently or remains on
while driving.
NOTE:
If the speedometer, tachometer, or
any engine related gauges are not
working, the Occupant Restraint Controller (ORC) may also be dis-
abled. The air bags may not be
ready to inflate for your protec-
tion. Promptly check the fuse
block for blown fuses. Refer to the
label located on the inside of the
fuse block cover for the proper air
bag fuses. See your authorized
dealer if the fuse is good.
EVENT DATA RECORDER
(EDR)
This vehicle is equipped with an event
data recorder (EDR). The main pur-
pose of an EDR is to record, in certain
crash or near crash-like situations,
such as an air bag deployment or hit-
ting a road obstacle, data that will
assist in understanding how a vehi-
cle’s systems performed. The EDR is
designed to record data related to ve-
hicle dynamics and safety systems for
a short period of time, typically
30 seconds or less. The EDR in this
vehicle is designed to record such data
as:
How various systems in your ve-
hicle were operating;
41
Page 59 of 316

Periodic Safety Checks You
Should Make Outside The
Vehicle
Tires
Examine tires for excessive tread wear
and uneven wear patterns. Check for
stones, nails, glass, or other objects
lodged in the tread or sidewall. In-
spect the tread for cuts and cracks.
Inspect sidewalls for cuts, cracks and
bulges. Check the wheel nuts fortightness. Check the tires (including
spare) for proper cold inflation pres-
sure.
Lights
Have someone observe the operation
of exterior lights while you work the
controls. Check turn signal and high
beam indicator lights on the instru-
ment panel.
Door Latches
Check for positive closing, latching,
and locking.Fluid Leaks
Check area under vehicle after over-
night parking for fuel, engine coolant,
oil, or other fluid leaks. Also, if gaso-
line fumes are detected or if fuel,
power steering fluid, or brake fluid
leaks are suspected, the cause should
be located and corrected immediately.
53
Page 160 of 316

INSTRUMENT CLUSTER
DESCRIPTIONS
1. TachometerThis gauge measures engine
revolutions-per-minute (RPM x 1000).2. Park/Headlight ON Indicator
(for versions/markets, where
provided)This indicator will illumi-
nate when the park lights or
headlights are turned on.
3. Turn Signal Indicators The arrow will flash with
the exterior turn signal
when the turn signal lever is
operated.
If the vehicle electronics sense that the
vehicle is driven more than 1.6 km
with either turn signal on, a continu-
ous chime will sound to alert you to
turn the signals off. If either indicator
flashes at a rapid rate, check for a
defective outside light bulb. 4. Front Fog Light Indicator (for
versions/markets, where provided)
This indicator will illuminate
when the front fog lights are on.
5. Rear Fog Light Indicator (for
versions/markets, where provided)
This indicator will illuminate
when the rear fog lights are on.
6. High Beam Indicator
This indicator shows that the
high beam headlights are on.
Push the multifunction lever
forward to switch the headlights to
high beam, and pull toward yourself
(normal position) to return to low
beam.
7. Odometer Display / Electronic
Vehicle Information Center (EVIC)
Display
Odometer Display
The odometer display shows the total
distance the vehicle has been driven. Electronic Vehicle Information
Center (EVIC) Display
The Electronic Vehicle Information
Center (EVIC) features a driver-
interactive display that is located in
the instrument cluster. For further in-
formation, refer to “Electronic Ve-
hicle Information Center (EVIC)”.
The Shift Lever Indicator is self-
contained within the EVIC display. It
displays the gear position of the auto-
matic transmission.
NOTE:
You must apply the brakes be-
fore shifting from PARK.
The highest available transmis-
sion gear is displayed in the
lower right corner of the Elec-
tronic Vehicle Information Cen-
ter (EVIC) whenever the Elec-
tronic Range Select (ERS)
feature is active. Use the +/- se-
lector on the shift lever to acti-
vate ERS. Refer to “Automatic
Transmission” in “Starting And
Operating” for further informa-
tion.
154
Page 162 of 316

9. Malfunction Indicator Light
(MIL)The Malfunction Indicator
Light (MIL) is part of an on-
board diagnostic system,
called OBD, that monitors en-
gine and automatic transmission con-
trol systems. The light will illuminate
when the key is in the ON/RUN posi-
tion, before engine start. If the bulb
does not come on when turning the
key from OFF to ON/RUN, have the
condition checked promptly.
Certain conditions, such as poor fuel
quality, etc., may illuminate the MIL
after engine start. The vehicle should
be serviced if the light stays on
through several of your typical driv-
ing cycles. In most situations, the ve-
hicle will drive normally and will not
require towing.
CAUTION!
Prolonged driving with the MIL on
could cause damage to the engine
control system. It also could affect
fuel economy and drivability. If the
MIL is flashing, severe catalytic con-
verter damage and power loss will
soon occur. Immediate service is re-
quired.WARNING!
A malfunctioning catalytic con-
verter, as referenced above, can
reach higher temperatures than in
normal operating conditions. This
can cause a fire if you drive slowly or
park over flammable substances
such as dry plants, wood, cardboard,
etc. This could result in death or
serious injury to the driver, occu-
pants or others. 10. Speedometer
Indicates vehicle speed.
11. Fuel Door Reminder
The arrow in this symbol is
a reminder that the Fuel
Filler Door is located on the
left side of the vehicle.
12. Fuel Gauge
The pointer shows the level of fuel in
the fuel tank when the ignition switch
is in the ON/RUN position.
13. Air Bag Warning Light This light will turn on for
four to eight seconds as a
bulb check when the igni-
tion switch is first turned to
ON/RUN. If the light is either not on
during starting, stays on, or turns on
while driving, have the system in-
spected at an authorized dealer as
soon as possible. Refer to “Occupant
Restraints” in “Things To Know Be-
fore Starting Your Vehicle” for further
information.
156
Page 165 of 316
19. Seat Belt Reminder LightWhen the ignition switch is first
turned to ON/RUN, this light
will turn on for four to eight
seconds as a bulb check. During the
bulb check, if the driver's seat belt is
unbuckled, a chime will sound. After
the bulb check or when driving, if the
driver's seat belt remains unbuckled,
the Seat Belt Reminder Light will il-
luminate and the chime will sound.
Refer to “Occupant Restraints” in
“Things To Know Before Starting
Your Vehicle” for further information.
20. Temperature Gauge
The temperature gauge shows engine
coolant temperature. Any reading
within the normal range indicates
that the engine cooling system is op-
erating satisfactorily.
The gauge pointer will likely indicate
a higher temperature when driving in
hot weather, up mountain grades, or
when towing a trailer. It should not be
allowed to exceed the upper limits of
the normal operating range.
CAUTION!
Driving with a hot engine cooling
system could damage your vehicle.
If the temperature gauge reads “H”
pull over and stop the vehicle. Idle
the vehicle with the air conditioner
turned off until the pointer drops
back into the normal range. If the
pointer remains on the “H” and you
hear continuous chimes, turn the en-
gine off immediately and call an au-
thorized dealership for service.WARNING!
A hot engine cooling system is dan-
gerous. You or others could be badly
burned by steam or boiling coolant.
You may want to call an authorized
dealership for service if your vehicle
overheats. If you decide to look un-
der the hood yourself, see “Main-
taining Your Vehicle”. Follow the
warnings under the Cooling System
Pressure Cap paragraph. ELECTRONIC VEHICLE
INFORMATION CENTER
(EVIC)
The Electronic Vehicle Information
Center (EVIC) features a driver-
interactive display that is located in
the instrument cluster.
This system allows the driver to select
a variety of useful information by
pressing the switches mounted on the
steering wheel. The EVIC consists of
the following:
Radio Info
Fuel Economy Info
Cruise Control Info
Digital Vehicle Speed
Trip Info
Electronic Vehicle Information
Center (EVIC)
159
Page 169 of 316
Trunk AjarThis light will turn on to
indicate that the trunk lid is
ajar.
Oil Pressure Warning Telltale This telltale indicates low en-
gine oil pressure. If the light
turns on while driving, stop the ve-
hicle and shut off the engine as soon
as possible. A chime will sound for
four minutes when this light turns on.
Do not operate the vehicle until the
cause is corrected. This light does not
show how much oil is in the engine.
The engine oil level must be checked
under the hood.
Charging System Telltale This telltale shows the status of
the electrical charging system.
If the telltale stays on or comes on
while driving, turn off some of the
vehicle's non-essential electrical de-
vices or increase engine speed (if at
idle). If the charging system telltale
remains on, it means that the vehicle
is experiencing a problem with the charging system. Obtain SERVICE
IMMEDIATELY. See an authorized
dealer.
If jump starting is required, refer to
“Jump Starting Procedures” in “What
To Do In Emergencies”.
Electronic Throttle Control
(ETC) Telltale
This telltale informs you of
a problem with the Elec-
tronic Throttle Control
(ETC) system. If the telltale
comes on while driving, have the sys-
tem checked by an authorized dealer.
If a problem is detected, the telltale
will come on while the engine is run-
ning. Cycle the ignition key when the
vehicle has completely stopped and
the shift lever is placed in the PARK
position. The telltale should turn off.
If the telltale remains lit with the en-
gine running, your vehicle will usually
be drivable. However, see an autho-
rized dealer for service as soon as pos-
sible. If the telltale is flashing when
the engine is running, immediate ser-
vice is required. You may experience
reduced performance, an elevated/ rough idle or engine stall and your
vehicle may require towing.
Engine Temperature Warning
Telltale This telltale warns of an over-
heated engine condition. As
temperatures rise and the
gauge approaches H,this telltale will
illuminate and a single chime will
sound after reaching a set threshold.
Further overheating will cause the
temperature gauge to pass H,the tell-
tale will continuously flash and a con-
tinuous chime will occur until the en-
gine is allowed to cool.
If the telltale turns on while driving,
safely pull over and stop the vehicle. If
the A/C system is on, turn it off. Also,
shift the transmission into NEUTRAL
and idle the vehicle. If the tempera-
ture reading does not return to nor-
mal, turn the engine off immediately
and call for service. Refer to “If Your
Engine Overheats” in “What To Do In
Emergencies” for more information.
163
Page 174 of 316
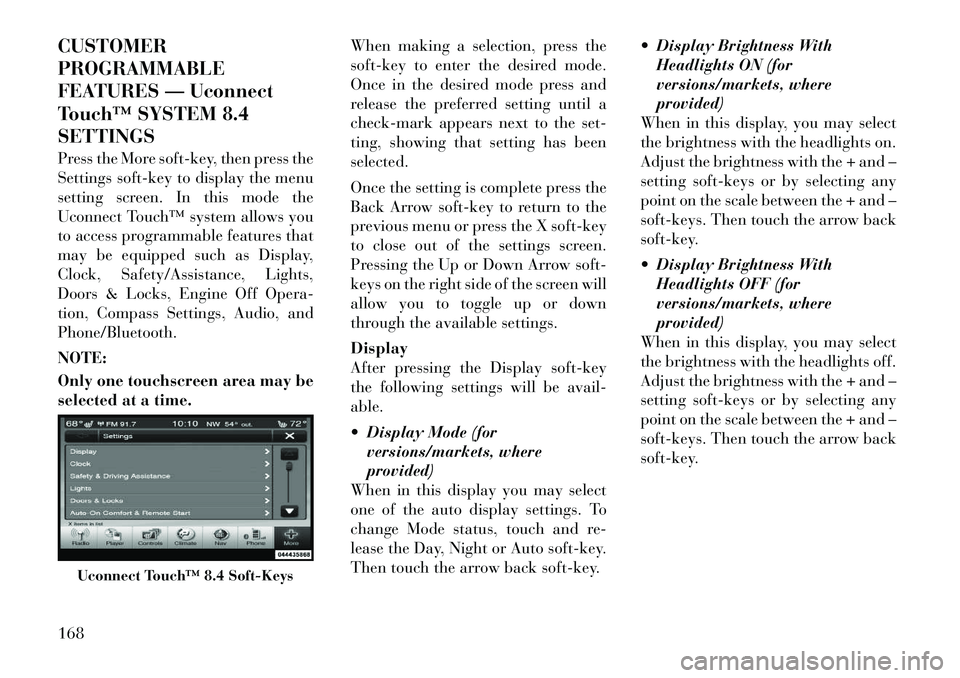
CUSTOMER
PROGRAMMABLE
FEATURES — Uconnect
Touch™ SYSTEM 8.4
SETTINGS
Press the More soft-key, then press the
Settings soft-key to display the menu
setting screen. In this mode the
Uconnect Touch™ system allows you
to access programmable features that
may be equipped such as Display,
Clock, Safety/Assistance, Lights,
Doors & Locks, Engine Off Opera-
tion, Compass Settings, Audio, and
Phone/Bluetooth.
NOTE:
Only one touchscreen area may be
selected at a time.When making a selection, press the
soft-key to enter the desired mode.
Once in the desired mode press and
release the preferred setting until a
check-mark appears next to the set-
ting, showing that setting has been
selected.
Once the setting is complete press the
Back Arrow soft-key to return to the
previous menu or press the X soft-key
to close out of the settings screen.
Pressing the Up or Down Arrow soft-
keys on the right side of the screen will
allow you to toggle up or down
through the available settings.
Display
After pressing the Display soft-key
the following settings will be avail-
able.
Display Mode (for
versions/markets, where
provided)
When in this display you may select
one of the auto display settings. To
change Mode status, touch and re-
lease the Day, Night or Auto soft-key.
Then touch the arrow back soft-key. Display Brightness With
Headlights ON (for
versions/markets, where
provided)
When in this display, you may select
the brightness with the headlights on.
Adjust the brightness with the + and –
setting soft-keys or by selecting any
point on the scale between the + and –
soft-keys. Then touch the arrow back
soft-key.
Display Brightness With Headlights OFF (for
versions/markets, where
provided)
When in this display, you may select
the brightness with the headlights off.
Adjust the brightness with the + and –
setting soft-keys or by selecting any
point on the scale between the + and –
soft-keys. Then touch the arrow back
soft-key.
Uconnect Touch™ 8.4 Soft-Keys
168
Page 179 of 316
Headlights With Wipers (forversions/markets, where
provided)
When this feature is selected, and the
headlight switch is in the AUTO posi-
tion, the headlights will turn on ap-
proximately 10 seconds after the wip-
ers are turned on. The headlights will
also turn off when the wipers are
turned off if they were turned on by
this feature. To make your selection,
touch the Headlights With Wipers
soft-key, until a check-mark appears
next to setting, showing that setting
has been selected. Touch the back ar-
row soft-key to return to the previous
menu.
Auto Dim High Beams “SmartBeam™” (for
versions/markets, where
provided)
When this feature is selected, the high
beam headlights will deactivate auto-
matically under certain conditions. To
make your selection, touch the Auto
High Beams soft-key, until a check-
mark appears next to setting, showing
that setting has been selected. Touch
the back arrow soft-key to return to the previous menu. Refer to “Lights/
SmartBeam™ (for versions/markets,
where provided)” in “Understanding
The Features Of Your Vehicle” for
further information.
Daytime Running Lights (for
versions/markets, where
provided)
When this feature is selected, the
headlights will turn on whenever the
engine is running. To make your se-
lection, touch the Daytime Running
Lights soft-key, until a check-mark
appears next to setting, showing that
setting has been selected. Touch the
back arrow soft-key to return to the
previous menu.
Steering Directed Lights (for versions/markets, where
provided)
When this feature is selected, the
headlights turn relative to a change in
direction of the steering wheel. To
make your selection, touch the Steer-
ing Directed Lights soft-key, until a
check-mark appears next to setting,
showing that setting has been se-
lected. Touch the back arrow soft-key
to return to the previous menu. Doors & Locks
After pressing the Doors & Locks soft-
key the following settings will be
available.
Auto Unlock On Exit (for
versions/markets, where
provided)
When this feature is selected, all doors
will unlock when the vehicle is
stopped and the transmission is in the
PARK or NEUTRAL position and the
driver's door is opened. To make your
selection, touch the Auto Unlock On
Exit soft-key, until a check-mark ap-
pears next to setting, showing that
setting has been selected. Touch the
back arrow soft-key to return to the
previous menu.
1st Press Of Key Fob Unlocks (for versions/markets, where
provided)
When 1st Press Of Key Fob Unlocks is
selected, only the driver's door will
unlock on the first press of the Remote
Keyless Entry (RKE) transmitter UN-
LOCK button. When 1st Press Of Key
Fob Unlocks is selected, you must
press the RKE transmitter UNLOCK
button twice to unlock the passenger's
173
Page 211 of 316

SHALLOW STANDING
WATER
Although your vehicle is capable of
driving through shallow standing wa-
ter, consider the following Caution
and Warning before doing so.CAUTION!
Always check the depth of thestanding water before driving
through it. Never drive through
standing water that is deeper than
the bottom of the tire rims
mounted on the vehicle.
Determine the condition of the
road or the path that is under
water and if there are any ob-
stacles in the way before driving
through the standing water.
Do not exceed 8 km/h when driv-
ing through standing water. This
will minimize wave effects.
(Continued)
CAUTION!(Continued)
Driving through standing water
may cause damage to your vehi-
cle’s drivetrain components. Al-
ways inspect your vehicle’s fluids
(i.e., engine oil, transmission,
axle, etc.) for signs of contamina-
tion (i.e., fluid that is milky or
foamy in appearance) after driv-
ing through standing water. Do
not continue to operate the vehicle
if any fluid appears contami-
nated, as this may result in further
damage. Such damage is not cov-
ered by the New Vehicle Limited
Warranty.
Getting water inside your vehi-
cle’s engine can cause it to lock up
and stall out, and cause serious
internal damage to the engine.
Such damage is not covered by the
New Vehicle Limited Warranty.
WARNING!
Driving through standing waterlimits your vehicle’s traction ca-
pabilities. Do not exceed 8 km/h
when driving through standing
water.
Driving through standing water
limits your vehicle’s braking ca-
pabilities, which increases stop-
ping distances. Therefore, after
driving through standing water,
drive slowly and lightly press on
the brake pedal several times to
dry the brakes.
Getting water inside your vehi-
cle’s engine can cause it to lock up
and stall out, and leave you
stranded.
Failure to follow these warnings
may result in injuries that are se-
rious or fatal to you, your passen-
gers, and others around you.
205