rear view mirror Lancia Thema 2012 Owner handbook (in English)
[x] Cancel search | Manufacturer: LANCIA, Model Year: 2012, Model line: Thema, Model: Lancia Thema 2012Pages: 316, PDF Size: 3.85 MB
Page 69 of 316

MIRRORS
AUTOMATIC DIMMING
MIRROR
This mirror automatically adjusts for
headlight glare from vehicles behind
you.
NOTE:
This feature is disabled when the
vehicle is moving in reverse.CAUTION!
To avoid damage to the mirror dur-
ing cleaning, never spray any clean-
ing solution directly onto the mirror.
Apply the solution onto a clean cloth
and wipe the mirror clean.OUTSIDE MIRRORS
To receive maximum benefit, adjust
the outside mirror(s) to center on the
adjacent lane of traffic and a slight
overlap of the view obtained from the
inside mirror.
NOTE:
The passenger side convex outside
mirror will give a much wider view
to the rear, and especially of the
lane next to your vehicle.
WARNING!
Vehicles and other objects seen in
the passenger side convex mirror
will look smaller and farther away
than they really are. Relying too
much on your passenger side convex
mirror could cause you to collide
with another vehicle or other object.
Use your inside mirror when judging
the size or distance of a vehicle seen
in the passenger side convex mirror.
OUTSIDE MIRRORS
FOLDING FEATURE
Vehicles are equipped with mirrors
that are hinged. The hinge allows the
mirror to pivot forward and rearward to resist damage. The hinge has three
detent positions: full forward, full
rearward and normal.
DRIVER'S AUTOMATIC
DIMMING MIRROR (for
versions/markets, where
provided)
The driver’s outside mirror will auto-
matically adjust for glare from ve-
hicles behind you. This feature is con-
trolled by the inside automatic
dimming mirror and can be turned on
or off by pressing the button at the
base of the inside mirror. The mirror
will automatically adjust for head-
light glare when the inside mirror ad-
justs.
OUTSIDE MIRRORS WITH
TURN SIGNAL AND
APPROACH LIGHTING (for
versions/markets, where
provided)
Driver and passenger outside mirrors
with turn signals located within the
mirror housing and approach lighting
located within mirror glass contain
five LEDs.
Automatic Dimming Mirror
63
Page 70 of 316

Three of the LEDs are turn signal
indicators, which flash with the corre-
sponding turn signal lights in the
front and rear of the vehicle. Turning
on the Hazard Warning flashers will
also activate these LEDs.
The other two LEDs supply illumi-
nated entry lighting, which turns on
in both mirrors when you use the Re-
mote Keyless Entry (RKE) transmit-
ter or open any door. These LEDs
shine outward to illuminate the front
and rear door handles. They also
shine downward to illuminate the
area in front of the doors.
The Illuminated Entry lighting fades
to off after about 30 seconds or it will
fade to off immediately once the igni-
tion is placed into the RUN position.
NOTE:
The approach lighting will not
function when the shift lever is
moved out of the PARK position.TILT MIRRORS IN
REVERSE (for
versions/markets, where
provided)
Tilt Mirrors in Reverse provides auto-
matic outside mirror positioning
which will aid the driver’s view of the
ground rearward of the front doors.
The outside mirrors will move slightly
downward from the present position
when the vehicle is shifted into RE-
VERSE. The outside mirrors will then
return to the original position when
the vehicle is shifted out of the RE-
VERSE position. Each stored
memory setting will have an associ-
ated Tilt Mirrors in Reverse position.
NOTE:
The Tilt Mirrors in Reverse feature
can be turned on and off using the
Uconnect Touch™ System, refer to
“Uconnect Touch™ Settings” in
“Understanding Your Instrument
Panel” for further information.POWER MIRRORS
The power mirror controls are located
on the driver's door trim panel.
The power mirror controls consist of
mirror select buttons and a four-way
mirror control switch. To adjust a mir-
ror, press either the L (left) or R
(right) button to select the mirror that
you want to adjust.
NOTE:
A light in the select button will
illuminate indicating the mirror is
activated and can be adjusted.
Using the mirror control switch, press
on any of the four arrows for the di-
rection that you want the mirror to
move.
Power Mirror Control
64
Page 72 of 316
BLIND SPOT
MONITORING (for
versions/markets, where
provided)
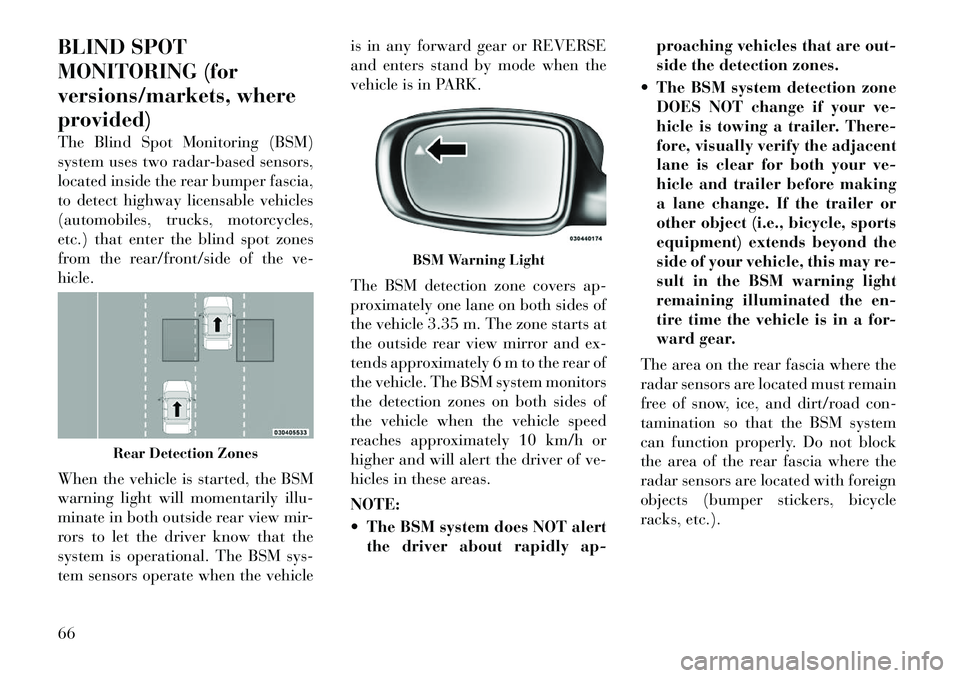
The Blind Spot Monitoring (BSM)
system uses two radar-based sensors,
located inside the rear bumper fascia,
to detect highway licensable vehicles
(automobiles, trucks, motorcycles,
etc.) that enter the blind spot zones
from the rear/front/side of the ve-
hicle.
When the vehicle is started, the BSM
warning light will momentarily illu-
minate in both outside rear view mir-
rors to let the driver know that the
system is operational. The BSM sys-
tem sensors operate when the vehicleis in any forward gear or REVERSE
and enters stand by mode when the
vehicle is in PARK.
The BSM detection zone covers ap-
proximately one lane on both sides of
the vehicle 3.35 m. The zone starts at
the outside rear view mirror and ex-
tends approximately 6 m to the rear of
the vehicle. The BSM system monitors
the detection zones on both sides of
the vehicle when the vehicle speed
reaches approximately 10 km/h or
higher and will alert the driver of ve-
hicles in these areas.
NOTE:
The BSM system does NOT alert
the driver about rapidly ap- proaching vehicles that are out-
side the detection zones.
The BSM system detection zone DOES NOT change if your ve-
hicle is towing a trailer. There-
fore, visually verify the adjacent
lane is clear for both your ve-
hicle and trailer before making
a lane change. If the trailer or
other object (i.e., bicycle, sports
equipment) extends beyond the
side of your vehicle, this may re-
sult in the BSM warning light
remaining illuminated the en-
tire time the vehicle is in a for-
ward gear.
The area on the rear fascia where the
radar sensors are located must remain
free of snow, ice, and dirt/road con-
tamination so that the BSM system
can function properly. Do not block
the area of the rear fascia where the
radar sensors are located with foreign
objects (bumper stickers, bicycle
racks, etc.).
Rear Detection Zones
BSM Warning Light
66
Page 74 of 316
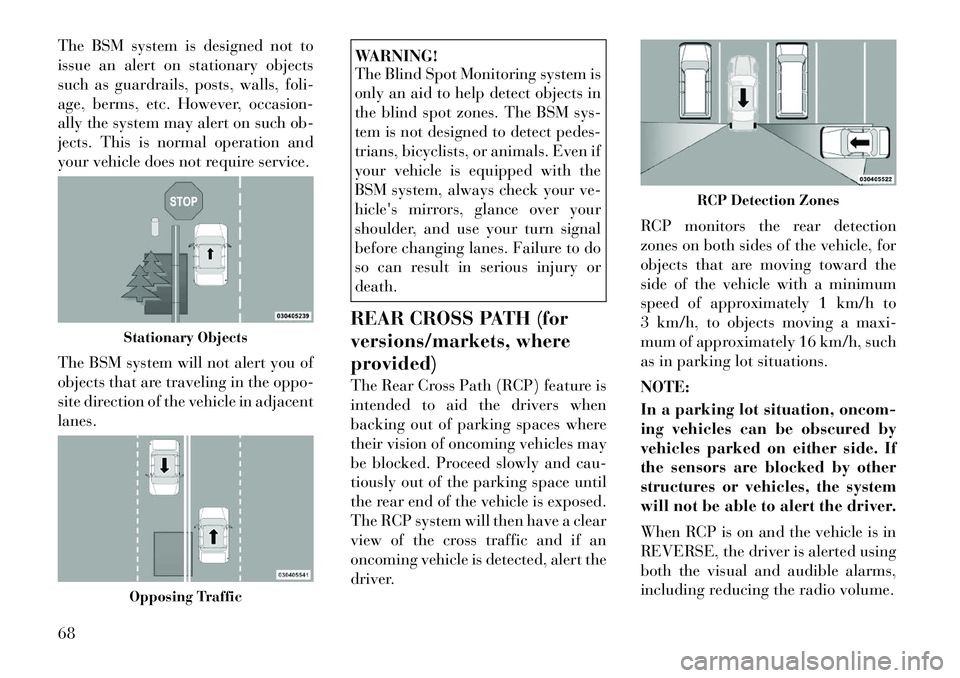
The BSM system is designed not to
issue an alert on stationary objects
such as guardrails, posts, walls, foli-
age, berms, etc. However, occasion-
ally the system may alert on such ob-
jects. This is normal operation and
your vehicle does not require service.
The BSM system will not alert you of
objects that are traveling in the oppo-
site direction of the vehicle in adjacent
lanes.
WARNING!
The Blind Spot Monitoring system is
only an aid to help detect objects in
the blind spot zones. The BSM sys-
tem is not designed to detect pedes-
trians, bicyclists, or animals. Even if
your vehicle is equipped with the
BSM system, always check your ve-
hicle's mirrors, glance over your
shoulder, and use your turn signal
before changing lanes. Failure to do
so can result in serious injury or
death.
REAR CROSS PATH (for
versions/markets, where
provided)
The Rear Cross Path (RCP) feature is
intended to aid the drivers when
backing out of parking spaces where
their vision of oncoming vehicles may
be blocked. Proceed slowly and cau-
tiously out of the parking space until
the rear end of the vehicle is exposed.
The RCP system will then have a clear
view of the cross traffic and if an
oncoming vehicle is detected, alert the
driver. RCP monitors the rear detection
zones on both sides of the vehicle, for
objects that are moving toward the
side of the vehicle with a minimum
speed of approximately 1 km/h to
3 km/h, to objects moving a maxi-
mum of approximately 16 km/h, such
as in parking lot situations.
NOTE:
In a parking lot situation, oncom-
ing vehicles can be obscured by
vehicles parked on either side. If
the sensors are blocked by other
structures or vehicles, the system
will not be able to alert the driver.
When RCP is on and the vehicle is in
REVERSE, the driver is alerted using
both the visual and audible alarms,
including reducing the radio volume.
Stationary ObjectsOpposing Traffic
RCP Detection Zones
68
Page 88 of 316
Dialing Using The Mobile Phone
Keypad
You can dial a phone number with
your mobile phone keypad and still
use the Uconnect™ Phone (while di-
aling via the mobile phone keypad,
the user must exercise caution and
take precautionary safety measures).
By dialing a number with your paired
Bluetooth® mobile phone, the audio
will be played through your vehicle's
audio system. The Uconnect™ Phone
will work the same as if you dial the
number using voice command.
NOTE:
Certain brands of mobile phones
do not send the dial ring to the
Uconnect™ Phone to play it on the
vehicle audio system, so you will
not hear it. Under this situation,
after successfully dialing a num-
ber the user may feel that the call
did not go through even though the
call is in progress. Once your call is
answered, you will hear the audio.Mute/Un-Mute (Mute OFF)
When you mute the Uconnect™
Phone, you will still be able to hear
the conversation coming from the
other party, but the other party will
not be able to hear you. In order to
mute the Uconnect™ Phone simply
touch the Mute button on the Phone
main screen.
ADVANCED PHONE
CONNECTIVITY
Transfer Call To And From
Mobile Phone
The Uconnect™ Phone allows ongo-
ing calls to be transferred from your
mobile phone to the Uconnect™
Phone without terminating the call.
To transfer an ongoing call from your
Uconnect™ Phone paired mobile
phone to the Uconnect™ Phone or
vice versa, press the Transfer button
on the Phone main screen.
Connect Or Disconnect Link
Between The Uconnect™ Phone
And Mobile Phone
If you would like to connect or discon-
nect the Bluetooth® connection be-
tween a Uconnect™ Phone paired
mobile phone and the Uconnect™
Phone, follow the instructions de-
scribed in your mobile phone User's
Manual.
THINGS YOU SHOULD
KNOW ABOUT YOUR
UCONNECT™ PHONE
Voice Command
For best performance, adjust the
rearview mirror to provide at least
1 cm gap between the overhead
console (for versions/markets,
where provided) and the mirror.
Always wait for the beep before speaking.
82
Page 177 of 316
warns you of a possible collision when
you are much closer to the vehicle in
front of you. This allows for a more
dynamic driving experience. To
change the FCW status, touch and
release the OFF, Near or Far button.
Then touch the arrow back soft-key.
For further information, refer to
“Adaptive Cruise Control (ACC)” in
“Understanding The Features Of
Your Vehicle”.
Park Assist (for versions/markets, where provided)
The Rear Park Assist system will scan
for objects behind the vehicle when
the transmission shift lever is in RE-
VERSE and the vehicle speed is less
than 11 mph (18 km/h). The system
can be enabled with Sound Only,
Sound and Display, or turned OFF. To
change the Park Assist status, touch
and release the OFF, Sound Only or
Sounds and Display button. Then
touch the arrow back soft-key. Refer
to “ParkSense® Rear Park Assist” in
“Understanding The Features Of
Your Vehicle” for system function and
operating information. Tilt Mirrors In Reverse (for
versions/markets, where
provided)
When this feature is selected, the out-
side sideview mirrors will tilt down-
ward when the ignition is in the RUN
position and the transmission shift le-
ver is in the REVERSE position. The
mirrors will move back to their previ-
ous position when the transmission is
shifted out of REVERSE. To make
your selection, touch the Tilt Mirrors
In Reverse soft-key, until a check-
mark appears next to setting, showing
that setting has been selected. Touch
the back arrow soft-key to return to
the previous menu.
Blind Spot Alert (for versions/markets, where
provided)
When this feature is selected, the
Blind Spot Alert feature can be set to
Off, Lights or Lights and Chime. The
Blind Spot Alert feature can be acti-
vated in “Lights” mode. When this
mode is selected, the Blind Spot Moni-
tor (BSM) system is activated and will
only show a visual alert in the outside
mirrors. When “Lights & Chime” mode is activated, the Blind Spot
Monitor (BSM) will show a visual
alert in the outside mirrors as well as
an audible alert when the turn signal
is on. When “Off” is selected, the
Blind Spot Monitor (BSM) system is
deactivated. To change the Blind Spot
Alert status, touch the Off, Lights or
Lights & Chime soft-key. Then touch
the arrow back soft-key.
NOTE:
If your vehicle has experienced
any damage in the area where the
sensor is located, even if the fascia
is not damaged, the sensor may
have become misaligned. Take
your vehicle to an authorized
dealer to verify sensor alignment.
Having a sensor that is misaligned
will result in the BSM not operat-
ing to specification.
171
Page 279 of 316

Your leather upholstery can be best
preserved by regular cleaning with a
damp soft cloth. Small particles of
dirt can act as an abrasive and dam-
age the leather upholstery and should
be removed promptly with a damp
cloth. Stubborn soils can be removed
easily with a soft cloth and appropri-
ate products. Care should be taken to
avoid soaking your leather upholstery
with any liquid. Please do not use
polishes, oils, cleaning fluids, sol-
vents, detergents, or ammonia-based
cleaners to clean your leather uphol-
stery. Application of a leather condi-
tioner is not required to maintain the
original condition.WARNING!
Do not use volatile solvents for
cleaning purposes. Many are poten-
tially flammable, and if used in
closed areas they may cause respira-
tory harm.Cleaning Headlights
Your vehicle has plastic headlights
that are lighter and less susceptible to
stone breakage than glass headlights.
Plastic is not as scratch resistant as
glass and therefore different lens
cleaning procedures must be fol-
lowed.
To minimize the possibility of scratch-
ing the lenses and reducing light out-
put, avoid wiping with a dry cloth. To
remove road dirt, wash with a mild
soap solution followed by rinsing.
Do not use abrasive cleaning compo-
nents, solvents, steel wool or other
aggressive material to clean the
lenses.
Glass Surfaces
All glass surfaces should be cleaned
on a regular basis with any commer-
cial household-type glass cleaner.
Never use an abrasive type cleaner.
Use caution when cleaning the inside
rear window equipped with electric
defrosters or the right rear quarter
window equipped with the radio an- tenna. Do not use scrapers or other
sharp instrument that may scratch
the elements.
When cleaning the rear view mirror,
spray cleaner on the towel or rag that
you are using. Do not spray cleaner
directly on the mirror.
Cleaning Plastic Instrument
Cluster Lenses
The lenses in front of the instruments
in this vehicle are molded in clear
plastic. When cleaning the lenses,
care must be taken to avoid scratch-
ing the plastic.
1. Clean with a wet soft rag or micro-
fiber towel. A mild soap solution may
be used, but do not use high alcohol
content or abrasive cleaners. If soap is
used, wipe clean with a clean damp
rag.
2. Dry with a soft cloth.
273
Page 284 of 316
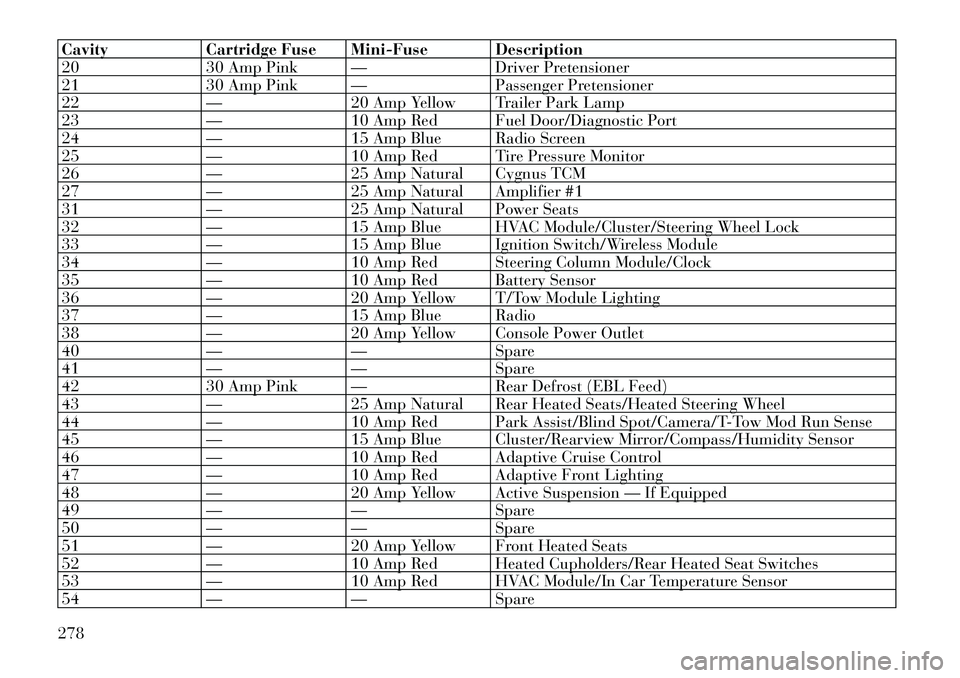
CavityCartridge Fuse Mini-Fuse Description
20 30 Amp Pink — Driver Pretensioner
21 30 Amp Pink — Passenger Pretensioner
22 —20 Amp Yellow Trailer Park Lamp
23 —10 Amp Red Fuel Door/Diagnostic Port
24 —15 Amp Blue Radio Screen
25 —10 Amp Red Tire Pressure Monitor
26 —25 Amp Natural Cygnus TCM
27 —25 Amp Natural Amplifier #1
31 —25 Amp Natural Power Seats
32 —15 Amp Blue HVAC Module/Cluster/Steering Wheel Lock
33 —15 Amp Blue Ignition Switch/Wireless Module
34 —10 Amp Red Steering Column Module/Clock
35 —10 Amp Red Battery Sensor
36 —20 Amp Yellow T/Tow Module Lighting
37 —15 Amp Blue Radio
38 —20 Amp Yellow Console Power Outlet
40 ——Spare
41 ——Spare
42 30 Amp Pink — Rear Defrost (EBL Feed)
43 —25 Amp Natural Rear Heated Seats/Heated Steering Wheel
44 —10 Amp Red Park Assist/Blind Spot/Camera/T-Tow Mod Run Sense
45 —15 Amp Blue Cluster/Rearview Mirror/Compass/Humidity Sensor
46 —10 Amp Red Adaptive Cruise Control
47 —10 Amp Red Adaptive Front Lighting
48 —20 Amp Yellow Active Suspension — If Equipped
49 ——Spare
50 ——Spare
51 —20 Amp Yellow Front Heated Seats
52 —10 Amp Red Heated Cupholders/Rear Heated Seat Switches
53 —10 Amp Red HVAC Module/In Car Temperature Sensor
54 ——Spare
278
Page 309 of 316

Automatic Door . . . . . . . . . . 19
Child Protection . . . . . . . . . . 20
Door . . . . . . . . . . . . . . . . . . 18
Power Door . . . . . . . . . . . . . 19
Low Tire Pressure System . . . . 219
Lower Anchors and Tether for
CHildren (LATCH) . . . . . . . 46,47
Lubrication, Body . . . . . . . . . 262
Maintenance Free Battery . . . . 260
Maintenance Procedures . . . . . 257
Maintenance Schedule . . . 290,293
Maintenance, General . . . . . . . 257
Malfunction Indicator Light
(Check Engine) . . . . . . . . . . . 156
Manual Transmission . . . . . . . 271 Fluid Level Check . . . . . . . 271
Master Cylinder (Brakes) . . . . 269
Memory Feature (Memory
Seat) . . . . . . . . . . . . . . . . . . 101
Memory Seat . . . . . . . . . . . . . 101
Memory Seats and Radio . . . . 101
Methanol . . . . . . . . . . . . . . . 223
Methanol Fuel . . . . . . . . . . . . 223
Mini-Trip Computer . . . . . . . . 166
Mirrors . . . . . . . . . . . . . . . . . . 63
Automatic Dimming . . . . . . . 63
Electric Powered . . . . . . . . . 64
Electric Remote . . . . . . . . . . 64 Exterior Folding . . . . . . . . . . 63
Heated . . . . . . . . . . . . . . . . 65
Outside . . . . . . . . . . . . . . . . 63
Vanity . . . . . . . . . . . . . . . . . 65
Mode Fuel Saver . . . . . . . . . . . . . 165
Modifications/Alterations,
Vehicle . . . . . . . . . . . . . . . . . . . 7
Monitor, Tire Pressure
System . . . . . . . . . . . . . . . . . 219
Multi-Function Control
Lever . . . . . . . . . . . . . . . . . . 107
Navigation System
(Uconnect™ gps) . . . . . . 134,177
New Vehicle Break-In Period . . 50
Occupant Restraints . . . . 25,37,40
Occupant Restraints
(Sedan) . . . . . . . . . . . . . 35,37,39
Octane Rating, Gasoline
(Fuel) . . . . . . . . . . . . . . 223,284
Odometer . . . . . . . . . . . . . . . 154
Oil Change Indicator . . . . 154,164
Oil Change Indicator,
Reset . . . . . . . . . . . . . . . 154,164
Oil, Engine . . . . . . . . . . . 258,284 Capacity . . . . . . . . . . . . . . 283
Change Interval . . . . . . 164,258 Diesel . . . . . . . . . . . . . . . . 259
Dipstick . . . . . . . . . . . . . . . 258
Filter . . . . . . . . . . . . . 259,284
Materials Added to . . . . . . . 259
Recommendation . . 258,259,283
Synthetic . . . . . . . . . . . . . . 259
Viscosity . . . . . . . . . . . . . . 283
Onboard Diagnostic System . . 257
Operating Precautions . . . . . . 257
Operator Manual (Owner's
Manual) . . . . . . . . . . . . . . . . . . 5
Outside Rearview Mirrors . . . . . 63
Overdrive . . . . . . . . . . . . . . . 202
Overdrive OFF Switch . . . . . . 202
Overhead Console . . . . . . . . . 135
Overheating, Engine . . . . 159,240
Owner's Manual (Operator
Manual) . . . . . . . . . . . . . . . . . . 5
Paint Care . . . . . . . . . . . . . . . 271
Park Sense System, Rear . . . . 129
Parking Brake . . . . . . . . . . . . 206
Passing Light . . . . . . . . . . . . 108
Pedals, Adjustable . . . . . . . . . 114
Pets . . . . . . . . . . . . . . . . . . . . 50
Power
Deck Lid Release . . . . . . . . . 24
Distribution Center
(Fuses) . . . . . . . . . . . . 274,276
303