seats Lancia Thema 2013 Owner handbook (in English)
[x] Cancel search | Manufacturer: LANCIA, Model Year: 2013, Model line: Thema, Model: Lancia Thema 2013Pages: 336, PDF Size: 3.87 MB
Page 56 of 336
WARNING!
Rearward-facing child seats must
never be used in the front seat of a
vehicle with the front passenger air
bag. An air bag deployment could
cause severe injury or death to in-
fants in this position.
Older Children And Child
RestraintsChildren who are two years old or who
have outgrown their rear-facing con-
vertible child seat can ride forward-
facing in the vehicle. Forward-facing
child seats and convertible child seats
used in the forward-facing direction
are for children who are over two years
old or who have outgrown the rear-
facing weight or height limit of their
rear-facing convertible child seat. Chil-
dren should remain in a forward-facing
child seat with a harness for as long as
possible, up to the highest weight or
height allowed by the child seat. These
child seats are also held in the vehicle
by the lap/shoulder belt or the ISOFIX
child restraint anchorage system. Refer
to “ISOFIX — Child Seat Anchorage
System”.
All children whose weight or height is
above the forward-facing limit for
the child seat should use a belt-
positioning booster seat until the
vehicle’s seat belts fit properly. If the
child cannot sit with knees bent over
the vehicle's seat cushion while the
child's back is against the seatback,
they should use a belt-positioning
booster seat. The child and belt-
positioning booster seat are held in
the vehicle by the lap/shoulder belt.
Children Too Large For Booster
Seats
Children who are large enough to
wear the shoulder belt comfortably
and whose legs are long enough to
bend over the front of the seat when
their back is against the seatback
should use the lap/shoulder belt in a
rear seat.
Make sure that the child is upright in the seat.
The lap portion should be low on the hips and as snug as possible. Check belt fit periodically. A child's
squirming or slouching can move
the belt out of position.
If the shoulder belt contacts the face or neck, move the child closer
to the center of the vehicle. Never
allow a child to put the shoulder
belt under an arm or behind their
back.
WARNING!
Improper installation can lead tofailure of an infant or child re-
straint. It could come loose in a
collision. The child could be
badly injured or killed. Follow
the manufacturer's directions ex-
actly when installing an infant or
child restraint.
A rearward-facing child restraint should only be used in a rear seat.
A rearward-facing child restraint
in the front seat may be struck by
a deploying passenger air bag,
which may cause severe or fatal
injury to the infant.
50
Page 57 of 336
Here are some tips on getting the
most out of your child restraint:
Before buying any restraint system,make sure that it has a label certi-
fying that it meets all applicable
Safety Standards. LANCIA also
recommends that you make sure
that you can install the child re-
straint in the vehicle where you will
use it before you buy it.
The restraint must be appropriate for your child's weight and height.
Check the label on the restraint for
weight and height limits.
Carefully follow the instructions that come with the restraint. If you
install the restraint improperly, it
may not work when you need it.
Buckle the child into the seat ac- cording to the child restraint manu-
facturer's directions.WARNING!
When your child restraint is not in
use, secure it in the vehicle with
the seat belt or remove it from the
vehicle. Do not leave it loose in the
(Continued)
WARNING!(Continued)
vehicle. In a sudden stop or colli-
sion, it could strike the occupants
or seatbacks and cause serious per-
sonal injury.
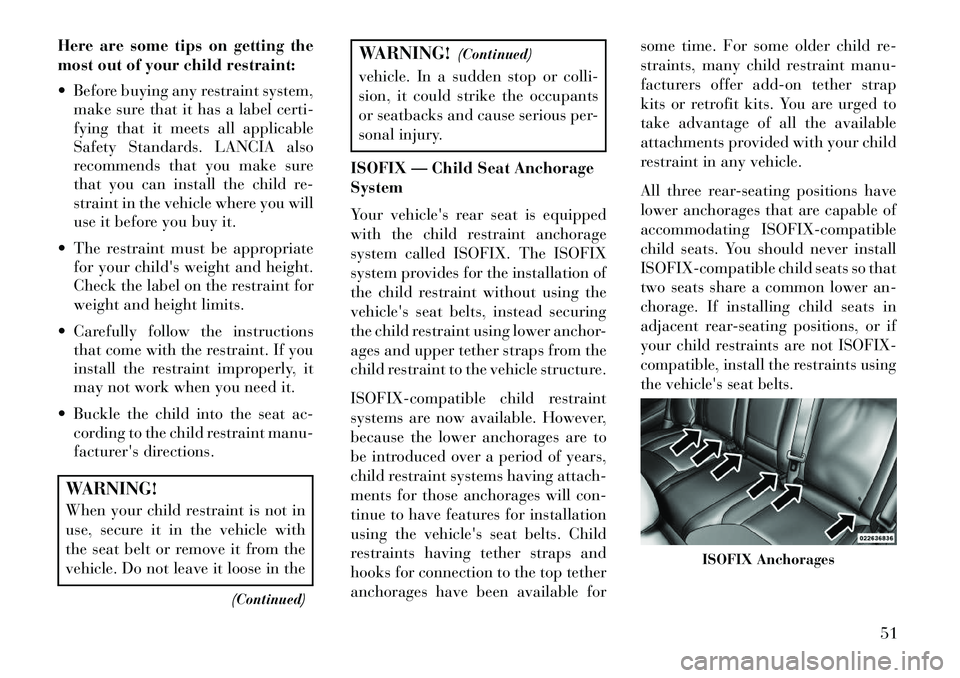
ISOFIX — Child Seat Anchorage
System
Your vehicle's rear seat is equipped
with the child restraint anchorage
system called ISOFIX. The ISOFIX
system provides for the installation of
the child restraint without using the
vehicle's seat belts, instead securing
the child restraint using lower anchor-
ages and upper tether straps from the
child restraint to the vehicle structure.
ISOFIX-compatible child restraint
systems are now available. However,
because the lower anchorages are to
be introduced over a period of years,
child restraint systems having attach-
ments for those anchorages will con-
tinue to have features for installation
using the vehicle's seat belts. Child
restraints having tether straps and
hooks for connection to the top tether
anchorages have been available for some time. For some older child re-
straints, many child restraint manu-
facturers offer add-on tether strap
kits or retrofit kits. You are urged to
take advantage of all the available
attachments provided with your child
restraint in any vehicle.
All three rear-seating positions have
lower anchorages that are capable of
accommodating ISOFIX-compatible
child seats. You should never install
ISOFIX-compatible child seats so that
two seats share a common lower an-
chorage. If installing child seats in
adjacent rear-seating positions, or if
your child restraints are not ISOFIX-
compatible, install the restraints using
the vehicle's seat belts.
ISOFIX Anchorages
51
Page 62 of 336

SAFETY TIPS
Transporting Passengers
NEVER TRANSPORT PASSEN-
GERS IN THE CARGO AREA.WARNING!
Do not leave children or animalsinside parked vehicles in hot
weather. Interior heat build-up
may cause serious injury or
death.
It is extremely dangerous to ride in a cargo area, inside or outside
of a vehicle. In a collision, people
riding in these areas are more
likely to be seriously injured or
killed.
Do not allow people to ride in any area of your vehicle that is not
equipped with seats and seat
belts.
Be sure everyone in your vehicle is
in a seat and using a seat belt
properly. Exhaust Gas
WARNING!
Exhaust gases can injure or kill.
They contain carbon monoxide
(CO), which is colorless and odor-
less. Breathing it can make you un-
conscious and can eventually poi-
son you. To avoid breathing (CO),
follow these safety tips:
Do not run the engine in a closed
garage or in confined areas any
longer than needed to move your
vehicle in or out of the area.
If you are required to drive with
the trunk/liftgate open, make
sure that all windows are closed
and the climate control BLOWER
switch is set at high speed. DO
NOT use the recirculation mode.
If it is necessary to sit in a parked vehicle with the engine running,
adjust your heating or cooling
controls to force outside air into
the vehicle. Set the blower at high
speed. The best protection against carbon
monoxide entry into the vehicle body
is a properly maintained engine ex-
haust system.
Whenever a change is noticed in the
sound of the exhaust system, when
exhaust fumes can be detected inside
the vehicle, or when the underside or
rear of the vehicle is damaged, have a
competent mechanic inspect the com-
plete exhaust system and adjacent
body areas for broken, damaged, de-
teriorated, or mispositioned parts.
Open seams or loose connections
could permit exhaust fumes to seep
into the passenger compartment. In
addition, inspect the exhaust system
each time the vehicle is raised for
lubrication or oil change. Replace as
required.
56
Page 66 of 336
UCONNECT™ PHONE (8.4/8.4N) . . . . . . . . . . . . . .74 UCONNECT TOUCH™ 8.4/8.4 NAV . . . . . . . . . . .74
OPERATION . . . . . . . . . . . . . . . . . . . . . . . . . . . .76
PHONE CALL FEATURES . . . . . . . . . . . . . . . . .81
UCONNECT™ PHONE FEATURES . . . . . . . . . . .84
ADVANCED PHONE CONNECTIVITY . . . . . . . . .87
THINGS YOU SHOULD KNOW ABOUT YOURUCONNECT™ PHONE . . . . . . . . . . . . . . . . . . . .87
GENERAL INFORMATION . . . . . . . . . . . . . . . . .92
VOICE COMMAND . . . . . . . . . . . . . . . . . . . . . . . . .92
Uconnect Touch™ 8.4/8.4 Nav . . . . . . . . . . . . . .92
Uconnect™ Voice Commands . . . . . . . . . . . . . . .93
Voice Tree . . . . . . . . . . . . . . . . . . . . . . . . . . . . .94
SEATS . . . . . . . . . . . . . . . . . . . . . . . . . . . . . . . . .100
POWER SEATS . . . . . . . . . . . . . . . . . . . . . . . .100
POWER LUMBAR(for versions/markets, where provided) . . . . . .101
HEATED SEATS (for versions/markets, where provided) . . . . . .102
VENTILATED SEATS (for versions/markets, where provided) . . . . . .103
HEAD RESTRAINTS . . . . . . . . . . . . . . . . . . . .104
FOLDING REAR SEAT . . . . . . . . . . . . . . . . . . .105
DRIVER MEMORY SEAT (for versions/markets, where provided) . . . . . . . .105
PROGRAMMING THE MEMORY FEATURE . . .106
60
Page 106 of 336

SEATS
Seats are a part of the Occupant
Restraint System of the vehicle.WARNING!
It is dangerous to ride in a cargo
area, inside or outside of a vehicle.
In a collision, people riding in
these areas are more likely to be
seriously injured or killed. Do not allow people to ride in anyarea of your vehicle that is not
equipped with seats and seat
belts. In a collision, people riding
in these areas are more likely to
be seriously injured or killed.
Be sure everyone in your vehicle is
in a seat and using a seat belt
properly.
POWER SEATS
On models equipped with power
seats, the switch is located on the out-
board side of the seat near the floor.
Use this switch to move the driver's
seat up or down, forward or rearward
or to recline the seatback. NOTE: The passenger's seat will
move up or down, forward or rear-
ward.
WARNING!
Adjusting a seat while driving may
be dangerous. Moving a seat while
driving could result in loss of con-
trol which could cause a collision
and serious injury or death. Seats should be adjusted before
fastening the seat belts and while
the vehicle is parked. Serious in-
jury or death could result from a
poorly adjusted seat belt.
(Continued)
WARNING!(Continued)
Do not ride with the seatback re- clined so that the shoulder belt is
no longer resting against your
chest. In a collision you could
slide under the seat belt, which
could result in serious injury or
death.CAUTION!Do not place any article under a
power seat or impede its ability to
move as it may cause damage to the
seat controls. Seat travel may be-
come limited if movement is stopped
by an obstruction in the seat’s path.Adjusting The Seat Forward Or
Rearward
The seat can be adjusted both forward
and rearward. Push the seat switch
forward or rearward, the seat will
move in the direction of the switch.
Release the switch when the desired
position has been reached.
Power Seat Switches
1 — Seat Control
2 — Seatback Control
100
Page 107 of 336

Adjusting The Seat Up Or Down
The height of the seats can be ad-
justed up or down. Pull upward or
push downward on the seat switch,
the seat will move in the direction of
the switch. Release the switch when
the desired position is reached.
Tilting The Seat Up Or Down
The angle of the seat cushion can be
adjusted in four directions. Pull up-
ward or push downward on the front
or rear of the seat switch, the front or
rear of the seat cushion will move in
the direction of the switch. Release the
switch when the desired position has
been reached.
Reclining The Seatback
The angle of the seatback can be ad-
justed forward or rearward. Push the
seatback switch forward or rearward,
the seat will move in the direction of
the switch. Release the switch when
the desired position is reached.
WARNING!
Adjusting a seat while driving may
be dangerous. Moving a seat while
driving could result in loss of con-
trol which could cause a collision
and serious injury or death. Seats should be adjusted beforefastening the seat belts and while
the vehicle is parked. Serious in-
jury or death could result from a
poorly adjusted seat belt.
Do not ride with the seatback re-
clined so that the shoulder belt is
no longer resting against your
chest. In a collision you could slide
under the seat belt, which could
result in serious injury or death.CAUTION!Do not place any article under a
power seat or impede its ability to
move as it may cause damage to the
seat controls. Seat travel may be-
come limited if movement is stopped
by an obstruction in the seat’s path.
POWER LUMBAR
(for versions/markets,
where provided)Vehicles equipped with power driver
or passenger seats may be also be
equipped with power lumbar. The
power lumbar switch is located on the
outboard side of the power seat. Push
the switch forward or rearward to in-
crease or decrease the lumbar support.
Push the switch upward or downward
to raise or lower the lumbar support.
Power Lumbar Switch
101
Page 108 of 336

HEATED SEATS
(for versions/markets,
where provided)
On some models, the front and rear
seats may be equipped with heaters in
both the seat cushions and seatbacks.
The front driver and passenger heated
seats are operated using the Uconnect
Touch™ System.WARNING!
Persons who are unable to feel
pain to the skin because of ad-
vanced age, chronic illness, dia-
betes, spinal cord injury, medica-
tion, alcohol use, exhaustion or
other physical condition must ex-
ercise care when using the seat
heater. It may cause burns even at
low temperatures, especially if
used for long periods of time.Do not place anything on the seat
or seatback that insulates against
heat, such as a blanket or cushion.
This may cause the seat heater to
overheat. Sitting in a seat that has
(Continued)
WARNING!(Continued)been overheated could cause seri-
ous burns due to the increased sur-
face temperature of the seat.
Front Heated Seat Operations —
Uconnect Touch™ 8.4 and 8.4 Nav:Press the “Controls” soft-key located
on the bottom of the Uconnect Touch™
display.
Press the “Driver” or “Pas-
senger” seat soft-key once
to select HI-level heating.
Press the soft-key a second
time to select LO-level heating. Press
the soft-key a third time to shut the
heating elements OFF. NOTE: Once a heat setting is se-
lected, heat will be felt within two
to five minutes.
When the HI-level setting is selected,
the heater will provide a boosted heat
level during the first four minutes of
operation. Then, the heat output will
drop to the normal HI-level. If the
HI-level setting is selected, the system
will automatically switch to LO-level
after a maximum of 60 minutes of
continuous operation. At that time,
the display will change from HI to LO,
indicating the change. The LO-level
setting will turn OFF automatically
after a maximum of 45 minutes.
Rear Heated Seats
On some models, the two outboard
seats are equipped with heated seats.
Controls Soft-Key
Heated Seats Soft-Keys
102
Page 109 of 336
The heated seat switches for these seats
are located on the rear of the center
console. There are two heated seat
switches that allow the rear passengers
to operate the seats independently.You can choose from HI, LO or OFF
heat settings. Amber indicator lights
in each switch indicate the level of
heat in use. Two indicator lights will
illuminate for HI, one for LO and
none for OFF.Press the switch once to se-
lect HI-level heating. Press
the switch a second time to
select LO-level heating.
Press the switch a third time to shut
the heating elements OFF.
NOTE:
Once a heat setting is selected, heat will be felt within two to
five minutes.
The engine must be running for the heated seats to operate.
When the HI-level setting is selected,
the heater will provide a boosted heat
level during the first four minutes of operation. Then, the heat output will
drop to the normal HI-level. If the
HI-level setting is selected, the system
will automatically switch to LO-level
after a maximum of 60 minutes of
continuous operation. At that time,
the number of illuminated LEDs
changes from two to one, indicating
the change. The LO-level setting will
turn OFF automatically after a maxi-
mum of 45 minutes.
VENTILATED SEATS
(for versions/markets,
where provided)
On some models, both the driver and
passenger seats are ventilated. Lo-
cated in the seat cushion and seatback
are small fans that draw air from the
seat surface through fine perforations
in the seat cover to help keep the
driver and front passenger cooler in
higher ambient temperatures.
The ventilated seats can be operated
using the Uconnect Touch™ System.
NOTE: The engine must be run-
ning for the ventilated seats to
operate.
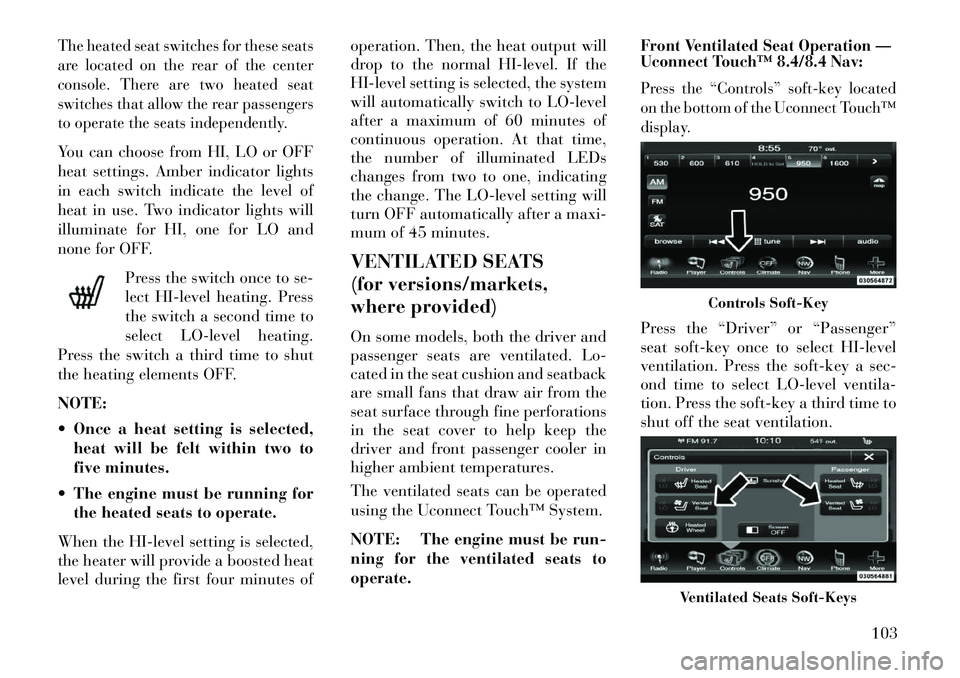
Front Ventilated Seat Operation —
Uconnect Touch™ 8.4/8.4 Nav:
Press the “Controls” soft-key located
on the bottom of the Uconnect Touch™
display.Press the “Driver” or “Passenger”
seat soft-key once to select HI-level
ventilation. Press the soft-key a sec-
ond time to select LO-level ventila-
tion. Press the soft-key a third time to
shut off the seat ventilation.
Controls Soft-Key
Ventilated Seats Soft-Keys
103
Page 110 of 336

HEAD RESTRAINTSHead restraints are designed to reduce
the risk of injury by restricting head
movement in the event of a rear im-
pact. Head restraints should be ad-
justed so that the top of the head
restraint is located above the top of
your ear.WARNING!
The head restraints for all occu-
pants must be properly adjusted
prior to operating the vehicle or
occupying a seat. Head restraints
should never be adjusted while the
vehicle is in motion. Driving a ve-
hicle with the head restraints im-
properly adjusted or removed could
cause serious injury or death in the
event of a collision.
Active Head Restraints — Front
Seats
The front driver and passenger seats
are equipped with Active Head Re-
straints (AHR). In the event of a rear
impact the AHRs will automatically
extend forward minimizing the gap
between the back of the occupants
head and the AHR. The AHRs will automatically return
to their normal position following a
rear impact. If the AHRs do not return
to their normal position see your au-
thorized dealer immediately.
To raise the head restraint, pull up-
ward on the head restraint. To lower
the head restraint, press the push but-
ton, located at the base of the head
restraint, and push downward on the
head restraint.
NOTE:
The head restraints should
only be removed by qualified tech-
nicians, for service purposes only.
If either of the head restraints re-
quire removal, see your authorized
dealer.
WARNING!
Do not place items over the top of
the Active Head Restraint, such as
coats, seat covers or portable DVD
players. These items may interfere
with the operation of the Active
Head Restraint in the event of a
collision and could result in serious
injury or death.
Rear Head Restraints
The center head restraint has two po-
sitions, up or down. When the center
seat is being occupied the head re-
straint should be in the raised posi-
tion. When there are no occupants in
the center seat the head restraint can
be lowered for maximum visibility for
the driver.
Push Button
104
Page 111 of 336
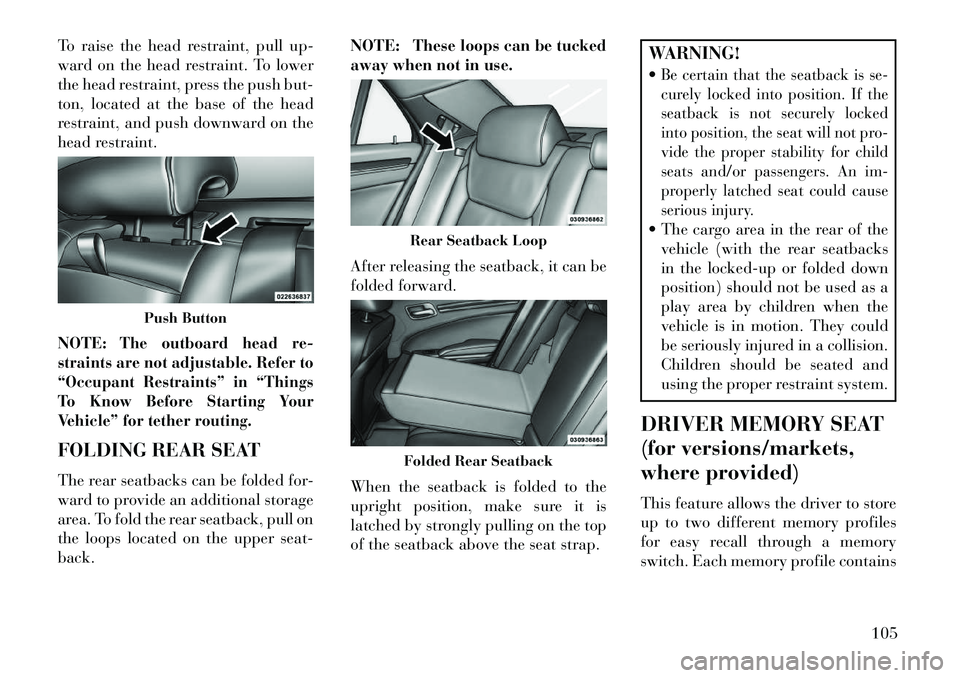
To raise the head restraint, pull up-
ward on the head restraint. To lower
the head restraint, press the push but-
ton, located at the base of the head
restraint, and push downward on the
head restraint.
NOTE:
The outboard head re-
straints are not adjustable. Refer to
“Occupant Restraints” in “Things
To Know Before Starting Your
Vehicle” for tether routing.
FOLDING REAR SEAT
The rear seatbacks can be folded for-
ward to provide an additional storage
area. To fold the rear seatback, pull on
the loops located on the upper seat-
back. NOTE:
These loops can be tucked
away when not in use.
After releasing the seatback, it can be
folded forward.
When the seatback is folded to the
upright position, make sure it is
latched by strongly pulling on the top
of the seatback above the seat strap.
WARNING!
Be certain that the seatback is se-
curely locked into position. If the
seatback is not securely locked
into position, the seat will not pro-
vide the proper stability for child
seats and/or passengers. An im-
properly latched seat could cause
serious injury. The cargo area in the rear of the vehicle (with the rear seatbacks
in the locked-up or folded down
position) should not be used as a
play area by children when the
vehicle is in motion. They could
be seriously injured in a collision.
Children should be seated and
using the proper restraint system.
DRIVER MEMORY SEAT
(for versions/markets,
where provided)
This feature allows the driver to store
up to two different memory profiles
for easy recall through a memory
switch. Each memory profile contains
Push Button
Rear Seatback LoopFolded Rear Seatback
105