ECO mode Lancia Thema 2013 Owner handbook (in English)
[x] Cancel search | Manufacturer: LANCIA, Model Year: 2013, Model line: Thema, Model: Lancia Thema 2013Pages: 336, PDF Size: 3.87 MB
Page 149 of 336

WARNING!
Never leave children in a vehiclewith the Remote Keyless Entry
(RKE) transmitter in the passen-
ger compartment. Occupants,
particularly unattended children,
can become entrapped by the
power sunroof while operating
the power sunroof switch. Such
entrapment may result in serious
injury or death.
In a collision, there is a greater risk
of being thrown from a vehicle
with an open sunroof. You could
also be seriously injured or killed.
Always fasten your seat belt prop-
erly and make sure all passengers
are properly secured too.Do not allow small children to op-
erate the sunroof. Never allow your
fingers, other body parts, or any
object to project through the sun-
roof opening. Injury may result.
OPENING SUNROOF —
EXPRESS
Press the switch rearward and release
it within one-half second and the sun-
roof will open automatically from any
position. The sunroof will open fully
and stop automatically. This is called
“Express Open”. During Express
Open operation, any movement of the
sunroof switch will stop the sunroof.
OPENING SUNROOF —
MANUAL MODE
To open the sunroof, press and hold
the switch rearward to full open. Any
release of the switch will stop the
movement and the sunroof will re-
main in a partially opened condition
until the switch is pushed and held
rearward again.
CLOSING SUNROOF —
EXPRESS
Press the switch forward and release it
within one-half second and the sun-
roof will close automatically from any
position. The sunroof will close fully and stop automatically. This is called
“Express Close”. During Express
Close operation, any movement of the
switch will stop the sunroof.
CLOSING SUNROOF —
MANUAL MODE
To close the sunroof, press and hold
the switch in the forward position.
Any release of the switch will stop the
movement and the sunroof will re-
main in a partially closed condition
until the switch is pushed and held
forward again.
OPENING POWER SHADE
— EXPRESS
Press the shade switch rearward and
release it within one-half second and
the shade will open automatically
from any position. The shade will
open fully and stop automatically.
This is called “Express Open”. During
Express Open operation, any move-
ment of the shade switch will stop the
shade.
143
Page 150 of 336

OPENING POWER
SHADE — MANUAL MODE
To open the shade, press and hold the
switch rearward to full open. Any re-
lease of the switch will stop the move-
ment and the shade will remain in a
partially opened condition until the
switch is pushed and held rearward
again.
CLOSING POWER
SHADE — EXPRESS
Press the switch forward and release it
within one-half second and the shade
will close automatically from any po-
sition. The shade will close fully and
stop automatically. This is called “Ex-
press Close”. During Express Close
operation, any movement of the
switch will stop the shade.
CLOSING POWER
SHADE — MANUAL MODE
To close the shade, press and hold the
switch in the forward position. Any
release of the switch will stop the
movement and the shade will remainin a partially closed condition until
the switch is pushed and held forward
again.
PINCH PROTECT FEATURE
This feature will detect an obstruction
in the opening of the sunroof during
Express Close operation. If an ob-
struction in the path of the sunroof is
detected, the sunroof will automati-
cally retract. Remove the obstruction
if this occurs. Next, press the switch
forward and release to Express Close.
NOTE: If three consecutive sun-
roof close attempts result in Pinch
Protect reversals, the fourth close
attempt will be a Manual Close
movement with Pinch Protect dis-
abled.
WIND BUFFETING
Wind buffeting can be described as
the perception of pressure on the ears
or a helicopter-type sound in the ears.
Your vehicle may exhibit wind buffet-
ing with the windows down, or the
sunroof (for versions/markets, where
provided) in certain open or partially
open positions. This is a normal oc-
currence and can be minimized. If the
buffeting occurs with the rear win-
dows open, open the front and rear
windows together to minimize the
buffeting. If the buffeting occurs with
the sunroof open, adjust the sunroof
opening to minimize the buffeting or
open any window.
SUNROOF MAINTENANCE
Use only a non-abrasive cleaner and a
soft cloth to clean the glass panel.
IGNITION OFF OPERATION
For vehicles not equipped with the
Electronic Vehicle Information Center
(EVIC), the power sunroof switch will
remain active for 45 seconds after the
ignition switch is turned to the LOCK
position. Opening either front door
will cancel this feature.
144
Page 175 of 336
DIESEL PARTICULATE
FILTER (DPF) MESSAGES
Exhaust System — RegenerationRequired Now. Under conditions of
exclusive short duration and low
speed driving and low speed driv-
ing cycles, the engine and exhaust
after-treatment system may never
reach the conditions required to re-
move the trapped PM. If this occurs
the “Exhaust System Regeneration
Required Now” message will be
displayed on the EVIC. By driving
your vehicle at highway speeds
for as little as 30 minutes, you can
remedy the condition in the par-
ticulate filter system by allowing
the trapped PM to be removed to
restore the system to normal oper-
ating condition.
Exhaust Service Require — See Dealer Now. The engine will be de-
rated to prevent permanent dam-
age to the after-treatment system. If
this condition occurs, it is necessary
to have your vehicle serviced by
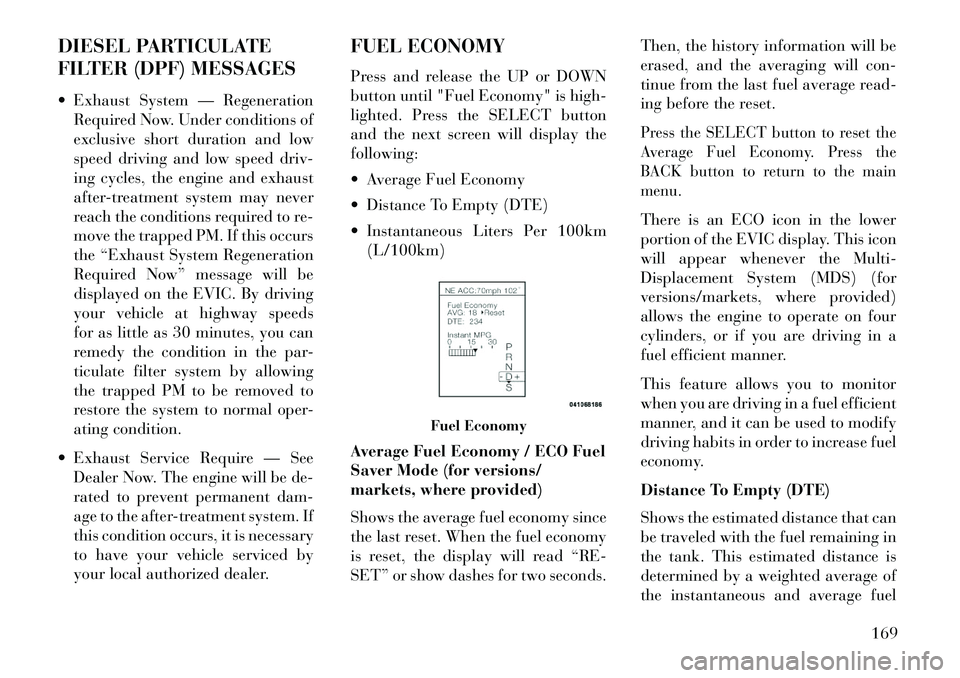
your local authorized dealer. FUEL ECONOMY
Press and release the UP or DOWN
button until "Fuel Economy" is high-
lighted. Press the SELECT button
and the next screen will display the
following:
Average Fuel Economy
Distance To Empty (DTE)
Instantaneous Liters Per 100km
(L/100km)
Average Fuel Economy / ECO Fuel
Saver Mode (for versions/
markets, where provided)
Shows the average fuel economy since
the last reset. When the fuel economy
is reset, the display will read “RE-
SET” or show dashes for two seconds. Then, the history information will be
erased, and the averaging will con-
tinue from the last fuel average read-
ing before the reset.
Press the SELECT button to reset the
Average Fuel Economy. Press the
BACK button to return to the main
menu.There is an ECO icon in the lower
portion of the EVIC display. This icon
will appear whenever the Multi-
Displacement System (MDS) (for
versions/markets, where provided)
allows the engine to operate on four
cylinders, or if you are driving in a
fuel efficient manner.
This feature allows you to monitor
when you are driving in a fuel efficient
manner, and it can be used to modify
driving habits in order to increase fuel
economy.
Distance To Empty (DTE)
Shows the estimated distance that can
be traveled with the fuel remaining in
the tank. This estimated distance is
determined by a weighted average of
the instantaneous and average fuel
Fuel Economy
169
Page 182 of 336
Blind Spot Alert (for versions/
markets, where provided)
When this feature is selected, the
Blind Spot Alert feature can be set to
Off, Lights or Lights and Chime. The
Blind Spot Alert feature can be acti-
vated in “Lights” mode. When this
mode is selected, the Blind Spot Moni-
tor (BSM) system is activated and will
only show a visual alert in the outside
mirrors. When “Lights & Chime”
mode is activated, the Blind Spot
Monitor (BSM) will show a visual
alert in the outside mirrors as well as
an audible alert when the turn signal
is on. When “Off” is selected, the
Blind Spot Monitor (BSM) system is
deactivated. To change the Blind Spot
Alert status, touch the Off, Lights or
Lights & Chime soft-key. Then touch
the arrow back soft-key.
NOTE: If your vehicle has expe-
rienced any damage in the area
where the sensor is located, even if
the fascia is not damaged, the sen-
sor may have become misaligned.
Take your vehicle to an authorized
dealer to verify sensor alignment.Having a sensor that is misaligned
will result in the BSM not operat-
ing to specification.
ParkView® Backup Camera (for
versions/markets, where provided)
Your vehicle may be equipped with
the ParkView® Rear Back Up Cam-
era that allows you to see an on-screen
image of the rear surroundings of
your vehicle whenever the shift lever
is put into REVERSE. The image will
be displayed on the radio touchscreen
display along with a caution note to
“check entire surroundings” across
the top of the screen. After five sec-
onds, this note will disappear. The
ParkView® camera is located on the
rear of the vehicle above the rear Li-
cense plate. To make your selection,
touch the ParkView® Backup Cam-
era soft-key, until a check-mark ap-
pears next to setting, showing that
setting has been selected. Touch the
back arrow soft-key to return to the
previous menu.
Rain Sensing Auto Wipers (for
versions/markets, where provided)
When this feature is selected, the sys-
tem will automatically activate the
windshield wipers if it senses moisture
on the windshield. To make your se-
lection, touch the Rain Sensing soft-
key, until a check-mark appears next
to setting, showing that setting has
been selected. Touch the back arrow
soft-key to return to the previous
menu.
Hill Start Assist
When this feature is selected, the Hill
Start Assist (HSA) system is active.
Refer to “Electronic Brake Control
System” in “Starting And Operating”
for system function and operating in-
formation. To make your selection,
touch the Hill Start Assist soft-key,
until a check-mark appears next to
setting, showing that setting has been
selected. Touch the back arrow soft-
key to return to the previous menu.
176
Page 189 of 336
Mode will only be available for video
media sources (DVDs, Video CDs, or
other video media supported by the
radio). Some audio will sound better
in DSS modes, others in Stereo mode.
When in “Audio Surround” mode,
balance is set automatically. Fader
control is available in surround mode
but should be set to the center position
for optimal surround performance.
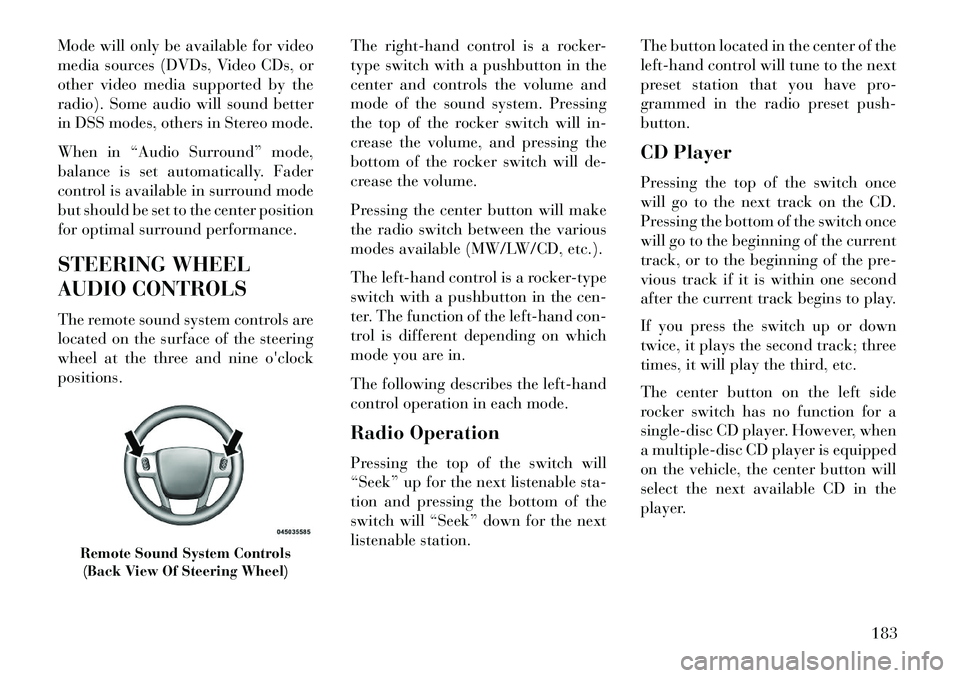
STEERING WHEEL
AUDIO CONTROLS
The remote sound system controls are
located on the surface of the steering
wheel at the three and nine o'clock
positions.The right-hand control is a rocker-
type switch with a pushbutton in the
center and controls the volume and
mode of the sound system. Pressing
the top of the rocker switch will in-
crease the volume, and pressing the
bottom of the rocker switch will de-
crease the volume.
Pressing the center button will make
the radio switch between the various
modes available (MW/LW/CD, etc.).
The left-hand control is a rocker-type
switch with a pushbutton in the cen-
ter. The function of the left-hand con-
trol is different depending on which
mode you are in.
The following describes the left-hand
control operation in each mode.
Radio Operation
Pressing the top of the switch will
“Seek” up for the next listenable sta-
tion and pressing the bottom of the
switch will “Seek” down for the next
listenable station.The button located in the center of the
left-hand control will tune to the next
preset station that you have pro-
grammed in the radio preset push-
button.
CD Player
Pressing the top of the switch once
will go to the next track on the CD.
Pressing the bottom of the switch once
will go to the beginning of the current
track, or to the beginning of the pre-
vious track if it is within one second
after the current track begins to play.
If you press the switch up or down
twice, it plays the second track; three
times, it will play the third, etc.
The center button on the left side
rocker switch has no function for a
single-disc CD player. However, when
a multiple-disc CD player is equipped
on the vehicle, the center button will
select the next available CD in the
player.
Remote Sound System Controls
(Back View Of Steering Wheel)
183
Page 190 of 336
CD/DVD DISC
MAINTENANCE
To keep a CD/DVD in good condition,
take the following precautions:
1. Handle the disc by its edge; avoid
touching the surface.
2. If the disc is stained, clean the
surface with a soft cloth, wiping from
center to edge.
3. Do not apply paper or tape to the
disc; avoid scratching the disc.
4. Do not use solvents such as ben-
zene, thinner, cleaners, or anti-static
sprays.
5. Store the disc in its case after play-
ing.
6. Do not expose the disc to direct
sunlight.
7. Do not store the disc where tem-
peratures may become too high.
NOTE: If you experience diffi-
culty in playing a particular disc, it
may be damaged (i.e., scratched,
reflective coating removed, a hair,moisture or dew on the disc) over-
sized, or have protection encoding.
Try a known good disc before con-
sidering disc player service.
RADIO OPERATION AND
MOBILE PHONES
Under certain conditions, the mobile
phone being on in your vehicle can
cause erratic or noisy performance
from your radio. This condition may
be lessened or eliminated by relocat-
ing the mobile phone antenna. This
condition is not harmful to the radio.
If your radio performance does not
satisfactorily “clear” by the reposi-
tioning of the antenna, it is recom-
mended that the radio volume be
turned down or off during mobile
phone operation.
CLIMATE CONTROLS
The air conditioning and heating sys-
tem is designed to make you comfort-
able in all types of weather. This sys-
tem can be operated through either
the Automatic Climate Controls on
the instrument panel or through the
Uconnect Touch™ system display.When the Uconnect Touch™ system
is in different modes (Radio, Player,
Settings, More, etc.) the driver and
passenger temperature settings will be
indicated at the top of the display.
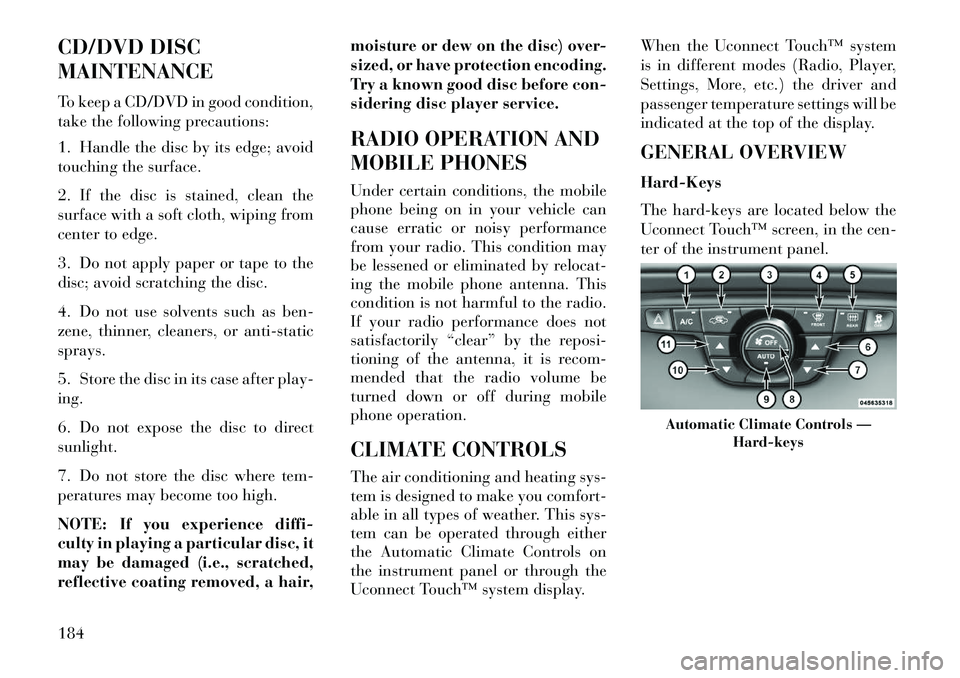
GENERAL OVERVIEW
Hard-Keys
The hard-keys are located below the
Uconnect Touch™ screen, in the cen-
ter of the instrument panel.
Automatic Climate Controls —
Hard-keys
184
Page 191 of 336
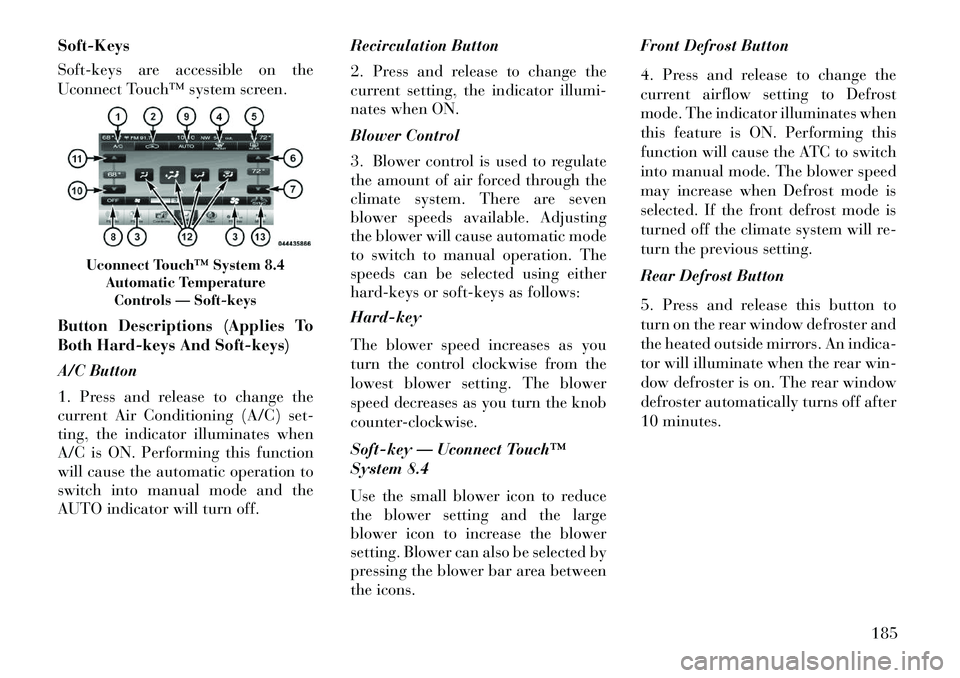
Soft-Keys
Soft-keys are accessible on the
Uconnect Touch™ system screen.
Button Descriptions (Applies To
Both Hard-keys And Soft-keys)
A/C Button
1. Press and release to change the
current Air Conditioning (A/C) set-
ting, the indicator illuminates when
A/C is ON. Performing this function
will cause the automatic operation to
switch into manual mode and the
AUTO indicator will turn off.Recirculation Button
2. Press and release to change the
current setting, the indicator illumi-
nates when ON.
Blower Control
3. Blower control is used to regulate
the amount of air forced through the
climate system. There are seven
blower speeds available. Adjusting
the blower will cause automatic mode
to switch to manual operation. The
speeds can be selected using either
hard-keys or soft-keys as follows:
Hard-key
The blower speed increases as you
turn the control clockwise from the
lowest blower setting. The blower
speed decreases as you turn the knob
counter-clockwise.
Soft-key — Uconnect Touch™
System 8.4
Use the small blower icon to reduce
the blower setting and the large
blower icon to increase the blower
setting. Blower can also be selected by
pressing the blower bar area between
the icons.Front Defrost Button
4. Press and release to change the
current airflow setting to Defrost
mode. The indicator illuminates when
this feature is ON. Performing this
function will cause the ATC to switch
into manual mode. The blower speed
may increase when Defrost mode is
selected. If the front defrost mode is
turned off the climate system will re-
turn the previous setting.
Rear Defrost Button
5. Press and release this button to
turn on the rear window defroster and
the heated outside mirrors. An indica-
tor will illuminate when the rear win-
dow defroster is on. The rear window
defroster automatically turns off after
10 minutes.
Uconnect Touch™ System 8.4
Automatic TemperatureControls — Soft-keys
185
Page 193 of 336

down or side to side to regulate air-
flow direction. There is a shut off
wheel located below the air vanes to
shut off or adjust the amount of air-
flow from these outlets.
Bi-Level ModeAir comes from the instrument
panel outlets and floor outlets.
A slight amount of air is di-
rected through the defrost and side
window demister outlets.
NOTE: BI-LEVEL mode is de-
signed under comfort conditions
to provide cooler air out of the
panel outlets and warmer air from
the floor outlets.
Floor Mode
Air comes from the floor out-
lets. A slight amount of air is
directed through the defrost
and side window demister outlets.
Mix Mode
Air comes from the floor,
defrost and side window
demist outlets. This mode works
best in cold or snowy conditions.
Defrost Mode Air comes from the windshield
and side window demist out-
lets. Use Defrost mode with
maximum temperature settings for
best windshield and side window de-
frosting and defogging. When the de-
frost mode is selected, the blower level
may increase.
SYNC
13. Press the Sync soft-key to toggle
the Sync feature On/Off. The Sync
indicator is illuminated when this fea-
ture is enabled. Sync is used to syn-
chronize the passenger temperature
setting with the driver temperature
setting. Changing the passenger tem-
perature setting while in Sync will
automatically exit this feature.
CLIMATE CONTROL
FUNCTIONS
A/C (Air Conditioning)
The Air Conditioning (A/C) button
allows the operator to manually acti-
vate or deactivate the air conditioning
system. When the air conditioning system is turned on, cool dehumidi-
fied air will flow through the outlets
into the cabin. For improved fuel
economy, press the A/C button to turn
off the air conditioning and manually
adjust the blower and airflow mode
settings.
NOTE:
If fog or mist appears on the wind-
shield or side glass, select Defrost
mode and increase blower speed. If your air conditioning perfor-
mance seems lower than ex-
pected, check the front of the
A/C condenser (located in front
of the radiator), for an accumu-
lation of dirt or insects. Clean
with a gentle water spray from
behind the radiator and through
the condenser.
Recirculation When outside air contains
smoke, odors, or high hu-
midity, or if rapid cooling is
desired, you may wish to
recirculate interior air by pressing the
187
Page 194 of 336

Recirculation control button. The re-
circulation indicator will illuminate
when this button is selected. Push the
button a second time to turn off the
Recirculation mode and allow outside
air into the vehicle.
NOTE: In cold weather, use of Re-
circulation mode may lead to ex-
cessive window fogging. On sys-
tems with Manual Climate
Controls, the Recirculation mode
is not allowed in Defrost mode to
improve window clearing opera-
tion. Recirculation will be dis-
abled automatically if this mode is
selected. Attempting to use Recir-
culation while in this mode will
cause the LED in the control but-
ton to blink and then turn off.
AUTOMATIC
TEMPERATURE CONTROL
(ATC)
ATC Hard-keys are located in the cen-
ter of the instrument panel.
Soft-keys are accessible on the
Uconnect Touch™ system screen.Automatic Operation
1. Press the AUTO hard-key or soft-
key button (9) on the Automatic Tem-
perature Control (ATC) Panel.
2. Next, adjust the temperature you
would like the system to maintain by
adjusting the driver and passenger
temperature hard or soft control but-
tons (8, 9, 14, 15). Once the desired
temperature is displayed, the system
will achieve and automatically main-
tain that comfort level.
3. When the system is set up for your
comfort level, it is not necessary to
change the settings. You will experi-
ence the greatest efficiency by simply
allowing the system to function auto-
matically.
NOTE:
It is not necessary to move the
temperature settings for cold or
hot vehicles. The system auto-
matically adjusts the tempera-
ture, mode, and blower speed to
provide comfort as quickly as
possible. The temperature can be dis-
played in U.S. or Metric units by
selecting the US/M customer-
programmable feature. Refer to
the “Uconnect Touch™ System
Settings” in this section of the
manual.
To provide you with maximum com-
fort in the Automatic mode, during
cold start-ups the blower fan will re-
main on low until the engine warms
up. The blower will increase in speed
and transition into Auto mode.
Manual Operation
The system allows for manual selec-
tion of blower speed, air distribution
mode, A/C status and recirculation
control.
The blower fan speed can be set to any
fixed speed by adjusting the blower
control. The fan will now operate at a
fixed speed until additional speeds are
selected. This allows the front occu-
pants to control the volume of air
circulated in the vehicle and cancel
the Auto mode.
188
Page 195 of 336

The operator can also select the direc-
tion of the airflow by selecting one of
the available mode settings. A/C op-
eration and Recirculation control can
also be manually selected in Manual
operation.
OPERATING TIPS
NOTE:
Refer to the chart at the
end of this section for suggested
control settings for various weather
conditions.
Summer OperationThe engine cooling system in air-
conditioned vehicles must be protected
with a high-quality antifreeze coolant
to provide proper corrosion protection
and to protect against engine overheat-
ing. A solution of 50% glycol antifreeze
coolant and 50% water is recom-
mended. Refer to “Maintenance Proce-
dures” in “Maintaining Your Vehicle”
for proper coolant selection.
Winter OperationUse of the air Recirculation mode dur-
ing Winter months is not recommended
because it may cause window fogging.Vacation Storage
Any time you store your vehicle or
keep it out of service (i.e., vacation)
for two weeks or more, run the air
conditioning system at idle for about
five minutes in the fresh air and high
blower setting. This will ensure ad-
equate system lubrication to minimize
the possibility of compressor damage
when the system is started again.
Window Fogging
Interior fogging on the windshield can
be quickly removed by turning the
mode selector to Defrost. The Defrost/
Floor mode can be used to maintain a
clear windshield and provide suffi-
cient heating. If side window fogging
becomes a problem increase blower
speed. Vehicle windows tend to fog on
the inside in mild but rainy or humid
weather. NOTE:
Recirculate without A/C should
not be used for long periods, as
fogging may occur.Automatic Temperature Controls
(ATC) will automatically adjust
the climate control settings to re-
duce or eliminate window fogging
on the front windshield. When
this occurs, recirculation will be
unavailable.A/C Air Filter
The climate control system filters out-
side air containing dust, pollen and
some odors. Strong odors cannot be
totally filtered out. Refer to “Mainte-
nance Procedures” in “Maintaining
Your Vehicle” for filter replacement
instructions.
189