Lancia Thema 2013 Owner handbook (in English)
Manufacturer: LANCIA, Model Year: 2013, Model line: Thema, Model: Lancia Thema 2013Pages: 336, PDF Size: 3.87 MB
Page 51 of 336
WARNING!(Continued)
Do not attempt to modify any part
of your air bag system. The air bag
may inflate accidentally or may
not function properly if modifica-
tions are made. Take your vehicle
to an authorized dealer for any
air bag system service. If your seat,
including your trim cover and
cushion, needs to be serviced in
any way (including removal or
loosening/tightening of seat at-
tachment bolts), take the vehicle
to your authorized dealer. Only
manufacturer approved seat ac-
cessories may be used. If it is nec-
essary to modify the air bag system
for persons with disabilities, con-
tact your authorized dealer.
Air Bag Warning Light
You will want to have the
air bags ready to inflate for
your protection in a colli-
sion. The Air Bag Warning
Light monitors the internal circuits
and interconnecting wiring associated with air bag system electrical compo-
nents. While the air bag system is
designed to be maintenance free. If
any of the following occurs, have an
authorized dealer service the air bag
system immediately.
The Air Bag Warning Light does
not come on during the four to eight
seconds when the ignition is first
cycled to the ON/RUN.
The Air Bag Warning Light remains on after the four to eight-second
interval.
The Air Bag Warning Light comes on intermittently or remains on
while driving.
NOTE:
If the speedometer, ta-
chometer, or any engine related
gauges are not working, the Occu-
pant Restraint Controller (ORC)
may also be disabled. The air bags
may not be ready to inflate for your
protection. Promptly check the fuse
block for blown fuses. Refer to the
label located on the inside of the
fuse block cover for the proper air
bag fuses. See your authorized
dealer if the fuse is good.
Event Data Recorder (EDR)This vehicle is equipped with an event
data recorder (EDR). The main pur-
pose of an EDR is to record, in certain
crash or near crash-like situations,
such as an air bag deployment or hit-
ting a road obstacle, data that will
assist in understanding how a vehicle’s
systems performed. The EDR is de-
signed to record data related to vehicle
dynamics and safety systems for a
short period of time, typically 30 sec-
onds or less. The EDR in this vehicle is
designed to record such data as: How various systems in your ve-
hicle were operating;
Whether or not the driver and pas- senger safety belts were
buckled/fastened;
How far (if at all) the driver was depressing the accelerator and/or
brake pedal; and,
How fast the vehicle was traveling.
These data can help provide a better
understanding of the circumstances in
which crashes and injuries occur.
45
Page 52 of 336

NOTE:
EDR data are recorded by
your vehicle only if a non-trivial
crash situation occurs; no data are
recorded by the EDR under normal
driving conditions and no personal
data (e.g., name, gender, age, and
crash location) are recorded. How-
ever, other parties, such as law en-
forcement, could combine the EDR
data with the type of personally
identifying data routinely acquired
during a crash investigation.
To read data recorded by an EDR,
special equipment is required, and ac-
cess to the vehicle or the EDR is
needed. In addition to the vehicle
manufacturer, other parties, such as
law enforcement, that have the spe-
cial equipment, can read the informa-
tion if they have access to the vehicle
or the EDR. CHILD RESTRAINTS
Everyone in your vehicle needs to
be buckled up all the time, including
babies and children.
Children 12 years or younger should
ride properly buckled up in a rear
seat, if available. According to crash
statistics, children are safer when
properly restrained in the rear seats
rather than in the front.
WARNING!
“Extreme Hazard! Do not use a
rearward-facing child restraint
on a seat protected by an air bag
in front of it!” Refer to visor and
door shut face mounted labels for
information.
(Continued)
WARNING!(Continued)
In a collision, an unrestrained child, even a tiny baby, can be-
come a projectile inside the ve-
hicle. The force required to hold
even an infant on your lap could
become so great that you could
not hold the child, no matter how
strong you are. The child and
others could be badly injured.
Any child riding in your vehicle
should be in a proper restraint for
the child's size.
There are different sizes and types of
restraints for children from newborn
size to the child almost large enough
for an adult safety belt. Always check
the child seat Owner's Manual to en-
sure you have the correct seat for your
child. Use the restraint that is correct
for your child.
46
Page 53 of 336

Universal Child Seat Position Chart
Mass GroupSeating Position (or other site)
Front
Passenger Rear
Outboard Rear Center Intermediate
OutboardIntermediate
Center
Group up to 10 kg XUUN/AN/A
Group 0+ up to 13 kg XUUN/AN/A
Group I 9 to 18 kg XUUN/AN/A
Group II 15 to 25 kg XUUN/AN/A
Group III 22 to 36 kg XUUN/AN/A
Key of letters used in the table above:
U = Suitable for “universal” cat- egory restraints approved for use in
this mass group.
UF = Suitable for forward-facing “universal” category restraints ap-
proved for use in this mass group. L = Suitable for particular child
restraints given on attached list.
These restraints may be of the “spe-
cific vehicle”, “restricted or “semi-
universal” categories. B = Built-in restraint for this mass
group.
X = Seat position not suitable for children in this mass group.
47
Page 54 of 336
ISOFIX Fixture Chart
Vehicle ISOFIX Positions Chart
Mass Group Size
Class Fixture
Front
Passenger Rear
Outboard Rt. / Lt.
Rear
Center Inter-
mediate
Outboard Inter-
mediate Center Other
Sites
Carrycot F ISO/L1 X XX N/A N/A N/A
G ISO/L2 X XX N/A N/A N/A
(1) X N/A N/A N/A N/A N/A
0 — up to 10 kg E ISO/R1 X 1UF / 1UF 1UF N/A N/A N/A
(1) X N/A N/A N/A N/A N/A
0+ — up to 13 kg E ISO/R1 X 1UF / 1UF 1UF N/A N/A N/A
D ISO/R2 X 1UF / 1UF 1UF N/A N/A N/A
C ISO/R3 X 1UF / 1UF 1UF N/A N/A N/A
(1) X N/A N/A N/A N/A N/A
I – 9 to 18 kg D ISO/R2 X 1UF / 1UF 1UF N/A N/A N/A
C ISO/R3 X 1UF / 1UF 1UF N/A N/A N/A
B ISO/F2 X 1UF / 1UF 1UF N/A N/A N/A
B1 ISO/ F2X X
1UF / 1UF 1UF N/A N/A N/A
A ISO/F3 X 1UF / 1UF 1UF N/A N/A N/A
(1) X N/A N/A N/A N/A N/A
48
Page 55 of 336

Vehicle ISOFIX Positions Chart
Mass Group Size
Class Fixture
Front
Passenger Rear
Outboard Rt. / Lt.
Rear
Center Inter-
mediate
Outboard Inter-
mediate Center Other
Sites
II – 15 to 25 kg (1) XN/A N/A N/A N/A N/A
III – 22 to 36 kg (1) XN/A N/A N/A N/A N/A
Key of letters used in the table above:
(1) For the CRS which do not carry the ISO/XX size class identification
(A to G), for the applicable mass
group, the car manufacturer shall
indicate the vehicle specific ISOFIX
child restraint system(s) recom-
mended for each position.
1UF = Suitable for ISOFIX forward child restraint systems of “univer-
sal” category approved for use in
the mass group.
1L = suitable for particular ISOFIX child restraint systems (CRS) given
in the attached list. These ISOFIX
CRS are those of the “specific
vehicle”, “restricted” or “semi-
universal” categories. X = ISOFIX position not suitable
for ISOFIX child restraint systems
in this mass group and/or this size
class.
Infants And Child Restraints
Safety experts recommend that children
ride rearward-facing in the vehicle until
they are two years old or until they
reach either the height or weight limit of
their rear facing child safety seat. Two
types of child restraints can be used
rearward-facing: infant carriers and
convertible child seats.The infant carrier is only used
rearward-facing in the vehicle. It is
recommended for children from birth
until they reach the weight or height
limit of the infant carrier. Convertible child seats can be used either
rearward-facing or forward-facing in
the vehicle. Convertible child seats
often have a higher weight limit in the
rearward-facing direction than infant
carriers do, so they can be used
rearward-facing by children who have
outgrown their infant carrier but are
still less than at least two years old.
Children should remain rearward-
facing until they reach the highest
weight or height allowed by their con-
vertible child seat. Both types of child
restraints are held in the vehicle by the
lap/shoulder belt or the ISOFIX child
restraint anchor system. Refer to
“ISOFIX — Child Seat Anchorage
System”.
49
Page 56 of 336
WARNING!
Rearward-facing child seats must
never be used in the front seat of a
vehicle with the front passenger air
bag. An air bag deployment could
cause severe injury or death to in-
fants in this position.
Older Children And Child
RestraintsChildren who are two years old or who
have outgrown their rear-facing con-
vertible child seat can ride forward-
facing in the vehicle. Forward-facing
child seats and convertible child seats
used in the forward-facing direction
are for children who are over two years
old or who have outgrown the rear-
facing weight or height limit of their
rear-facing convertible child seat. Chil-
dren should remain in a forward-facing
child seat with a harness for as long as
possible, up to the highest weight or
height allowed by the child seat. These
child seats are also held in the vehicle
by the lap/shoulder belt or the ISOFIX
child restraint anchorage system. Refer
to “ISOFIX — Child Seat Anchorage
System”.
All children whose weight or height is
above the forward-facing limit for
the child seat should use a belt-
positioning booster seat until the
vehicle’s seat belts fit properly. If the
child cannot sit with knees bent over
the vehicle's seat cushion while the
child's back is against the seatback,
they should use a belt-positioning
booster seat. The child and belt-
positioning booster seat are held in
the vehicle by the lap/shoulder belt.
Children Too Large For Booster
Seats
Children who are large enough to
wear the shoulder belt comfortably
and whose legs are long enough to
bend over the front of the seat when
their back is against the seatback
should use the lap/shoulder belt in a
rear seat.
Make sure that the child is upright in the seat.
The lap portion should be low on the hips and as snug as possible. Check belt fit periodically. A child's
squirming or slouching can move
the belt out of position.
If the shoulder belt contacts the face or neck, move the child closer
to the center of the vehicle. Never
allow a child to put the shoulder
belt under an arm or behind their
back.
WARNING!
Improper installation can lead tofailure of an infant or child re-
straint. It could come loose in a
collision. The child could be
badly injured or killed. Follow
the manufacturer's directions ex-
actly when installing an infant or
child restraint.
A rearward-facing child restraint should only be used in a rear seat.
A rearward-facing child restraint
in the front seat may be struck by
a deploying passenger air bag,
which may cause severe or fatal
injury to the infant.
50
Page 57 of 336
Here are some tips on getting the
most out of your child restraint:
Before buying any restraint system,make sure that it has a label certi-
fying that it meets all applicable
Safety Standards. LANCIA also
recommends that you make sure
that you can install the child re-
straint in the vehicle where you will
use it before you buy it.
The restraint must be appropriate for your child's weight and height.
Check the label on the restraint for
weight and height limits.
Carefully follow the instructions that come with the restraint. If you
install the restraint improperly, it
may not work when you need it.
Buckle the child into the seat ac- cording to the child restraint manu-
facturer's directions.WARNING!
When your child restraint is not in
use, secure it in the vehicle with
the seat belt or remove it from the
vehicle. Do not leave it loose in the
(Continued)
WARNING!(Continued)
vehicle. In a sudden stop or colli-
sion, it could strike the occupants
or seatbacks and cause serious per-
sonal injury.
ISOFIX — Child Seat Anchorage
System
Your vehicle's rear seat is equipped
with the child restraint anchorage
system called ISOFIX. The ISOFIX
system provides for the installation of
the child restraint without using the
vehicle's seat belts, instead securing
the child restraint using lower anchor-
ages and upper tether straps from the
child restraint to the vehicle structure.
ISOFIX-compatible child restraint
systems are now available. However,
because the lower anchorages are to
be introduced over a period of years,
child restraint systems having attach-
ments for those anchorages will con-
tinue to have features for installation
using the vehicle's seat belts. Child
restraints having tether straps and
hooks for connection to the top tether
anchorages have been available for some time. For some older child re-
straints, many child restraint manu-
facturers offer add-on tether strap
kits or retrofit kits. You are urged to
take advantage of all the available
attachments provided with your child
restraint in any vehicle.
All three rear-seating positions have
lower anchorages that are capable of
accommodating ISOFIX-compatible
child seats. You should never install
ISOFIX-compatible child seats so that
two seats share a common lower an-
chorage. If installing child seats in
adjacent rear-seating positions, or if
your child restraints are not ISOFIX-
compatible, install the restraints using
the vehicle's seat belts.
ISOFIX Anchorages
51
Page 58 of 336

Installing The ISOFIX-
Compatible Child Restraint
System
We urge you to follow the manufac-
turer's directions carefully when in-
stalling your child restraint. Not all
child restraint systems will be in-
stalled as described here. Again, care-
fully follow the installation instruc-
tions that are provided with the child
restraint system.The rear seat lower anchor-
ages are round bars located
at the rear of the seat cush-
ion where it meets the seat-
back and are located just below the
button with the anchorage symbol on
the rear seat, but are not visible. You
will easily feel them if you run your
finger along the intersection of the
seatback and seat cushion surfaces.
In addition, there are tether
strap anchorages behind
each rear seating position
located in the panel be-
tween the rear seatback and the rear window. These tether strap anchor-
ages are under a plastic cover with
this symbol on it.
Many, but not all, restraint systems
will be equipped with separate straps
on each side, with each having a
hook or connector for attachment to
the lower anchorage and a means of
adjusting the tension in the strap.
Forward-facing toddler restraints and
some rear-facing infant restraints will
also be equipped with a tether strap, a
hook for attachment to the tether strap
anchorage and a means of adjusting
the tension of the strap.You will first loosen the child seat
adjusters on the lower straps and on
the tether strap so that you can more
easily attach the hooks or connectors
to the vehicle anchorages. Next, at-
tach the lower hooks or connectors
over the top of the seat cover material.
Then, rotate the tether anchorage
cover directly behind the seat where
you are placing the child restraint and
attach the tether strap to the anchor-
age, being careful to route the tether
strap to provide the most direct path
between the anchor and the child re-
straint. Finally, tighten all three
straps as you push the child restraint
rearward and downward into the seat,
removing slack in the straps accord-
ing to the child restraint manufactur-
er's instructions.
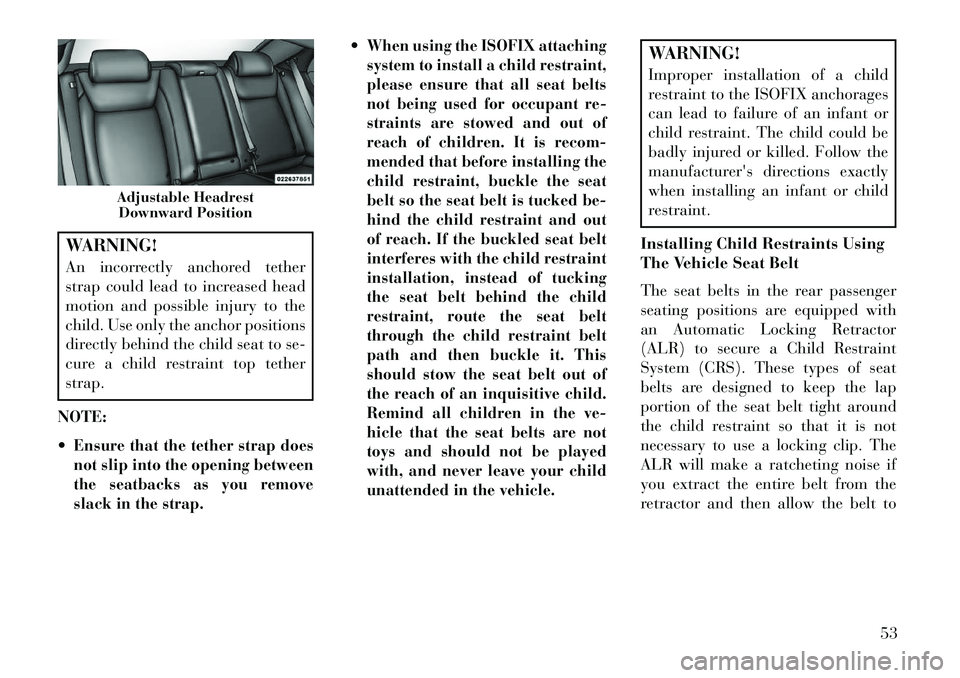
For center seating position route the
tether strap over the seatback and
adjustable headrest (with the head-
rest in the full down position) then
attach the hook to the tether anchor
located in the panel between the rear
seatback and the rear window.
Adjustable Headrest Release
Push Button
52
Page 59 of 336
WARNING!
An incorrectly anchored tether
strap could lead to increased head
motion and possible injury to the
child. Use only the anchor positions
directly behind the child seat to se-
cure a child restraint top tether
strap.
NOTE:
Ensure that the tether strap does
not slip into the opening between
the seatbacks as you remove
slack in the strap.
When using the ISOFIX attaching
system to install a child restraint,
please ensure that all seat belts
not being used for occupant re-
straints are stowed and out of
reach of children. It is recom-
mended that before installing the
child restraint, buckle the seat
belt so the seat belt is tucked be-
hind the child restraint and out
of reach. If the buckled seat belt
interferes with the child restraint
installation, instead of tucking
the seat belt behind the child
restraint, route the seat belt
through the child restraint belt
path and then buckle it. This
should stow the seat belt out of
the reach of an inquisitive child.
Remind all children in the ve-
hicle that the seat belts are not
toys and should not be played
with, and never leave your child
unattended in the vehicle.
WARNING!
Improper installation of a child
restraint to the ISOFIX anchorages
can lead to failure of an infant or
child restraint. The child could be
badly injured or killed. Follow the
manufacturer's directions exactly
when installing an infant or child
restraint.
Installing Child Restraints Using
The Vehicle Seat Belt
The seat belts in the rear passenger
seating positions are equipped with
an Automatic Locking Retractor
(ALR) to secure a Child Restraint
System (CRS). These types of seat
belts are designed to keep the lap
portion of the seat belt tight around
the child restraint so that it is not
necessary to use a locking clip. The
ALR will make a ratcheting noise if
you extract the entire belt from the
retractor and then allow the belt to
Adjustable Headrest Downward Position
53
Page 60 of 336

retract into the retractor. For addi-
tional information on ALR, refer to
“Automatic Locking Mode”. The
chart below defines the seating posi-
tions with an Automatic Locking Re-
tractor (ALR) or a cinching latch
plate.
Driver Center Passen-ger
First
Row N/A N/A N/A
Second
Row ALR ALR ALR
N/A — Not ApplicableALR — Automatic Locking RetractorInstalling a Child Restraint with an
ALR:
1. To install a child restraint with
ALR, first, pull enough of the seat belt
webbing from the retractor to route it
through the belt path of the child re-
straint. Slide the latch plate into the
buckle until you hear a “click.” Next,
extract all the seat belt webbing out of
the retractor and then allow the belt to
retract into the retractor. As the belt retracts, you will hear a ratcheting
sound. This indicates the safety belt is
now in the Automatic Locking mode.
2. Finally, pull on any excess web-
bing to tighten the lap portion around
the child restraint. Any seat belt sys-
tem will loosen with time, so check the
belt occasionally, and pull it tight if
necessary.
In the rear center seat, you may
have trouble tightening the lap/
shoulder belt on the child restraint
because the buckle or latch plate is
too close to the belt path opening on
the restraint. Disconnect the latch
plate from the buckle and twist the
short buckle-end belt several times
to shorten it. Insert the latch plate
into the buckle with the release but-
ton facing out.
If the belt still can’t be tightened, or
if pulling and pushing on the re-
straint loosens the belt, disconnect
the latch plate from the buckle, turn
the buckle around, and insert the
latch plate into the buckle again.
If you still can’t make the child re-
straint secure, try a different seating
position.
To attach a child restraint tether strap:1. Rotate the cover over the anchor
directly behind the seat where you are
placing the child restraint.
2. Route the tether strap to provide
the most direct path for the strap be-
tween the anchor and the child seat.
3. Attach the tether strap hook (A) of
the child restraint to the anchor (B)
and remove slack in the tether strap
according to the child restraint manu-
facturer's instructions.
Tether Strap Mounting
1 — Cover A — Tether Strap
Hook
3 — Attaching
Strap B — Tether Anchor
54