key Lancia Thema 2013 Owner handbook (in English)
[x] Cancel search | Manufacturer: LANCIA, Model Year: 2013, Model line: Thema, Model: Lancia Thema 2013Pages: 336, PDF Size: 3.87 MB
Page 183 of 336
Lights
After pressing the Lights soft-key the
following settings will be available.
Headlight Off DelayWhen this feature is selected, the driver
can choose to have the headlights re-
main on for 0, 30, 60, or 90 seconds
when exiting the vehicle. To change the
Headlight Off Delay status touch the 0,
30, 60 or 90 soft-key. Then touch the
arrow back soft-key. Headlight Illumination On
Approach
When this feature is selected, the
headlights will activate and remain on
for 0, 30, 60, or 90 seconds when the
doors are unlocked with the Remote
Keyless Entry (RKE) transmitter. To
change the Illuminated Approach sta-
tus, touch the + or - soft-key to select
your desired time interval. Touch the
back arrow soft-key to return to the
previous menu. Headlights With Wipers (for
versions/markets, where provided)
When this feature is selected, and the
headlight switch is in the AUTO posi-
tion, the headlights will turn on
approximately 10 seconds after the
wipers are turned on. The headlights
will also turn off when the wipers are
turned off if they were turned on by
this feature. To make your selection,
touch the Headlights With Wipers
soft-key, until a check-mark appears
next to setting, showing that setting
has been selected. Touch the back
arrow soft-key to return to the previ-
ous menu.
Auto Dim High Beams
“SmartBeam™” (for versions/
markets, where provided)
When this feature is selected, the high
beam headlights will deactivate auto-
matically under certain conditions. To
make your selection, touch the Auto
High Beams soft-key, until a check-
mark appears next to setting, showing
that setting has been selected. Touch
the back arrow soft-key to return to the previous menu. Refer to “Lights/
SmartBeam™ (for versions/markets,
where provided)” in “Understanding
The Features Of Your Vehicle” for fur-
ther information.
Daytime Running Lights (for
versions/markets, where provided)
When this feature is selected, the
headlights will turn on whenever the
engine is running. To make your se-
lection, touch the Daytime Running
Lights soft-key, until a check-mark
appears next to setting, showing that
setting has been selected. Touch the
back arrow soft-key to return to the
previous menu.
Steering Directed Lights (for
versions/markets, where provided)When this feature is selected, the head-
lights turn relative to a change in direc-
tion of the steering wheel. To make
your selection, touch the Steering Di-
rected Lights soft-key, until a check-
mark appears next to setting, showing
that setting has been selected. Touch
the back arrow soft-key to return to the
previous menu.
177
Page 184 of 336

Headlight Dipped Beam (Traffic
Changeover) (for versions/markets,
where provided)Low beam headlights have more con-
trol of upward light and direct most of
their light downward and either to the
left for right hand drive countries or to
the right for left hand drive countries to
provide safe forward visibility without
excessive glare.Doors & Locks
After pressing the Doors & Locks soft-
key the following settings will be
available.
Auto Unlock On ExitWhen this feature is selected, all doors
will unlock when the vehicle is stopped
and the transmission is in the PARK or
NEUTRAL position and the driver's
door is opened. To make your selection,
touch the Auto Unlock On Exit soft-
key, until a check-mark appears next
to setting, showing that setting has
been selected. Touch the back arrow
soft-key to return to the previous
menu.
1st Press Of Key Fob Unlocks
When 1st Press Of Key Fob Unlocks is
selected, only the driver's door will
unlock on the first press of the Remote
Keyless Entry (RKE) transmitter UN-
LOCK button. When 1st Press Of Key
Fob Unlocks is selected, you must
press the RKE transmitter UNLOCK
button twice to unlock the passenger's
doors. When Unlock All Doors On 1st
Press is selected, all of the doors will
unlock on the first press of the RKE
transmitter UNLOCK button.
NOTE: If the vehicle is pro-
grammed 1st Press Of Key Fob Un-
locks, all doors will unlock no
matter which Passive Entry
equipped door handle is grasped.
If 1st Press Of Key Fob Unlocks is
programmed, only the driver’s
door will unlock when the driver’s
door is grasped. With Passive En-
try, if 1st Press Of Key Fob Unlocks
is programmed touching the
handle more than once will only
result in the driver’s door opening.
If driver door first is selected, oncethe driver door is opened, the inte-
rior door lock/unlock switch can
be used to unlock all doors (or use
RKE transmitter).
Passive Entry
This feature allows you to lock and
unlock the vehicle’s door(s) without
having to press the Remote Keyless
Entry (RKE) transmitter lock or un-
lock buttons. To make your selection,
touch the Passive Entry soft-key, until
a check-mark appears next to setting,
showing that setting has been selected.
Touch the back arrow soft-key to re-
turn to the previous menu. Refer to
“Keyless Enter-N-Go” in “Things To
Know Before Starting Your Vehicle”. Personal Settings Linked To
FOB (for versions/markets,
where provided)This feature provides automatic driver
seat positioning to enhance driver mo-
bility when entering and exiting the
vehicle. To make your selection, touch
the Personal Settings Linked To FOB
soft-key, until a check-mark appears
next to setting, showing that setting
178
Page 185 of 336
has been selected. Touch the back
arrow soft-key to return to the previous
menu.NOTE:
The seat will return to the
memorized seat location (if Recall
Memory with Remote Key Unlock is
set to ON) when the Remote Keyless
Entry (RKE) transmitter is used to
unlock the door. Refer to “Driver
Memory Seat” in “Understanding
The Features Of Your Vehicle” for
further information.
Engine Off Options
After pressing the Engine Off Options
soft-key the following settings will be
available.
Easy Exit Seat (for versions/
markets, where provided)This feature provides automatic driver
seat positioning to enhance driver
mobility when entering and exiting the
vehicle. To make your selection, touch
the Easy Exit Seats soft-key, until a
check-mark appears next to setting,
showing that setting has been selected.
Touch the back arrow soft-key to re-
turn to the previous menu.
Engine Off Power Delay (for
versions/markets, where provided)When this feature is selected, the power
window switches, radio, Uconnect™
phone system (for versions/markets,
where provided), DVD video system
(for versions/markets, where pro-
vided), power sunroof (for versions/
markets, where provided), and power
outlets will remain active for up to
10 minutes after the ignition is cycled
to OFF.
Opening either front door will
cancel this feature. To change the
Engine Off Power Delay status touch
the 0 seconds, 45 seconds, 5 minutes or
10 minutes soft-key. Then touch the
arrow back soft-key.
Headlight Off Delay
When this feature is selected, the
driver can choose to have the head-
lights remain on for 0, 30, 60, or
90 seconds when exiting the vehicle.
To change the Headlight Off Delay
status touch the + or - soft-key to
select your desired time interval.
Touch the back arrow soft-key to re-
turn to the previous menu. Compass Settings
After pressing the Compass Settings
soft-key the following settings will be
available.
Variance
Compass Variance is the difference
between Magnetic North and Geo-
graphic North. To compensate for
the differences the variance should be
set for the zone where the vehicle is
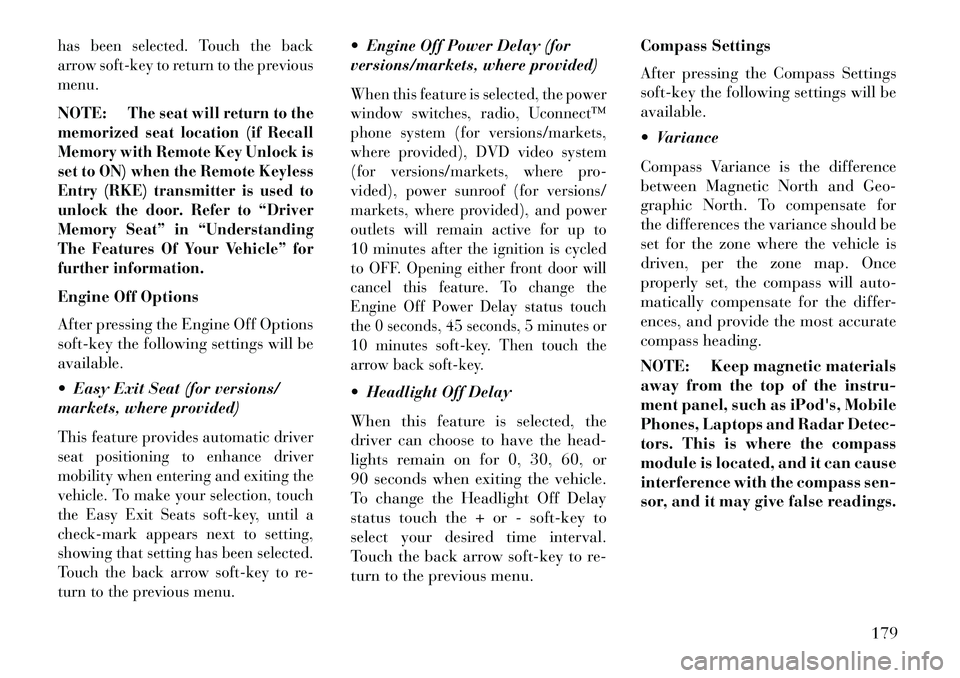
driven, per the zone map. Once
properly set, the compass will auto-
matically compensate for the differ-
ences, and provide the most accurate
compass heading.
NOTE: Keep magnetic materials
away from the top of the instru-
ment panel, such as iPod's, Mobile
Phones, Laptops and Radar Detec-
tors. This is where the compass
module is located, and it can cause
interference with the compass sen-
sor, and it may give false readings.
179
Page 186 of 336

Perform Compass CalibrationTouch the Calibration soft-key to
change this setting. This compass is
self-calibrating, which eliminates the
need to manually reset the compass.
When the vehicle is new, the compass
may appear erratic and the EVIC will
display CAL until the compass is
calibrated. You may also calibrate the
compass by pressing the ON soft-key
and completing one or more 360-de-
gree turns (in an area free from large
metal or metallic objects) until the CAL
indicator displayed in the EVIC turns
off. The compass will now function nor-
mally.
Audio
After pressing the Audio soft-key the
following settings will be available.
Balance/Fade
When in this display you may adjust
the Balance and Fade settings.
Compass Variance Map
180
Page 187 of 336
Equalizer
When in this display you may adjust
the Bass, Mid and Treble settings.
Adjust the settings with the + and –
setting soft-keys or by selecting any
point on the scale between the + and –
soft-keys. Then touch the arrow back
soft-key.
NOTE: Bass/Mid/Treble allow
you to simply slide your finger up
or down to change the setting as
well as touch directly on the de-
sired setting.
Speed Adjusted VolumeThis feature increases or decreases
volume relative to vehicle speed. To
change the Speed Adjusted Volume
touch the Off, 1, 2 or 3 soft-key. Then
touch the arrow back soft-key. Music Info Cleanup (for versions/
markets, where provided)
This feature helps organize music files
for optimized music navigation. To
make your selection, touch the Music
Info Cleanup soft-key, select On or Off
followed by pressing the arrow back
soft-key. Surround Sound (for versions/
markets, where provided)
This feature provides simulated sur-
round sound mode. To make your se-
lection, touch the Surround Sound
soft-key, select On or Off followed by
pressing the arrow back soft-key.
Phone/Bluetooth
After pressing the Phone/Bluetooth
soft-key the following settings will be
available.
Paired Devices
This feature shows which phones are
paired to the Phone/Bluetooth system.
For further information, refer to the
Uconnect Touch™ Supplement.SOUND SYSTEMS
Refer to your Sound Systems Booklet.
NAVIGATION SYSTEM
(for versions/markets,
where provided)
Refer to your Uconnect Touch™ User
Manual.
SETTING THE ANALOG
CLOCK
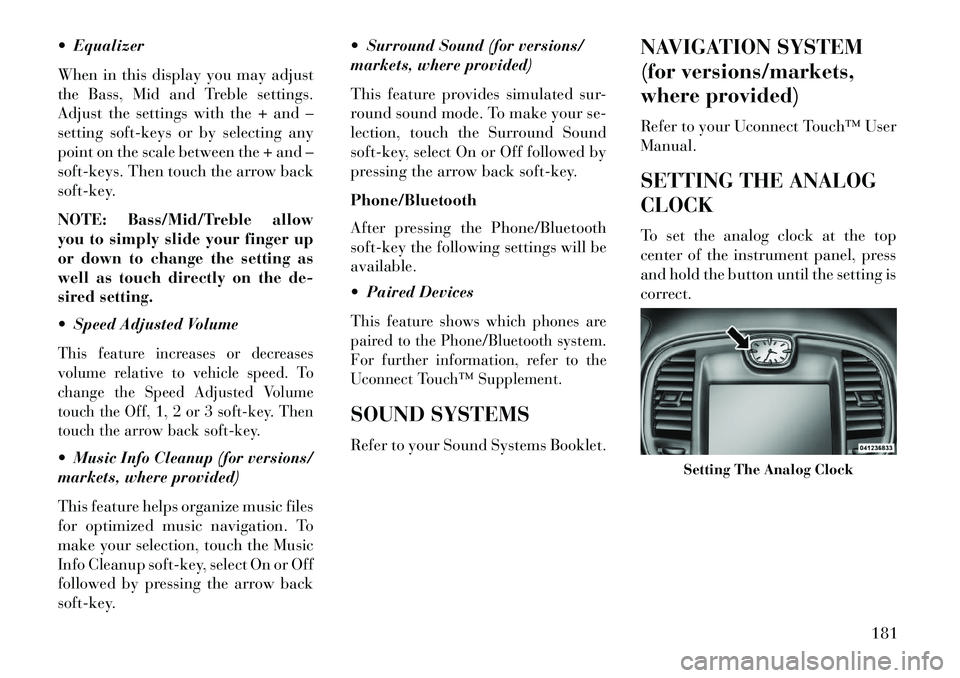
To set the analog clock at the top
center of the instrument panel, press
and hold the button until the setting is
correct.
Setting The Analog Clock
181
Page 190 of 336
CD/DVD DISC
MAINTENANCE
To keep a CD/DVD in good condition,
take the following precautions:
1. Handle the disc by its edge; avoid
touching the surface.
2. If the disc is stained, clean the
surface with a soft cloth, wiping from
center to edge.
3. Do not apply paper or tape to the
disc; avoid scratching the disc.
4. Do not use solvents such as ben-
zene, thinner, cleaners, or anti-static
sprays.
5. Store the disc in its case after play-
ing.
6. Do not expose the disc to direct
sunlight.
7. Do not store the disc where tem-
peratures may become too high.
NOTE: If you experience diffi-
culty in playing a particular disc, it
may be damaged (i.e., scratched,
reflective coating removed, a hair,moisture or dew on the disc) over-
sized, or have protection encoding.
Try a known good disc before con-
sidering disc player service.
RADIO OPERATION AND
MOBILE PHONES
Under certain conditions, the mobile
phone being on in your vehicle can
cause erratic or noisy performance
from your radio. This condition may
be lessened or eliminated by relocat-
ing the mobile phone antenna. This
condition is not harmful to the radio.
If your radio performance does not
satisfactorily “clear” by the reposi-
tioning of the antenna, it is recom-
mended that the radio volume be
turned down or off during mobile
phone operation.
CLIMATE CONTROLS
The air conditioning and heating sys-
tem is designed to make you comfort-
able in all types of weather. This sys-
tem can be operated through either
the Automatic Climate Controls on
the instrument panel or through the
Uconnect Touch™ system display.When the Uconnect Touch™ system
is in different modes (Radio, Player,
Settings, More, etc.) the driver and
passenger temperature settings will be
indicated at the top of the display.
GENERAL OVERVIEW
Hard-Keys
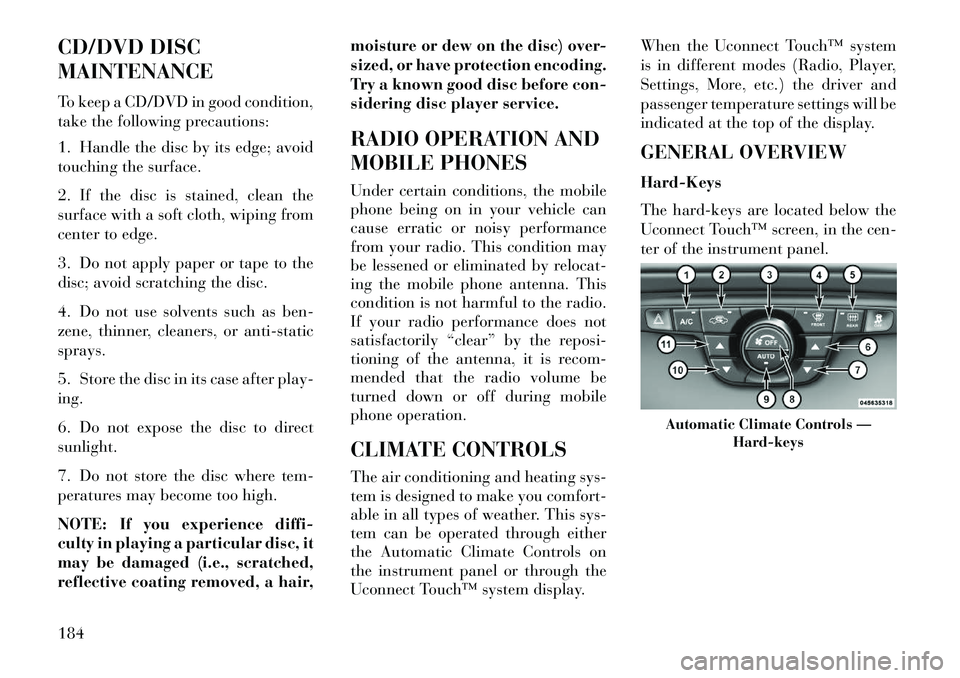
The hard-keys are located below the
Uconnect Touch™ screen, in the cen-
ter of the instrument panel.
Automatic Climate Controls —
Hard-keys
184
Page 191 of 336
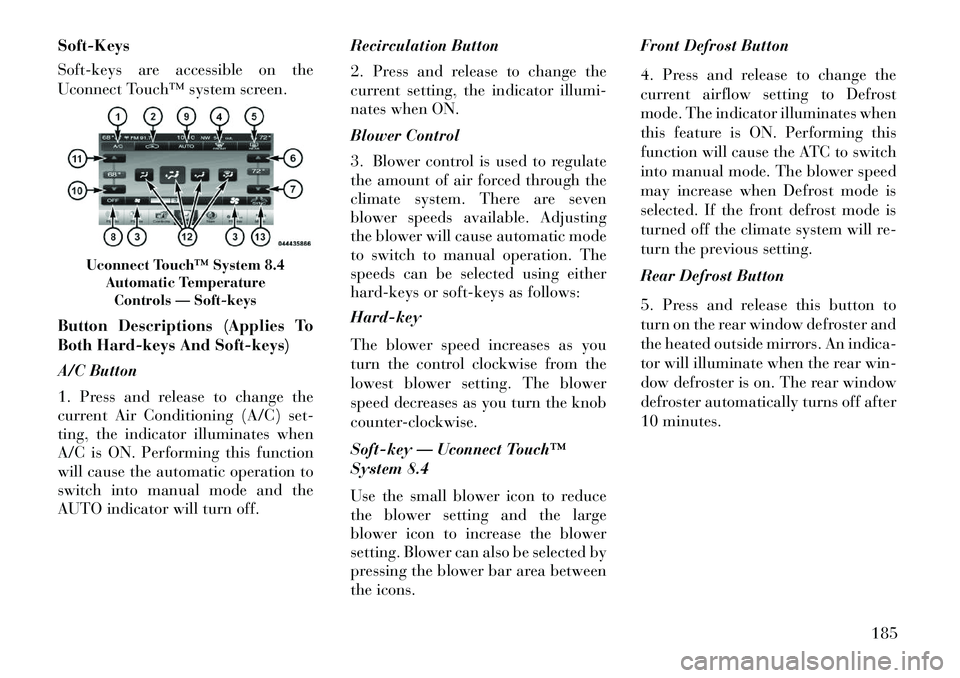
Soft-Keys
Soft-keys are accessible on the
Uconnect Touch™ system screen.
Button Descriptions (Applies To
Both Hard-keys And Soft-keys)
A/C Button
1. Press and release to change the
current Air Conditioning (A/C) set-
ting, the indicator illuminates when
A/C is ON. Performing this function
will cause the automatic operation to
switch into manual mode and the
AUTO indicator will turn off.Recirculation Button
2. Press and release to change the
current setting, the indicator illumi-
nates when ON.
Blower Control
3. Blower control is used to regulate
the amount of air forced through the
climate system. There are seven
blower speeds available. Adjusting
the blower will cause automatic mode
to switch to manual operation. The
speeds can be selected using either
hard-keys or soft-keys as follows:
Hard-key
The blower speed increases as you
turn the control clockwise from the
lowest blower setting. The blower
speed decreases as you turn the knob
counter-clockwise.
Soft-key — Uconnect Touch™
System 8.4
Use the small blower icon to reduce
the blower setting and the large
blower icon to increase the blower
setting. Blower can also be selected by
pressing the blower bar area between
the icons.Front Defrost Button
4. Press and release to change the
current airflow setting to Defrost
mode. The indicator illuminates when
this feature is ON. Performing this
function will cause the ATC to switch
into manual mode. The blower speed
may increase when Defrost mode is
selected. If the front defrost mode is
turned off the climate system will re-
turn the previous setting.
Rear Defrost Button
5. Press and release this button to
turn on the rear window defroster and
the heated outside mirrors. An indica-
tor will illuminate when the rear win-
dow defroster is on. The rear window
defroster automatically turns off after
10 minutes.
Uconnect Touch™ System 8.4
Automatic TemperatureControls — Soft-keys
185
Page 193 of 336

down or side to side to regulate air-
flow direction. There is a shut off
wheel located below the air vanes to
shut off or adjust the amount of air-
flow from these outlets.
Bi-Level ModeAir comes from the instrument
panel outlets and floor outlets.
A slight amount of air is di-
rected through the defrost and side
window demister outlets.
NOTE: BI-LEVEL mode is de-
signed under comfort conditions
to provide cooler air out of the
panel outlets and warmer air from
the floor outlets.
Floor Mode
Air comes from the floor out-
lets. A slight amount of air is
directed through the defrost
and side window demister outlets.
Mix Mode
Air comes from the floor,
defrost and side window
demist outlets. This mode works
best in cold or snowy conditions.
Defrost Mode Air comes from the windshield
and side window demist out-
lets. Use Defrost mode with
maximum temperature settings for
best windshield and side window de-
frosting and defogging. When the de-
frost mode is selected, the blower level
may increase.
SYNC
13. Press the Sync soft-key to toggle
the Sync feature On/Off. The Sync
indicator is illuminated when this fea-
ture is enabled. Sync is used to syn-
chronize the passenger temperature
setting with the driver temperature
setting. Changing the passenger tem-
perature setting while in Sync will
automatically exit this feature.
CLIMATE CONTROL
FUNCTIONS
A/C (Air Conditioning)
The Air Conditioning (A/C) button
allows the operator to manually acti-
vate or deactivate the air conditioning
system. When the air conditioning system is turned on, cool dehumidi-
fied air will flow through the outlets
into the cabin. For improved fuel
economy, press the A/C button to turn
off the air conditioning and manually
adjust the blower and airflow mode
settings.
NOTE:
If fog or mist appears on the wind-
shield or side glass, select Defrost
mode and increase blower speed. If your air conditioning perfor-
mance seems lower than ex-
pected, check the front of the
A/C condenser (located in front
of the radiator), for an accumu-
lation of dirt or insects. Clean
with a gentle water spray from
behind the radiator and through
the condenser.
Recirculation When outside air contains
smoke, odors, or high hu-
midity, or if rapid cooling is
desired, you may wish to
recirculate interior air by pressing the
187
Page 194 of 336

Recirculation control button. The re-
circulation indicator will illuminate
when this button is selected. Push the
button a second time to turn off the
Recirculation mode and allow outside
air into the vehicle.
NOTE: In cold weather, use of Re-
circulation mode may lead to ex-
cessive window fogging. On sys-
tems with Manual Climate
Controls, the Recirculation mode
is not allowed in Defrost mode to
improve window clearing opera-
tion. Recirculation will be dis-
abled automatically if this mode is
selected. Attempting to use Recir-
culation while in this mode will
cause the LED in the control but-
ton to blink and then turn off.
AUTOMATIC
TEMPERATURE CONTROL
(ATC)
ATC Hard-keys are located in the cen-
ter of the instrument panel.
Soft-keys are accessible on the
Uconnect Touch™ system screen.Automatic Operation
1. Press the AUTO hard-key or soft-
key button (9) on the Automatic Tem-
perature Control (ATC) Panel.
2. Next, adjust the temperature you
would like the system to maintain by
adjusting the driver and passenger
temperature hard or soft control but-
tons (8, 9, 14, 15). Once the desired
temperature is displayed, the system
will achieve and automatically main-
tain that comfort level.
3. When the system is set up for your
comfort level, it is not necessary to
change the settings. You will experi-
ence the greatest efficiency by simply
allowing the system to function auto-
matically.
NOTE:
It is not necessary to move the
temperature settings for cold or
hot vehicles. The system auto-
matically adjusts the tempera-
ture, mode, and blower speed to
provide comfort as quickly as
possible. The temperature can be dis-
played in U.S. or Metric units by
selecting the US/M customer-
programmable feature. Refer to
the “Uconnect Touch™ System
Settings” in this section of the
manual.
To provide you with maximum com-
fort in the Automatic mode, during
cold start-ups the blower fan will re-
main on low until the engine warms
up. The blower will increase in speed
and transition into Auto mode.
Manual Operation
The system allows for manual selec-
tion of blower speed, air distribution
mode, A/C status and recirculation
control.
The blower fan speed can be set to any
fixed speed by adjusting the blower
control. The fan will now operate at a
fixed speed until additional speeds are
selected. This allows the front occu-
pants to control the volume of air
circulated in the vehicle and cancel
the Auto mode.
188
Page 197 of 336

5
STARTING AND OPERATING
STARTING PROCEDURES . . . . . . . . . . . . . . . . . .195 KEYLESS ENTERNGO™ . . . . . . . . . . . . . . .195
NORMAL STARTING — GASOLINE ENGINE . . .195 EXTREME COLD WEATHER(BELOW �29°C) . . . . . . . . . . . . . . . . . . . . . . . .196
IF ENGINE FAILS TO START . . . . . . . . . . . . . .196
After Starting . . . . . . . . . . . . . . . . . . . . . . . . . .197
NORMAL STARTING – DIESEL ENGINE . . . . .197
AUTOMATIC TRANSMISSION . . . . . . . . . . . . . . .199
KEY IGNITION PARK INTERLOCK . . . . . . . . .200
BRAKE/TRANSMISSION SHIFTINTERLOCK SYSTEM . . . . . . . . . . . . . . . . . . .200
EIGHT -SPEED AUTOMATIC
TRANSMISSION – 3.6L ENGINE . . . . . . . . . . .200
GEAR RANGES . . . . . . . . . . . . . . . . . . . . . . . .201
FIVE-SPEED AUTOMATIC TRANSMISSION – 3.0L DIESEL ENGINE . . . .204
GEAR RANGES . . . . . . . . . . . . . . . . . . . . . . . .205
AUTOSTICK® (for versions/markets, where provided) . . . . . . . . . . . . . . . . . . . . . . . . .208
OPERATION – 3.6L ENGINE . . . . . . . . . . . . . . .208
OPERATION – 3.0L DIESEL ENGINE . . . . . . . .209
191