set clock Lancia Thema 2013 Owner handbook (in English)
[x] Cancel search | Manufacturer: LANCIA, Model Year: 2013, Model line: Thema, Model: Lancia Thema 2013Pages: 336, PDF Size: 3.87 MB
Page 115 of 336
WARNING!
Be sure the hood is fully latched
before driving your vehicle. If the
hood is not fully latched, it could
open when the vehicle is in motion
and block your vision. Failure to
follow this warning could result in
serious injury or death.
LIGHTS
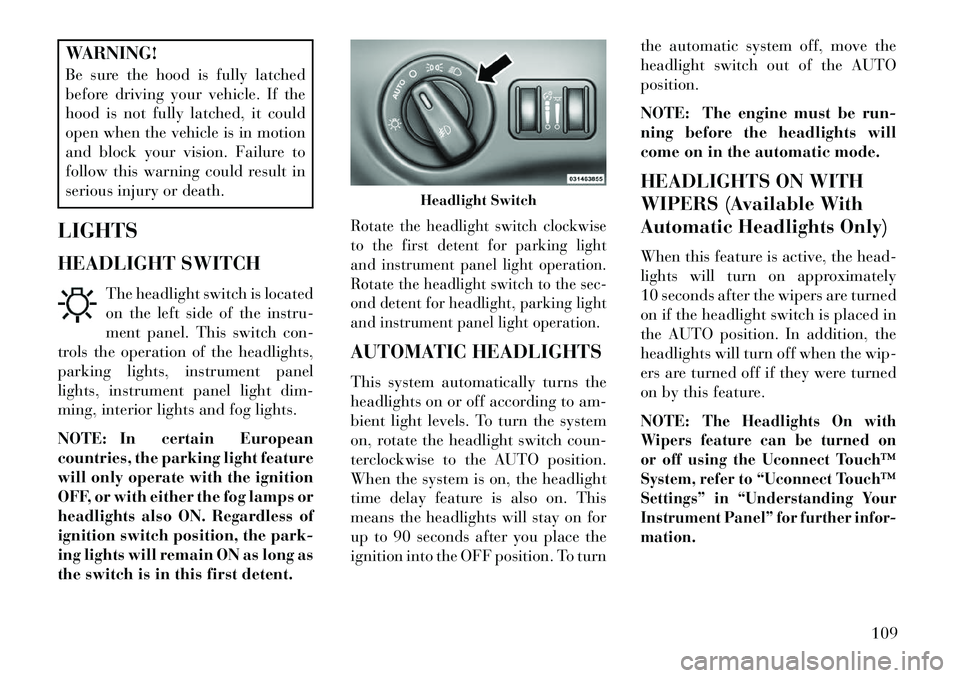
HEADLIGHT SWITCH The headlight switch is located
on the left side of the instru-
ment panel. This switch con-
trols the operation of the headlights,
parking lights, instrument panel
lights, instrument panel light dim-
ming, interior lights and fog lights.
NOTE: In certain European
countries, the parking light feature
will only operate with the ignition
OFF, or with either the fog lamps or
headlights also ON. Regardless of
ignition switch position, the park-
ing lights will remain ON as long as
the switch is in this first detent.
Rotate the headlight switch clockwise
to the first detent for parking light
and instrument panel light operation.
Rotate the headlight switch to the sec-
ond detent for headlight, parking light
and instrument panel light operation.AUTOMATIC HEADLIGHTS
This system automatically turns the
headlights on or off according to am-
bient light levels. To turn the system
on, rotate the headlight switch coun-
terclockwise to the AUTO position.
When the system is on, the headlight
time delay feature is also on. This
means the headlights will stay on for
up to 90 seconds after you place the
ignition into the OFF position. To turn the automatic system off, move the
headlight switch out of the AUTO
position.
NOTE: The engine must be run-
ning before the headlights will
come on in the automatic mode.
HEADLIGHTS ON WITH
WIPERS (Available With
Automatic Headlights Only)
When this feature is active, the head-
lights will turn on approximately
10 seconds after the wipers are turned
on if the headlight switch is placed in
the AUTO position. In addition, the
headlights will turn off when the wip-
ers are turned off if they were turned
on by this feature.
NOTE:
The Headlights On with
Wipers feature can be turned on
or off using the Uconnect Touch™
System, refer to “Uconnect Touch™
Settings” in “Understanding Your
Instrument Panel” for further infor-
mation.
Headlight Switch
109
Page 160 of 336
VEHICLE INFO (CUSTOMER INFORMATIONFEATURES) (for versions/markets, where
provided) . . . . . . . . . . . . . . . . . . . . . . . . . . . . .171
MESSAGES # . . . . . . . . . . . . . . . . . . . . . . . . . .172
TURN MENU OFF . . . . . . . . . . . . . . . . . . . . . . .172
Uconnect Touch™ SETTINGS . . . . . . . . . . . . . . .172
HARD-KEYS . . . . . . . . . . . . . . . . . . . . . . . . . .172
SOFT-KEYS . . . . . . . . . . . . . . . . . . . . . . . . . . .172
CUSTOMER PROGRAMMABLE FEATURES —Uconnect Touch™ SYSTEM 8.4 SETTINGS . . .172
SOUND SYSTEMS . . . . . . . . . . . . . . . . . . . . . . .181
NAVIGATION SYSTEM (for versions/markets, where provided) . . . . . . . .181
SETTING THE ANALOG CLOCK . . . . . . . . . . . . .181
iPod®/USB/MP3 CONTROL (for vehicles/markets, where provided) . . . . . . . .182
HARMAN KARDON® Logic7® HIGH PERFORMANCE MULTICHANNEL SURROUND
SOUND SYSTEM WITH DRIVER-SELECTABLE
SURROUND (DSS) (for versions/markets,
where required) . . . . . . . . . . . . . . . . . . . . . . . . . .182
STEERING WHEEL AUDIO CONTROLS . . . . . . .183 Radio Operation . . . . . . . . . . . . . . . . . . . . . . . .183
CD Player . . . . . . . . . . . . . . . . . . . . . . . . . . . . .183
CD/DVD DISC MAINTENANCE . . . . . . . . . . . . . .184
154
Page 178 of 336
Trans Temperature
Displays the actual transmissiontemperature.
Engine Hours
Displays the number of hours of engine operation.
MESSAGES #
Select from Main Menu using the UP
or DOWN buttons. This feature shows
the number of stored warning mes-
sages (in the # place holder). Pressing
the SELECT button will allow you to
see what the stored messages are.
Pressing the BACK button takes you
back to the Main Menu.
TURN MENU OFF
Select from Main Menu using the
DOWN button. Pressing the SELECT
button blanks the menu display.
Pressing any one of the four steering
wheel buttons brings the menu back. Uconnect Touch™
SETTINGS
The Uconnect Touch™ system uses a
combination of soft and hard keys
located on the center of the instru-
ment panel that allows you to access
and change the customer program-
mable features.
HARD-KEYS
Hard-Keys are located below the
Uconnect Touch™ system in the cen-
ter of the instrument panel. In addi-
tion, there is a Scroll/Enter control
knob located on the right side of the
Climate Controls in the center of the
instrument panel. Turn the control
knob to scroll through menus and
change settings (i.e., 30, 60, 90),
press the center of the control knob
one or more times to select or change a
setting (i.e., ON, OFF).
SOFT-KEYS
Soft-Keys are accessible on the
Uconnect Touch™ display.CUSTOMER
PROGRAMMABLE
FEATURES — Uconnect
Touch™ SYSTEM 8.4
SETTINGS
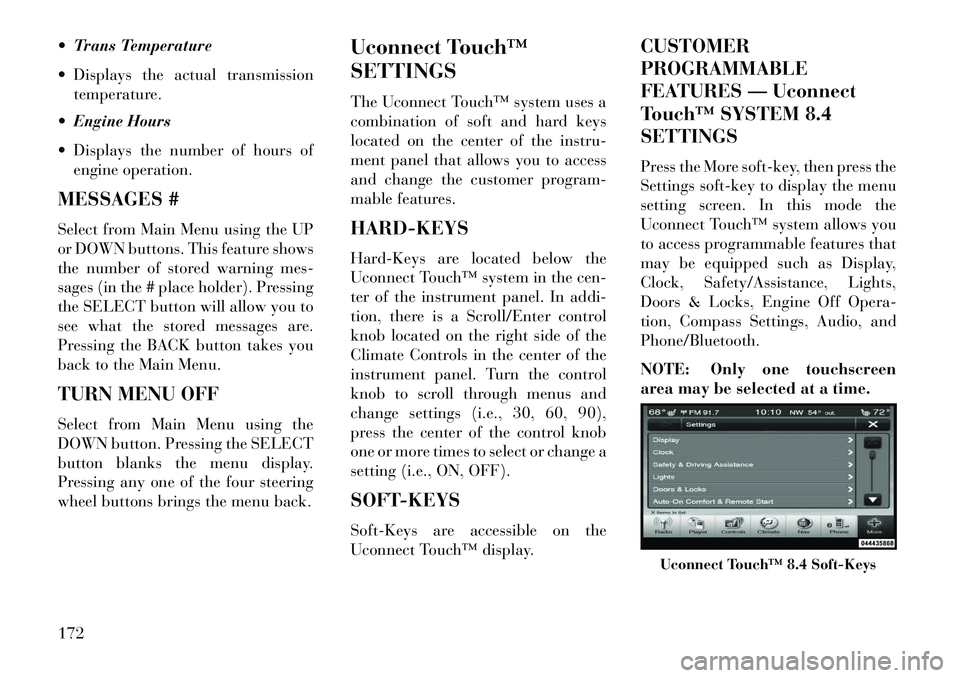
Press the More soft-key, then press the
Settings soft-key to display the menu
setting screen. In this mode the
Uconnect Touch™ system allows you
to access programmable features that
may be equipped such as Display,
Clock, Safety/Assistance, Lights,
Doors & Locks, Engine Off Opera-
tion, Compass Settings, Audio, and
Phone/Bluetooth.
NOTE: Only one touchscreen
area may be selected at a time.
Uconnect Touch™ 8.4 Soft-Keys
172
Page 180 of 336
Touchscreen Beep
When in this display, you may turn on
or shut off the sound heard when a
touch screen button (soft-key) is
pressed. Touch the Touchscreen Beep
soft-key until a check-mark appears
next to the setting, showing that set-
ting has been selected. Touch the back
arrow soft-key to return to the previ-
ous menu.
Navigation Turn-By-Turn In
Cluster (for versions/markets,
where provided)
When this feature is selected, the
turn-by-turn directions will appear in
the display as the vehicle approaches
a designated turn within a pro-
grammed route. To make your selec-
tion, touch the Navigation Turn-By-
Turn In Cluster soft-key, until a
check-mark appears next to the set-
ting, showing that setting has been
selected. Touch the back arrow soft-
key to return to the previous menu. Fuel Saver Display In Cluster
The “ECO” message is located in the
instrument cluster display, this mes-
sage can be turned on or off. To make
your selection, touch the Fuel Saver
Display soft-key, until a check-mark
appears next to the setting, showing
that setting has been selected. Touch
the back arrow soft-key to return to the
previous menu.Clock
After pressing the Clock soft-key the
following settings will be available.
Sync Time With GPS (for
versions/markets, where provided)
When in this display, you may auto-
matically have the radio set the time.
To change the Sync Time setting
touch the Sync with GPS Time soft-
key until a check-mark appears next
to the setting, showing that setting has
been selected. Touch the back arrow
soft-key to return to the previous
menu. Set Time Hours
When in this display, you may adjust
the hours. The Sync with GPS Time
soft-key must be unchecked. To make
your selection touch the + or - soft-
keys to adjust the hours up or down.
Touch the back arrow soft-key to re-
turn to the previous menu or touch the
X soft-key to close out of the settings
screen.
Set Time Minutes
When in this display, you may adjust
the minutes. The Sync with GPS Time
soft-key must be unchecked. To make
your selection touch the + or - soft-keys
to adjust the minutes up or down.
Touch the back arrow soft-key to re-
turn to the previous menu or touch the
X soft-key to close out of the settings
screen. Time Format
When in this display, you may select
the time format display setting. Touch
the Time Format soft-key until a
check-mark appears next to the 12hrs
or 24hrs setting, showing that setting
174
Page 181 of 336
has been selected. Touch the back ar-
row soft-key to return to the previous
menu.
Show Time In Status Bar
When in this display, you may turn on
or shut off the digital clock in the
status bar. To change the Show Time
Status setting touch the Show Time in
Status Bar soft-key until a check-
mark appears next to setting, showing
that setting has been selected. Touch
the back arrow soft-key to return to
the previous menu.
Safety / Assistance
After pressing the Safety / Assistance
soft-key the following settings will be
available.
Front Collision Sensitivity (for
versions/markets, where provided)
The Front Collision Warning (FCW)
feature can be can be set to Far, set to
Near or turned Off. The default status
of FCW is the Far setting. This means
the system will warn you of a possible
collision with the vehicle in front ofyou when you are farther away. This
gives you the most reaction time. To
change the setting for more dynamic
driving, select the Near setting. This
warns you of a possible collision when
you are much closer to the vehicle in
front of you. This allows for a more
dynamic driving experience. To
change the FCW status, touch and
release the OFF, Near or Far button.
Then touch the arrow back soft-key.
For further information, refer to
“Adaptive Cruise Control (ACC)” in
“Understanding The Features Of
Your Vehicle”.
Park Assist
The Rear Park Assist system will scan
for objects behind the vehicle when
the transmission shift lever is in RE-
VERSE and the vehicle speed is less
than 18 km/h. The system can be
enabled with Sound Only, Sound and
Display, or turned OFF. To change the
Park Assist status, touch and release
the OFF, Sound Only or Sounds and
Display button. Then touch the arrow
back soft-key. Refer to “ParkSense®
Rear Park Assist” in “Understanding
The Features Of Your Vehicle” for
system function and operating
information.
Tilt Mirrors In Reverse (for
versions/markets, where provided)
When this feature is selected, the out-
side sideview mirrors will tilt down-
ward when the ignition is in the RUN
position and the transmission shift
lever is in the REVERSE position.
The mirrors will move back to their
previous position when the transmis-
sion is shifted out of REVERSE. To
make your selection, touch the Tilt
Mirrors In Reverse soft-key, until a
check-mark appears next to setting,
showing that setting has been se-
lected. Touch the back arrow soft-key
to return to the previous menu.
175
Page 187 of 336
Equalizer
When in this display you may adjust
the Bass, Mid and Treble settings.
Adjust the settings with the + and –
setting soft-keys or by selecting any
point on the scale between the + and –
soft-keys. Then touch the arrow back
soft-key.
NOTE: Bass/Mid/Treble allow
you to simply slide your finger up
or down to change the setting as
well as touch directly on the de-
sired setting.
Speed Adjusted VolumeThis feature increases or decreases
volume relative to vehicle speed. To
change the Speed Adjusted Volume
touch the Off, 1, 2 or 3 soft-key. Then
touch the arrow back soft-key. Music Info Cleanup (for versions/
markets, where provided)
This feature helps organize music files
for optimized music navigation. To
make your selection, touch the Music
Info Cleanup soft-key, select On or Off
followed by pressing the arrow back
soft-key. Surround Sound (for versions/
markets, where provided)
This feature provides simulated sur-
round sound mode. To make your se-
lection, touch the Surround Sound
soft-key, select On or Off followed by
pressing the arrow back soft-key.
Phone/Bluetooth
After pressing the Phone/Bluetooth
soft-key the following settings will be
available.
Paired Devices
This feature shows which phones are
paired to the Phone/Bluetooth system.
For further information, refer to the
Uconnect Touch™ Supplement.SOUND SYSTEMS
Refer to your Sound Systems Booklet.
NAVIGATION SYSTEM
(for versions/markets,
where provided)
Refer to your Uconnect Touch™ User
Manual.
SETTING THE ANALOG
CLOCK
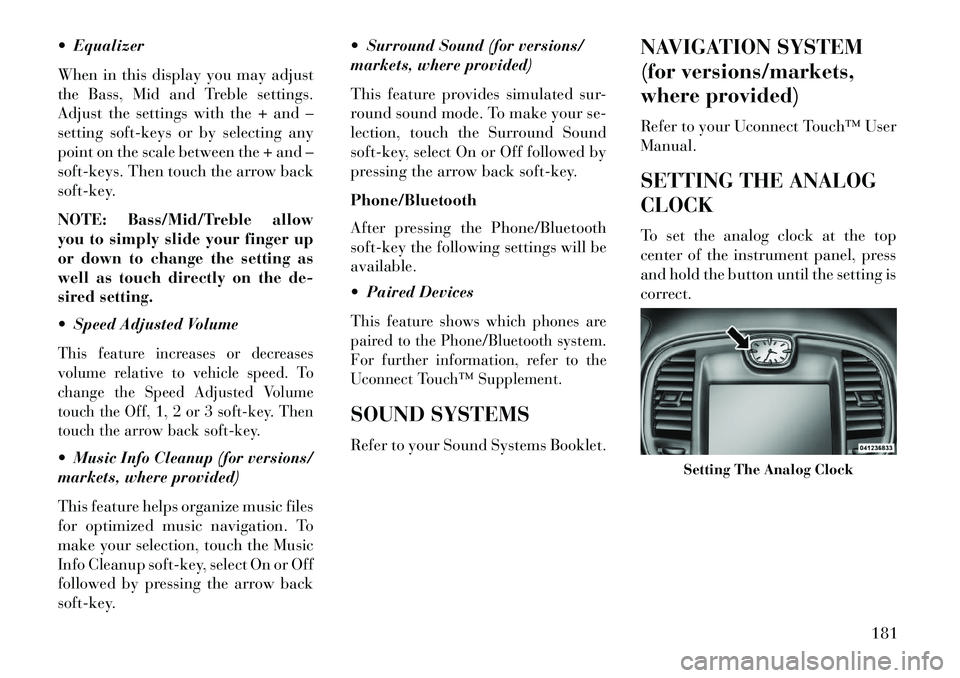
To set the analog clock at the top
center of the instrument panel, press
and hold the button until the setting is
correct.
Setting The Analog Clock
181
Page 189 of 336
Mode will only be available for video
media sources (DVDs, Video CDs, or
other video media supported by the
radio). Some audio will sound better
in DSS modes, others in Stereo mode.
When in “Audio Surround” mode,
balance is set automatically. Fader
control is available in surround mode
but should be set to the center position
for optimal surround performance.
STEERING WHEEL
AUDIO CONTROLS
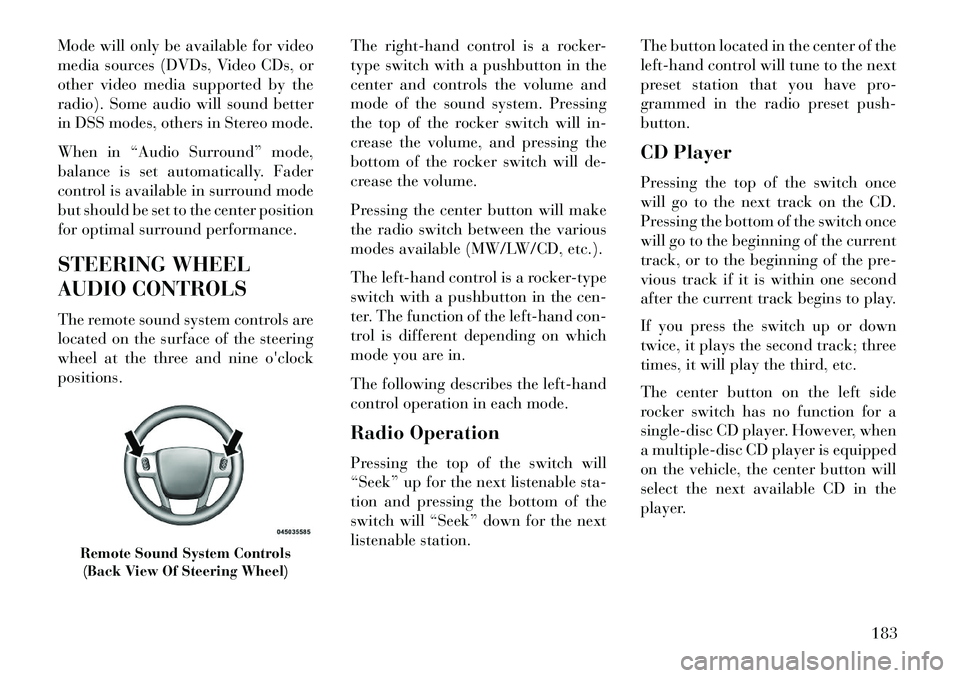
The remote sound system controls are
located on the surface of the steering
wheel at the three and nine o'clock
positions.The right-hand control is a rocker-
type switch with a pushbutton in the
center and controls the volume and
mode of the sound system. Pressing
the top of the rocker switch will in-
crease the volume, and pressing the
bottom of the rocker switch will de-
crease the volume.
Pressing the center button will make
the radio switch between the various
modes available (MW/LW/CD, etc.).
The left-hand control is a rocker-type
switch with a pushbutton in the cen-
ter. The function of the left-hand con-
trol is different depending on which
mode you are in.
The following describes the left-hand
control operation in each mode.
Radio Operation
Pressing the top of the switch will
“Seek” up for the next listenable sta-
tion and pressing the bottom of the
switch will “Seek” down for the next
listenable station.The button located in the center of the
left-hand control will tune to the next
preset station that you have pro-
grammed in the radio preset push-
button.
CD Player
Pressing the top of the switch once
will go to the next track on the CD.
Pressing the bottom of the switch once
will go to the beginning of the current
track, or to the beginning of the pre-
vious track if it is within one second
after the current track begins to play.
If you press the switch up or down
twice, it plays the second track; three
times, it will play the third, etc.
The center button on the left side
rocker switch has no function for a
single-disc CD player. However, when
a multiple-disc CD player is equipped
on the vehicle, the center button will
select the next available CD in the
player.
Remote Sound System Controls
(Back View Of Steering Wheel)
183
Page 191 of 336
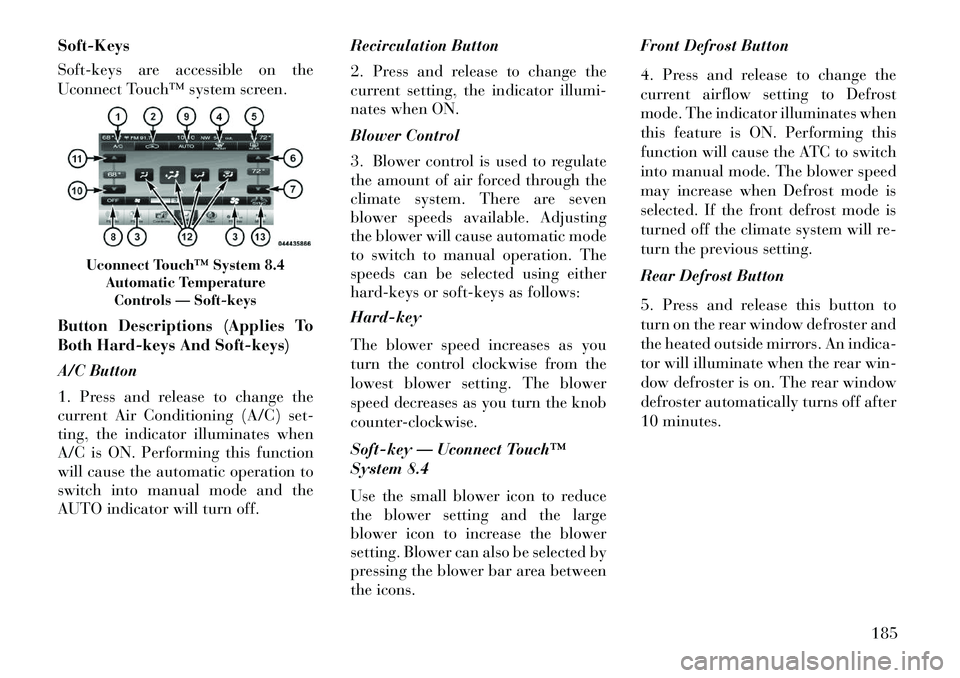
Soft-Keys
Soft-keys are accessible on the
Uconnect Touch™ system screen.
Button Descriptions (Applies To
Both Hard-keys And Soft-keys)
A/C Button
1. Press and release to change the
current Air Conditioning (A/C) set-
ting, the indicator illuminates when
A/C is ON. Performing this function
will cause the automatic operation to
switch into manual mode and the
AUTO indicator will turn off.Recirculation Button
2. Press and release to change the
current setting, the indicator illumi-
nates when ON.
Blower Control
3. Blower control is used to regulate
the amount of air forced through the
climate system. There are seven
blower speeds available. Adjusting
the blower will cause automatic mode
to switch to manual operation. The
speeds can be selected using either
hard-keys or soft-keys as follows:
Hard-key
The blower speed increases as you
turn the control clockwise from the
lowest blower setting. The blower
speed decreases as you turn the knob
counter-clockwise.
Soft-key — Uconnect Touch™
System 8.4
Use the small blower icon to reduce
the blower setting and the large
blower icon to increase the blower
setting. Blower can also be selected by
pressing the blower bar area between
the icons.Front Defrost Button
4. Press and release to change the
current airflow setting to Defrost
mode. The indicator illuminates when
this feature is ON. Performing this
function will cause the ATC to switch
into manual mode. The blower speed
may increase when Defrost mode is
selected. If the front defrost mode is
turned off the climate system will re-
turn the previous setting.
Rear Defrost Button
5. Press and release this button to
turn on the rear window defroster and
the heated outside mirrors. An indica-
tor will illuminate when the rear win-
dow defroster is on. The rear window
defroster automatically turns off after
10 minutes.
Uconnect Touch™ System 8.4
Automatic TemperatureControls — Soft-keys
185
Page 332 of 336
Rear Axle (Differential). . . . . . . .287
Rear Camera . . . . . . . . . . . . . . .138
Rear Cupholder . . . . . . . . . . . . .148
Rear Fog Lights . . . . . . . . . . . . .111
Rear Park Sense System . . . . . . .134
Rear Seat, Folding . . . . . . . . . . .105
Rear Window Defroster . . . . . . . .151
Rear Window Features . . . . . . . .151
Recorder, Event Data . . . . . . . . . .45
Recreational Towing . . . . . . . . . .251
Refrigerant . . . . . . . . . . . . . . . .277
Reminder, Lights On . . . . . . . . . .111
Reminder, Seat Belt . . . . . . . . . . .35
Remote Keyless Entry (RKE) . . . . .18
Remote Sound System (Radio) Controls . . . . . . . . . . . . . . . .183
Remote Trunk Release . . . . . . . . . .26
Replacement Bulbs . . . . . . . . . . .298
Replacement Keys . . . . . . . . . . . .14
Replacement Parts . . . . . . . . . . .273
Replacement Tires . . . . . . . . . . .231
Resetting Oil Change Indicator . . . . . . . . . . . .158, 168
Restraint, Head . . . . . . . . . . . . .104
Restraints, Child . . . . . . . . . . . . .46
Restraints, Occupant . . . . . . . . . . .27
Rocking Vehicle When Stuck . . . .262
Rotation, Tires . . . . . . . . . . . . . .233 Safety Checks Inside Vehicle
. . . . .57
Safety Checks Outside Vehicle . . . .58
Safety, Exhaust Gas . . . . . . . . . . .56
Safety Information, Tire . . . . . . .221
Safety Tips . . . . . . . . . . . . . . . . .56
Schedule, Maintenance . . . .310, 314
Seat Belt Maintenance . . . . . . . . .290
Seat Belt Reminder . . . . . . . . . . . .35
Seat Belts . . . . . . . . . . . . .27, 29, 57
Adjustable Upper Shoulder
Anchorage . . . . . . . . . . . . . . .31
And Pregnant Women . . . . . . .36
Child Restraint . . . .46, 49, 50, 53
Front Seat . . . . . . . . . . . .29, 30
Inspection . . . . . . . . . . . . . . .57
Operating Instructions . . . . . . .30
Pretensioners . . . . . . . . . . . . .33
Rear Seat . . . . . . . . . . . . . . . .29
Untwisting Procedure . . . . . . .31
Seats . . . . . . . . . . . . . . . . . . . .100
Adjustment . . . . . . . . . . . . .100
Easy Entry . . . . . . . . . . . . . .107
Head Restraints . . . . . . . . . .104
Height Adjustment . . . . . . . .100
Memory . . . . . . . . . . . . . . . .105
Power . . . . . . . . . . . . . . . . .100
Rear Folding . . . . . . . . . . . .105
Seatback Release . . . . . . . . . .105 Tilting
. . . . . . . . . . . . . . . . .100
Selection of Coolant (Antifreeze) . . . . . . . . . .282, 302
Selection of Oil . . . . . . . . . . . . .275
Sentry Key (Immobilizer) . . . . . . .13
Sentry Key Programming . . . . . . .14
Sentry Key Replacement . . . . . . . .14
Service Engine Soon Light (Malfunction Indicator) . . . . . .159
Setting the Clock . . . . . . . . . . . .181
Shifting . . . . . . . . . . . . . . . . . .199
Automatic Transmission . . . . .199
Shift Lever Override . . . . . . . . . .263
Shoulder Belts . . . . . . . . . . . . . . .29
Shoulder Belt Upper Anchorage . . .31
Side Airbag . . . . . . . . . . . . . . . . .42
Side View Mirror Adjustment . . . . .67
Signals, Turn . . . . . . . .58, 112, 158
SmartBeams . . . . . . . . . . . . . . .110
Snow Chains (Tire Chains) . . . . .232
Sound System Kicker . . . . . . . . . . . . . . . . .182
Sound Systems . . . . . . . . . . . . . .181
Sound Systems (Radio) . . . . . . . .181
Spare Tire . . . . . . . . . . . . . . . . .230
Spark Plugs . . . . . . . . . . . . . . . .302
Specifications Fuel (Gasoline) . . . . . . .238, 302
326