child seat Lancia Thema 2014 Owner handbook (in English)
[x] Cancel search | Manufacturer: LANCIA, Model Year: 2014, Model line: Thema, Model: Lancia Thema 2014Pages: 332, PDF Size: 3.46 MB
Page 49 of 332
Driver And Passenger Advanced
Front Air Bag Inflator Units
The Driver and Passenger Advanced
Front Air Bag Inflator Units are lo-
cated in the center of the steering
wheel and on the right side of the
instrument panel. When the ORC de-
tects a collision requiring the Ad-
vanced Front Air Bags, it signals the
inflator units. A large quantity of non-
toxic gas is generated to inflate the
Advanced Front Air Bags. Different
air bag inflation rates are possible,
based on several factors, including the
collision type and severity. The steer-
ing wheel hub trim cover and the up-
per right side of the instrument panel
separate and fold out of the way as the
air bags inflate to their full size. The
air bags fully inflate in about 50 to 70
milliseconds. This is about half of the
time it takes to blink your eyes. The
air bags then quickly deflate while
helping to restrain the driver and
front passenger.
The Advanced Front Air Bag gas is
vented through the vent holes in thesides of the air bag. In this way, the air
bags do not interfere with your con-
trol of the vehicle.
Supplemental Driver Side Knee
Air Bag Inflator Unit
The Supplemental Driver Side Knee
Air Bag unit is located in the instru-
ment panel trim beneath the steering
column. When the ORC detects a col-
lision requiring the Advanced Front
Air Bags, it signals the inflator units.
A large quantity of non-toxic gas is
generated to inflate the Supplemental
Driver Side Knee Air Bag. The trim
cover separates and folds out of the
way allowing the air bag to inflate to
the full size. The air bag fully inflates
in about 15 to 20 milliseconds.
Supplemental Seat-Mounted Side
Air Bag (SAB) Inflator Units
The Supplemental Seat-Mounted
Side Air Bags (SAB) are designed to
activate only in certain side collisions.
The ORC determines if a side collision
requires the side air bags to inflate,
based on the severity and type of col-
lision.Based on the severity and type of col-
lision, the side air bag inflator on the
crash side of the vehicle may be trig-
gered, releasing a quantity of non-
toxic gas. The inflating SAB exits
through the seat seam into the space
between the occupant and the door.
The SAB fully inflates in about 10
milliseconds. The side air bag moves
at a very high speed and with such a
high force that it could injure you if
you are not seated properly, or if items
are positioned in the area where the
side air bag inflates. This especially
applies to children.
Supplemental Side Air Bag
Inflatable Curtain (SABIC)
Inflator Units
During collisions where the impact is
confined to a particular area of the
side of the vehicle, the ORC may de-
ploy the SABIC air bags, depending
on the severity and type of collision. In
these events, the ORC will deploy the
SABIC only on the impact side of the
vehicle.
A quantity of non-toxic gas is gener-
ated to inflate the side curtain air bag.
43
Page 50 of 332

The inflating side curtain air bag
pushes the outside edge of the head-
liner out of the way and covers the
window. The air bag inflates in about
30 milliseconds (about one-quarter of
the time that it takes to blink your
eyes) with enough force to injure you
if you are not belted and seated prop-
erly, or if items are positioned in the
area where the side curtain air bag
inflates. This especially applies to
children. The side curtain air bag is
only about 9 cm thick when it is in-
flated.
Because air bag sensors estimate de-
celeration over time, vehicle speed
and damage are not good indicators of
whether or not an air bag should have
deployed.
Front And Side Impact Sensors
In front and side impacts, impact sen-
sors can aid the ORC in determining
appropriate response to impact
events.Enhanced Accident Response
System
In the event of an impact causing air
bag deployment, if the communica-
tion network remains intact, and the
power remains intact, depending on
the nature of the event the ORC will
determine whether to have the En-
hanced Accident Response System
perform the following functions:
Cut off fuel to the engine.
Flash hazard lights as long as the
battery has power or until the igni-
tion is cycled off.
Turn on the interior lights, which remain on as long as the battery has
power or until the ignition key is
removed.
Unlock the doors automatically.
In order to reset the Enhanced Acci-
dent Response System functions after
an event, the ignition switch must be
changed from IGN ON to IGN OFF. If A Deployment Occurs
The Advanced Front Air Bags are de-
signed to deflate immediately after
deployment.
NOTE: Front and/or side air bags
will not deploy in all collisions.
This does not mean something is
wrong with the air bag system.
If you do have a collision, which de-
ploys the air bags, any or all of the
following may occur:
The nylon air bag material may
sometimes cause abrasions and/or
skin reddening to the driver and
front passenger as the air bags de-
ploy and unfold. The abrasions are
similar to friction rope burns or
those you might get sliding along a
carpet or gymnasium floor. They
are not caused by contact with
chemicals. They are not permanent
and normally heal quickly. How-
ever, if you haven't healed signifi-
cantly within a few days, or if you
have any blistering, see your doctor
immediately.
44
Page 53 of 332

CHILD RESTRAINTS
Everyone in your vehicle needs to be
buckled up all the time, including ba-
bies and children.
Children 12 years or younger should
ride properly buckled up in a rear
seat, if available. According to crash
statistics, children are safer when
properly restrained in the rear seats
rather than in the front.
WARNING!
“Extreme Hazard! Do not use arearward-facing child restraint
on a seat protected by an air bag
in front of it!” Refer to visor and
door shut face mounted labels for
information.
In a collision, an unrestrained child, even a tiny baby, can be-
come a projectile inside the ve-
hicle. The force required to hold
even an infant on your lap could
become so great that you could
not hold the child, no matter how
strong you are. The child and oth-
ers could be badly injured. Any
child riding in your vehicle
should be in a proper restraint for
the child's size. There are different sizes and types of
restraints for children from newborn
size to the child almost large enough
for an adult safety belt. Always check
the child seat Owner's Manual to en-
sure you have the correct seat for your
child. Use the restraint that is correct
for your child.
47
Page 54 of 332

Summary Of Recommendations For Restraining Children In Vehicles
Child Size, Height, Weight or AgeRecommended Type of Child
Restraint
Infants and Toddlers Children who are two years old or younger and who have not reached the height orweight limits of their child restraint Either an Infant Carrier or a Convertible
Child Restraint, facing rearward in the rear seat of the vehicle
Small Children Children who are at least two years old or who have out-grown the height or weightlimit of their rear-facing child restraint Forward-Facing Child Restraint with a
five-point Harness, facing forward in the rear seat of the vehicle
Larger Children Children who have out-grown their
forward-facing child restraint, but are too small to properly fit the vehicle’s seat belt Belt Positioning Booster Seat and the ve-
hicle seat belt, seated in the rear seat of the vehicle
Children Too Large for Child Restraints Children 12 years old or younger, who
have out-grown the height or weight limit of their booster seat Vehicle Seat Belt, seated in the rear seat of
the vehicle
Infants And Child Restraints
Safety experts recommend that chil-
dren ride rearward-facing in the ve-
hicle until they are two years old or
until they reach either the height or
weight limit of their rear facing child
safety seat. Two types of child re-
straints can be used rearward-facing:
infant carriers and convertible child
seats. The infant carrier is only used
rearward-facing in the vehicle. It is
recommended for children from birth
until they reach the weight or height
limit of the infant carrier. Convertible
child seats can be used either
rearward-facing or forward-facing in
the vehicle. Convertible child seats of-
ten have a higher weight limit in the
rearward-facing direction than infant
carriers do, so they can be used
rearward-facing by children who
have outgrown their infant carrier but
are still less than at least two years
old. Children should remain
rearward-facing until they reach the
highest weight or height allowed by
their convertible child seat.
48
Page 55 of 332

WARNING!
Never place a rear facing infantseat in front of an air bag. A de-
ploying Passenger Advanced
Front Air Bag can cause death or
serious injury to a child 12 years
or younger, including a child in a
rearward facing infant seat.
Only use a rearward-facing child restraint in a vehicle with a rear
seat.
Older Children And Child
Restraints
Children who are two years old or who
have outgrown their rear-facing con-
vertible child seat can ride forward-
facing in the vehicle. Forward-facing
child seats and convertible child seats
used in the forward-facing direction
are for children who are over two
years old or who have outgrown the
rear-facing weight or height limit of
their rear-facing convertible child
seat. Children should remain in a
forward-facing child seat with a har-
ness for as long as possible, up to the
highest weight or height allowed by
the child seat. All children whose weight or height is
above the forward-facing limit for the
child seat should use a belt-
positioning booster seat until the ve-
hicle’s seat belts fit properly. If the
child cannot sit with knees bent over
the vehicle’s seat cushion while the
child’s back is against the seatback,
they should use a belt-positioning
booster seat. The child and belt-
positioning booster seat are held in
the vehicle by the seat belt.
WARNING!
Improper installation can lead to
failure of an infant or child re-
straint. It could come loose in a
collision. The child could be
badly injured or killed. Follow
the child restraint manufacturer’s
directions exactly when installing
an infant or child restraint.
(Continued)
WARNING!(Continued)
When your child restraint is notin use, secure it in the vehicle with
the seat belt or ISOFIX anchor-
ages, or remove it from the ve-
hicle. Do not leave it loose in the
vehicle. In a sudden stop or acci-
dent, it could strike the occupants
or seatbacks and cause serious
personal injury.
Children Too Large For Booster
Seats
Children who are large enough to
wear the shoulder belt comfortably,
and whose legs are long enough to
bend over the front of the seat when
their back is against the seatback,
should use the seat belt in a rear seat.
Use this simple 5-step test to decide
whether the child can use the vehicle’s
seat belt alone:
1. Can the child sit all the way back
against the back of the vehicle seat?
2. Do the child’s knees bend comfort-
ably over the front of the vehicle seat –
while they are still sitting all the way
back? 49
Page 56 of 332

3. Does the shoulder belt cross the
child’s shoulder between their neck
and arm?
4. Is the lap part of the belt as low as
possible, touching the child’s thighs
and not their stomach?5. Can the child stay seated like this
for the whole trip?
If the answer to any of these questions
was “no,” then the child still needs to
use a booster seat in this vehicle. If the
child is using the lap/shoulder belt,
check belt fit periodically. A child’ssquirming or slouching can move the
belt out of position. If the shoulder
belt contacts the face or neck, move
the child closer to the center of the
vehicle. Never allow a child to put the
shoulder belt under an arm or behind
their back.
Universal Child Seat Position Chart
Mass Group Seating Position (or other site)
Front
Passenger Rear
Outboard Rear Center Intermediate
OutboardIntermediate
Center
Group up to 10 kg XUUN /AN /A
Group 0+ up to 13 kg XUUN /AN /A
Group I 9 to 18 kg XUUN /AN /A
Group II 15 to 25 kg XUUN /AN /A
Group III 22 to 36 kg XUUN /AN /A
Key of letters used in the table above:
U = Suitable for “universal” cat- egory restraints approved for use in
this mass group.
UF = Suitable for forward-facing “universal” category restraints ap-
proved for use in this mass group. L = Suitable for particular child
restraints given on attached list.
These restraints may be of the “spe-
cific vehicle”, “restricted or “semi-
universal” categories. B = Built-in restraint for this mass
group.
X = Seat position not suitable for children in this mass group.
50
Page 59 of 332
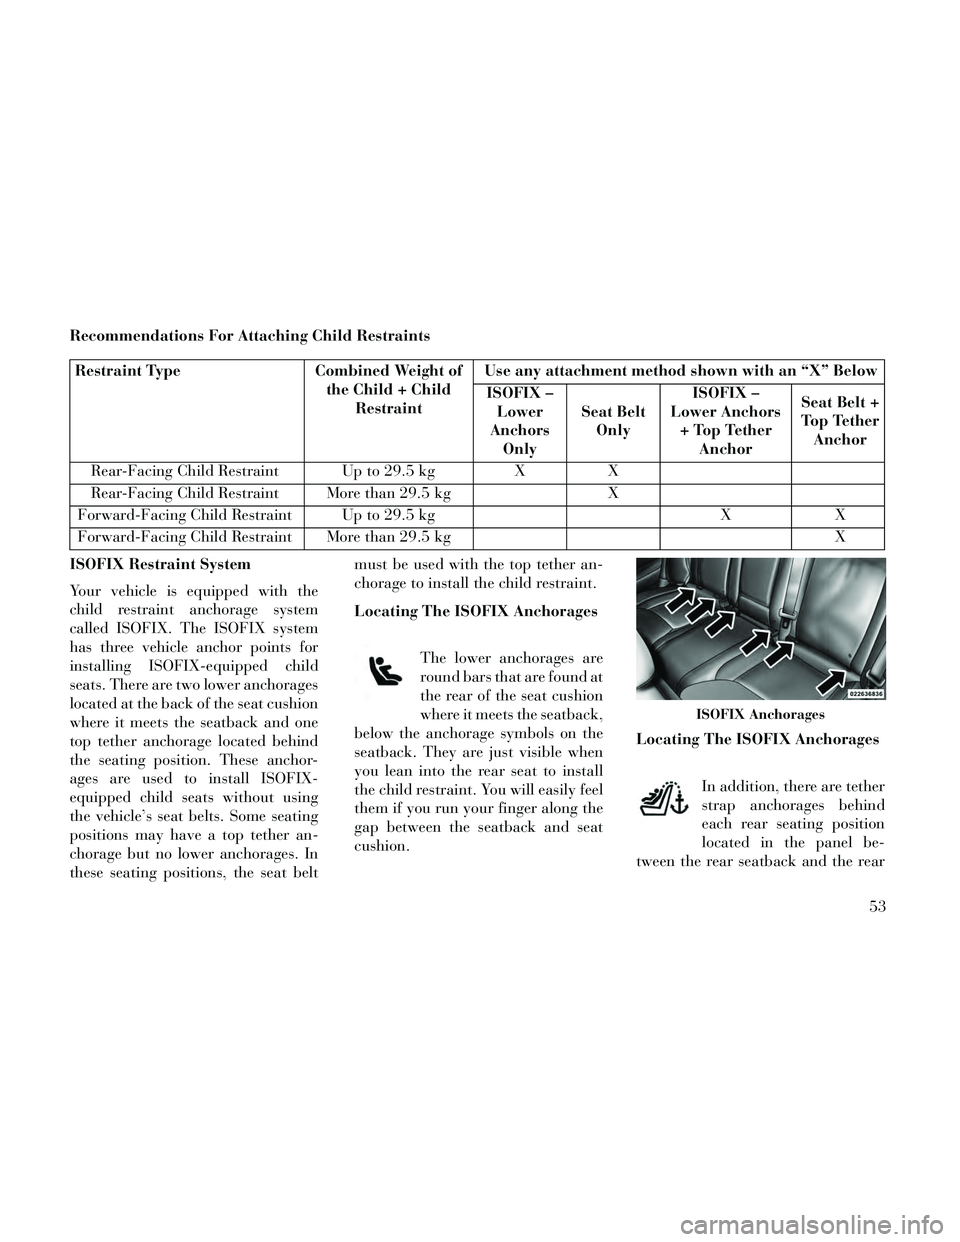
Recommendations For Attaching Child Restraints
Restraint TypeCombined Weight of
the Child + Child Restraint Use any attachment method shown with an “X” Below
ISOFIX – Lower
Anchors Only Seat Belt
Only ISOFIX –
Lower Anchors + Top Tether Anchor Seat Belt +
Top Tether Anchor
Rear-Facing Child Restraint Up to 29.5 kg XX
Rear-Facing Child Restraint More than 29.5 kg X
Forward-Facing Child Restraint Up to 29.5 kg XX
Forward-Facing Child Restraint More than 29.5 kg X
ISOFIX Restraint System
Your vehicle is equipped with the
child restraint anchorage system
called ISOFIX. The ISOFIX system
has three vehicle anchor points for
installing ISOFIX-equipped child
seats. There are two lower anchorages
located at the back of the seat cushion
where it meets the seatback and one
top tether anchorage located behind
the seating position. These anchor-
ages are used to install ISOFIX-
equipped child seats without using
the vehicle’s seat belts. Some seating
positions may have a top tether an-
chorage but no lower anchorages. In
these seating positions, the seat belt must be used with the top tether an-
chorage to install the child restraint.
Locating The ISOFIX Anchorages
The lower anchorages are
round bars that are found at
the rear of the seat cushion
where it meets the seatback,
below the anchorage symbols on the
seatback. They are just visible when
you lean into the rear seat to install
the child restraint. You will easily feel
them if you run your finger along the
gap between the seatback and seat
cushion. Locating The ISOFIX Anchorages
In addition, there are tether
strap anchorages behind
each rear seating position
located in the panel be-
tween the rear seatback and the rear
ISOFIX Anchorages
53
Page 60 of 332

window. These tether strap anchor-
ages are under a plastic cover with the
tether anchorage symbol on it.
ISOFIX child restraint systems will be
equipped with a rigid bar on each
side. Each will have a hook or connec-
tor to attach to the lower anchorage
and a way to tighten the connection to
the anchorage. Forward-facing child
restraints and some rear-facing infant
restraints may also be equipped with
a tether strap. The tether strap will
have a hook at the end to attach to the
top tether anchorage and a way to
tighten the strap after it is attached to
the anchorage.Center Seat ISOFIX
If a child restraint installed in the
center position blocks the seat belt
webbing or buckle for the outboard
position, do not use that outboard po-
sition. If a child seat in the center
position blocks the outboard ISOFIX
anchors or seat belt, do not install a
child seat in that outboard position.
WARNING!
Never use the same lower anchor-
age to attach more than one child
restraint. Please refer to “To Install
a ISOFIX-Compatible Child Re-
straint” for typical installation in-
structions.
Always follow the directions of the
child restraint manufacturer when in-
stalling your child restraint. Not all
child restraint systems will be in-
stalled as described here. To Install An ISOFIX-compatible
Child Restraint
1. If the selected seating position has
a Switchable Automatic Locking Re-
tractor (ALR) seat belt, stow the seat
belt, following the instructions below.
See the section “Installing Child Re-
straints Using the Vehicle Seat Belt”
to check what type of seat belt each
seating position has.
2. Loosen the adjusters on the lower
connectors and on the tether strap of
the child seat so that you can more
easily attach the connectors to the ve-
hicle anchorages.
3. Place the child seat between the
lower anchorages for that seating po-
sition. For some second row seats, you
may need to recline the seat and / or
raise the head restraint to get a better
fit. If the rear seat can be moved for-
ward and rearward in the vehicle, you
may wish to move it to its rear-most
position to make room for the child
seat. You may also move the front seat
forward to allow more room for the
car seat.
Tether Strap Anchorages
54
Page 61 of 332

4. Attach the connectors of the child
restraint to the lower anchorages in
the selected seating position.
5. If the child restraint has a tether
strap, connect it to the top tether an-
chorage. See the section “Installing
Child Restraints Using the Top Tether
Anchorage” for directions to attach a
tether anchor.
6. Tighten all of the straps as you
push the child restraint rearward and
downward into the seat. Remove
slack in the straps according to the
child restraint manufacturer’s in-
structions.
7. Test that the child restraint is in-
stalled tightly by pulling back and
forth on the child seat at the belt path.
It should not move more than 25.4
mm in any direction.WARNING!
Child restraint anchorages are de-
signed to withstand only those
loads imposed by correctly-fitted
child restraints. Under no circum-
stances are they to be used for adult
seat belts, harnesses, or for attach-
ing other items or equipment to the
vehicle.
How To Stow An Unused ALR
Seatbelt
When using the ISOFIX attaching
system to install a child restraint, stow
all ALR seat belts that are not being
used by other occupants or being used
to secure child restraints. An unused
belt could injure a child if they play
with it and accidentally lock the seat-
belt retractor. Before installing a child
restraint using the ISOFIX system,
buckle the seat belt behind the child
restraint and out of the child’s reach.
If the buckled seat belt interferes with
the child restraint installation, instead
of buckling it behind the child re-
straint, route the seat belt through the
child restraint belt path and then
buckle it. Do not lock the seatbelt. Remind all children in the vehicle that
the seat belts are not toys and that
they should not play with them.
WARNING!
Improper installation of a child re-
straint to the ISOFIX anchorages
can lead to failure of an infant or
child restraint. The child could be
badly injured or killed. Follow the
manufacturer's directions exactly
when installing an infant or child
restraint.
Installing Child Restraints Using
The Vehicle Seat Belt
The seat belts in the passenger seating
positions are equipped with either a
Switchable Automatic Locking Re-
tractor (ALR) or a cinching latch
plate or both. Both types of seat belts
are designed to keep the lap portion of
the seat belt tight around the child
restraint so that it is not necessary to
use a locking clip. The ALR retractor
can be “switched” into a locked mode
by pulling all of the webbing out of
55
Page 62 of 332

the retractor and then letting the web-
bing retract back into the retractor. If
it is locked, the ALR will make a
clicking noise while the webbing is
pulled back into the retractor. For
additional information on ALR, refer
to the “Automatic Locking Mode” de-
scription under “Occupant Re-
straints.” The cinching latch plate is
designed to hold the lap portion of the
seatbelt tight when webbing is pulled
tight and straight through a child re-
straint’s belt path.
Installing A Child Restraint With
A Switchable Automatic Locking
Retractor (ALR)
1. Place the child seat in the center of
the seating position. For some second
row seats, you may need to recline the
seat and/or raise the head restraint to
get a better fit. If the rear seat can be
moved forward and rearward in the
vehicle, you may wish to move it to its
rear-most position to make room for
the child seat. You may also move the
front seat forward to allow more room
for the car seat.2. Pull enough of the seat belt web-
bing from the retractor to pass it
through the belt path of the child re-
straint. Do not twist the belt webbing
in the belt path.
3. Slide the latch plate into the
buckle until you hear a “click.”
4. Pull on the webbing to make the
lap portion tight against the child
seat.
5. To lock the seat belt, pull down on
the shoulder part of the belt until you
have pulled all the seat belt webbing
out of the retractor. Then, allow the
webbing to retract back into the re-
tractor. As the webbing retracts, you
will hear a clicking sound. This means
the seat belt is now in the Automatic
Locking mode.
6. Try to pull the webbing out of the
retractor. If it is locked, you should
not be able to pull out any webbing. If
the retractor is not locked, repeat step
5.
7. Finally, pull up on any excess web-
bing to tighten the lap portion around
the child restraint while you push the
child restraint rearward and down-
ward into the vehicle seat.
8. If the child restraint has a top
tether strap and the seating position
has a top tether anchorage, connect
the tether strap to the anchorage and
tighten the tether strap. Refer to “In-
stalling Child Restraints Using The
Top Tether Anchorage” for directions
to attach a tether anchor.
9. Test that the child restraint is in-
stalled tightly by pulling back and
forth on the child seat at the belt path.
It should not move more than 25.4
mm in any direction.
Any seat belt system will loosen with
time, so check the belt occasionally,
and pull it tight if necessary.
56