service Lancia Thema 2014 Owner handbook (in English)
[x] Cancel search | Manufacturer: LANCIA, Model Year: 2014, Model line: Thema, Model: Lancia Thema 2014Pages: 332, PDF Size: 3.46 MB
Page 51 of 332
As the air bags deflate, you may seesome smoke-like particles. The
particles are a normal by-product
of the process that generates the
non-toxic gas used for air bag infla-
tion. These airborne particles may
irritate the skin, eyes, nose, or
throat. If you have skin or eye irri-
tation, rinse the area with cool wa-
ter. For nose or throat irritation,
move to fresh air. If the irritation
continues, see your doctor. If these
particles settle on your clothing,
follow the garment manufacturer's
instructions for cleaning.
Do not drive your vehicle after the air
bags have deployed. If you are in-
volved in another collision, the air bags
will not be in place to protect you.
WARNING!
Deployed air bags and seat belt pre-
tensioners cannot protect you in
another collision. Have the air
bags, seat belt pretensioners, and
the front seat belt retractor assem-
blies replaced by an authorized
dealer immediately. Also, have the
Occupant Restraint Controller Sys-
tem serviced as well. Maintaining Your Air Bag System
WARNING!
Modifications to any part of the
air bag system could cause it to
fail when you need it. You could
be injured if the air bag system is
not there to protect you. Do not
modify the components or wiring,
including adding any kind of
badges or stickers to the steering
wheel hub trim cover or the upper
right side of the instrument panel.
Do not modify the front bumper,
vehicle body structure, or add af-
termarket side steps or running
boards.
It is dangerous to try to repair any part of the air bag system your-
self. Be sure to tell anyone who
works on your vehicle that it has
an air bag system.
(Continued)
WARNING!(Continued)
Do not attempt to modify anypart of your air bag system. The
air bag may inflate accidentally
or may not function properly if
modifications are made. Take
your vehicle to an authorized
dealer for any air bag system ser-
vice. If your seat, including your
trim cover and cushion, needs to
be serviced in any way (including
removal or loosening/tightening
of seat attachment bolts), take
the vehicle to your authorized
dealer. Only manufacturer ap-
proved seat accessories may be
used. If it is necessary to modify
the air bag system for persons
with disabilities, contact your au-
thorized dealer.
Air Bag Warning Light
You will want to have the
air bags ready to inflate for
your protection in a colli-
sion. The Air Bag Warning
Light monitors the internal circuits
45
Page 52 of 332

and interconnecting wiring associated
with air bag system electrical compo-
nents. While the air bag system is
designed to be maintenance free. If
any of the following occurs, have an
authorized dealer service the air bag
system immediately.
The Air Bag Warning Light doesnot come on during the four to eight
seconds when the ignition is first
cycled to the ON/RUN.
The Air Bag Warning Light remains on after the four to eight-second
interval.
The Air Bag Warning Light comes on intermittently or remains on
while driving.
NOTE: If the speedometer, ta-
chometer, or any engine related
gauges are not working, the Occu-
pant Restraint Controller (ORC)
may also be disabled. The air bags
may not be ready to inflate for your
protection. Promptly check the
fuse block for blown fuses. Refer to
“Fuses” in “Maintaining Your Ve-
hicle” for the proper air bag fuses. See your authorized dealer if the
fuse is good.
EVENT DATA RECORDER
(EDR)
This vehicle is equipped with an event
data recorder (EDR). The main pur-
pose of an EDR is to record, in certain
crash or near crash-like situations,
such as an air bag deployment or hit-
ting a road obstacle, data that will
assist in understanding how a vehi-
cle’s systems performed. The EDR is
designed to record data related to ve-
hicle dynamics and safety systems for
a short period of time, typically 30
seconds or less. The EDR in this ve-
hicle is designed to record such data
as:
How various systems in your ve-
hicle were operating;
Whether or not the driver and pas- senger safety belts were
buckled/fastened;
How far (if at all) the driver was depressing the accelerator and/or
brake pedal; and, How fast the vehicle was traveling.
These data can help provide a better
understanding of the circumstances in
which crashes and injuries occur.
NOTE: EDR data are recorded by
your vehicle only if a non-trivial
crash situation occurs; no data are
recorded by the EDR under nor-
mal driving conditions and no per-
sonal data (e.g., name, gender, age,
and crash location) are recorded.
However, other parties, such as
law enforcement, could combine
the EDR data with the type of per-
sonally identifying data routinely
acquired during a crash investiga-
tion.
To read data recorded by an EDR,
special equipment is required, and ac-
cess to the vehicle or the EDR is
needed. In addition to the vehicle
manufacturer, other parties, such as
law enforcement, that have the spe-
cial equipment, can read the informa-
tion if they have access to the vehicle
or the EDR.
46
Page 66 of 332

WARNING!(Continued)
If you are required to drive withthe trunk/liftgate/rear doors
open, make sure that all windows
are closed and the climate control
BLOWER switch is set at high
speed. DO NOT use the recircula-
tion mode.
If it is necessary to sit in a parked vehicle with the engine running,
adjust your heating or cooling
controls to force outside air into
the vehicle. Set the blower at high
speed.
The best protection against carbon
monoxide entry into the vehicle body
is a properly maintained engine ex-
haust system.
Whenever a change is noticed in the
sound of the exhaust system, when
exhaust fumes can be detected inside
the vehicle, or when the underside or
rear of the vehicle is damaged, have a
competent mechanic inspect the com-
plete exhaust system and adjacent
body areas for broken, damaged, de-
teriorated, or mispositioned parts. Open seams or loose connections
could permit exhaust fumes to seep
into the passenger compartment. In
addition, inspect the exhaust system
each time the vehicle is raised for lu-
brication or oil change. Replace as
required.
SAFETY CHECKS YOU
SHOULD MAKE INSIDE
THE VEHICLE
Seat Belts
Inspect the belt system periodically,
checking for cuts, frays, and loose
parts. Damaged parts must be re-
placed immediately. Do not disas-
semble or modify the system.
Front seat belt assemblies must be
replaced after a collision. Rear seat
belt assemblies must be replaced after
a collision if they have been damaged
(i.e., bent retractor, torn webbing,
etc.). If there is any question regard-
ing belt or retractor condition, replace
the belt.
Air Bag Warning Light
The light should come on
and remain on for four to
eight seconds as a bulb
check when the ignition
switch is first turned ON. If the light is
not lit during starting, see your autho-
rized dealer. If the light stays on,
flickers, or comes on while driving,
have the system checked by an autho-
rized dealer.
Defroster
Check operation by selecting the de-
frost mode and place the blower con-
trol on high speed. You should be able
to feel the air directed against the
windshield. See your authorized
dealer for service if your defroster is
inoperable.
Floor Mat Safety Information
Always use floor mats designed to fit
the footwell of your vehicle. Use only
floor mats that leave the pedal area
unobstructed and that are firmly se-
cured so that they cannot slip out of
60
Page 73 of 332
ACTIVATING ADAPTIVE CRUISE CONTROL(ACC) ................................126
TO ACTIVATE ..........................127
TO SET A DESIRED ACC SPEED ...........127
TO CANCEL ...........................128
TO TURN OFF .........................128
TO RESUME SPEED .....................128
TO VARY THE SPEED SETTING ...........128
SETTING THE FOLLOWING DISTANCE IN ACC .................................129
OVERTAKE AID ........................131
ADAPTIVE CRUISE CONTROL (ACC) MENU . .131
DISPLAY WARNINGS AND MAINTENANCE . . .132
PRECAUTIONS WHILE DRIVING WITH ACC .................................133
NORMAL (FIXED SPEED) CRUISE CONTROL MODE................................134
FORWARD COLLISION WARNING (for versions/markets, where provided) ..........136
PARKSENSE® PARK ASSIST ...............137
PARKSENSE® SENSORS .................137
PARKSENSE® WARNING DISPLAY .........137
PARKSENSE® DISPLAY .................138
FRONT PARK ASSIST AUDIBLE ALERTS . . . .139
ENABLING AND DISABLING PARKSENSE® . .139
SERVICE THE PARKSENSE® PARK ASSIST SYSTEM..............................140
CLEANING THE PARK ASSIST SYSTEM .....140
67
Page 80 of 332

The BSM system notifies the driver of
objects in the detection zones by illu-
minating the BSM warning light lo-
cated in the outside mirrors in addi-
tion to sounding an audible (chime)
alert and reducing the radio volume.
Refer to “Modes Of Operation” for
further information.
The BSM system monitors the detec-
tion zone from three different entry
points (side, rear, front) while driving
to see if an alert is necessary. The BSM
system will issue an alert during these
types of zone entries.Entering From The Side
Vehicles that move into your adjacent
lanes from either side of the vehicle.
Entering From The Rear
Vehicles that come up from behind
your vehicle on either side and enter
the rear detection zone with a relative
speed of less than 48 km/h.
Overtaking Traffic
If you pass another vehicle slowly
with a relative speed of less than
24 km/h and the vehicle remains in
the blind spot for approximately 1.5
seconds, the warning light will be il-
luminated. If the difference in speed
between the two vehicles is greater
than 24 km/h, the warning light will
not illuminate.
The BSM system is designed not to
issue an alert on stationary objects
such as guardrails, posts, walls, foli-
age, berms, etc. However, occasion-
ally the system may alert on such ob-
jects. This is normal operation and
your vehicle does not require service.
Sensor Location (Driver Side Shown)
Side Monitoring
Rear Monitoring
Overtaking/Approaching
74
Page 90 of 332
from your mobile phonebook. When
complete the new favorite will be
shown.
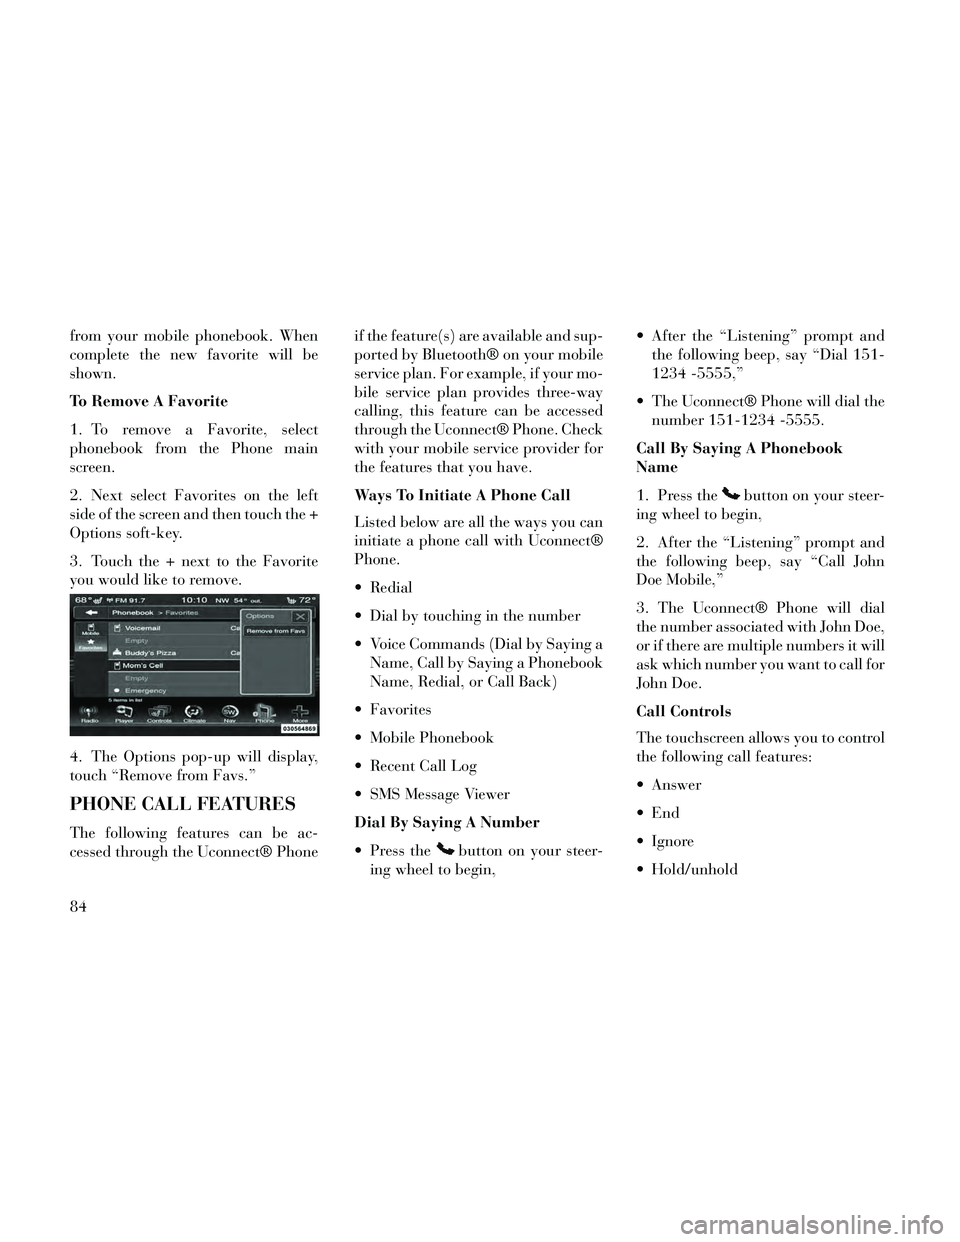
To Remove A Favorite
1. To remove a Favorite, select
phonebook from the Phone main
screen.
2. Next select Favorites on the left
side of the screen and then touch the +
Options soft-key.
3. Touch the + next to the Favorite
you would like to remove.
4. The Options pop-up will display,
touch “Remove from Favs.”
PHONE CALL FEATURES
The following features can be ac-
cessed through the Uconnect® Phoneif the feature(s) are available and sup-
ported by Bluetooth® on your mobile
service plan. For example, if your mo-
bile service plan provides three-way
calling, this feature can be accessed
through the Uconnect® Phone. Check
with your mobile service provider for
the features that you have.
Ways To Initiate A Phone Call
Listed below are all the ways you can
initiate a phone call with Uconnect®
Phone.
Redial
Dial by touching in the number
Voice Commands (Dial by Saying a
Name, Call by Saying a Phonebook
Name, Redial, or Call Back)
Favorites
Mobile Phonebook
Recent Call Log
SMS Message Viewer
Dial By Saying A Number
Press the
button on your steer-
ing wheel to begin, After the “Listening” prompt and
the following beep, say “Dial 151-
1234 -5555,”
The Uconnect® Phone will dial the number 151-1234 -5555.
Call By Saying A Phonebook
Name
1. Press the
button on your steer-
ing wheel to begin,
2. After the “Listening” prompt and
the following beep, say “Call John
Doe Mobile,”
3. The Uconnect® Phone will dial
the number associated with John Doe,
or if there are multiple numbers it will
ask which number you want to call for
John Doe.
Call Controls
The touchscreen allows you to control
the following call features:
Answer
Ignore
Hold/unhold
84
Page 93 of 332
NOTE: After every Uconnect®
Phone language change operation,
only the language-specific 32-
name phonebook is usable. The
paired phone name is not
language-specific and is usable
across all languages.
Emergency Assistance
If you are in an emergency and the
mobile phone is reachable:
Pick up the phone and manuallydial the emergency number for
your area.
If the phone is not reachable and the
Uconnect® Phone is operational, you
may reach the emergency number as
follows:
Press the
button to begin.
After the “Listening” prompt and the following beep, say “Call Emer-
gency or Dial Emergency” and the
Uconnect® Phone will instruct the
paired mobile phone to call the
emergency number. This feature is
supported in the U.S., Canada, and
Mexico. NOTE:
The Emergency call may also be
initiated by using the touch-
screen.
The emergency number dialed is based on the country where the
vehicle is purchased. The num-
ber dialed may not be appli-
cable with the available mobile
service and area.
The Uconnect® Phone does slightly lower your chances of
successfully making a phone
call as to that for the mobile
phone directly.
WARNING!
Your phone must be turned on and
connected to the Uconnect® Phone
to allow use of this vehicle feature
in emergency situations, when the
mobile phone has network coverage
and stays connected to the
Uconnect® Phone. Breakdown Service (for
versions/markets, where
provided)
If you need Breakdown service:
Press the
button to begin.
After the “Ready” prompt and the following beep, say “Breakdown
service.”
NOTE: The Breakdown service
number has to be setup before us-
ing. To setup, press the
button
and say “Setup, Breakdown Ser-
vice” and follow prompts.
Paging
To learn how to page, refer to “Work-
ing with Automated Systems.” Paging
works properly except for pagers of
certain companies, which time out a
little too soon to work properly with
the Uconnect® Phone.
Voice Mail Calling
To learn how to access your voice
mail, refer to “Working with Auto-
mated Systems.”
87
Page 94 of 332
Working With Automated Systems
This method is used in instances
where one generally has to press num-
bers on the mobile phone keypad
while navigating through an auto-
mated telephone system.
You can use your Uconnect® Phone to
access a voice mail system or an auto-
mated service, such as a paging ser-
vice or automated customer service
line. Some services require immediate
response selection. In some instances,
that may be too quick for use of the
Uconnect® Phone.
When calling a number with your
Uconnect® Phone that normally re-
quires you to enter in a touch-tone
sequence on your mobile phone key-
pad, you can utilize the touchscreen
or press the
button and say the
word “Send” then the sequence you
wish to enter. For example, if required
to enter your PIN followed with a
pound, (3746#),youcanpressthe
button and say, “Send3746#.”
Saying “Send” followed by a number,
or sequence of numbers, is also to be used for navigating through an auto-
mated customer service center menu
structure, and to leave a number on a
pager.
You can also send stored mobile
phonebook entries as tones for fast
and easy access to voice mail and
pager entries. For example, if you pre-
viously created a Phonebook entry
with First and/or Last Name as
“Voicemail Password”, then if you
press the
button and say “Send
Voicemail Password” the Uconnect®
Phone will then send the correspond-
ing phone number associated with the
phonebook entry, as tones over the
phone.
NOTE:
The first number encountered for that contact will be sent. All
other numbers entered for that
contact will be ignored.
You may not hear all of the tones due to mobile phone network
configurations. This is normal. Some paging and voice mail sys-
tems have system time out set-
tings that are too short and may
not allow the use of this feature.
Pauses, wait or other characters that are supported by some
phones are not supported over
Bluetooth®. These additional
symbols will be ignored in the
dialing a numbered sequence.
Barge In — Overriding Prompts
The
button can be used when
you wish to skip part of a prompt and
issue your voice command immedi-
ately. For example, if a prompt is ask-
ing “There are two numbers with the
name John. Say the full name” you
could press the
button and say,
“John Smith” to select that option
without having to listen to the rest of
the voice prompt.
88
Page 107 of 332
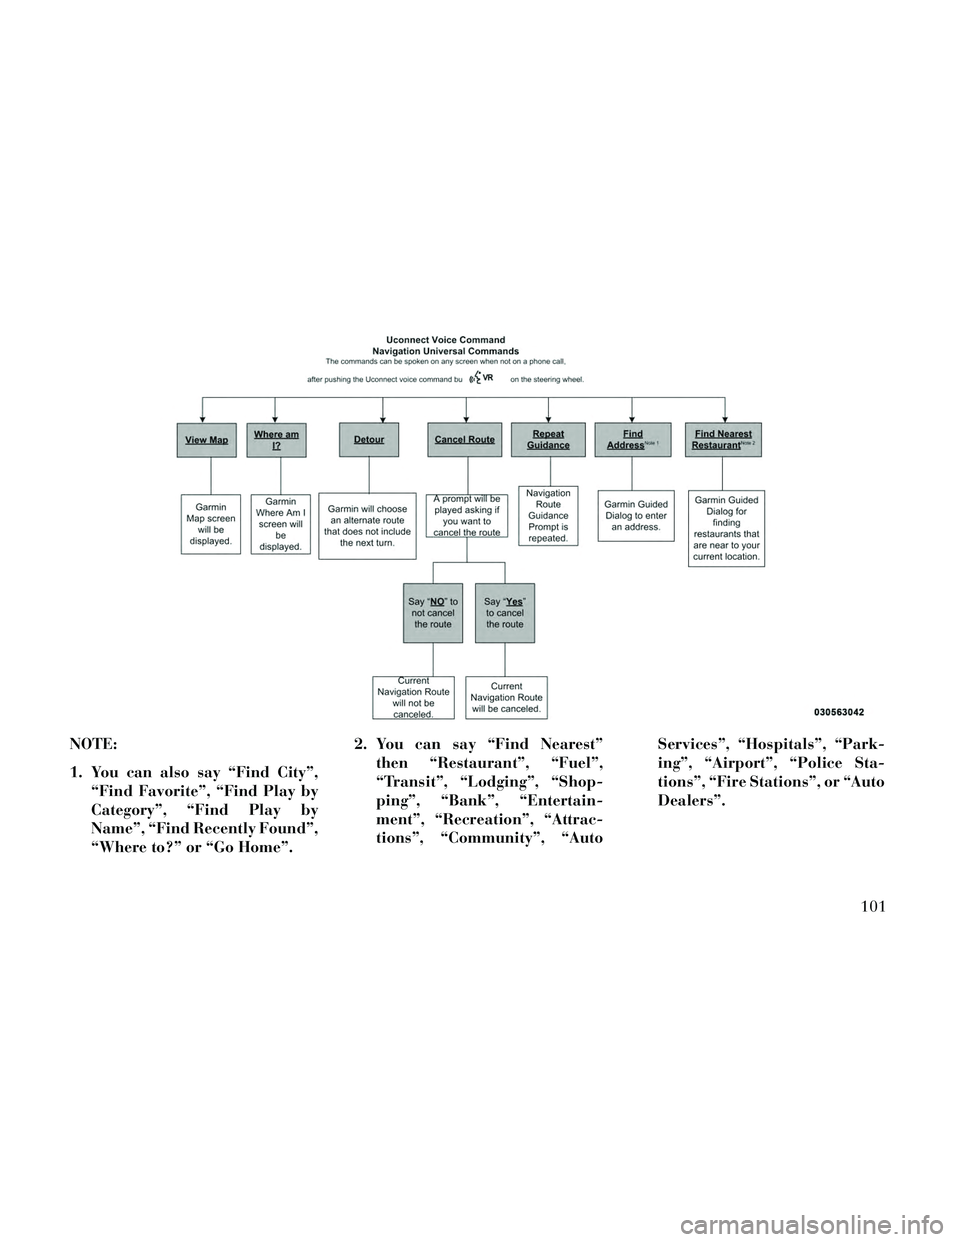
NOTE:
1. You can also say “Find City”,“Find Favorite”, “Find Play by
Category”, “Find Play by
Name”, “Find Recently Found”,
“Where to?” or “Go Home”. 2. You can say “Find Nearest”
then “Restaurant”, “Fuel”,
“Transit”, “Lodging”, “Shop-
ping”, “Bank”, “Entertain-
ment”, “Recreation”, “Attrac-
tions”, “Community”, “Auto Services”, “Hospitals”, “Park-
ing”, “Airport”, “Police Sta-
tions”, “Fire Stations”, or “Auto
Dealers”.
101
Page 113 of 332
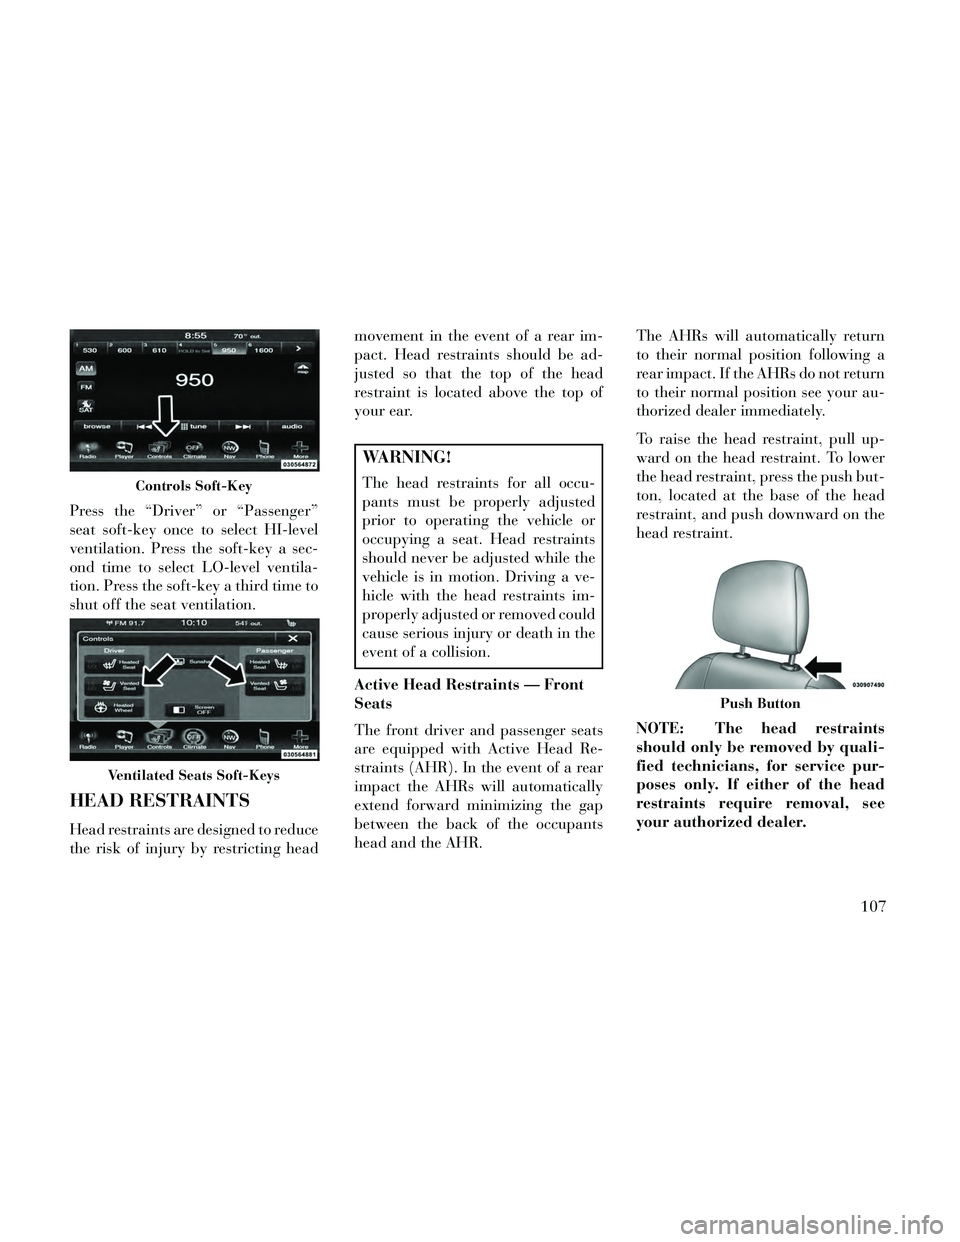
Press the “Driver” or “Passenger”
seat soft-key once to select HI-level
ventilation. Press the soft-key a sec-
ond time to select LO-level ventila-
tion. Press the soft-key a third time to
shut off the seat ventilation.
HEAD RESTRAINTS
Head restraints are designed to reduce
the risk of injury by restricting headmovement in the event of a rear im-
pact. Head restraints should be ad-
justed so that the top of the head
restraint is located above the top of
your ear.
WARNING!
The head restraints for all occu-
pants must be properly adjusted
prior to operating the vehicle or
occupying a seat. Head restraints
should never be adjusted while the
vehicle is in motion. Driving a ve-
hicle with the head restraints im-
properly adjusted or removed could
cause serious injury or death in the
event of a collision.
Active Head Restraints — Front
Seats
The front driver and passenger seats
are equipped with Active Head Re-
straints (AHR). In the event of a rear
impact the AHRs will automatically
extend forward minimizing the gap
between the back of the occupants
head and the AHR. The AHRs will automatically return
to their normal position following a
rear impact. If the AHRs do not return
to their normal position see your au-
thorized dealer immediately.
To raise the head restraint, pull up-
ward on the head restraint. To lower
the head restraint, press the push but-
ton, located at the base of the head
restraint, and push downward on the
head restraint.
NOTE: The head restraints
should only be removed by quali-
fied technicians, for service pur-
poses only. If either of the head
restraints require removal, see
your authorized dealer.Controls Soft-Key
Ventilated Seats Soft-Keys
Push Button
107