climate control Lancia Thema 2014 Owner handbook (in English)
[x] Cancel search | Manufacturer: LANCIA, Model Year: 2014, Model line: Thema, Model: Lancia Thema 2014Pages: 332, PDF Size: 3.46 MB
Page 66 of 332

WARNING!(Continued)
If you are required to drive withthe trunk/liftgate/rear doors
open, make sure that all windows
are closed and the climate control
BLOWER switch is set at high
speed. DO NOT use the recircula-
tion mode.
If it is necessary to sit in a parked vehicle with the engine running,
adjust your heating or cooling
controls to force outside air into
the vehicle. Set the blower at high
speed.
The best protection against carbon
monoxide entry into the vehicle body
is a properly maintained engine ex-
haust system.
Whenever a change is noticed in the
sound of the exhaust system, when
exhaust fumes can be detected inside
the vehicle, or when the underside or
rear of the vehicle is damaged, have a
competent mechanic inspect the com-
plete exhaust system and adjacent
body areas for broken, damaged, de-
teriorated, or mispositioned parts. Open seams or loose connections
could permit exhaust fumes to seep
into the passenger compartment. In
addition, inspect the exhaust system
each time the vehicle is raised for lu-
brication or oil change. Replace as
required.
SAFETY CHECKS YOU
SHOULD MAKE INSIDE
THE VEHICLE
Seat Belts
Inspect the belt system periodically,
checking for cuts, frays, and loose
parts. Damaged parts must be re-
placed immediately. Do not disas-
semble or modify the system.
Front seat belt assemblies must be
replaced after a collision. Rear seat
belt assemblies must be replaced after
a collision if they have been damaged
(i.e., bent retractor, torn webbing,
etc.). If there is any question regard-
ing belt or retractor condition, replace
the belt.
Air Bag Warning Light
The light should come on
and remain on for four to
eight seconds as a bulb
check when the ignition
switch is first turned ON. If the light is
not lit during starting, see your autho-
rized dealer. If the light stays on,
flickers, or comes on while driving,
have the system checked by an autho-
rized dealer.
Defroster
Check operation by selecting the de-
frost mode and place the blower con-
trol on high speed. You should be able
to feel the air directed against the
windshield. See your authorized
dealer for service if your defroster is
inoperable.
Floor Mat Safety Information
Always use floor mats designed to fit
the footwell of your vehicle. Use only
floor mats that leave the pedal area
unobstructed and that are firmly se-
cured so that they cannot slip out of
60
Page 162 of 332

VEHICLE INFO (CUSTOMER INFORMATIONFEATURES) (for versions/markets, where
provided) .............................174
MESSAGES # ..........................174
TURN MENU OFF .......................174
Uconnect® SETTINGS .....................174
HARD-KEYS ..........................175
SOFT-KEYS ...........................175
CUSTOMER PROGRAMMABLE FEATURES — Uconnect® 8.4 SETTINGS ................175
SOUND SYSTEMS ........................183
NAVIGATION SYSTEM (for versions/markets, where provided) .........................183
SETTING THE ANALOG CLOCK .............184
iPod®/USB/MP3 CONTROL (for vehicles/markets, where provided) .........................184
HARMAN KARDON® Logic7® HIGH PERFORMANCE MULTICHANNEL SURROUND
SOUND SYSTEM WITH DRIVER-SELECTABLE
SURROUND (DSS) (for versions/markets, where
required) ...............................184
STEERING WHEEL AUDIO CONTROLS .......185
RADIO OPERATION .....................185
CDPLAYER...........................185
CD/DVD DISC MAINTENANCE ..............186
RADIO OPERATION AND MOBILE PHONES . . . .186
CLIMATE CONTROLS .....................186
156
Page 163 of 332

GENERAL OVERVIEW...................186
CLIMATE CONTROL FUNCTIONS ..........190
AUTOMATIC TEMPERATURE CONTROL (ATC) ................................190
OPERATING TIPS ......................191
157
Page 164 of 332

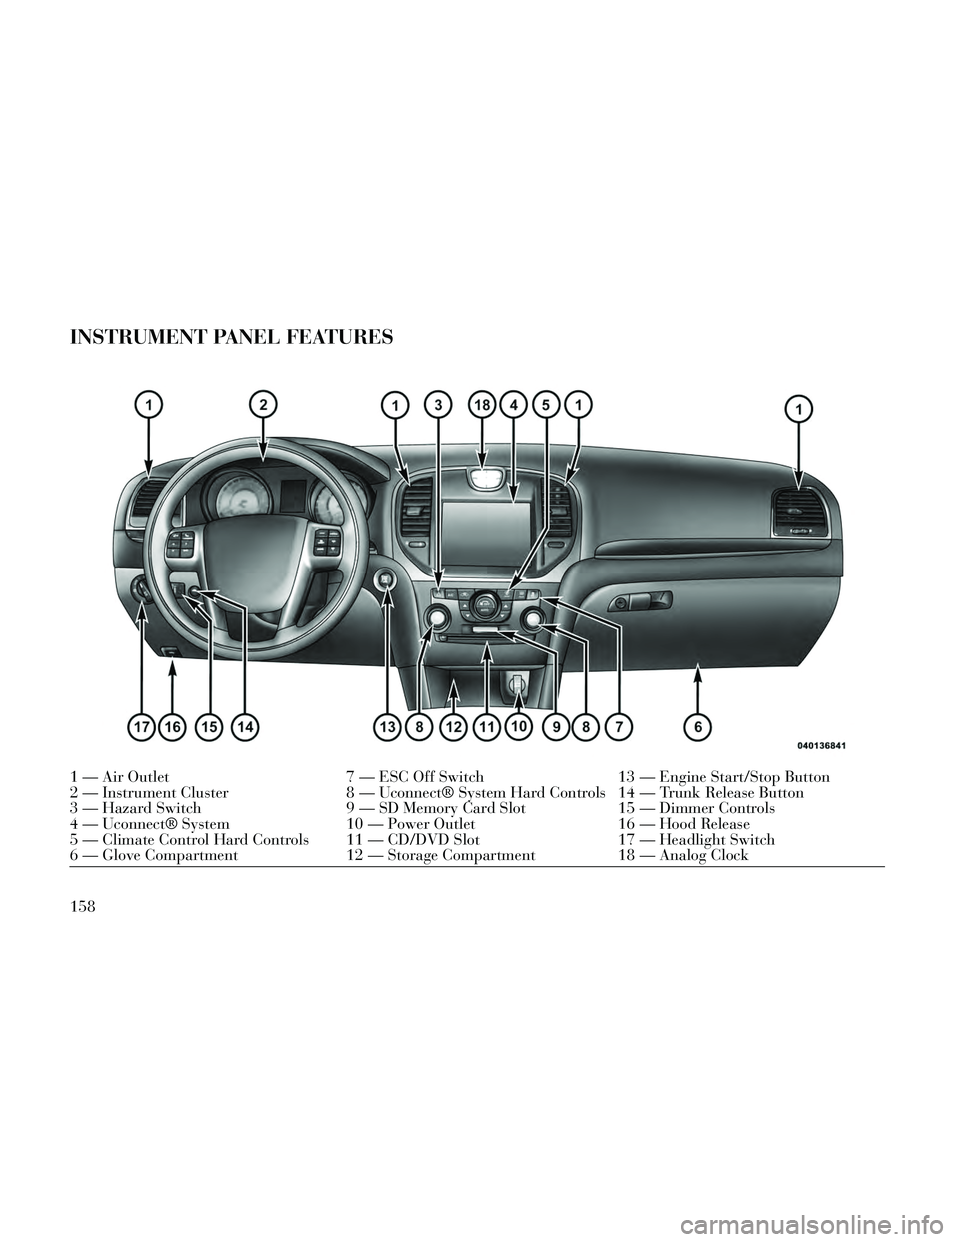
INSTRUMENT PANEL FEATURES
1 — Air Outlet7 — ESC Off Switch13 — Engine Start/Stop Button
2 — Instrument Cluster 8 — Uconnect® System Hard Controls 14 — Trunk Release Button
3 — Hazard Switch 9 — SD Memory Card Slot15 — Dimmer Controls
4 — Uconnect® System 10 — Power Outlet16 — Hood Release
5 — Climate Control Hard Controls 11 — CD/DVD Slot 17 — Headlight Switch
6 — Glove Compartment 12 — Storage Compartment18 — Analog Clock
158
Page 181 of 332

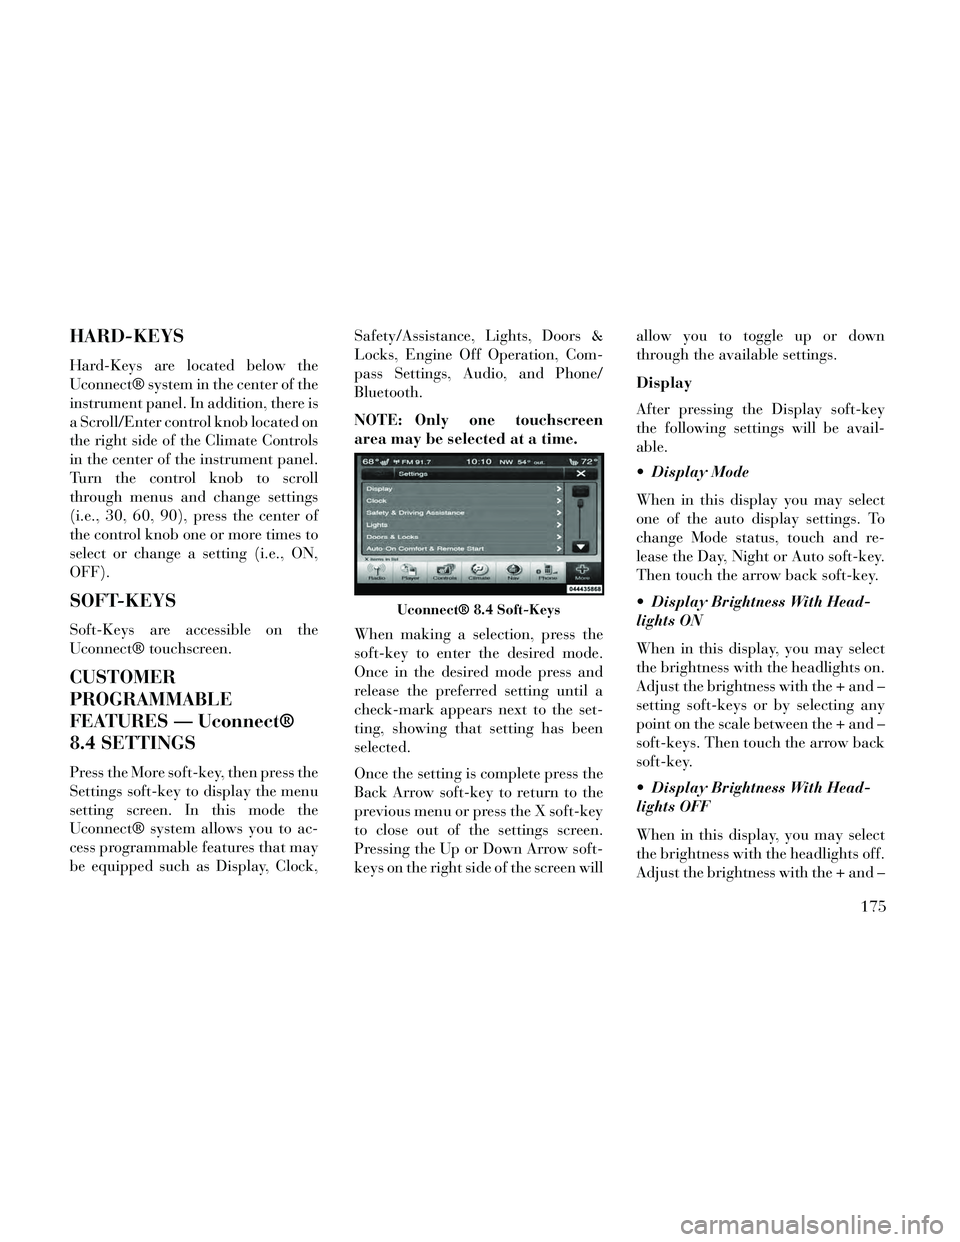
HARD-KEYS
Hard-Keys are located below the
Uconnect® system in the center of the
instrument panel. In addition, there is
a Scroll/Enter control knob located on
the right side of the Climate Controls
in the center of the instrument panel.
Turn the control knob to scroll
through menus and change settings
(i.e., 30, 60, 90), press the center of
the control knob one or more times to
select or change a setting (i.e., ON,
OFF).
SOFT-KEYS
Soft-Keys are accessible on the
Uconnect® touchscreen.
CUSTOMER
PROGRAMMABLE
FEATURES — Uconnect®
8.4 SETTINGS
Press the More soft-key, then press the
Settings soft-key to display the menu
setting screen. In this mode the
Uconnect® system allows you to ac-
cess programmable features that may
be equipped such as Display, Clock,Safety/Assistance, Lights, Doors &
Locks, Engine Off Operation, Com-
pass Settings, Audio, and Phone/
Bluetooth.
NOTE: Only one touchscreen
area may be selected at a time.
When making a selection, press the
soft-key to enter the desired mode.
Once in the desired mode press and
release the preferred setting until a
check-mark appears next to the set-
ting, showing that setting has been
selected.
Once the setting is complete press the
Back Arrow soft-key to return to the
previous menu or press the X soft-key
to close out of the settings screen.
Pressing the Up or Down Arrow soft-
keys on the right side of the screen willallow you to toggle up or down
through the available settings.
Display
After pressing the Display soft-key
the following settings will be avail-
able.
Display Mode
When in this display you may select
one of the auto display settings. To
change Mode status, touch and re-
lease the Day, Night or Auto soft-key.
Then touch the arrow back soft-key.
Display Brightness With Head-
lights ON
When in this display, you may select
the brightness with the headlights on.
Adjust the brightness with the + and –
setting soft-keys or by selecting any
point on the scale between the + and –
soft-keys. Then touch the arrow back
soft-key.
Display Brightness With Head-
lights OFF
When in this display, you may select
the brightness with the headlights off.
Adjust the brightness with the + and –
Uconnect® 8.4 Soft-Keys
175
Page 192 of 332

on the vehicle, the center button will
select the next available CD in the
player.
CD/DVD DISC
MAINTENANCE
To keep a CD/DVD in good condition,
take the following precautions:
1. Handle the disc by its edge; avoid
touching the surface.
2. If the disc is stained, clean the
surface with a soft cloth, wiping from
center to edge.
3. Do not apply paper or tape to the
disc; avoid scratching the disc.
4. Do not use solvents such as ben-
zene, thinner, cleaners, or anti-static
sprays.
5. Store the disc in its case after play-
ing.
6. Do not expose the disc to direct
sunlight.
7. Do not store the disc where tem-
peratures may become too high.NOTE: If you experience diffi-
culty in playing a particular disc, it
may be damaged (i.e., scratched,
reflective coating removed, a hair,
moisture or dew on the disc) over-
sized, or have protection encoding.
Try a known good disc before con-
sidering disc player service.
RADIO OPERATION AND
MOBILE PHONES
Under certain conditions, the mobile
phone being on in your vehicle can
cause erratic or noisy performance
from your radio. This condition may
be lessened or eliminated by relocat-
ing the mobile phone antenna. This
condition is not harmful to the radio.
If your radio performance does not
satisfactorily “clear” by the reposi-
tioning of the antenna, it is recom-
mended that the radio volume be
turned down or off during mobile
phone operation.
CLIMATE CONTROLS
The air conditioning and heating sys-
tem is designed to make you comfort-
able in all types of weather. This sys-
tem can be operated through either
the controls on the instrument panel
or through the Uconnect® system dis-
play.
When the Uconnect® system is in dif-
ferent modes (Radio, Player, Settings,
More, etc.) the driver and passenger
temperature settings will be indicated
at the top of the display.
GENERAL OVERVIEW
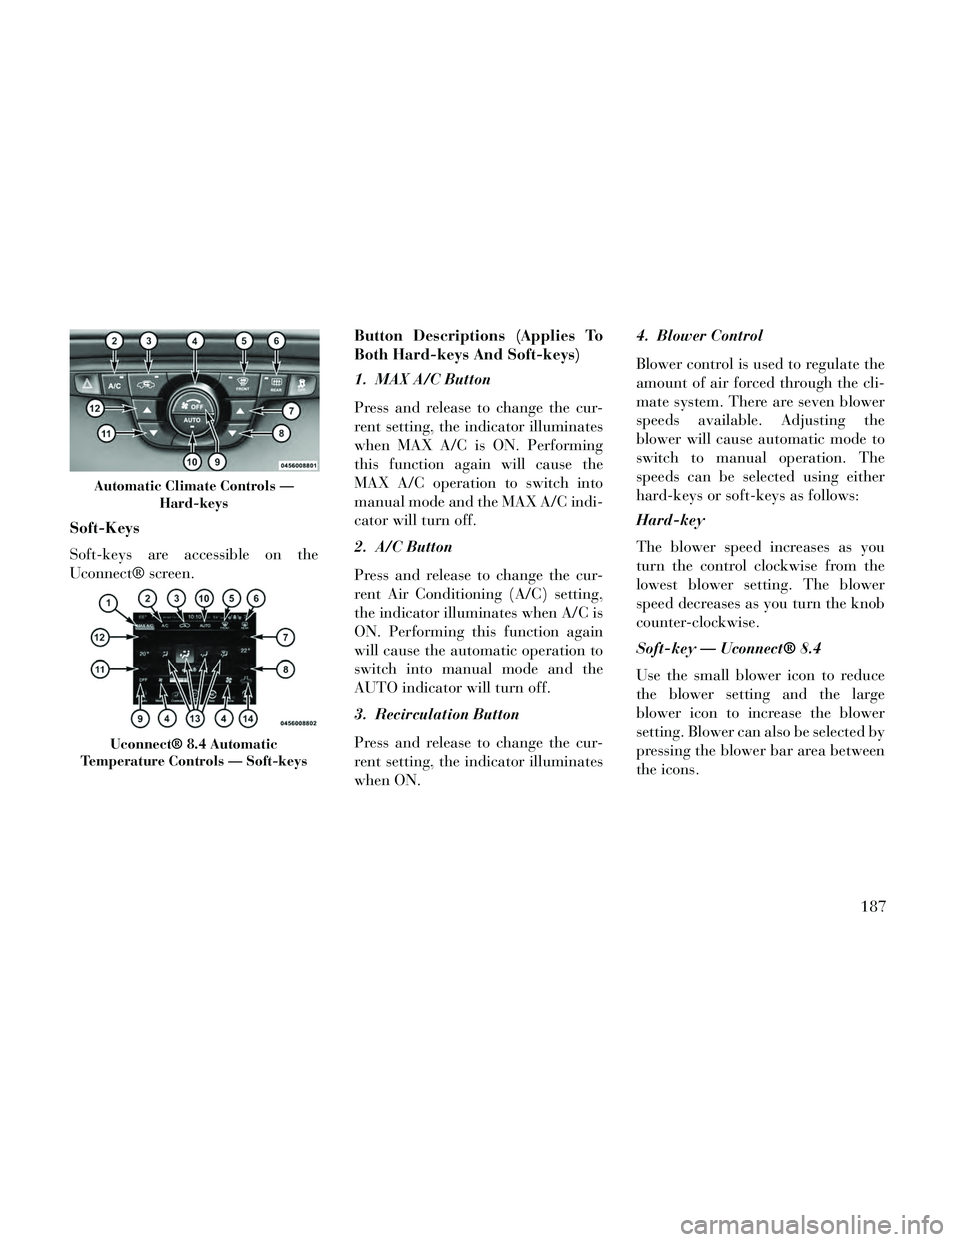
Hard-Keys
The hard-keys are located below the
Uconnect® screen, in the center of the
instrument panel.
186
Page 193 of 332

Soft-Keys
Soft-keys are accessible on the
Uconnect® screen.Button Descriptions (Applies To
Both Hard-keys And Soft-keys)
1. MAX A/C Button
Press and release to change the cur-
rent setting, the indicator illuminates
when MAX A/C is ON. Performing
this function again will cause the
MAX A/C operation to switch into
manual mode and the MAX A/C indi-
cator will turn off.
2. A/C Button
Press and release to change the cur-
rent Air Conditioning (A/C) setting,
the indicator illuminates when A/C is
ON. Performing this function again
will cause the automatic operation to
switch into manual mode and the
AUTO indicator will turn off.
3. Recirculation Button
Press and release to change the cur-
rent setting, the indicator illuminates
when ON.4. Blower Control
Blower control is used to regulate the
amount of air forced through the cli-
mate system. There are seven blower
speeds available. Adjusting the
blower will cause automatic mode to
switch to manual operation. The
speeds can be selected using either
hard-keys or soft-keys as follows:
Hard-key
The blower speed increases as you
turn the control clockwise from the
lowest blower setting. The blower
speed decreases as you turn the knob
counter-clockwise.
Soft-key — Uconnect® 8.4
Use the small blower icon to reduce
the blower setting and the large
blower icon to increase the blower
setting. Blower can also be selected by
pressing the blower bar area between
the icons.
Automatic Climate Controls —
Hard-keys
Uconnect® 8.4 Automatic
Temperature Controls — Soft-keys
187
Page 194 of 332

5. Front Defrost Button
Press and release to change the cur-
rent airflow setting to Defrost mode.
The indicator illuminates when this
feature is ON. Air comes from the
windshield and side window demist
outlets. When the defrost button is
selected, the blower level will in-
crease. Use Defrost mode with maxi-
mum temperature settings for best
windshield and side window defrost-
ing and defogging. Performing this
function will cause the ATC to switch
into manual mode. If the front defrost
mode is turned off the climate system
will return to the previous setting.
6. Rear Defrost Button
Press and release this button to turn
on the rear window defroster and the
heated outside mirrors. An indicator
will illuminate when the rear window
defroster is on. The rear window de-
froster automatically turns off after
10 minutes.CAUTION!
Failure to follow these cautions can
cause damage to the heating ele-
ments:
Use care when washing the insideof the rear window. Do not use
abrasive window cleaners on the
interior surface of the window.
Use a soft cloth and a mild wash-
ing solution, wiping parallel to
the heating elements. Labels can
be peeled off after soaking with
warm water.
Do not use scrapers, sharp instru- ments, or abrasive window clean-
ers on the interior surface of the
window.
Keep all objects a safe distance from the window.
7. Passenger Temperature Control
Up Button
Provides the passenger with indepen-
dent temperature control. Push the
button for warmer temperature set-
tings. NOTE: Pressing this button
while in Sync mode will automati-
cally exit Sync.
8. Passenger Temperature Control
Down Button
Provides the passenger with indepen-
dent temperature control. Push the
button for cooler temperature set-
tings.
NOTE: Pressing this button
while in Sync mode will automati-
cally exit Sync.
9. Climate Control OFF Button
Press and release this button to turn
the Climate Control ON/OFF.
10. AUTO Operation Button
Automatically controls the interior
cabin temperature by adjusting air-
flow distribution and amount. Per-
forming this function will cause the
ATC to switch between manual mode
and automatic modes. Refer to “Au-
tomatic Operation” for more informa-
tion.
188
Page 196 of 332

CLIMATE CONTROL
FUNCTIONS
A/C (Air Conditioning)
The Air Conditioning (A/C) button
allows the operator to manually acti-
vate or deactivate the air conditioning
system. When the air conditioning
system is turned on, cool dehumidi-
fied air will flow through the outlets
into the cabin. For improved fuel
economy, press the A/C button to turn
off the air conditioning and manually
adjust the blower and airflow mode
settings. Also, make sure to select only
Panel, Bi-Level or Floor modes.
NOTE:
If fog or mist appears on thewindshield or side glass, select
Defrost mode and increase
blower speed.
If your air conditioning perfor- mance seems lower than ex-
pected, check the front of the
A/C condenser (located in front
of the radiator), for an accumu-
lation of dirt or insects. Clean
with a gentle water spray from behind the radiator and through
the condenser. Fabric front fas-
cia protectors may reduce air-
flow to the condenser, reducing
air conditioning performance.
MAX A/C
Max A/C sets the control for maxi-
mum cooling performance.Press and
release to toggle between Max A/C
and the prior settings. The soft-key
illuminates when Max A/C is ON.
In MAX A/C, the blower level and
mode position can be adjusted to de-
sired user settings. Pressing other set-
tings will cause the MAX A/C opera-
tion to switch to the prior settings and
the MAX A/C indicator will turn off.
Recirculation
When outside air contains
smoke, odors, or high hu-
midity, or if rapid cooling is
desired, you may wish to
recirculate interior air by pressing the
Recirculation control button. The re-
circulation indicator will illuminate
when this button is selected. Push the button a second time to turn off the
Recirculation mode and allow outside
air into the vehicle.
NOTE: In cold weather, use of
Recirculation mode may lead to
excessive window fogging. The re-
circulation feature may be un-
available (soft-key button greyed
out) if conditions exist that could
create fogging on the inside of he
windshield. On systems with
Manual Climate Controls, the Re-
circulation mode is not allowed in
Defrost mode to improve window
clearing operation. Recirculation
will be disabled automatically if
this mode is selected. Attempting
to use Recirculation while in this
mode will cause the LED in the
control button to blink and then
turn off.
AUTOMATIC
TEMPERATURE CONTROL
(ATC)
ATC Hard-keys are located in the cen-
ter of the instrument panel.
190
Page 198 of 332

water is recommended. Refer to
“Maintenance Procedures” in “Main-
taining Your Vehicle” for proper cool-
ant selection.
Winter Operation
Use of the air Recirculation mode dur-
ing Winter months is not recom-
mended because it may cause window
fogging.
Vacation Storage
Any time you store your vehicle or
keep it out of service (i.e., vacation)
for two weeks or more, run the air
conditioning system at idle for about
five minutes in the fresh air and high
blower setting. This will ensure ad-
equate system lubrication to minimize
the possibility of compressor damage
when the system is started again.Window Fogging
Interior fogging on the windshield can
be quickly removed by turning the
mode selector to Defrost. The Defrost/
Floor mode can be used to maintain a
clear windshield and provide suffi-
cient heating. If side window fogging
becomes objectionable, increase
blower speed to improve airflow and
clearing of the side windows. Vehicle
windows tend to fog on the inside in
mild but rainy or humid weather.
NOTE:
Recirculate without A/C should
not be used for long periods, as
fogging may occur.
Automatic Temperature Con- trols (ATC) will automatically
adjust the climate control set-
tings to reduce or eliminate win-
dow fogging on the front wind-
shield. When this occurs,
recirculation will be
unavailable. A/C Air Filter
The climate control system filters out-
side air containing dust, pollen and
some odors. Strong odors cannot be
totally filtered out. Refer to “Mainte-
nance Procedures” in “Maintaining
Your Vehicle” for filter replacement
instructions.
192