window Lancia Thesis 2006 Owner handbook (in English)
[x] Cancel search | Manufacturer: LANCIA, Model Year: 2006, Model line: Thesis, Model: Lancia Thesis 2006Pages: 386, PDF Size: 8.69 MB
Page 53 of 386
52
The other recognition system set-
tings that can be enabled/disabled
are:
– automatic locking of doors and
boot.
As regards the setting of the recog-
nition system customizations, refer
to the CONNECT supplement.
FAILURE INDICATION
The presence of anomalies in the
Keyless System is indicated by the
lighting of symbol Yon the instru-
ment display, together with the mes-
sage “VEHICLE PROTECTION
SYSTEM FAULT”.
IMPORTANT In case of fault, con-
tact your Lancia Dealership.
Before and during auto-
matic actuation of the
window regulators and
sunroof, always make sure that
the passengers and the persons
standing near the car are not
exposed to the risk of injures that
may be caused either by the mov-
ing windows and sunroof or by
objects dragged or hit by the
same. To actuate central opening of the
windows and sunroof, keep the
remote control button B(fig. 25)
depressed for more than 2 seconds
after opening the doors: both the win-
dow regulators and the sunroof will be
actuated until they are fully opened or
until the button is released.
This function can be used to aerate
the passenger’s compartment before
getting into the car parked in the sun.
IMPORTANT Do not lay the CID
device outside the car on the sunroof,
to avoid a fake identification of the
CID itself as if inside the car. It is rec-
ommend to carry about with you the
CID device (e.g. into a pocket). SYSTEM SETTINGS
The CONNECT enables to cus-
tomize certain functions of the
Keyless System recognition system,
through the settings that can be
selected on the CONNECT display.
The “central unlock” and “driver’s
door unlock” functions of the central
locking can be set also for the
Keyless System and operate as fol-
lows:
– central unlock: all the car doors
are unlocked simultaneously and
access is possible through every door
– driver’s door unlock: access is
possible through the driver’s door
whereas the other doors remain
locked, thus preventing un-autho-
rized persons from getting into the
car. In this case, the led on the dri-
ver’s door panel lights up (green
colour) whereas the leds on the other
doors remain off.
When “unlocking driver’s door” is
set, it is anyhow possible to unlock all
the doors, to enable access to passen-
gers, by pushing button B(fig. 18) on
CID device or, after opening the dri-
ver’s door, by pushing the central
unlock button existing on the door
panel.
Page 73 of 386
72
The mirrors are automatically
demisted/defrosted when the heated
rear window is operated.
IMPORTANTRearview mirror
surface is flat to make objects seem
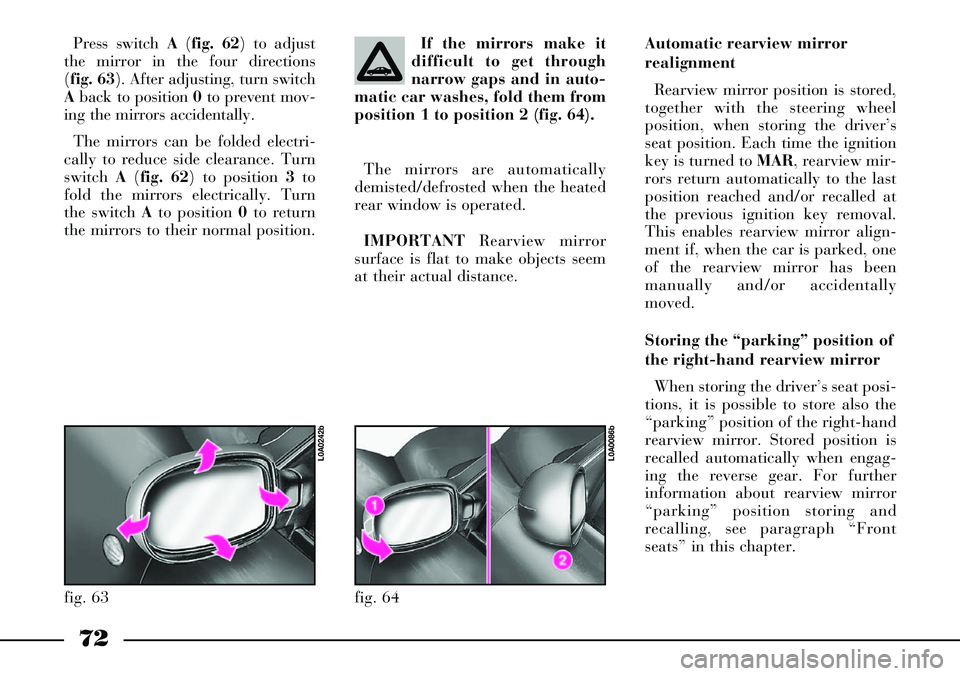
at their actual distance. If the mirrors make it
difficult to get through
narrow gaps and in auto-
matic car washes, fold them from
position 1 to position 2 (fig. 64).Automatic rearview mirror
realignment
Rearview mirror position is stored,
together with the steering wheel
position, when storing the driver’s
seat position. Each time the ignition
key is turned to MAR, rearview mir-
rors return automatically to the last
position reached and/or recalled at
the previous ignition key removal.
This enables rearview mirror align-
ment if, when the car is parked, one
of the rearview mirror has been
manually and/or accidentally
moved.
Storing the “parking” position of
the right-hand rearview mirror
When storing the driver’s seat posi-
tions, it is possible to store also the
“parking” position of the right-hand
rearview mirror. Stored position is
recalled automatically when engag-
ing the reverse gear. For further
information about rearview mirror
“parking” position storing and
recalling, see paragraph “Front
seats” in this chapter.
fig. 64
L0A0086b
Press switch A(fig. 62) to adjust
the mirror in the four directions
(fig. 63). After adjusting, turn switch
Aback to position 0to prevent mov-
ing the mirrors accidentally.
The mirrors can be folded electri-
cally to reduce side clearance. Turn
switch A(fig. 62) to position 3to
fold the mirrors electrically. Turn
the switch Ato position 0to return
the mirrors to their normal position.
fig. 63
L0A0242b
Page 74 of 386
73
Improper use of the elec-
trical window winders can
be dangerous. Before and
during their operation ensure
that any passengers in the car are
not at risk from the moving glass
either by personal objects getting
caught in the mechanism or by
being injured by it directly.
Always remove the ignition key
when you get out of the car to
prevent the electrical window
winders being operated acciden-
tally and constituting a danger to
the people left in the car. IMPORTANT In the event that the
anti-trap function is activated 5
times in only 1 minute, the system
will automatically enter the “recov-
ery” mode (self-protection). This
condition is pointed out by the fact
that, in the closing phase, the win-
dow goes up in jerks.
It is therefore necessary in this case
to carry out the system restore pro-
cedure by operating window open-
ing control or turning the ignition
key to STOPand then to MAR.
Regular operation is restored if no
malfunction is present: otherwise
contact a Lancia Dealership.
In the event that the system detects
a malfunction, the failure message
and symbol ª!will appear on the
instrument panel display (see
“Window anti-trap safety system” at
paragraph “Warning lights”).ELECTRIC
WINDOWS
ANTI-TRAP SAFETY SYSTEM
Front and rear electric windows are
provided with anti-trap safety
device. When the system control unit
detects an obstacle in the window
closing travel, it makes the window
travel stop and reverse immediately.
This system complies with regula-
tion 2000/4/EC coming soon in
force, which is destined to protect
passengers leaning out of the win-
dows. Therefore, in case of unlawful
intrusions from the outside, the anti-
trap safety device could not activate.
Page 75 of 386

74
CONTROLS
Electric windows work with igni-
tion key at MAR.
IMPORTANTWith ignition key at
STOPor after removing it, the elec-
tric windows can be still operated for
about 2 minutes. They will deacti-
vate immediately when opening one
of the doors.
Driver’s side
On the driver’s door panel mask
there are 5 buttons (fig. 65) for con-
trolling every window.Front windows
Press buttons Aor Bto open/close
the required window (driver or pas-
senger side). Pressing briefly the
button the window “jerks”, whereas
a prolonged pressing makes the win-
dow opening or closing in “automat-
ic and continuous” mode. When
pressing again the button the win-
dow stops in the required position.
A– Front left window opening/ clos-
ing, “continuous automatic” opera-
tion during window opening/ closing
B– Front right window opening/
closing, “continuous automatic” oper-
ation during window opening/ clos-
ing.
Rear windows
Press buttons Cor Dto open/close
the required window (left or right
side). Pressing briefly the button the
window “jerks”, whereas a prolonged
pressing makes the window opening
in “automatic and continuous” mode.
When pressing again the button the
window stops in the required posi-
tion.C– Rear left window opening/clos-
ing, “continuous automatic” opera-
tion just during window opening
D– Rear right window opening/
closing, “continuous automatic” oper-
ation just during window opening
E– Rear window controls enabling/
disabling button; controls are disabled
when the button led is on.
Passenger’s side
On the passenger’s door panel
mask there is button A (fig. 66), for
opening/closing the passenger’s win-
dow.
fig. 65
L0A0050b
fig. 66
L0A0065b
Page 76 of 386
75
Pressing briefly the button the win-
dow “jerks”, whereas a prolonged
pressing makes the window opening
or closing in “automatic and continu-
ous” mode. When pressing again the
button the window stops in the
required position.
Rear controls
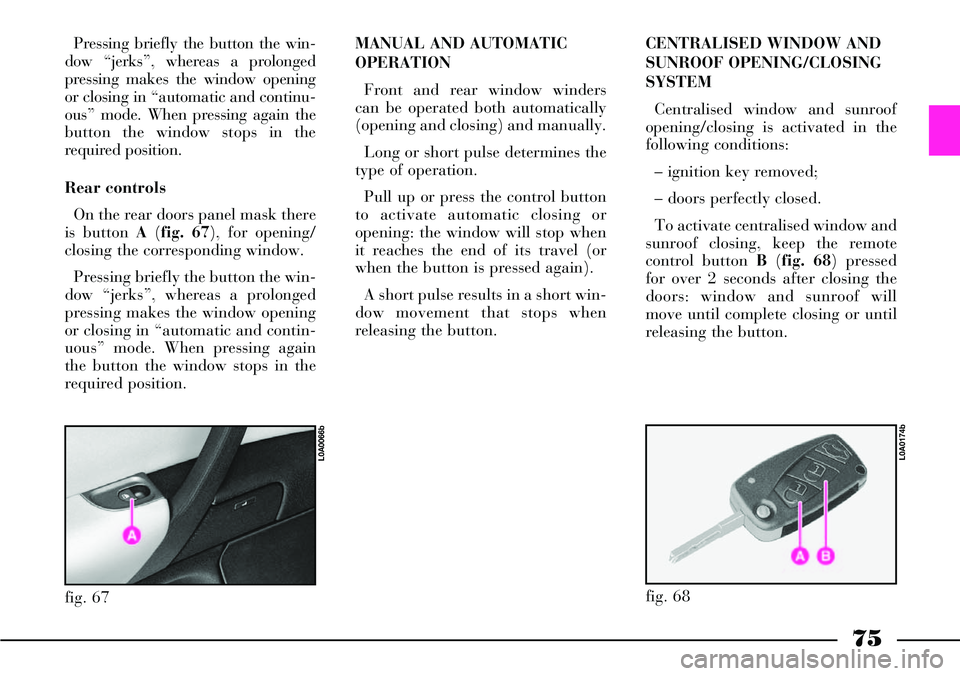
On the rear doors panel mask there
is button A (fig. 67), for opening/
closing the corresponding window.
Pressing briefly the button the win-
dow “jerks”, whereas a prolonged
pressing makes the window opening
or closing in “automatic and contin-
uous” mode. When pressing again
the button the window stops in the
required position.MANUAL AND AUTOMATIC
OPERATION
Front and rear window winders
can be operated both automatically
(opening and closing) and manually.
Long or short pulse determines the
type of operation.
Pull up or press the control button
to activate automatic closing or
opening: the window will stop when
it reaches the end of its travel (or
when the button is pressed again).
A short pulse results in a short win-
dow movement that stops when
releasing the button.CENTRALISED WINDOW AND
SUNROOF OPENING/CLOSING
SYSTEM
Centralised window and sunroof
opening/closing is activated in the
following conditions:
– ignition key removed;
– doors perfectly closed.
To activate centralised window and
sunroof closing, keep the remote
control button B(fig. 68) pressed
for over 2 seconds after closing the
doors: window and sunroof will
move until complete closing or until
releasing the button.
fig. 67
L0A0066b
fig. 68
L0A0174b
Page 77 of 386

76
SEAT BELTS
HOW TO USE
THE SEAT BELTS
The belt should be worn keeping
the chest straight and rested against
the seat back.
Instrument panel warning light
<
will come on if the ignition key is
turned to MARand the driver’s seat
belt is not fastened.
To fasten the seat belt, take the
fastening tongue A (fig. 69) and
push it into buckle B, until you hear
it click.Pull the seat belt gently. If it jams,
let it rewind a little and pull it out
again without jerking.
To release the seat belts, press but-
ton C. Guide the seat belt with your
hand while is rewinding to prevent it
from twisting.
Through the reel, the belt auto-
matically adapts to the body of the
passenger wearing it, allowing free-
dom of movement.Never press button C
(fig. 69) while travelling.
fig. 69
L0A0088b
fig. 70
L0A003b
To activate centralised window and
sunroof opening, keep button A(fig.
68) pressed for over 2 seconds after
opening the doors: window and sun-
roof will move until complete open-
ing or until releasing the button.
This function can be used to aerate
the passenger’s compartment before
getting into the car parked in the
sun.
Page 89 of 386
88
FRONT AND SIDE
AIRBAGS
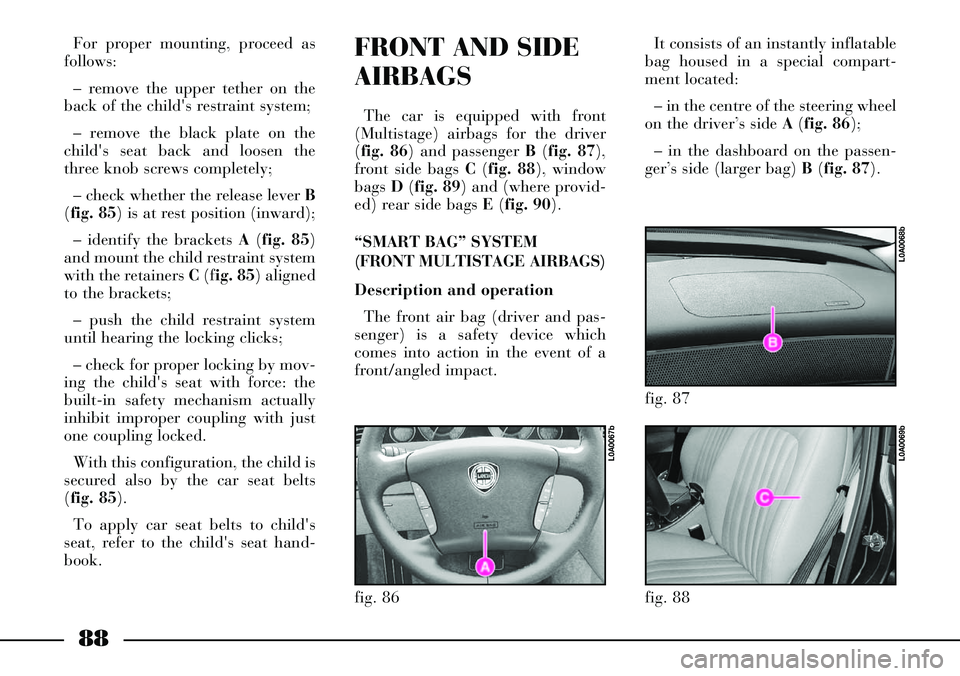
The car is equipped with front
(Multistage) airbags for the driver
(fig. 86) and passenger B(fig. 87),
front side bags C (fig. 88), window
bags D(fig. 89) and (where provid-
ed) rear side bags E(fig. 90).
“SMART BAG” SYSTEM
(FRONT MULTISTAGE AIRBAGS)
Description and operation
The front air bag (driver and pas-
senger) is a safety device which
comes into action in the event of a
front/angled impact.
fig. 86
L0A0067b
For proper mounting, proceed as
follows:
– remove the upper tether on the
back of the child's restraint system;
– remove the black plate on the
child's seat back and loosen the
three knob screws completely;
– check whether the release lever B
(fig. 85) is at rest position (inward);
– identify the brackets A(fig. 85)
and mount the child restraint system
with the retainers C(fig. 85) aligned
to the brackets;
– push the child restraint system
until hearing the locking clicks;
– check for proper locking by mov-
ing the child's seat with force: the
built-in safety mechanism actually
inhibit improper coupling with just
one coupling locked.
With this configuration, the child is
secured also by the car seat belts
(fig. 85).
To apply car seat belts to child's
seat, refer to the child's seat hand-
book.It consists of an instantly inflatable
bag housed in a special compart-
ment located:
– in the centre of the steering wheel
on the driver’s side A (fig. 86);
– in the dashboard on the passen-
ger’s side (larger bag) B(fig. 87).
fig. 87
L0A0068b
fig. 88
L0A0069b
Page 93 of 386
In the event of side collisions at low
speed, the restraining action of the
seat belts is sufficient and the airbag
is not inflated. Also in this case it is
of vital importance to wear the seat
belts since in case of side crash they
guarantee proper positioning of the
passenger and prevent the occupants
to be pitched out of the car in case of
violent crashes.
The front and rear side bag is not a
replacement for the use of seat belts
but rather a complement. We rec-
ommend that seat belts are worn at
all times as prescribed by legislation
in Europe and most other countries
world-wide.
92
SIDE AIRBAGS
(SIDE BAG - WINDOW BAG)
Purpose of the side airbags is to
increase passenger protection in the
event of a side impact of medium to
high severity.
Side airbags consist of two types of
instantly inflatable bags:
– the side bags housed in the front
seat bags C (fig. 88) and (where
provided) in the side stuffing of the
rear seats E (fig. 90). This solution
ensures that the bag is always in an
optimal position with respect to the
passenger, regardless of the seat
position;– the window bags, which are “cur-
tain” cushions located behind the
side coverings of the roof and cov-
ered by proper finishings such to
allow the cushion unfolding down-
wards; this solution, studied for the
head protection, allows offering the
best protection to the front and rear
passengers in the event of side crash,
thanks to the wide cushion inflation
surface.
In In the event of a side collision
the electronic control unit processes
the signals coming from a decelera-
tion sensor and, if required, fire the
bags.
The bags inflate instantly and act
as a soft protective barrier between
the body of the passengers and the
car door. Bags deflate immediately
afterwards.
Page 94 of 386

IMPORTANT If the ¬warning
light does not turn on when turning
the ignition key to MARor if it stays
on when travelling, (together with
message on display) this could indi-
cate a failure in safety retaining sys-
tems; under this condition air bags
or pretensioners could not trigger in
the event of collision or, in a restrict-
ed number of cases, they could trig-
ger accidentally. Stop the car and
contact Lancia Dealershipto have
the system checked immediately.
The air bag system has a validity of
14 years as concerns the pyrotechnic
charge and 10 years as concerns the
coil contact (see the plate on the front
let door). As these dates approach, con-
tact Lancia Dealershipto have them
replaced.
IMPORTANTAfter an accident
which triggered the airbags, go to a
Lancia Dealershipto have the
entire safety system, the electronic
control unit, the seat belts and the
pretensioners replaced and to have
the electrical system checked. Never lean head, arms
and elbows out of the
window.Operation of the front bags is not
disabled by the passenger’s front
airbag and rear side bag deactiva-
tion switch.
IMPORTANTIn the event of side
crash, you can obtain the best pro-
tection by the system keeping a cor-
rect position on the seat, allowing
thus a correct window bag unfold-
ing.IMPORTANTThe front airbags
and/or front and rear side bags can
be triggered if the car is involved in
hard impacts or collisions in the area
of the underbody, such as for exam-
ple violent impacts against steps,
kerbs or projecting objects fixed to
the ground or if the car falls into
large pot-holes or dips in the road
surface.
IMPORTANTWhen the airbag is
fired it emits a small amount of
powder and smoke. This is not
harmful and does not indicate the
beginning of a fire. Furthermore the
surface of the inflated bag and the
passenger compartment may be cov-
ered with powder residues. This
powder may irritate skin and eyes.
In the event of exposure, wash with
mild soap and water.
93
Never rest head, arms
and elbows on the door,
on the windows and in the
window bag area to prevent pos-
sible injuries during the inflation
phase.
Page 103 of 386
102
The wiper stops working a few
strokes after releasing the stalk; a
further “cleaning stroke”, after a
few seconds completes the wiping
operation.
Windscreen washer nozzles are fit-
ted with demisting resistors that cut
in automatically (for about 3 min-
utes) when pressing the fast window
demisting/defrosting button.
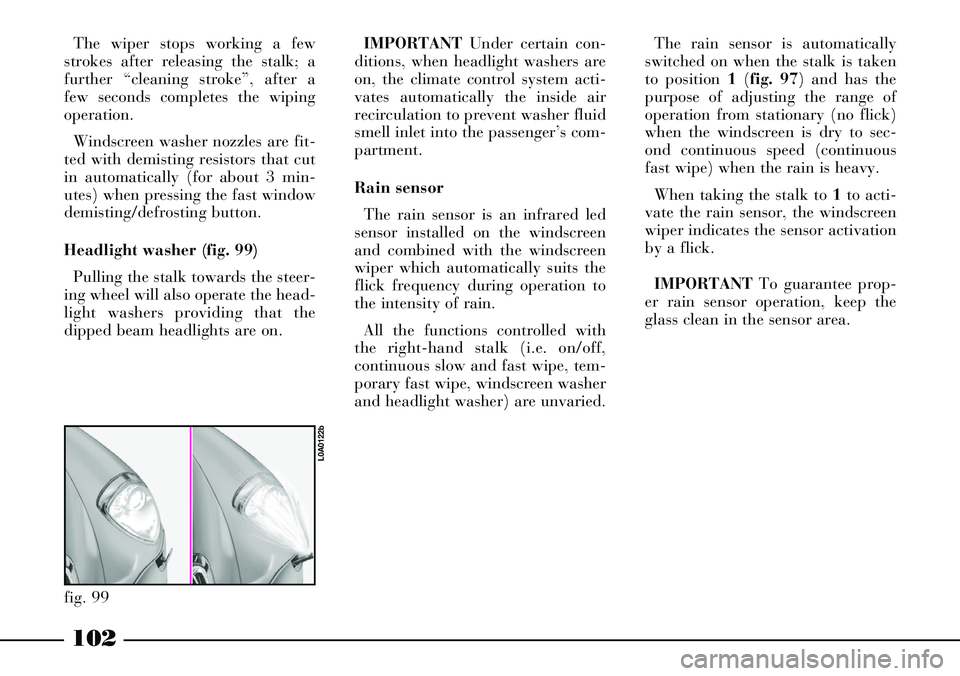
Headlight washer (fig. 99)
Pulling the stalk towards the steer-
ing wheel will also operate the head-
light washers providing that the
dipped beam headlights are on.IMPORTANTUnder certain con-
ditions, when headlight washers are
on, the climate control system acti-
vates automatically the inside air
recirculation to prevent washer fluid
smell inlet into the passenger’s com-
partment.
Rain sensor
The rain sensor is an infrared led
sensor installed on the windscreen
and combined with the windscreen
wiper which automatically suits the
flick frequency during operation to
the intensity of rain.
All the functions controlled with
the right-hand stalk (i.e. on/off,
continuous slow and fast wipe, tem-
porary fast wipe, windscreen washer
and headlight washer) are unvaried.
fig. 99
L0A0122b
The rain sensor is automatically
switched on when the stalk is taken
to position 1(fig. 97) and has the
purpose of adjusting the range of
operation from stationary (no flick)
when the windscreen is dry to sec-
ond continuous speed (continuous
fast wipe) when the rain is heavy.
When taking the stalk to 1to acti-
vate the rain sensor, the windscreen
wiper indicates the sensor activation
by a flick.
IMPORTANTTo guarantee prop-
er rain sensor operation, keep the
glass clean in the sensor area.