boot Lancia Thesis 2006 Owner handbook (in English)
[x] Cancel search | Manufacturer: LANCIA, Model Year: 2006, Model line: Thesis, Model: Lancia Thesis 2006Pages: 386, PDF Size: 8.69 MB
Page 304 of 386

303
DISCONNECTING THE
UNLOADED BATTERY
Should the discharged battery be
disconnected (to have it charged
again or to replace it) perform the fol-
lowing operations in the given order:
1) To open the boot from the out-
side, fully turn the key anticlockwise
in the lock (fig. 81), and at the same
time slightly press the lower edge of
the number plate holder to reduce op-
eration effort.
2) Remove the cover and disconnect
the battery terminals.
3) Fully charge the battery again or
replace it.4) Connect battery terminals and re-
assemble cover.
5) Depress push button A(fig. 81)
to restore normal lock operation.
6) Close boot normally without
slamming it down: lock electric servo
control will fully lock it.
7) Perform the initialisation proce-
dure of the door lock, air conditioner
and ESP system control units, here-
after described.INITIALISING THE CONTROL
UNITS OF THE DOOR LOCKS,
AIR CONDITIONER AND ESP
SYSTEM
Whenever the battery is connected
electrically or protection fuses are re-
placed, to restore correct door locking,
air conditioning and ESP system, per-
form the following operations (after
connection is performed or after re-
placing one of the fuses):
1) Enter key into the lock of one of
the front doors and perform a door
centralised opening/closing cycle.
2) Start the engine and turn on the
compressor of the conditioner, setting
a lower temperature value than that
of the environment and check
whether the led on the disconnection
push button of the conditioner com-
pressor òis lit.
3) Start running the car and drive it
for a few meters in a straight line (ac-
celerating), until the ESP warning
light is off
á. It is not possible to close
the boot when battery is
discharged or discon-
nected for the purpose of being re-
placed/ charged again: do not try
to close the boot by slamming it
down. The boot remains anyhow
hooked on and it must be re-
opened by turning the key in the
lock.
Page 306 of 386

305
Under no circumstances
should a battery charger
be used to start the
engine: it could damage the elec-
tronic systems and in particular
the ignition and injection control
units.Carefully clean the
threading before fastening
the tow ring. Before start-
ing to tow the car, make sure the
ring has been fully fastened. Never try to charge a
frozen battery: first let it
thaw out, otherwise it
may bust. If the battery has
frozen, check that the internal
elements are not broken (risk of
short circuit) and that the casing
is not cracked causing the acid to
leak out. This acid is poisonous
and corrosive.
TOWING THE CAR
The tow ring provided with the car
is to be found in the tool box under
the boot carpet.
To fit the tow ring proceed as fol-
lows:
– Remove the clipped in Acover
from the front (fig. 82) or rear
bumper (fig. 83), by using a screw-
driver as a lever in the point shown
in the figure.IMPORTANT To carry out this
operation, if you use the provided
flat-head screwdriver, cover its head
with a piece of cloth to prevent paint
damaging.
– Screw the tow ring Bin its hous-
ing.
fig. 82
L0A0090b
fig. 83
L0A0091b
Page 313 of 386

312
SERVICE SCHEDULE
20 40 60 80 100 120 140 160 180 thousands of kilometres
ççççç çççç
ççççç çççç
ççççç çççç
çç çç
ççççç çççç
ççççç çççç
çç
çç çç
ççççç çççç
çç
çç çç
ççççç çççç
ççççç ççççCheck tyre conditions and wear; adjust pressure, if required
Check primary and secondary battery charge status
Check wear of windscreen/rear window blades
Check rear disc brake pad wear
Inspect conditions of: underbody protection and outside
bodywork, piping (exhaust - fuel lines - brake lines), rubber parts
(boots, sleeves, bushings, etc.), brake and fuel line hoses
Check for bonnet and boot lock cleanness, lever cleanness
and lubrication
Sight check for conditions of Poly-V accessory drive belt
Check diesel engine smokiness in exhaust
Replace fuel filter (JTD versions)
Check fuel evaporation system operation
Replace air cleaner cartridge (petrol versions)
Replace air cleaner cartridge (JTD versions)
Check and top up fluids (engine coolant, brakes,
hydraulic clutch, power steering, windscreen washer, battery, etc.)
Page 315 of 386

314
ADDITIONAL
CHECKS
Every 1,000 kmor before long
trips, check and top up as necessary:
– engine coolant level
– brake/hydraulic clutchfluid
level
– power steering fluid level
– windscreen/rear window and
headlight washer fluid level
– tyre pressure and conditions.
Every 3,000 kmcheck the engine
oil level and top up as necessary.
You are recommended to use FL
Seleniaproducts that are designed
and produced specifically for LAN-
CIA cars (see “Capacities” in
“Technical Specifications”).
ANNUAL
INSPECTION
SCHEDULE
The following annual inspection
schedule is recommended for
cars travelling less than 20,000
km a year (e.g. approximately
10,000 km). The schedule
includes the following opera-
tions:
1) Check tyre condition and wear
and adjust pressure (including spare
wheel)
2) Check wear on windscreen/rear
window blades
3) Check rear disc brake pad con-
ditions and wear
4) Inspect conditions of: under-
body protection and outside body-
work, piping (exhaust - fuel lines -
brake lines), rubber parts (boots -
sleeves - bushings, etc.), brake and
fuel line hoses5) check for bonnet and boot lock
cleanness, lever cleanness and lubri-
cation
6) Check primary and secondary
battery charge status
7) Check conditions of various con-
trol belts
8) Check and top up fluid levels
(engine coolant, brakes, windscreen
washer, battery, etc.)
9) Change engine oil
10) Replace engine oil filter
11) Replace dust/pollen filter.
Page 330 of 386

329
USEFUL ADVICE FOR
LENGTHENING THE LIFE OF
YOUR BATTERY
To prevent rapidly draining the
battery and ensure that it continues
to work correctly, the following
should be noted:
– Terminals must always be firmly
tightened.
– Do not keep accessories (e.g.
sound system, hazard lights, parking
lights, etc.).
– When you park the car, ensure
the doors, boot and bonnet are
closed properly. The ceiling lights
must be off.
– Before working on the electrical
system, disconnect the negative
cable from the battery.– If after buying the car, you want
to install electric accessories which
require permanent electric supply,
visit a Lancia Dealership, whose
qualified personnel, in addition to
suggesting the most suitable devices
belonging to the Lineaccessori
Lancia, will evaluate the overall
electric absorption, checking
whether the car’s electric system is
capable of withstanding the load
required, or whether it should be
integrated with a more powerful
battery. These devices in fact take
electricity also when the ignition key
is removed (car parked, engine off),
and can gradually drain the battery.
The overall intake of these devices
(standard and after-market) must
be less than 0.6 mA x Ah (of the bat-
tery), as shown in the following
table.Battery Maximum
idle intake
70 Ah 42 mA
80 Ah 48 mA
100 Ah 60 mA
It is also important to remember
that high intake devices (such as
bottle warmers, vacuum cleaners,
cellular phones, frigo bar, etc.) will
speed up battery discharging when
powered with engine off or running
idle.
– Please note that when installing
additional systems in the car, incor-
rect wiring can be dangerous espe-
cially when concerning safety sys-
tems.
Page 342 of 386

341
IDENTIFICATION
DATA
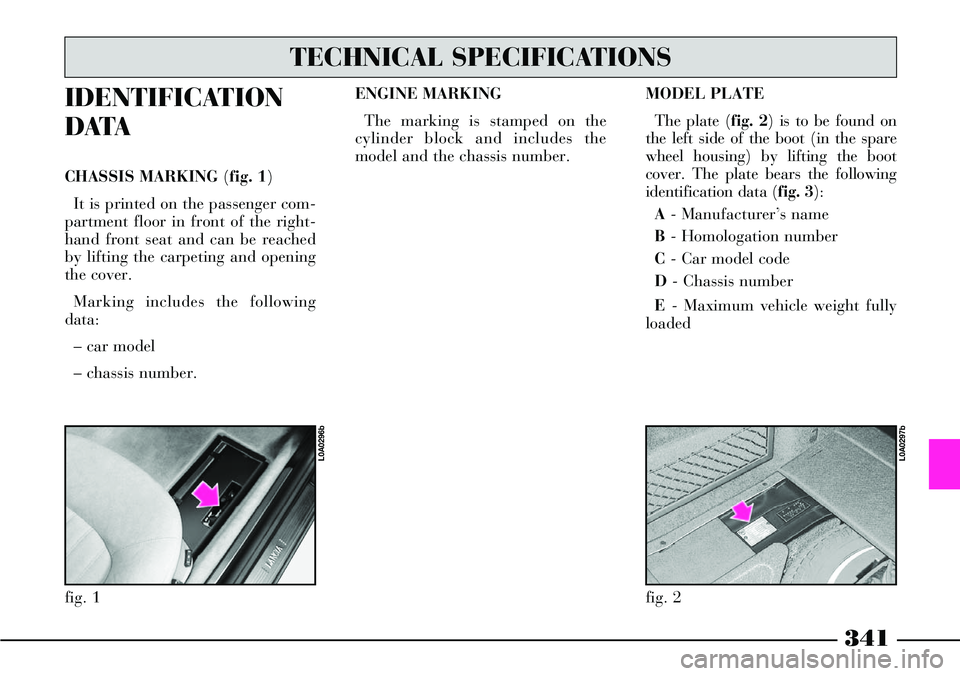
CHASSIS MARKING (fig. 1)
It is printed on the passenger com-
partment floor in front of the right-
hand front seat and can be reached
by lifting the carpeting and opening
the cover.
Marking includes the following
data:
– car model
– chassis number.ENGINE MARKING
The marking is stamped on the
cylinder block and includes the
model and the chassis number.
fig. 1
L0A0296b
fig. 2
L0A0297b
TECHNICAL SPECIFICATIONS
MODEL PLATE
The plate (fig. 2) is to be found on
the left side of the boot (in the spare
wheel housing) by lifting the boot
cover. The plate bears the following
identification data (fig. 3):
A- Manufacturer’s name
B- Homologation number
C- Car model code
D- Chassis number
E- Maximum vehicle weight fully
loaded
Page 360 of 386

359
DIMENSIONS
fig. 7The sizes are in mm and refer to the car fitted with standard tyres.
Slight size changes with optional tyres. Height is intended for an unladen car.
Boot volume (as per VDA standards): 400 dm
3
L0A0171b
(*) = 3.0 V6 CAEand
3.2 V6 CAE versions
Page 371 of 386

370
Battery
- checking the battery
charge ................................ 327
- disconnecting the loaded
battery ............................... 302
- disconnecting the
unloaded battery................ 303
- initialising the control
units of the door locks,
air conditioner and ESP
system................................ 303
- jump starting ............. 272-304
- maintenance ..................... 326
- recharging the
battery ...................... 304-328
- replacement ...................... 328
- useful advice ..................... 329
Bodywork
- maintenance ..................... 337
- version code ...................... 343Bodywork paint
identification plate .............. 342
Bodywork versions (codes) ..... 343
Bonnet .................................... 237
Boot
- anchoring the load ............ 232
- ceiling light ........................ 231
- closing the boot.................. 231
- functions that can be
modified by the
CONNECT menu ............... 229
- luggage nets ....................... 231
- luggage transport -
important notes ................. 233
- opening by remote
control ............................... 228
- opening from the inside .... 227
- opening from the outside
with the key ....................... 228
- power socket ..................... 234
Boot light
- bulb replacement ............... 290Bose HI-FI audio system ........ 248
Bottle/can holder
- front ................................. 217
- rear ................................... 219
Brake and hydraulic
clutch fluid .......................... 323
Brakes
- fluid level ......................... 323
- technical specifications ...... 348
Bulbs (replacing) .................... 281
- bulbs ................................. 283
- front light cluster ............... 284
- general instructions ........... 282
- rear light cluster ................ 286
- replacing an exterior light .. 284
- types of bulbs ................... 282
Capacities ............................. 362
Car maintenance .................. 309
- additional checks .............. 314
Page 375 of 386

374
Front fog lights
- bulb replacement ............... 285
- control .............................. 171
Front passenger presence sensor
(airbag) ................................ 91
Front seats ............................. 60
- armrests ............................. 65
- Comfort Seats ................... 64
- electrically adjustable
seats ................................. 60
- head restraints .................. 65
- heating ............................. 62
- manually adjustable seats
(moving the seat backward
and forward) .................... 60
- paper pockets .................... 221
- storing the driver’s seat
positions ............................ 62
Fuel
- consumption ..................... 366
- cut-off switch .................... 173
- fuel tank cap ..................... 238- level gauge ........................ 108
Fuel consumption ................... 366
Fuel cut-off switch and circuit
breaker................................. 173
Fuel evaporation canister ....... 6
Fuel feed/ignition
- technical specifications ...... 346
Fuel filler cap .......................... 238
Fuel gauge............................... 108
Fuses (replacing) .................... 292
- fuses ................................. 296
- fuses in the boot ................ 295
- fuses in the dashboard ....... 294
- fuses in the engine
compartment ..................... 294
- general .............................. 292
- general fuses ..................... 293
- location ............................. 293
Getting to know your car.... 12
Glove compartment ................ 216
Glove compartment light
- bulb replacement .............. 289
Handles ................................ 221
Hazard lights ........................ 170
Headlight washer
- control .............................. 101
- fluid .................................. 324
Headlights
- (Bi-Xeno) gas-discharge
lamps ................................. 241
- headlight orientation
for left-/right-hand drive .. 243
Head restraints
- front ................................. 65
- rear ................................... 66
Heated rear window ............... 172
Identification data ................. 341
- bodywork paint
identification plate ............. 342
- chassis marking ................ 341
- engine marking ................. 341
- model plate ....................... 341
Page 376 of 386

375
If a tyre is punctured
(changing a wheel) .............. 274
If an accident occurs .............. 308
- if anyone is injured ............ 308
- first-aid kit ....................... 309
Ignition switch ....................... 24
In an emergency ................... 271
Instrument dimmer ................ 172
Instrument panel .................... 105
Instruments ............................. 107
Interior equipment ................. 212
Interiors (cleaning) ................. 339
“Isofix” child restraint system
(presetting for mounting) .... 85
Jack ...................................... 276
Jacking the car ........................ 307
- with an arm hoist or
a shop jack ........................ 307
- with the jack ..................... 307
Key ...................................... 27
- actuation logic of the boot
lock by means of the metal
insert ................................. 36
- actuation logic of the boot
lock by means of the
remote control .................. 35
- automatically actuated
functions ............................ 37
- battery replacement .......... 38
- functions that can be
actuated with the metal
insert of the key ................. 34
- remote control functions .... 32
- request for additional
keys with remote control.... 39
Keyless System
(recognition system) ............ 44
- Autoclose function ............ 50
- bonnet opening ................. 50
- central locking/opening of
windows and sunroof ......... 51- CID device ........................ 44
- CID device battery
replacement ....................... 53
- door unlocking to
access car........................... 49
- knob for activating
instrument panel and
engine start-up .................. 47
- failure indication .............. 52
- locking the door and
leaving the car ................... 50
- “Garage” position
(emergency actuation) ...... 46
- ministerial homologation ... 53
- request for additional
CID devices ............................ 54
- system settings .................. 52
Kilometer counter and
trip meter ............................ 110
Kilometer counter and
trip meter display ................. 110