audio Lancia Thesis 2006 Owner handbook (in English)
[x] Cancel search | Manufacturer: LANCIA, Model Year: 2006, Model line: Thesis, Model: Lancia Thesis 2006Pages: 386, PDF Size: 8.69 MB
Page 16 of 386
15
THESIS CONNECT infotelematic
system, in its most refined version,
includes: colour TV set, sound sys-
tem with cassette player, CD-
ROM/Audio CD player, CD-chang-
er, GSM cell phone, navigator, trip
computer and voice commands (for
certain functions of cell phone,
audio system and navigator).
The following pages describe the
system controls and main functions.
The car is provided with a special
supplement dealing with CONNECT
infotelematic system to be used as
quick reference guide for using the
system. Read through this supple-
ment carefully and keep it always
within reach (e.g. in the glove com-
partment).
IMPORTANTFor the navigation
system of the CONNECT, only use
only the original CD provided with
the car or, in any case other CDs of
the same brand.If you drive with the vol-
ume too high you put both
your own life and that of
others in jeopardy. You should
adjust the volume so that you can
hear noises from outside the car
(e.g. horns, ambulance/police
sirens, etc.).
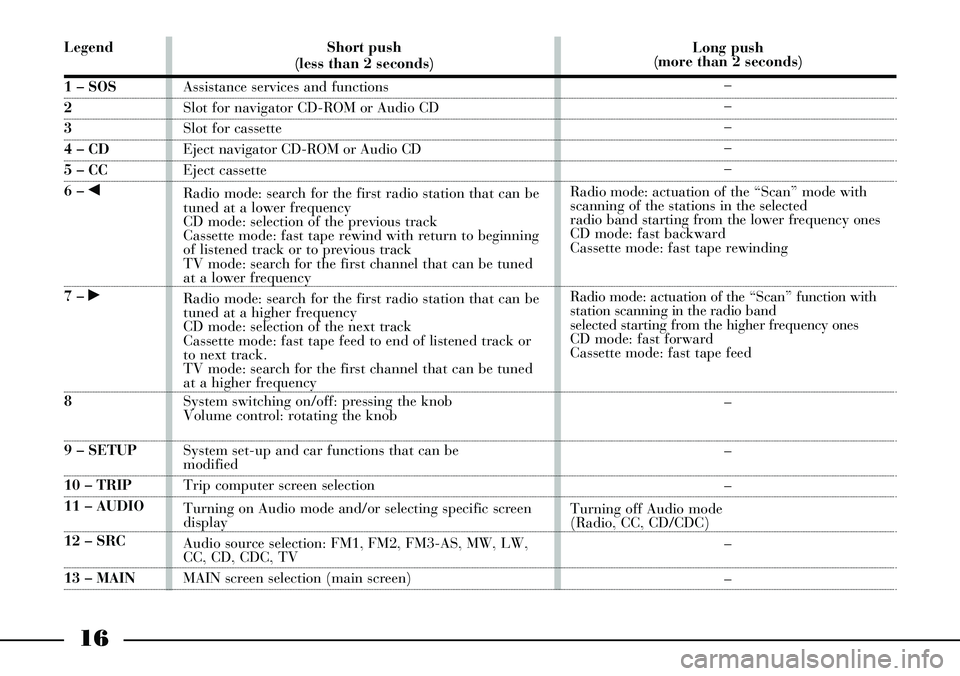
CONNECT CONTROLS (fig. 2)
The CONNECT system functions
can be managed by means of 29
buttons and 2 rotating selectors
(knobs). Certain controls have mul-
tiple functions that are dependent on
the system operating conditions
active.
The type of function that can be
actuated by means of the controls
depend, in some cases, on how long
the button is pressed down (long or
short push), as shown in the follow-
ing table. The Lancia navigation
system helps driver while
he drives, by suggesting
vocally or graphically, the opti-
mum routing to reach his preset
destination. Navigation system
suggestions do not excuse driver
from his full responsibilities due
to his driving behaviour and to
his compliance with road and
other traffic regulations. The
responsibility for road safety
always lies with the car driver,
and it falls on him in any case.IMPORTANTThe provided phone
is of the Single-Band type and there-
fore if your network provider is not
operating with the 900 Mhz GSM
standard, coverage troubles may arise
notwithstanding the roaming. Contact
your network provider for further in-
formation.
Page 17 of 386
16
Legend
1 – SOS
2
3
4 – CD
5 – CC
6 – ¯
7 – ˙
8
9 – SETUP
10 – TRIP
11 – AUDIO
12 – SRC
13 – MAINShort push
(less than 2 seconds)
Assistance services and functions
Slot for navigator CD-ROM or Audio CD
Slot for cassette
Eject navigator CD-ROM or Audio CD
Eject cassette
Radio mode: search for the first radio station that can be
tuned at a lower frequency
CD mode: selection of the previous track
Cassette mode: fast tape rewind with return to beginning
of listened track or to previous track
TV mode: search for the first channel that can be tuned
at a lower frequency
Radio mode: search for the first radio station that can be
tuned at a higher frequency
CD mode: selection of the next track
Cassette mode: fast tape feed to end of listened track or
to next track.
TV mode: search for the first channel that can be tuned
at a higher frequency
System switching on/off: pressing the knob
Volume control: rotating the knob
System set-up and car functions that can be
modified
Trip computer screen selection
Turning on Audio mode and/or selecting specific screen
display
Audio source selection: FM1, FM2, FM3-AS, MW, LW,
CC, CD, CDC, TV
MAIN screen selection (main screen)Long push
(more than 2 seconds)
–
–
–
–
–
Radio mode: actuation of the “Scan” mode with
scanning of the stations in the selected
radio band starting from the lower frequency ones
CD mode: fast backward
Cassette mode: fast tape rewinding
Radio mode: actuation of the “Scan” function with
station scanning in the radio band
selected starting from the higher frequency ones
CD mode: fast forward
Cassette mode: fast tape feed
–
–
–
Turning off Audio mode
(Radio, CC, CD/CDC)
–
–
Page 19 of 386
18
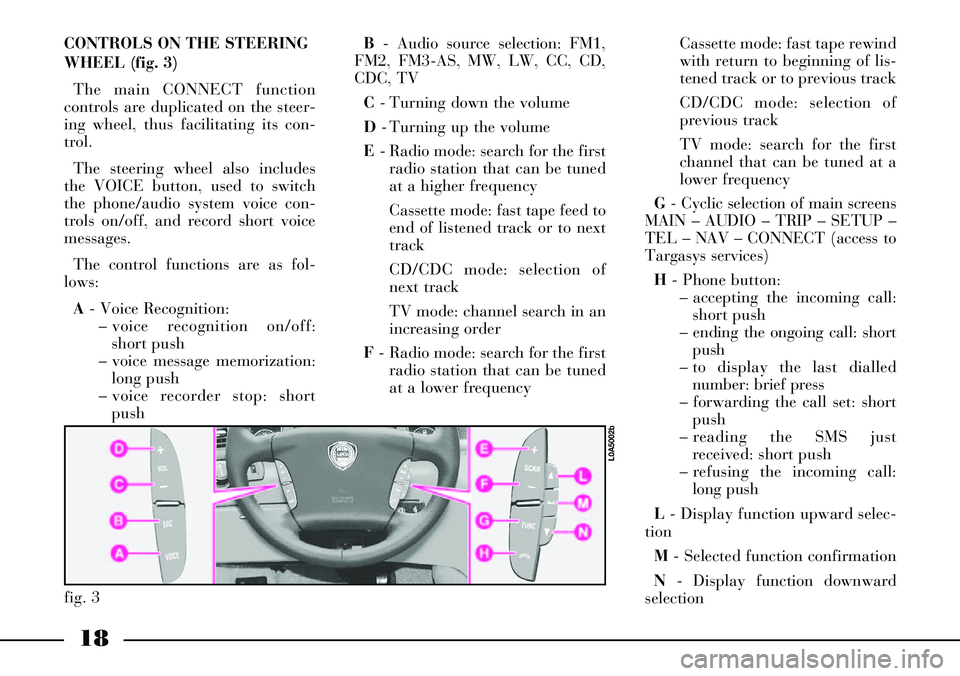
CONTROLS ON THE STEERING
WHEEL (fig. 3)
The main CONNECT function
controls are duplicated on the steer-
ing wheel, thus facilitating its con-
trol.
The steering wheel also includes
the VOICE button, used to switch
the phone/audio system voice con-
trols on/off, and record short voice
messages.
The control functions are as fol-
lows:
A- Voice Recognition:
– voice recognition on/off:
short push
– voice message memorization:
long push
– voice recorder stop: short
pushB- Audio source selection: FM1,
FM2, FM3-AS, MW, LW, CC, CD,
CDC, TV
C- Turning down the volume
D- Turning up the volume
E- Radio mode: search for the first
radio station that can be tuned
at a higher frequency
Cassette mode: fast tape feed to
end of listened track or to next
track
CD/CDC mode: selection of
next track
TV mode: channel search in an
increasing order
F- Radio mode: search for the first
radio station that can be tuned
at a lower frequencyCassette mode: fast tape rewind
with return to beginning of lis-
tened track or to previous track
CD/CDC mode: selection of
previous track
TV mode: search for the first
channel that can be tuned at a
lower frequency
G- Cyclic selection of main screens
MAIN – AUDIO – TRIP – SETUP –
TEL – NAV – CONNECT (access to
Targasys services)
H- Phone button:
– accepting the incoming call:
short push
– ending the ongoing call: short
push
– to display the last dialled
number: brief press
– forwarding the call set: short
push
– reading the SMS just
received: short push
– refusing the incoming call:
long push
L- Display function upward selec-
tion
M- Selected function confirmation
N- Display function downward
selection
fig. 3
L0A5002b
Page 20 of 386
19
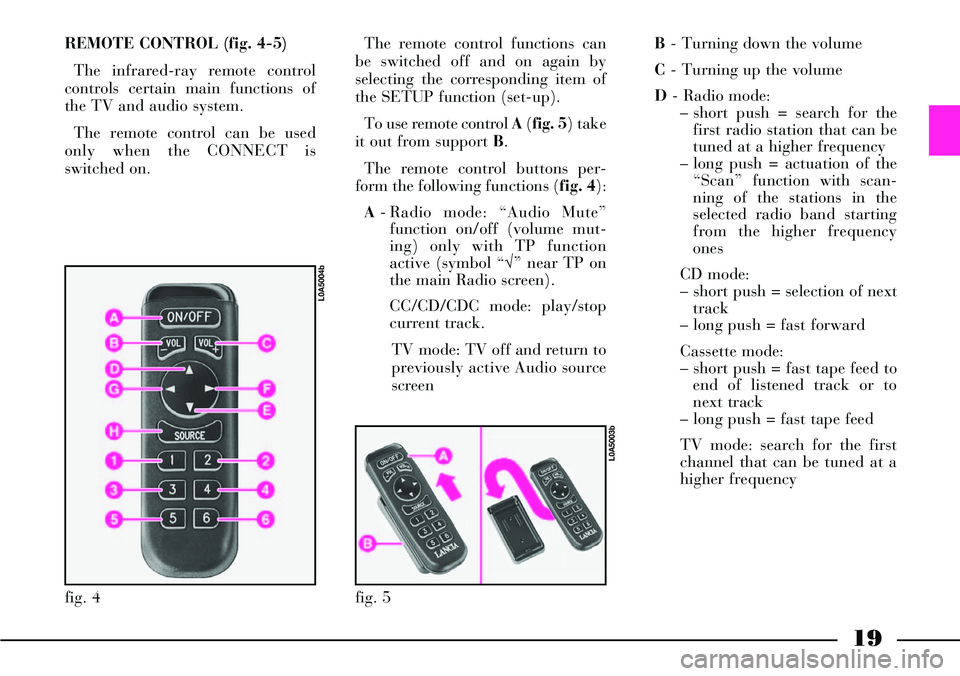
REMOTE CONTROL (fig. 4-5)
The infrared-ray remote control
controls certain main functions of
the TV and audio system.
The remote control can be used
only when the CONNECT is
switched on. The remote control functions can
be switched off and on again by
selecting the corresponding item of
the SETUP function (set-up).
To use remote control A(fig. 5) take
it out from support B.
The remote control buttons per-
form the following functions (fig. 4):
A- Radio mode: “Audio Mute”
function on/off (volume mut-
ing) only with TP function
active (symbol “√” near TP on
the main Radio screen).
CC/CD/CDC mode: play/stop
current track.
TV mode: TV off and return to
previously active Audio source
screenB- Turning down the volume
C- Turning up the volume
D- Radio mode:
– short push = search for the
first radio station that can be
tuned at a higher frequency
– long push = actuation of the
“Scan” function with scan-
ning of the stations in the
selected radio band starting
from the higher frequency
ones
CD mode:
– short push = selection of next
track
– long push = fast forward
Cassette mode:
– short push = fast tape feed to
end of listened track or to
next track
– long push = fast tape feed
TV mode: search for the first
channel that can be tuned at a
higher frequency
fig. 5
L0A5003b
fig. 4
L0A5004b
Page 21 of 386
20
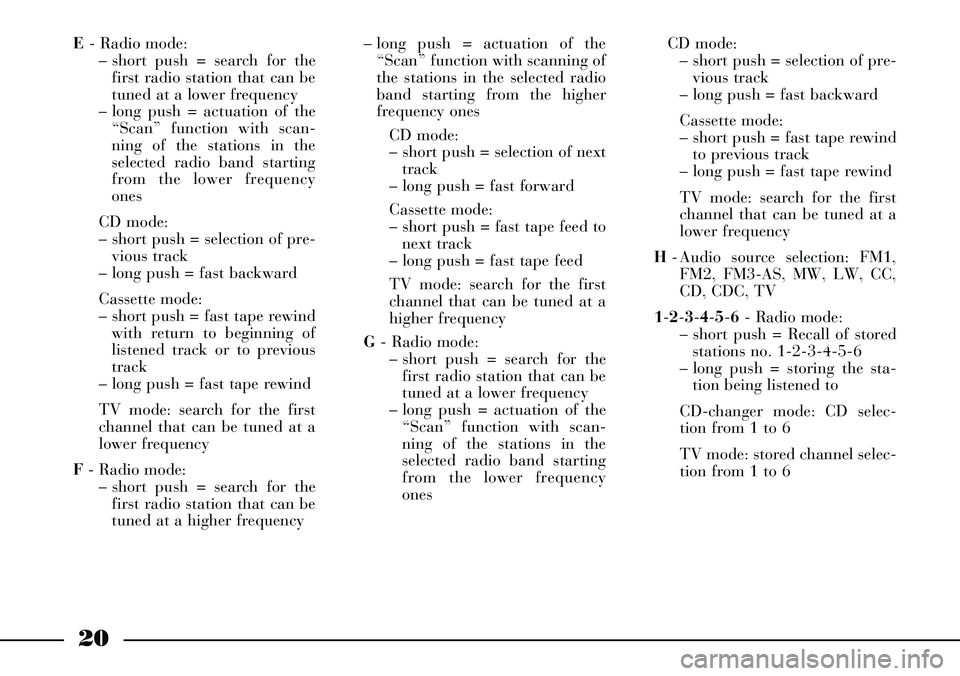
E- Radio mode:
– short push = search for the
first radio station that can be
tuned at a lower frequency
– long push = actuation of the
“Scan” function with scan-
ning of the stations in the
selected radio band starting
from the lower frequency
ones
CD mode:
– short push = selection of pre-
vious track
– long push = fast backward
Cassette mode:
– short push = fast tape rewind
with return to beginning of
listened track or to previous
track
– long push = fast tape rewind
TV mode: search for the first
channel that can be tuned at a
lower frequency
F- Radio mode:
– short push = search for the
first radio station that can be
tuned at a higher frequency– long push = actuation of the
“Scan” function with scanning of
the stations in the selected radio
band starting from the higher
frequency ones
CD mode:
– short push = selection of next
track
– long push = fast forward
Cassette mode:
– short push = fast tape feed to
next track
– long push = fast tape feed
TV mode: search for the first
channel that can be tuned at a
higher frequency
G- Radio mode:
– short push = search for the
first radio station that can be
tuned at a lower frequency
– long push = actuation of the
“Scan” function with scan-
ning of the stations in the
selected radio band starting
from the lower frequency
onesCD mode:
– short push = selection of pre-
vious track
– long push = fast backward
Cassette mode:
– short push = fast tape rewind
to previous track
– long push = fast tape rewind
TV mode: search for the first
channel that can be tuned at a
lower frequency
H- Audio source selection: FM1,
FM2, FM3-AS, MW, LW, CC,
CD, CDC, TV
1-2-3-4-5-6- Radio mode:
– short push = Recall of stored
stations no. 1-2-3-4-5-6
– long push = storing the sta-
tion being listened to
CD-changer mode: CD selec-
tion from 1 to 6
TV mode: stored channel selec-
tion from 1 to 6
Page 22 of 386
21
Function
Audio module switching on
Audio module switching off
Audio mute (only with TP
active on the main
Radio screen)
Audio source selection
Turning the volumeup/down
Selection of stored
radio stations
Radio station memorization
Search for the first radio
station that can be tuned
at a higher frequency
Search for the first radio
station that can be tuned
at a lower frequencyCONNECT buttons
Short push on AUDIO button
Long push on AUDIO button
“Audio Mute” selection and con-
firmation on Radio menu by the
right knob 21(fig. 2)
Press the multifunction but-
tons FM, AM, CC, CD, CDC,
TV or the SOURCE button
Rotate the left-hand knob
Short push on buttons
1 to 6
Long push on buttons 1 to 6
Short push on button ˙
Short push on button ¯Steering wheel buttons
–
–
–
Press the SOURCEbutton
Press VOL+/- buttons
–
–
Short push on SCAN+ button
Short push on SCAN- buttonRemote control buttons
–
–
Press the ON/OFF key
Press the SOURCEbutton
Press VOL+ or VOL- buttons
Short push on buttons
1 to 6
Long push on buttons 1 to 6
Short push on button N
Short push on button O
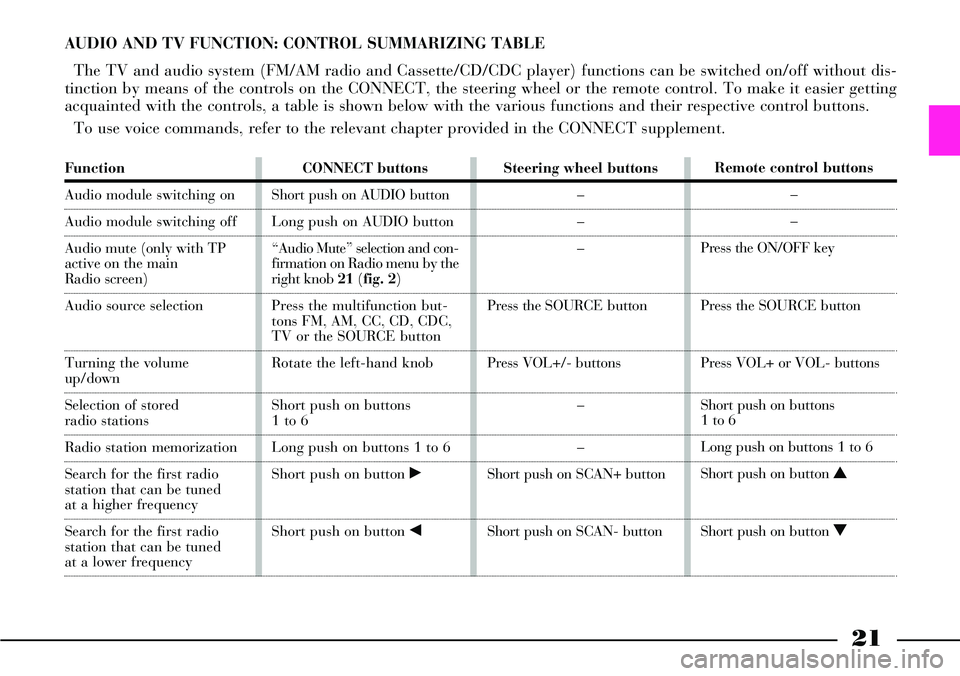
AUDIO AND TV FUNCTION: CONTROL SUMMARIZING TABLE
The TV and audio system (FM/AM radio and Cassette/CD/CDC player) functions can be switched on/off without dis-
tinction by means of the controls on the CONNECT, the steering wheel or the remote control. To make it easier getting
acquainted with the controls, a table is shown below with the various functions and their respective control buttons.
To use voice commands, refer to the relevant chapter provided in the CONNECT supplement.
Page 24 of 386
23
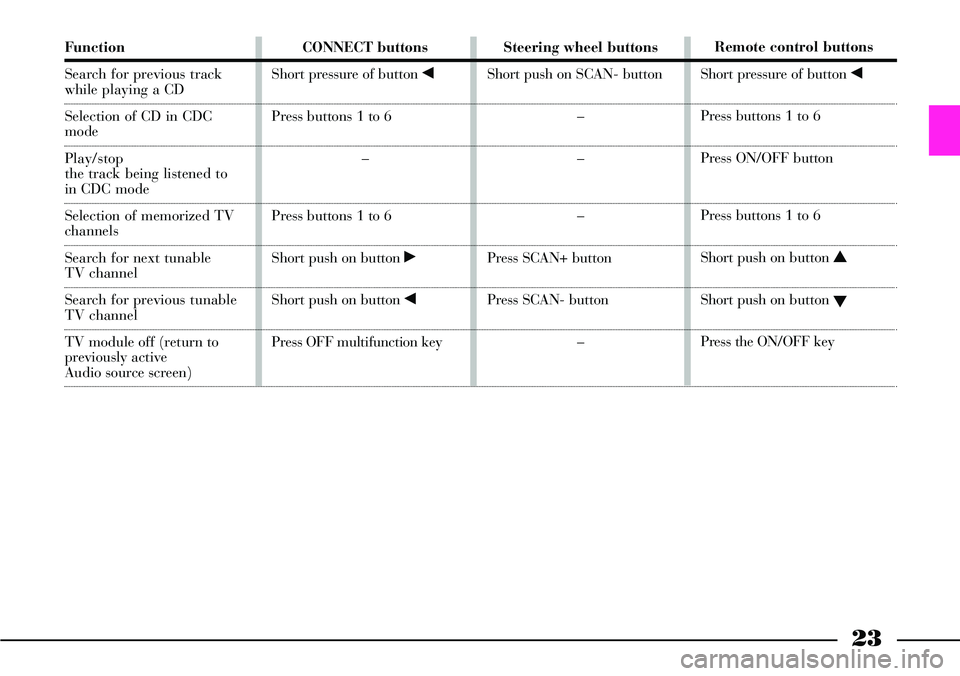
Function
Search for previous track
while playing a CD
Selection of CD in CDC
mode
Play/stop
the track being listened to
in CDC mode
Selection of memorized TV
channels
Search for next tunable
TV channel
Search for previous tunable
TV channel
TV module off (return to
previously active
Audio source screen)CONNECT buttons
Short pressure of button ¯
Press buttons 1 to 6
–
Press buttons 1 to 6
Short push on button ˙
Short push on button ¯
Press OFF multifunction keySteering wheel buttons
Short push on SCAN- button
–
–
–
Press SCAN+ button
Press SCAN- button
–Remote control buttons
Short pressure of button ¯
Press buttons 1 to 6
Press ON/OFF button
Press buttons 1 to 6
Short push on button N
Short push on button
O
Press the ON/OFF key
Page 112 of 386
111
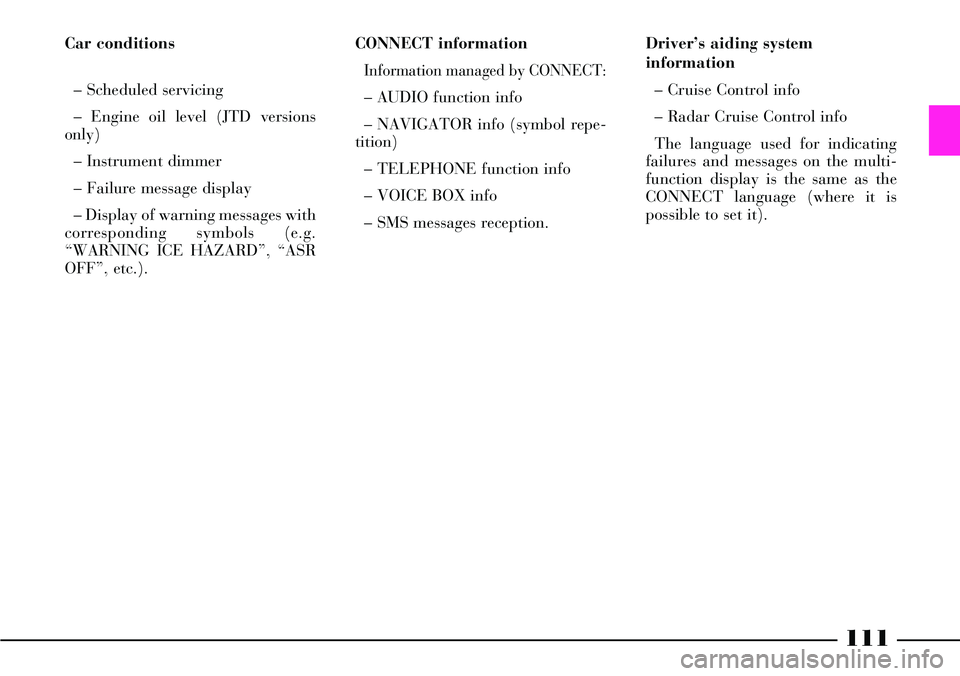
Driver’s aiding system
information
– Cruise Control info
– Radar Cruise Control info
The language used for indicating
failures and messages on the multi-
function display is the same as the
CONNECT language (where it is
possible to set it). Car conditions
– Scheduled servicing
– Engine oil level (JTD versions
only)
– Instrument dimmer
– Failure message display
– Display of warning messages with
corresponding symbols (e.g.
“WARNING ICE HAZARD”, “ASR
OFF”, etc.).CONNECT information
Information managed by CONNECT:
– AUDIO function info
– NAVIGATOR info (symbol repe-
tition)
– TELEPHONE function info
– VOICE BOX info
– SMS messages reception.
Page 249 of 386

248
fig. 224
L0A213b
SOUND SYSTEM
The car is equipped with a com-
plete sound system, consisting of the
following:
– RDS-TMC radio integral with the
CONNECT system
– audio CD/navigation CD-ROM
player A(fig. 221) on the dashboard
– audio cassette player Bon the
dashboard– multiple compact disc player
(CD-changer) C(fig. 222) in the
glove compartment (where fitted)
– BOSE HI-FI system (where fit-
ted).
For detailed instructions on the
Radio, CD and CD-Changer, refer to
the CONNECT supplement provid-
ed with the car.
SPEAKERS
Front speakers (fig. 223)
The front speakers Aare housed in
front door panels.Rear speakers (fig. 224)
The rear speakers Bare housed in
the rear door panels.
fig. 221
L0A0210b
fig. 222
L0A0217b
fig. 223
L0A0215b
Page 371 of 386

370
Battery
- checking the battery
charge ................................ 327
- disconnecting the loaded
battery ............................... 302
- disconnecting the
unloaded battery................ 303
- initialising the control
units of the door locks,
air conditioner and ESP
system................................ 303
- jump starting ............. 272-304
- maintenance ..................... 326
- recharging the
battery ...................... 304-328
- replacement ...................... 328
- useful advice ..................... 329
Bodywork
- maintenance ..................... 337
- version code ...................... 343Bodywork paint
identification plate .............. 342
Bodywork versions (codes) ..... 343
Bonnet .................................... 237
Boot
- anchoring the load ............ 232
- ceiling light ........................ 231
- closing the boot.................. 231
- functions that can be
modified by the
CONNECT menu ............... 229
- luggage nets ....................... 231
- luggage transport -
important notes ................. 233
- opening by remote
control ............................... 228
- opening from the inside .... 227
- opening from the outside
with the key ....................... 228
- power socket ..................... 234
Boot light
- bulb replacement ............... 290Bose HI-FI audio system ........ 248
Bottle/can holder
- front ................................. 217
- rear ................................... 219
Brake and hydraulic
clutch fluid .......................... 323
Brakes
- fluid level ......................... 323
- technical specifications ...... 348
Bulbs (replacing) .................... 281
- bulbs ................................. 283
- front light cluster ............... 284
- general instructions ........... 282
- rear light cluster ................ 286
- replacing an exterior light .. 284
- types of bulbs ................... 282
Capacities ............................. 362
Car maintenance .................. 309
- additional checks .............. 314