low beam Lancia Thesis 2006 Owner handbook (in English)
[x] Cancel search | Manufacturer: LANCIA, Model Year: 2006, Model line: Thesis, Model: Lancia Thesis 2006Pages: 386, PDF Size: 8.69 MB
Page 14 of 386
13
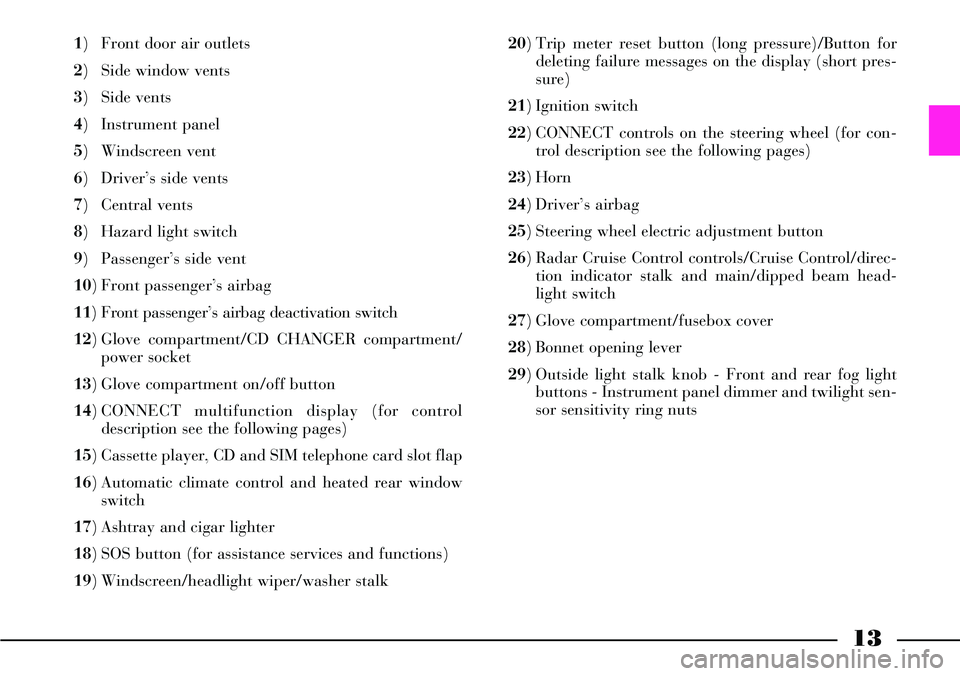
1) Front door air outlets
2) Side window vents
3) Side vents
4) Instrument panel
5) Windscreen vent
6) Driver’s side vents
7) Central vents
8) Hazard light switch
9) Passenger’s side vent
10) Front passenger’s airbag
11) Front passenger’s airbag deactivation switch
12) Glove compartment/CD CHANGER compartment/
power socket
13) Glove compartment on/off button
14) CONNECT multifunction display (for control
description see the following pages)
15) Cassette player, CD and SIM telephone card slot flap
16) Automatic climate control and heated rear window
switch
17) Ashtray and cigar lighter
18) SOS button (for assistance services and functions)
19) Windscreen/headlight wiper/washer stalk 20) Trip meter reset button (long pressure)/Button for
deleting failure messages on the display (short pres-
sure)
21) Ignition switch
22) CONNECT controls on the steering wheel (for con-
trol description see the following pages)
23) Horn
24) Driver’s airbag
25) Steering wheel electric adjustment button
26) Radar Cruise Control controls/Cruise Control/direc-
tion indicator stalk and main/dipped beam head-
light switch
27) Glove compartment/fusebox cover
28) Bonnet opening lever
29) Outside light stalk knob - Front and rear fog light
buttons - Instrument panel dimmer and twilight sen-
sor sensitivity ring nuts
Page 99 of 386
98
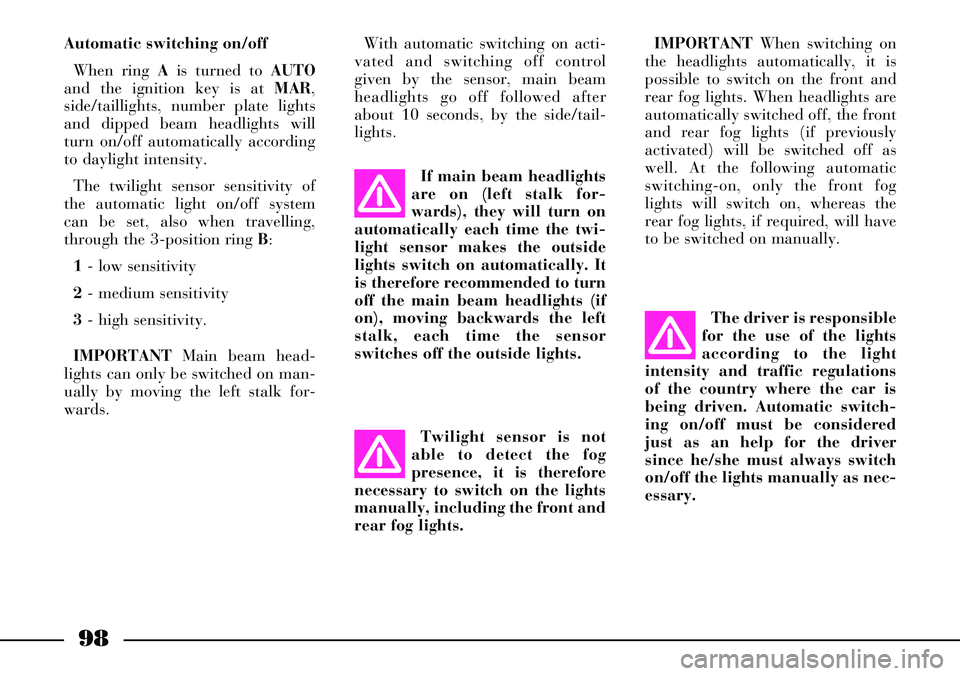
Automatic switching on/off
When ring Ais turned to AUTO
and the ignition key is at MAR,
side/taillights, number plate lights
and dipped beam headlights will
turn on/off automatically according
to daylight intensity.
The twilight sensor sensitivity of
the automatic light on/off system
can be set, also when travelling,
through the 3-position ring B:
1- low sensitivity
2- medium sensitivity
3- high sensitivity.
IMPORTANTMain beam head-
lights can only be switched on man-
ually by moving the left stalk for-
wards.If main beam headlights
are on (left stalk for-
wards), they will turn on
automatically each time the twi-
light sensor makes the outside
lights switch on automatically. It
is therefore recommended to turn
off the main beam headlights (if
on), moving backwards the left
stalk, each time the sensor
switches off the outside lights.
Twilight sensor is not
able to detect the fog
presence, it is therefore
necessary to switch on the lights
manually, including the front and
rear fog lights.The driver is responsible
for the use of the lights
according to the light
intensity and traffic regulations
of the country where the car is
being driven. Automatic switch-
ing on/off must be considered
just as an help for the driver
since he/she must always switch
on/off the lights manually as nec-
essary.With automatic switching on acti-
vated and switching off control
given by the sensor, main beam
headlights go off followed after
about 10 seconds, by the side/tail-
lights.IMPORTANTWhen switching on
the headlights automatically, it is
possible to switch on the front and
rear fog lights. When headlights are
automatically switched off, the front
and rear fog lights (if previously
activated) will be switched off as
well. At the following automatic
switching-on, only the front fog
lights will switch on, whereas the
rear fog lights, if required, will have
to be switched on manually.
Page 100 of 386
99
Twilight sensor
It is composed by an infrared led
sensor installed on the windscreen in
order to detect the changes of the
external light intensity of the car , as
a function of the light sensitivity set;
greater is the sensitivity, smaller is
the amount of external light neces-
sary to control the switching-on of
the exterior headlights.
It consists of two sensors: a global
sensor for evaluating environment
light intensity and a directional one
for evaluating light intensity in run-
ning direction in order to recognize
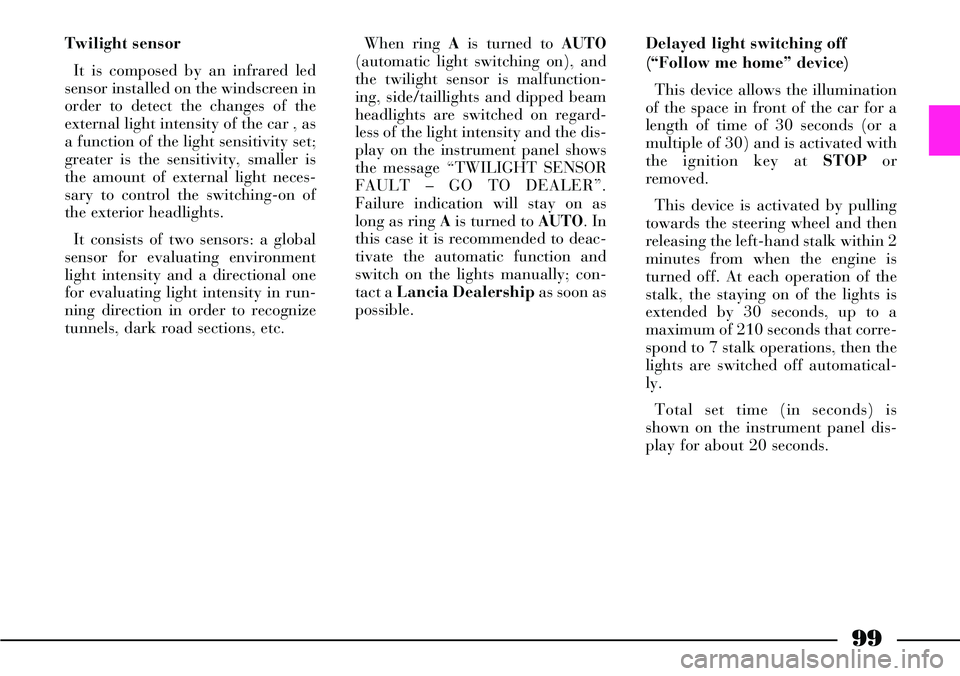
tunnels, dark road sections, etc.When ring Ais turned to AUTO
(automatic light switching on), and
the twilight sensor is malfunction-
ing, side/taillights and dipped beam
headlights are switched on regard-
less of the light intensity and the dis-
play on the instrument panel shows
the message “TWILIGHT SENSOR
FAULT – GO TO DEALER”.
Failure indication will stay on as
long as ring Ais turned to AUTO. In
this case it is recommended to deac-
tivate the automatic function and
switch on the lights manually; con-
tact a Lancia Dealershipas soon as
possible.Delayed light switching off
(“Follow me home” device)
This device allows the illumination
of the space in front of the car for a
length of time of 30 seconds (or a
multiple of 30) and is activated with
the ignition key at STOPor
removed.
This device is activated by pulling
towards the steering wheel and then
releasing the left-hand stalk within 2
minutes from when the engine is
turned off. At each operation of the
stalk, the staying on of the lights is
extended by 30 seconds, up to a
maximum of 210 seconds that corre-
spond to 7 stalk operations, then the
lights are switched off automatical-
ly.
Total set time (in seconds) is
shown on the instrument panel dis-
play for about 20 seconds.
Page 102 of 386
101
IMPORTANTThis operation will
flash the main beam headlights.
Follow the Highway Code to prevent
being fined.
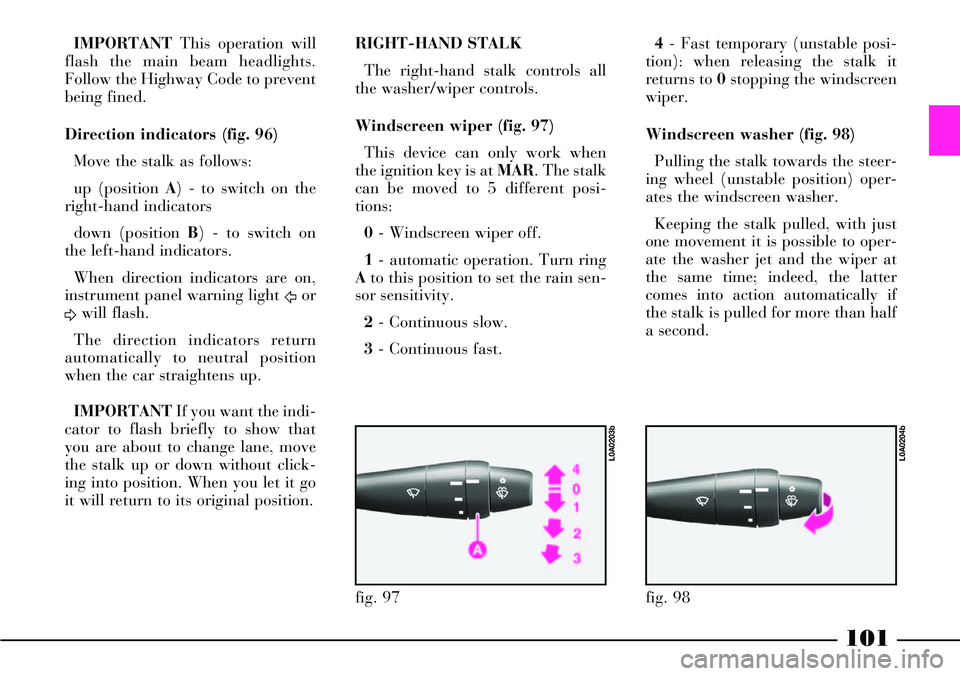
Direction indicators (fig. 96)
Move the stalk as follows:
up (position A) - to switch on the
right-hand indicators
down (position B) - to switch on
the left-hand indicators.
When direction indicators are on,
instrument panel warning light
Ÿor
∆will flash.
The direction indicators return
automatically to neutral position
when the car straightens up.
IMPORTANTIf you want the indi-
cator to flash briefly to show that
you are about to change lane, move
the stalk up or down without click-
ing into position. When you let it go
it will return to its original position.RIGHT-HAND STALK
The right-hand stalk controls all
the washer/wiper controls.
Windscreen wiper (fig. 97)
This device can only work when
the ignition key is at MAR. The stalk
can be moved to 5 different posi-
tions:
0- Windscreen wiper off.
1- automatic operation. Turn ring
Ato this position to set the rain sen-
sor sensitivity.
2- Continuous slow.
3- Continuous fast.4- Fast temporary (unstable posi-
tion): when releasing the stalk it
returns to 0stopping the windscreen
wiper.
Windscreen washer (fig. 98)
Pulling the stalk towards the steer-
ing wheel (unstable position) oper-
ates the windscreen washer.
Keeping the stalk pulled, with just
one movement it is possible to oper-
ate the washer jet and the wiper at
the same time; indeed, the latter
comes into action automatically if
the stalk is pulled for more than half
a second.
fig. 97
L0A0203b
fig. 98
L0A0204b
Page 103 of 386
102
The wiper stops working a few
strokes after releasing the stalk; a
further “cleaning stroke”, after a
few seconds completes the wiping
operation.
Windscreen washer nozzles are fit-
ted with demisting resistors that cut
in automatically (for about 3 min-
utes) when pressing the fast window
demisting/defrosting button.
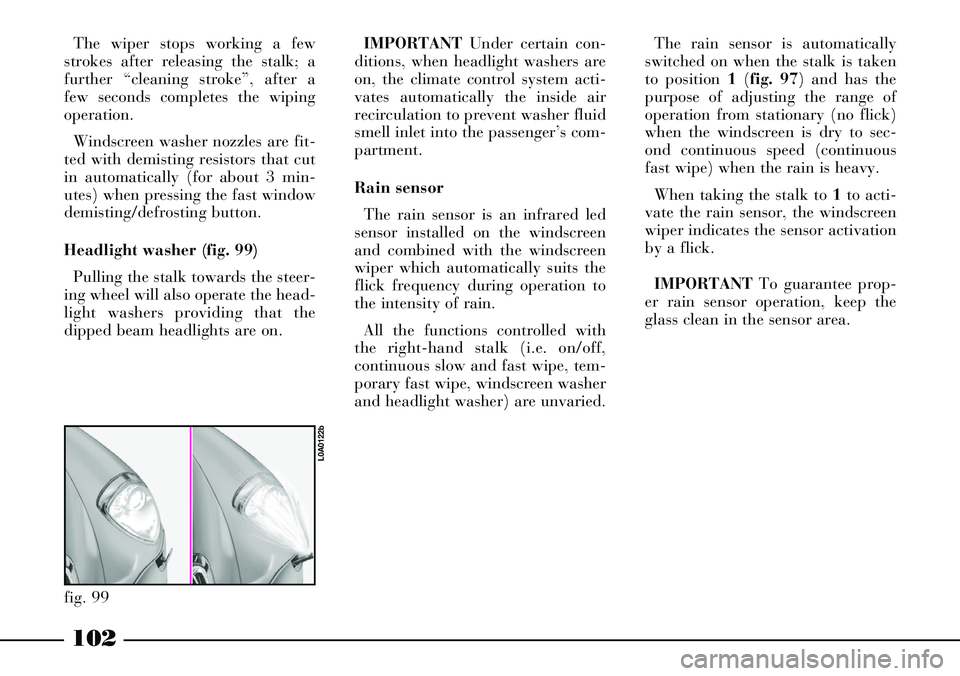
Headlight washer (fig. 99)
Pulling the stalk towards the steer-
ing wheel will also operate the head-
light washers providing that the
dipped beam headlights are on.IMPORTANTUnder certain con-
ditions, when headlight washers are
on, the climate control system acti-
vates automatically the inside air
recirculation to prevent washer fluid
smell inlet into the passenger’s com-
partment.
Rain sensor
The rain sensor is an infrared led
sensor installed on the windscreen
and combined with the windscreen
wiper which automatically suits the
flick frequency during operation to
the intensity of rain.
All the functions controlled with
the right-hand stalk (i.e. on/off,
continuous slow and fast wipe, tem-
porary fast wipe, windscreen washer
and headlight washer) are unvaried.
fig. 99
L0A0122b
The rain sensor is automatically
switched on when the stalk is taken
to position 1(fig. 97) and has the
purpose of adjusting the range of
operation from stationary (no flick)
when the windscreen is dry to sec-
ond continuous speed (continuous
fast wipe) when the rain is heavy.
When taking the stalk to 1to acti-
vate the rain sensor, the windscreen
wiper indicates the sensor activation
by a flick.
IMPORTANTTo guarantee prop-
er rain sensor operation, keep the
glass clean in the sensor area.
Page 172 of 386
171
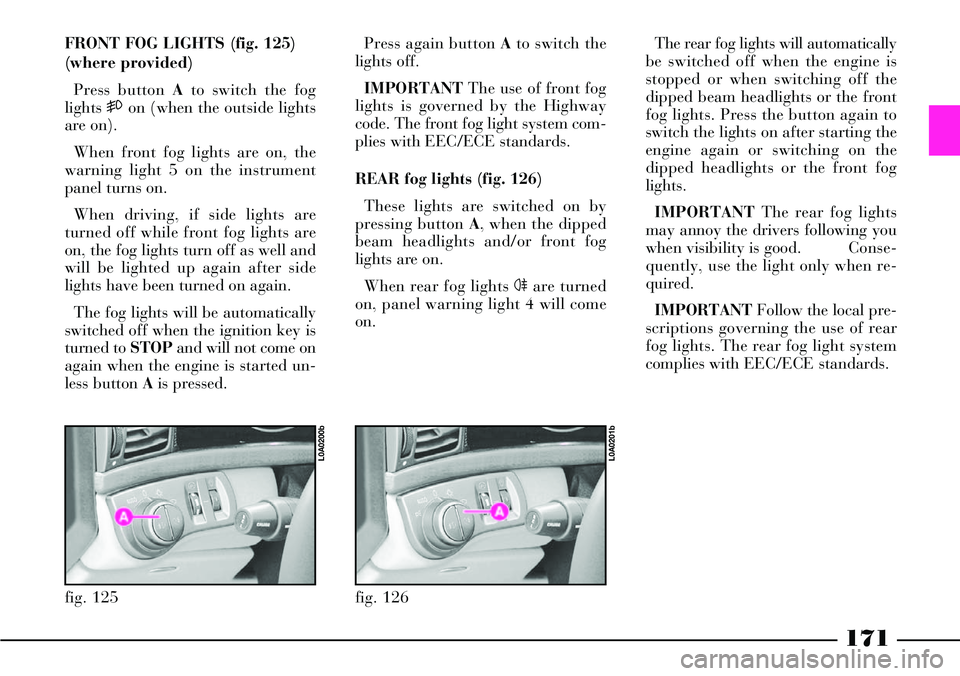
FRONT FOG LIGHTS (fig. 125)
(where provided)
Press button Ato switch the fog
lights 5on (when the outside lights
are on).
When front fog lights are on, the
warning light 5 on the instrument
panel turns on.
When driving, if side lights are
turned off while front fog lights are
on, the fog lights turn off as well and
will be lighted up again after side
lights have been turned on again.
The fog lights will be automatically
switched off when the ignition key is
turned to STOPand will not come on
again when the engine is started un-
less button Ais pressed.Press again button Ato switch the
lights off.
IMPORTANTThe use of front fog
lights is governed by the Highway
code. The front fog light system com-
plies with EEC/ECE standards.
REAR fog lights (fig. 126)
These lights are switched on by
pressing button A, when the dipped
beam headlights and/or front fog
lights are on.
When rear fog lights 4are turned
on, panel warning light 4 will come
on.
fig. 125
L0A0200b
fig. 126
L0A0201b
The rear fog lights will automatically
be switched off when the engine is
stopped or when switching off the
dipped beam headlights or the front
fog lights. Press the button again to
switch the lights on after starting the
engine again or switching on the
dipped headlights or the front fog
lights.
IMPORTANTThe rear fog lights
may annoy the drivers following you
when visibility is good.Conse-
quently, use the light only when re-
quired.
IMPORTANTFollow the local pre-
scriptions governing the use of rear
fog lights. The rear fog light system
complies with EEC/ECE standards.
Page 243 of 386

HEADLIGHTS
GAS-DISCHARGE (BI-XENO)
MAIN BEAM / DIPPED BEAM
HEADLIGHTS AND DYNAMIC
BEAM ADJUSTMENT DEVICE
These headlights, called Bi-Xeno,
use a lamp with a xenon-filled bulb,
both for the dipped beam and the
main beam headlights.
The main characteristics of this
type of headlights are:
– higher brilliancy
– higher light beam width and
adjustability
– lower consumption under work-
ing conditions
– longer bulb life.Each headlight is equipped with an
electronic control unit used to con-
trol supply voltage. Due to high bril-
liancy, bi-Xeno headlights require
the adoption of a dynamic beam
adjustment control system.
This system is controlled by an
electronic control unit operating at
two levels:
– constant headlight beam realign-
ment as a function of the car load
– dynamic headlight beam align-
ment to compensate car pitching
when running.Operation
Light is projected onto the road by
means of a spherical glass lens with
a large surface (70 mm diameter).
A deflector lifts and lowers, so that
light distribution is different for
both the main beam and dipped
beam headlights. The deflector is
electrically operated and the
mechanical lifting/lowering opera-
tion is performed real-time when
lights are switched.
The xenon lamp consists of a bulb
containing low-pressure xenon and
two electrodes.
To obtain light emission, an elec-
tric arc must be triggered between
the two electrodes and maintained.
Each headlight is equipped with a
control unit which:
– checks the voltage/current value
under working operation
– triggers the arc to the electrodes
and cause salt evaporation at
switching on.
242
Page 244 of 386

243
Automatic dynamic beam adjust-
ment device
Bi-Xeno headlights require, due to
produced brilliancy, an automatic,
dynamic beam adjustment system.
This system is managed by an elec-
tronic control unit that controls the
actuators mounted on each dipped
beam headlight. Actuator control
depends on the processing of the sig-
nals from two orientation sensors.
This automatic dynamic beam
adjustment system provides the fol-
lowing advantages:
– it avoids dazzling the vehicles
coming from the opposite direction
– it stabilizes the illuminated area
so as to improve active safety.Headlight beam adjustment con-
trol unit
The control unit calculates the
instant car trim, by comparing the
signals from the orientation sensors.
A “correction” signal is sent to the
actuators to adapt light beam orien-
tation to the calculated car trim.
To avoid oscillation of the anti-
dazzling beam in case of particular
road surfaces (paved surfaces, dirt
roads, etc.) or abrupt movements of
the car caused by the driver (clutch
disengagement, gear change, etc.),
the control unit reduces the number
of corrections to be made on the
light unit.Fault indication
Anomalies in the operation of one
or several system components are
signalled by the lighting of symbol
6on the multifunction display,
together with message “HEAD-
LAMP INCLINATION ADJUST-
MENT SYSTEM FAULT”.
IMPORTANT In case of faults,
contact a Lancia Dealership.
In case of component anomaly or
voltage drop, the system controls in
any case system operation according
to the following logic:
– faulty front sensor: trim calcula-
tion is made by replacing the voltage
value read on the faulty sensor with
a stored, fixed value
– faulty rear sensor: the system is
switched to the safety operation
mode and keeps the headlights in a
preset position of maximum lower-
ing allowed by the light beam.
Page 245 of 386

244
– Failed connection of actuators: if
the control signal is failing, the actu-
ators will be brought back to the
position of maximum lowering per-
mitted for the light beam
– control unit failure: depending on
the type of failure, the system can
remain in the position where it was
when the failure occurred, or set
itself for the maximum lowering per-
mitted for the light beam
– voltage drop: when voltage falls
below 9 V, the system remains in the
position where it was when the fail-
ure occurred.HEADLAMP ORIENTATION FOR
LEFT-/RIGHT HAND DRIVE
The car headlights are equipped
with Bi-Xeno lamps with high light-
ing power; therefore, when you trav-
el from a country with right-hand
drive to one with left-hand drive, or
vice versa, dipped beam headlight
orientation must be modified.
This operation is necessary to avoid
dazzling the vehicle coming from the
opposite direction, as well as to opti-
mize road edge illumination.To carry out this opera-
tion, contact a Lancia
Dealership.
When you go back to
your country of origin,
remember to have the
dipped beam headlight orienta-
tion modified again.
Page 258 of 386
257
– Keep a greater safety distance
from the cars in front of you than
during daylight hours: it is hard to
judge how fast other cars are going
when all you can see are their lights.
– Only use main beam headlights
when you are driving outside town
and when you are sure they do not
annoy other drivers.
– Dip your headlights as soon as
you see cars coming in the other
direction and pass them with the
headlights dipped.
– Keep all lights clean.
– Be careful of animals crossing the
road when driving in the country.
DRIVING IN THE RAIN
Rain and wet road surfaces spell
danger.
All manoeuvres are more difficult
on a wet road because the grip of the
wheels on the tarmac is greatly
reduced. This is why braking dis-
tances are much longer and road-
holding is lower.Here is some advice for driving in
the rain:
– Reduce speed and maintain a
greater safety distance from the cars
in front.
– If it is raining particularly heavi-
ly, visibility is also reduced. In these
cases, switch on the dipped head-
lights even if it is still daylight so you
can be seen more easily.
– Do not drive through puddles at
speed and hold on tightly to the
wheel if you do: a puddle taken at
high speed might cause you to lose
control of the car (“aquaplaning”).
– Move the ventilation controls to
the position for demisting the win-
dows (see the section “Getting to
know your car”), so to avoid visibil-
ity problems.
– Periodically check the condition
of the windscreen wiper blades. – Do not drive too many hours at a
time but stop at intervals to stretch
your legs and recoup your energy.
– Make sure the air in the car is
being changed continuously.
– Never coast downhill (i.e.: with
the engine off): if you do, you lose
the aid of engine braking and power
brakes so that braking requires
greater effort.
DRIVING AT NIGHT
There are the main rules to follow
when you are driving at night.
– Drive especially carefully: it is
harder to drive at night.
– Slow down especially if the road
is not lit.
– At the first signs of sleepiness,
stop: continuing would be a risk for
yourself and everybody else. Only
start driving again when you have
had enough rest.