spare wheel Lancia Thesis 2006 Owner handbook (in English)
[x] Cancel search | Manufacturer: LANCIA, Model Year: 2006, Model line: Thesis, Model: Lancia Thesis 2006Pages: 386, PDF Size: 8.69 MB
Page 275 of 386
274
Signal the presence of
the stopped car according
to the laws in force: haz-
ard lights, reflecting triangle, etc.
Passengers should get out of the
car and stay clear from oncoming
traffic while the wheel is being
changed.
IF A TYRE
IS PUNCTURED
Follow the instructions on this and
the following pages to use the jack
and the spare wheel correctly.If the wheel is being
changed on a steep or
badly surfaced road,
place wedges or other suitable
material under the wheels to stop
the car from moving.
Have the punctured tyre
repaired and fitted back as soon
as possible. Do not lubricate the
bolt threads before fitting them
back: they could come loose.
Wheel bolts are specific
for the type of rim (alloy
or steel) fitted. Never use,
also if in an emergency, wheel
bolts for another type of rim.
When changing rims (alloy rims
instead of steel ones or vice
versa), also the whole wheel bolt
set shall be changed with other
bolts specific for the new type of
rim adopted.The jack should only be
used to change a wheel on
the car for which it was
designed. It should not be put to
other uses or employed to raise
other models of car. Under no
circumstances should it be used
when carrying out repairs under
the car.
An incorrectly positioned jack
may cause the car to fall.
Do not use the jack to lift loads
exceeding those indicated on the
label attached to the jack itself.
The wheel cap may fly off when
the car is moving if it is not fas-
tened correctly. Never tamper
with the inflation valve. Do not
insert tools between the rim and
the tyre.
Check the tyre and spare wheel
pressure regularly. Tyre pressure
is shown in the “Technical
Specifications” chapter.
Page 276 of 386
275
CHANGING
A WHEEL
Please note:
– the jack weighs 2.100 kg;
– the jack requires no adjustments;
– the jack cannot be repaired. If it
breaks, it must be replaced with a
genuine spare part;
– no other tool, part from the
ratchet wrench, can be fitted to the
jack.Change the wheel as follows:
1) Stop the car so that it is not a
hazard for other road users or your-
self when changing the wheel. The
ground should be as flat and firm as
possible.
2) Turn engine off and engage the
electric parking brake.
3) Engage first gear or reverse. On
versions with automatic gearbox
shift the lever to P.4) Open the boot.
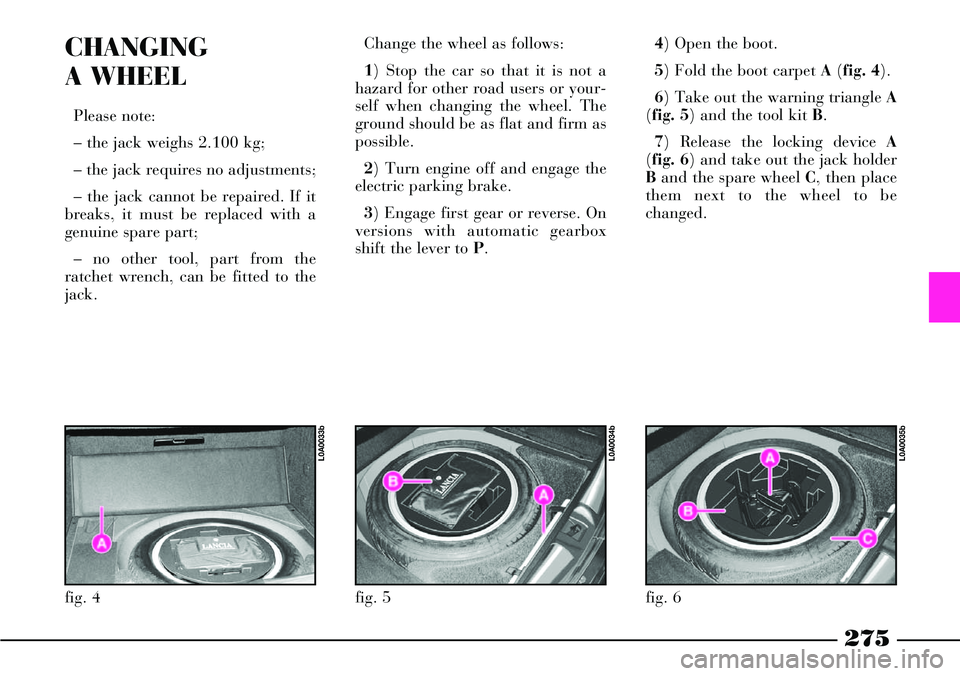
5) Fold the boot carpet A(fig. 4).
6) Take out the warning triangle A
(fig. 5) and the tool kit B.
7) Release the locking device A
(fig. 6) and take out the jack holder
Band the spare wheel C, then place
them next to the wheel to be
changed.
fig. 4
L0A0033b
fig. 5
L0A0034b
fig. 6
L0A0035b
Page 279 of 386
278
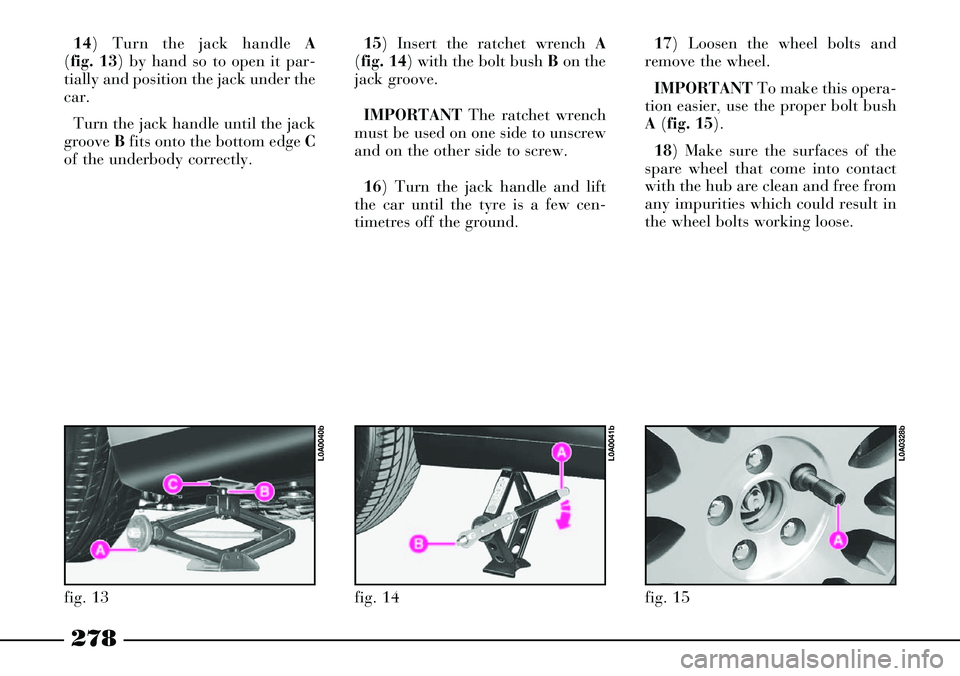
15) Insert the ratchet wrench A
(fig. 14) with the bolt bush Bon the
jack groove.
IMPORTANTThe ratchet wrench
must be used on one side to unscrew
and on the other side to screw.
16) Turn the jack handle and lift
the car until the tyre is a few cen-
timetres off the ground.17) Loosen the wheel bolts and
remove the wheel.
IMPORTANTTo make this opera-
tion easier, use the proper bolt bush
A(fig. 15).
18) Make sure the surfaces of the
spare wheel that come into contact
with the hub are clean and free from
any impurities which could result in
the wheel bolts working loose.
fig. 15
L0A0328b
fig. 13
L0A0040b
14) Turn the jack handle A
(fig. 13) by hand so to open it par-
tially and position the jack under the
car.
Turn the jack handle until the jack
groove Bfits onto the bottom edge C
of the underbody correctly.
fig. 14
L0A0041b
Page 315 of 386
314
ADDITIONAL
CHECKS
Every 1,000 kmor before long
trips, check and top up as necessary:
– engine coolant level
– brake/hydraulic clutchfluid
level
– power steering fluid level
– windscreen/rear window and
headlight washer fluid level
– tyre pressure and conditions.
Every 3,000 kmcheck the engine
oil level and top up as necessary.
You are recommended to use FL
Seleniaproducts that are designed
and produced specifically for LAN-
CIA cars (see “Capacities” in
“Technical Specifications”).
ANNUAL
INSPECTION
SCHEDULE
The following annual inspection
schedule is recommended for
cars travelling less than 20,000
km a year (e.g. approximately
10,000 km). The schedule
includes the following opera-
tions:
1) Check tyre condition and wear
and adjust pressure (including spare
wheel)
2) Check wear on windscreen/rear
window blades
3) Check rear disc brake pad con-
ditions and wear
4) Inspect conditions of: under-
body protection and outside body-
work, piping (exhaust - fuel lines -
brake lines), rubber parts (boots -
sleeves - bushings, etc.), brake and
fuel line hoses5) check for bonnet and boot lock
cleanness, lever cleanness and lubri-
cation
6) Check primary and secondary
battery charge status
7) Check conditions of various con-
trol belts
8) Check and top up fluid levels
(engine coolant, brakes, windscreen
washer, battery, etc.)
9) Change engine oil
10) Replace engine oil filter
11) Replace dust/pollen filter.
Page 323 of 386
322
fig. 14
L0A0293b
fig. 15
L0A0158b
The engine cooling sys-
tem works with PARAFLU
UP. Top up only with the
same fluid contained in the cool-
ing circuit. PARAFLU UP cannot
be mixed up with PARAFLU 11 or
other fluids. Should this take
place, do not start the engine and
contact a Lancia Dealership. In
case of need, lacking the speci-
fied fluid, top up with water and
contact a Lancia Dealership to
have the proper proportions
restored.
The cooling system is
pressurised. If necessary,
replace the cap with a
genuine spare part to avoid com-
promising the system efficiency.
The mixture of distilled water
and PARAFLU gives freeze pro-
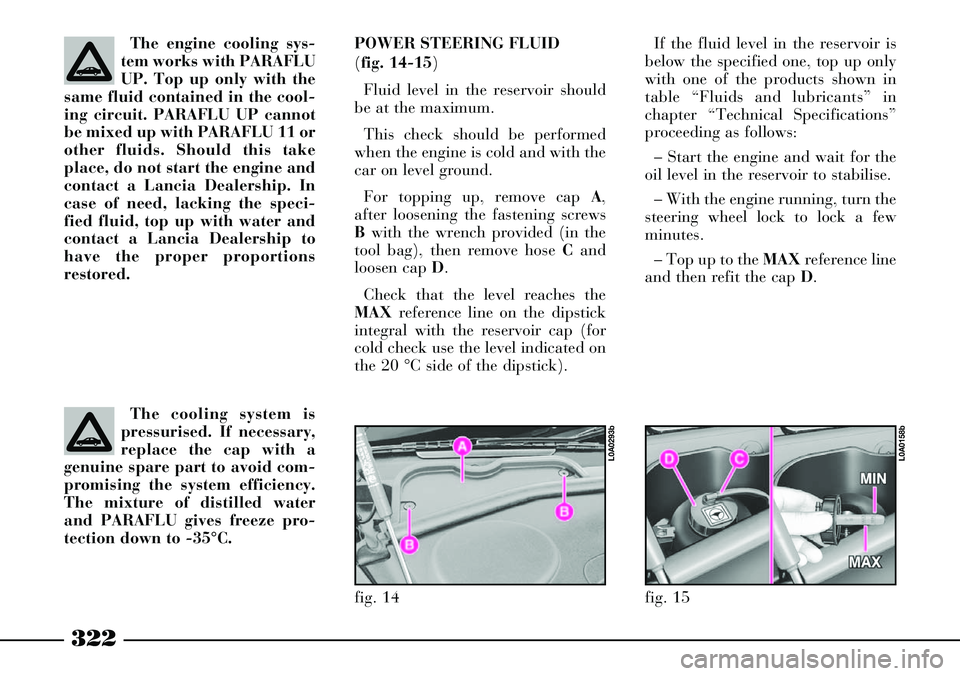
tection down to -35°C. POWER STEERING FLUID
(fig. 14-15)
Fluid level in the reservoir should
be at the maximum.
This check should be performed
when the engine is cold and with the
car on level ground.
For topping up, remove cap A,
after loosening the fastening screws
Bwith the wrench provided (in the
tool bag), then remove hose Cand
loosen cap D.
Check that the level reaches the
MAXreference line on the dipstick
integral with the reservoir cap (for
cold check use the level indicated on
the 20 °C side of the dipstick).If the fluid level in the reservoir is
below the specified one, top up only
with one of the products shown in
table “Fluids and lubricants” in
chapter “Technical Specifications”
proceeding as follows:
– Start the engine and wait for the
oil level in the reservoir to stabilise.
– With the engine running, turn the
steering wheel lock to lock a few
minutes.
– Top up to the MAXreference line
and then refit the cap D.
Page 332 of 386
331
WHEELS
AND TYRES
TYRE PRESSURE
Check the pressure of each tyre,
including the spare, every two weeks
and before long journeys.
The pressure should be checked
with the tyre rested and cold.
It is normal for the pressure to rise
when you are driving. If you have to
check or restore the pressure when
the tyres are warm, remember that
the pressure value must be 0.3 bar
above the specified value.
For proper tyre inflation pressure,
see “Wheels” in chapter “Technical
Specifications”.Tyre pressure must be
correct to ensure good
road holding.
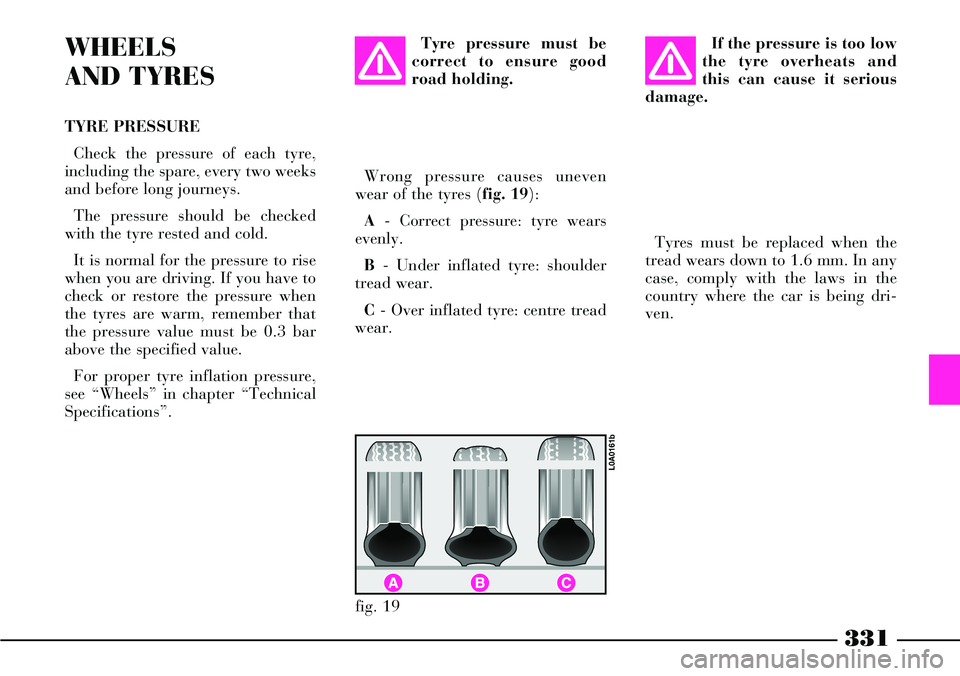
Wrong pressure causes uneven
wear of the tyres (fig. 19):
A- Correct pressure: tyre wears
evenly.
B- Under inflated tyre: shoulder
tread wear.
C- Over inflated tyre: centre tread
wear.If the pressure is too low
the tyre overheats and
this can cause it serious
damage.
Tyres must be replaced when the
tread wears down to 1.6 mm. In any
case, comply with the laws in the
country where the car is being dri-
ven.
fig. 19
L0A0161b
Page 333 of 386
332
If you replace a tyre it is a good
idea to change the inflation valve,
too.
To ensure the front and rear tyres
all wear evenly, you are advised to
change the tyres over every 10-15
thousand kilometres, keeping them
on the same side of the car so as to
not reverse the direction of rotation.
Do not change the tyres
over in criss-cross fash-
ion by moving a tyre from
the left hand side of the car to the
right and vice versa.GENERAL NOTES
As far as possible, avoid sharp
braking and screech starts, etc.
Be careful not to hit the kerb, pot-
holes or other obstacles hard.
Driving for long stretches over
bumpy roads can damage the tyres.
Periodically check that the tyres
have no cuts in the sidewalls, abnor-
mal swelling or irregular tyre wear.
If any of these occur, have the car
seen to at a Lancia Dealership.
Avoid overloading your car: this
can seriously damage wheels and
tyres.If you get a flat tyre, stop immedi-
ately and change it so as not to dam-
age the tyre, the wheel, the suspen-
sion and the steering. Tyres age even
if they are not used very much.
Cracking of the tread rubber and the
sidewalls are a sign of this ageing. In
any case, if the tyres have been fitted
for more than six years they should
be examined by an expert who can
judge whether they are still fit for
use. Remember to check the spare
tyre particularly carefully too
If a replacement is necessary,
always use new tyres and avoid
using ones the origin of which you
are not certain about.
Lancia THESIS fits tubeless tyres.
Under no circumstances use an inner
tube with these tyres.
Page 342 of 386
341
IDENTIFICATION
DATA
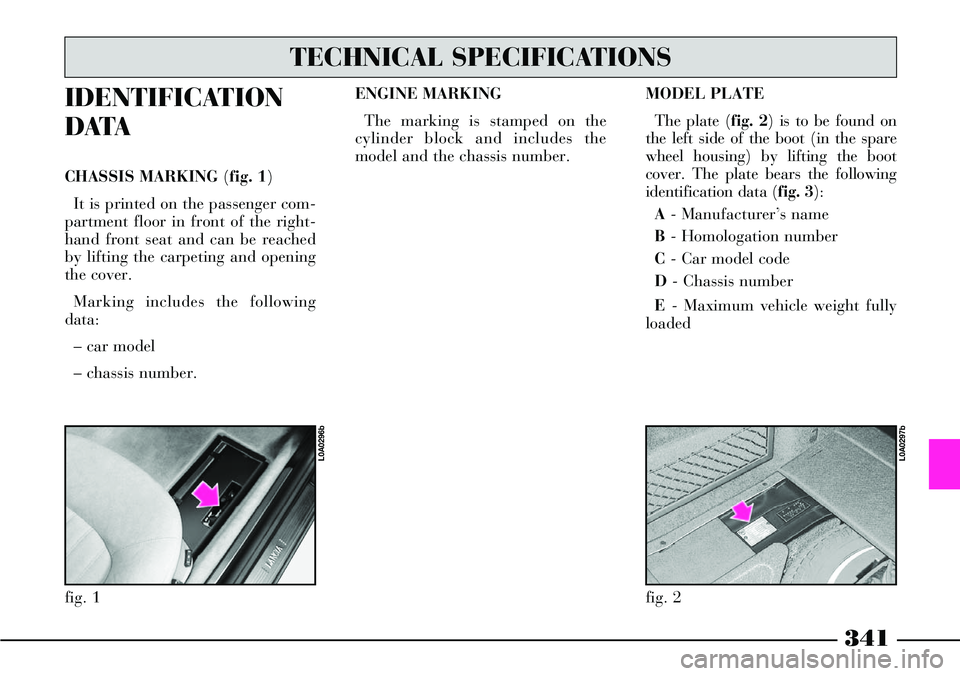
CHASSIS MARKING (fig. 1)
It is printed on the passenger com-
partment floor in front of the right-
hand front seat and can be reached
by lifting the carpeting and opening
the cover.
Marking includes the following
data:
– car model
– chassis number.ENGINE MARKING
The marking is stamped on the
cylinder block and includes the
model and the chassis number.
fig. 1
L0A0296b
fig. 2
L0A0297b
TECHNICAL SPECIFICATIONS
MODEL PLATE
The plate (fig. 2) is to be found on
the left side of the boot (in the spare
wheel housing) by lifting the boot
cover. The plate bears the following
identification data (fig. 3):
A- Manufacturer’s name
B- Homologation number
C- Car model code
D- Chassis number
E- Maximum vehicle weight fully
loaded