Lancia Voyager 2014 Owner handbook (in English)
Manufacturer: LANCIA, Model Year: 2014, Model line: Voyager, Model: Lancia Voyager 2014Pages: 364, PDF Size: 3.49 MB
Page 221 of 364
To set the password, activate the DVD
Setup Menu and follow these addi-
tional instructions:
Using the remote control Left andRight cursor buttons, select the
Rating tab.
Highlight "Change Password", and then press the remote control’s
ENTER/OK button.
Enter the current password. Select a digit, use the remote control Up
and Down cursor buttons to set the
value for the current digit, and then
press the remote control’s Right
cursor button to select the next
digit. Repeat this digit selection se-
quence for all four digits.
After the four-digit password is en- tered, press the remote control’s
ENTER/OK button. If the pass-
word is correct, the set password
screen is displayed.
Using the remote control’s Up and Down cursor buttons to set the
value for the current digit and the remote control’s Right cursor but-
ton to select digits, enter the new
password.
After the four-digit password is en- tered, press the remote control’s
ENTER/OK button to accept the
change.
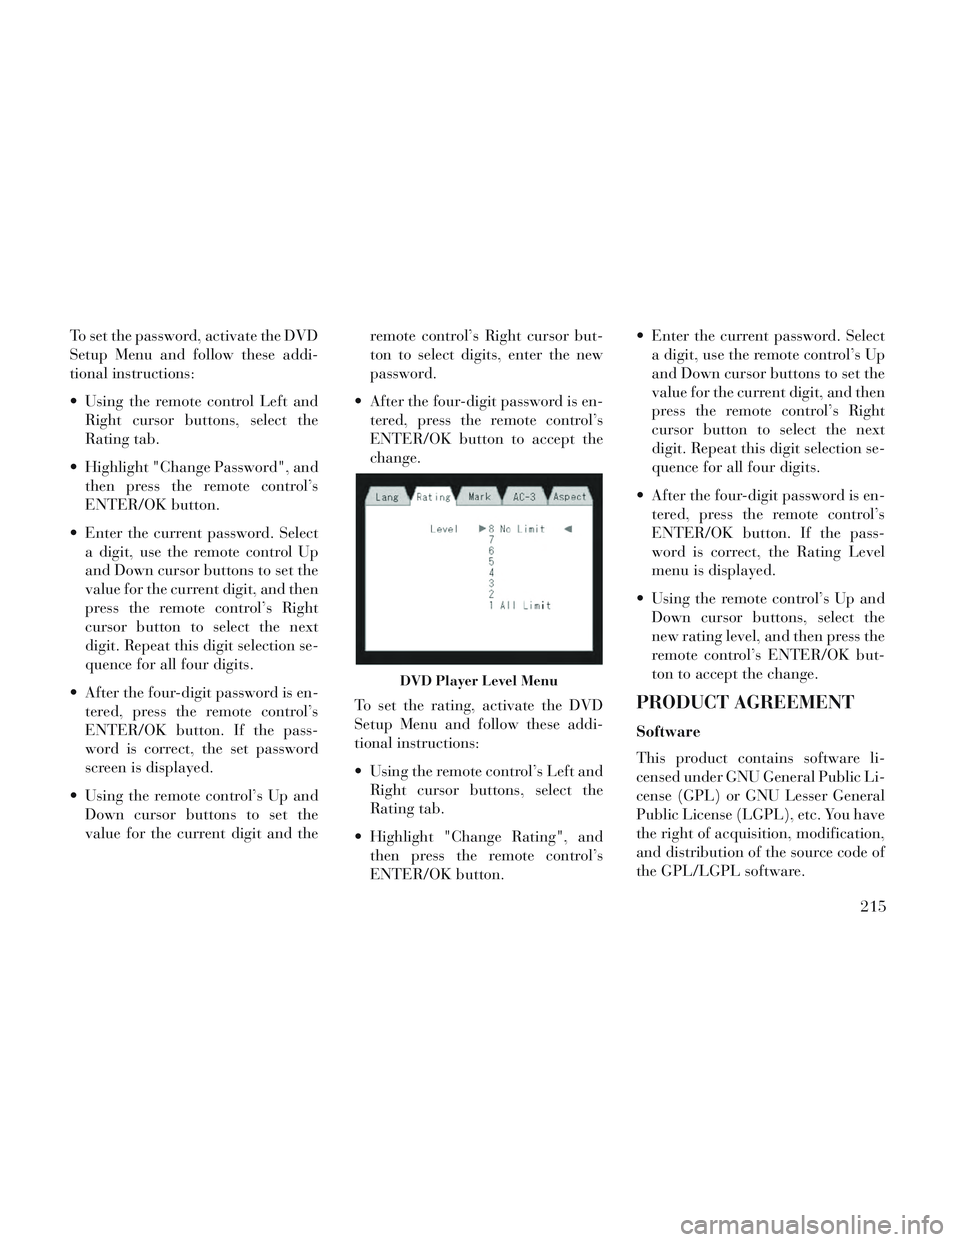
To set the rating, activate the DVD
Setup Menu and follow these addi-
tional instructions:
Using the remote control’s Left and Right cursor buttons, select the
Rating tab.
Highlight "Change Rating", and then press the remote control’s
ENTER/OK button. Enter the current password. Select
a digit, use the remote control’s Up
and Down cursor buttons to set the
value for the current digit, and then
press the remote control’s Right
cursor button to select the next
digit. Repeat this digit selection se-
quence for all four digits.
After the four-digit password is en- tered, press the remote control’s
ENTER/OK button. If the pass-
word is correct, the Rating Level
menu is displayed.
Using the remote control’s Up and Down cursor buttons, select the
new rating level, and then press the
remote control’s ENTER/OK but-
ton to accept the change.
PRODUCT AGREEMENT
Software
This product contains software li-
censed under GNU General Public Li-
cense (GPL) or GNU Lesser General
Public License (LGPL), etc. You have
the right of acquisition, modification,
and distribution of the source code of
the GPL/LGPL software.
DVD Player Level Menu
215
Page 222 of 364
THIS PRODUCT IS LICENSEDUNDER THE AVC PATENT
PORTFOLIO LICENSE FOR THE
PERSONAL AND NON-
COMMERCIAL USE OF A CON-
SUMER TO (i) ENCODE VIDEO
IN COMPLIANCE WITH THE
AVC STANDARD ("AVC VIDEO")
AND/OR (ii) DECODE AVC
VIDEO THAT WAS ENCODED BY
A CONSUMER ENGAGED IN A
PERSONAL AND NON-
COMMERCIAL ACTIVITY
AND/OR WAS OBTAINED FROM
A VIDEO PROVIDER LICENSED
TO PROVIDE AVC VIDEO. NO
LICENSE IS GRANTED OR
SHALL BE IMPLIED FOR ANY
OTHER USE. ADDITIONAL IN-
FORMATION MAY BE OBTAINED
FROM MPEG LA, L.L.C. SEE
HTTP://WWW.MPEGLA.COM
THIS PRODUCT IS LICENSED UNDER THE VC-1 PATENT
PORTFOLIO LICENSE FOR THE
PERSONAL AND NON-
COMMERCIAL USE OF A CON-
SUMER TO (i) ENCODE VIDEO
IN COMPLIANCE WITH THE VC-1 STANDARD ("VC-1
VIDEO") AND/OR (ii) DECODE
VC-1 VIDEO THAT WAS EN-
CODED BY A CONSUMER EN-
GAGED IN A PERSONAL AND
NON-COMMERCIAL ACTIVITY
AND/OR WAS OBTAINED FROM
A VIDEO PROVIDER LICENSED
TO PROVIDE VC-1 VIDEO. NO
LICENSE IS GRANTED OR
SHALL BE IMPLIED FOR ANY
OTHER USE. ADDITIONAL IN-
FORMATION MAY BE OBTAINED
FROM MPEG LA, L.L.C. SEE
HTTP://WWW.MPEGLA.COM
Patents
Cinavia Notice
This product uses Cinavia technology
to limit the use of unauthorized copies
of some commercially-produced film
and videos and their soundtracks.
When a prohibited use of an unau-
thorized copy is detected, a message
will be displayed and playback or
copying will be interrupted. More in-
formation about Cinavia technology
is provided at the Cinavia Online
Consumer Information Center at http://www.cinavia.com. To request
additional information about Cinavia
by mail, send a postcard with your
mailing address to: Cinavia Consumer
Information Center, P.O. Box 86851,
San Diego, CA, 92138, USA.
This product incorporates proprietary
technology under license from Ver-
ance Corporation and is protected by
U.S. Patent 7,369,677 and other U.S.
and worldwide patents issued and
pending as well as copyright and
trade secret protection for certain as-
pects of such technology. Cinavia is a
trademark of Verance Corporation.
Copyright 2004-2010 Verance
Corporation. All rights reserved by
Verance. Reverse engineering or dis-
assembly is prohibited.
This product incorporates copy-
right protection technology that is
protected by U.S. patents and other
intellectual property rights. Use of
this copyright protection technol-
ogy must be authorized by Macro-
vision, and is intended for home
and other limited viewing uses only
unless otherwise authorized by
216
Page 223 of 364
Macrovision. Reverse engineering
or disassembly is prohibited.
Manufactured under license under U.S. Patent #’s: 5,451,942;
5,956,674; 5,974,380; 5,978,762;
6,487,535 & other U.S. and world-
wide patents issued & pending.
DTS is a registered trademark and
the DTS logos, Symbol and DTS
2.0 Channel are trademarks of
DTS, Inc. © 1996-2007 DTS, Inc.
All Rights Reserved.
Manufactured under license from Dolby Laboratories. Dolby and the
double-D symbol are trademarks of
Dolby Laboratories.
ABOUT DIVX VIDEO: DivX® is a
digital video format created by DivX,
LLC, a subsidiary of Rovi
Corporation. This is an official DivX
Certified® device that plays DivX
video. Visit divx.com for more infor-
mation and software tools to convert
your files into DivX videos.
ABOUT DIVX VIDEO-ON-
DEMAND: This DivX Certified® de-
vice must be registered in order to play purchased DivX Video-on-
Demand (VOD) movies. To obtain
your registration code, locate the
DivX VOD section in your device
setup menu. Go to vod.divx.com for
more information on how to complete
your registration.
DivX®, DivX Certified® and associ-
ated logos are trademarks of Rovi
Corporation or its subsidiaries and
are used under license.
Trademark
Blu-ray Disc™, Blu-ray™ and the
logos are trademarks of the Blu-ray
Disc Association.
Java is a registered trademark of Oracle and/or its affiliates.
CAUTION!
Use of controls or adjustments or
performance of procedures other
than those specified herein may re-
sult in hazardous radiation expo-
sure.
STEERING WHEEL
AUDIO CONTROLS
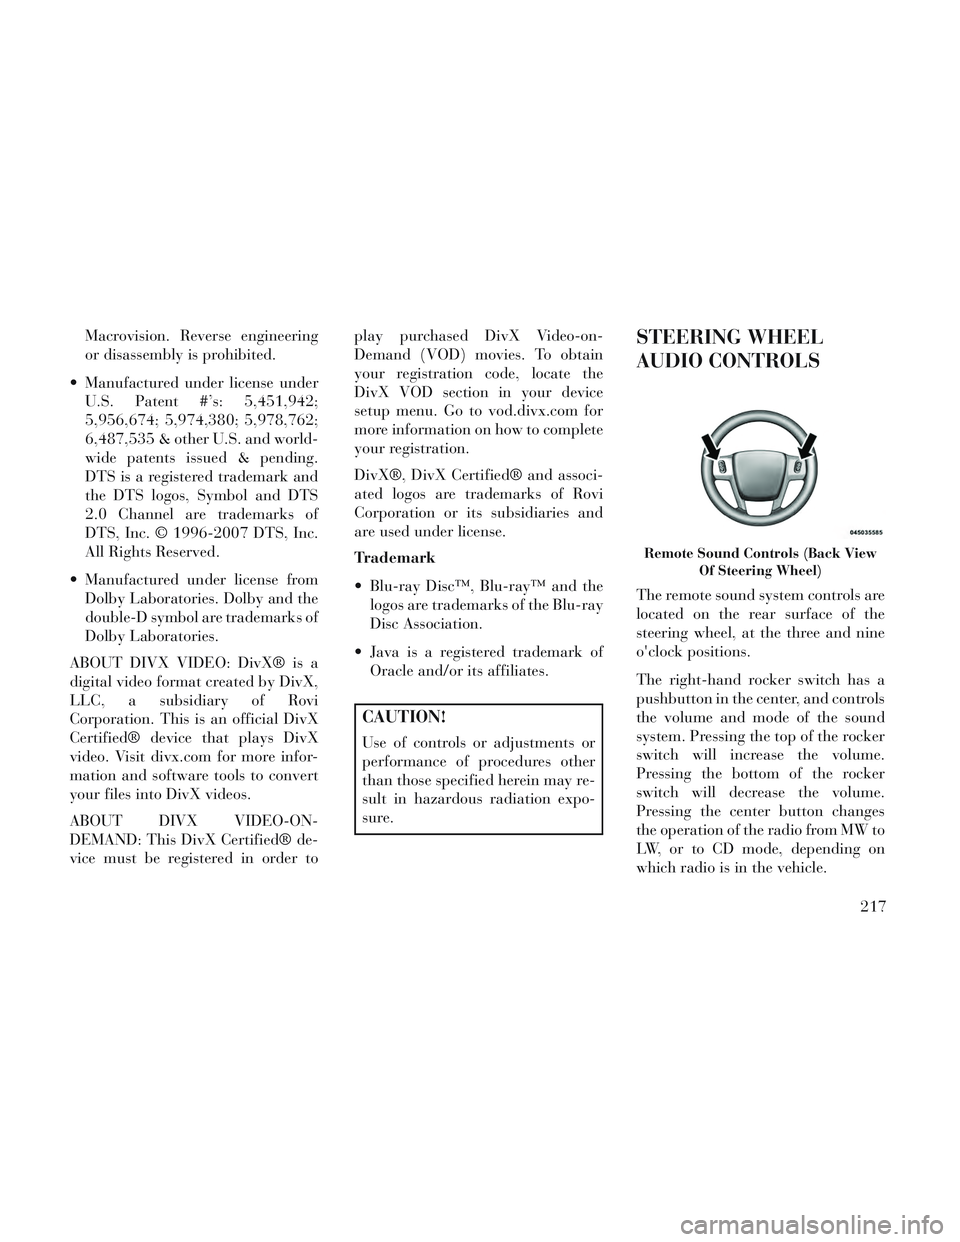
The remote sound system controls are
located on the rear surface of the
steering wheel, at the three and nine
o'clock positions.
The right-hand rocker switch has a
pushbutton in the center, and controls
the volume and mode of the sound
system. Pressing the top of the rocker
switch will increase the volume.
Pressing the bottom of the rocker
switch will decrease the volume.
Pressing the center button changes
the operation of the radio from MW to
LW, or to CD mode, depending on
which radio is in the vehicle.
Remote Sound Controls (Back View
Of Steering Wheel)
217
Page 224 of 364
The left-hand rocker switch has a
pushbutton in the center. The func-
tion of the left-hand switch is differ-
ent, depending on which mode you
are in.
The following describes the left-hand
rocker switch operation in each mode.
RADIO OPERATION
Pressing the top of the switch will
SEEK up for the next listenable sta-
tion, and pressing the bottom of the
switch will SEEK down for the next
listenable station.
The button located in the center of the
left-hand switch will tune to the next
preset station that you have pro-
grammed in the radio preset push-
button.
CD PLAYER
Pressing the top of the switch once
will go to the next track on the CD.
Pressing the bottom of the switch once
will go to the beginning of the current
track, or to the beginning of the pre-
vious track if it is within one second
after the current track begins to play.If you press the switch up or down
twice it plays the second track; three
times, it will play the third, etc.
The button in the center of the left-
hand switch has no function in this
mode.
CD/DVD DISC
MAINTENANCE
To keep a CD/DVD in good condition,
take the following precautions:
1. Handle the disc by its edge; avoid
touching the surface.
2. If the disc is stained, clean the
surface with a soft cloth, wiping from
center to edge.
3. Do not apply paper or tape to the
disc; avoid scratching the disc.
4. Do not use solvents such as ben-
zene, thinner, cleaners, or anti-static
sprays.
5. Store the disc in its case after play-
ing.
6. Do not expose the disc to direct
sunlight.7. Do not store the disc where tem-
peratures may become too high.
NOTE: If you experience diffi-
culty in playing a particular disc, it
may be damaged (i.e., scratched,
reflective coating removed, a hair,
moisture or dew on the disc) over-
sized, or have protection encoding.
Try a known good disc before con-
sidering disc player service.
RADIO OPERATION AND
MOBILE PHONES
Under certain conditions, the mobile
phone being on in your vehicle can
cause erratic or noisy performance
from your radio. This condition may
be lessened or eliminated by relocat-
ing the mobile phone antenna. This
condition is not harmful to the radio.
If your radio performance does not
satisfactorily “clear” by the reposi-
tioning of the antenna, it is recom-
mended that the radio volume be
turned down or off during mobile
phone operation.
218
Page 225 of 364
CLIMATE CONTROLS
The Climate Control system allows
you to regulate the temperature,
amount, and direction of air circulat-
ing throughout the vehicle. The con-
trols are located on the instrument
panel, below the radio.
AUTOMATIC
TEMPERATURE CONTROL
(ATC)
Front Three-Zone ATC allows bothdriver and front passenger seat oc-
cupant, and rear seat occupants to
select individual comfort settings.
When occupants in the vehicle se- lect the AUTO mode operation, a
comfort temperature can be set by
using the temperature up and down
buttons, and the auto blower op-
eration will be set automatically.
The system can be controlled manually, if desired.
SYNC feature links the controls for all three zones, allowing one com-
fort setting (driver setting) for the
cabin, if desired. The Three-Zone ATC system auto-
matically maintains the interior com-
fort level desired by the driver and all
passengers. The system automatically
adjusts the air temperature, the air-
flow volume, amount of outside air
recirculation and the airflow direc-
tion. This maintains a comfortable
temperature, even under changing
conditions.
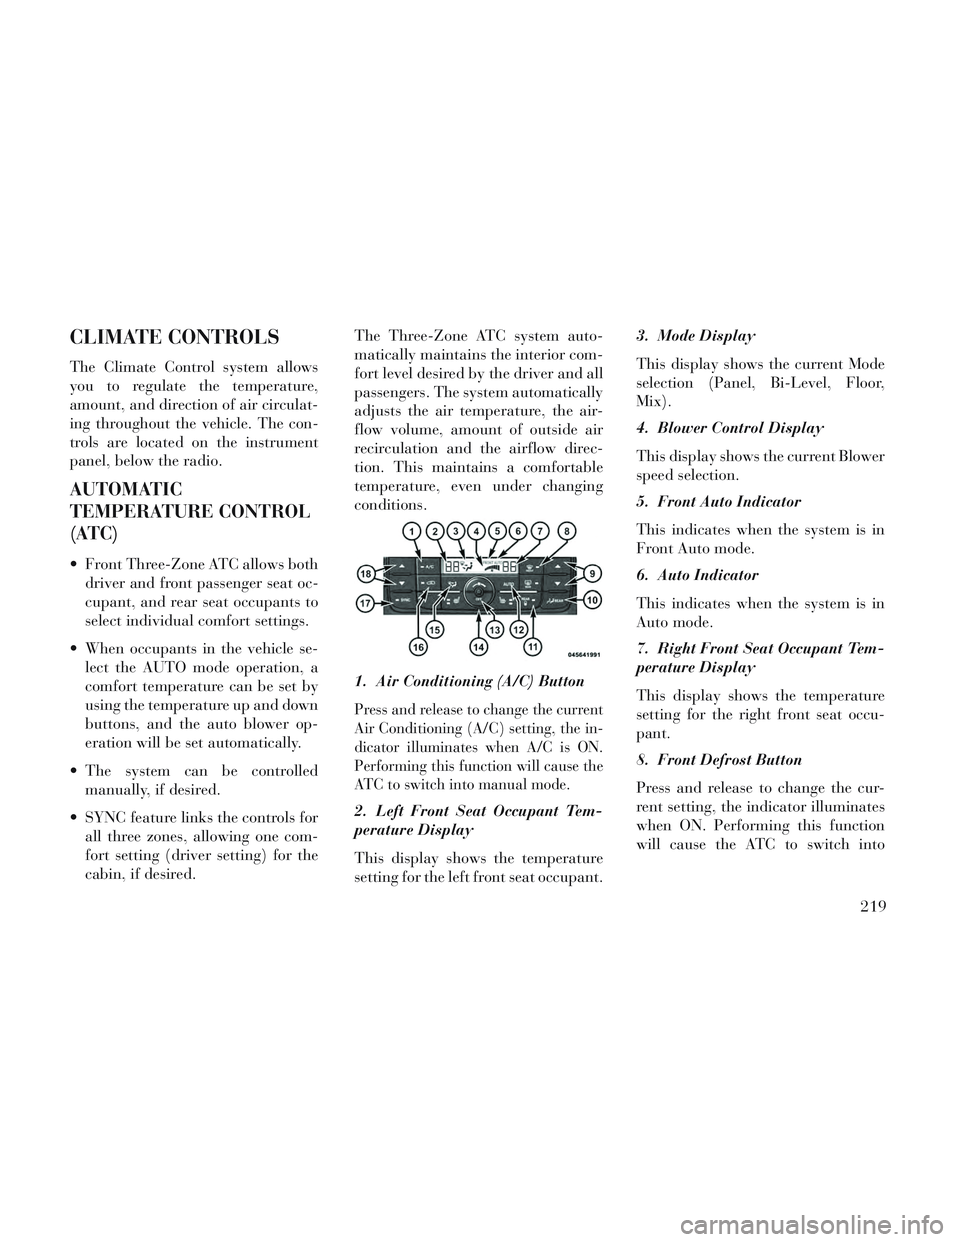
1. Air Conditioning (A/C) Button
Press and release to change the current
Air Conditioning (A/C) setting, the in-
dicator illuminates when A/C is ON.
Performing this function will cause the
ATC to switch into manual mode.
2. Left Front Seat Occupant Tem-
perature Display
This display shows the temperature
setting for the left front seat occupant. 3. Mode Display
This display shows the current Mode
selection (Panel, Bi-Level, Floor,
Mix).
4. Blower Control Display
This display shows the current Blower
speed selection.
5. Front Auto Indicator
This indicates when the system is in
Front Auto mode.
6. Auto Indicator
This indicates when the system is in
Auto mode.
7. Right Front Seat Occupant Tem-
perature Display
This display shows the temperature
setting for the right front seat occu-
pant.
8. Front Defrost Button
Press and release to change the cur-
rent setting, the indicator illuminates
when ON. Performing this function
will cause the ATC to switch into
219
Page 226 of 364
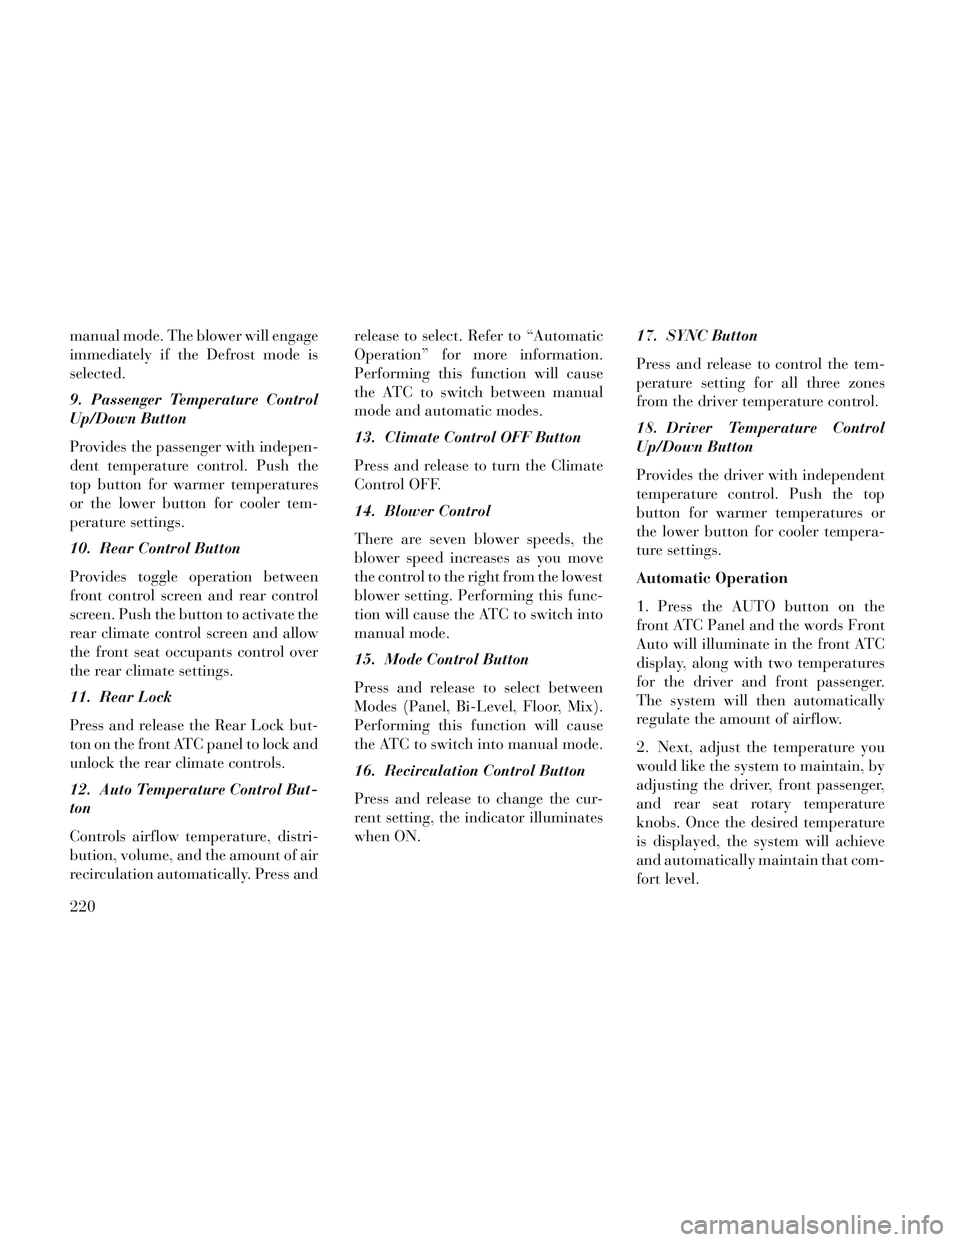
manual mode. The blower will engage
immediately if the Defrost mode is
selected.
9. Passenger Temperature Control
Up/Down Button
Provides the passenger with indepen-
dent temperature control. Push the
top button for warmer temperatures
or the lower button for cooler tem-
perature settings.
10. Rear Control Button
Provides toggle operation between
front control screen and rear control
screen. Push the button to activate the
rear climate control screen and allow
the front seat occupants control over
the rear climate settings.
11. Rear Lock
Press and release the Rear Lock but-
ton on the front ATC panel to lock and
unlock the rear climate controls.
12. Auto Temperature Control But-
ton
Controls airflow temperature, distri-
bution, volume, and the amount of air
recirculation automatically. Press andrelease to select. Refer to “Automatic
Operation” for more information.
Performing this function will cause
the ATC to switch between manual
mode and automatic modes.
13. Climate Control OFF Button
Press and release to turn the Climate
Control OFF.
14. Blower Control
There are seven blower speeds, the
blower speed increases as you move
the control to the right from the lowest
blower setting. Performing this func-
tion will cause the ATC to switch into
manual mode.
15. Mode Control Button
Press and release to select between
Modes (Panel, Bi-Level, Floor, Mix).
Performing this function will cause
the ATC to switch into manual mode.
16. Recirculation Control Button
Press and release to change the cur-
rent setting, the indicator illuminates
when ON.
17. SYNC Button
Press and release to control the tem-
perature setting for all three zones
from the driver temperature control.
18. Driver Temperature Control
Up/Down Button
Provides the driver with independent
temperature control. Push the top
button for warmer temperatures or
the lower button for cooler tempera-
ture settings.
Automatic Operation
1. Press the AUTO button on the
front ATC Panel and the words Front
Auto will illuminate in the front ATC
display, along with two temperatures
for the driver and front passenger.
The system will then automatically
regulate the amount of airflow.
2. Next, adjust the temperature you
would like the system to maintain, by
adjusting the driver, front passenger,
and rear seat rotary temperature
knobs. Once the desired temperature
is displayed, the system will achieve
and automatically maintain that com-
fort level.
220
Page 227 of 364
3. When the system is set up for your
comfort level, it is not necessary to
change the settings. You will experi-
ence the greatest efficiency by simply
allowing the system to function auto-
matically.
NOTE:
It is not necessary to move thetemperature settings for cold or
hot vehicles. The system auto-
matically adjusts the tempera-
ture, mode and fan speed to pro-
vide comfort as quickly as
possible.
The temperature can be dis- played in English or Metric units
by selecting the “Display Units
of Measure in” customer-
programmable feature. Refer to
the “Electronic Vehicle Informa-
tion Center (EVIC) — Customer-
Programmable Features” in this
Section.
To provide you with maximum com-
fort in the automatic mode, during
cold start-ups, the blower fan will re-
main on low until the engine warms
up. The fan will engage immediately if the Defrost mode is selected, or by
changing the front blower knob set-
ting.
Manual Operation Override
This system offers a full complement
of manual override features. The
AUTO symbol in the front ATC dis-
play will be turned off when the sys-
tem is being used in the manual mode.
NOTE: If not operating in AUTO
mode, the system will not auto-
matically sense the presence of fog,
mist or ice on the windshield. DE-
FROST mode must be manually
selected to clear the windshield
and side glass.
Air Conditioning (A/C)
The Air Conditioning (A/C) button
allows the operator to manually acti-
vate or deactivate the air conditioning
system. When in A/C mode and the
ATC is set to a cool temperature, de-
humidified air flows through the air
outlets. If Economy mode is desired,
press the A/C button to turn off the
A/C mode in the ATC display and
deactivate the A/C system.
NOTE:
If the system is in Mix, Floor or
Defrost Mode, the A/C can be
turned off, but the A/C system
shall remain active to prevent
fogging of the windows.
If fog or mist appears on the windshield or side glass, select
Defrost mode and increase
blower speed.
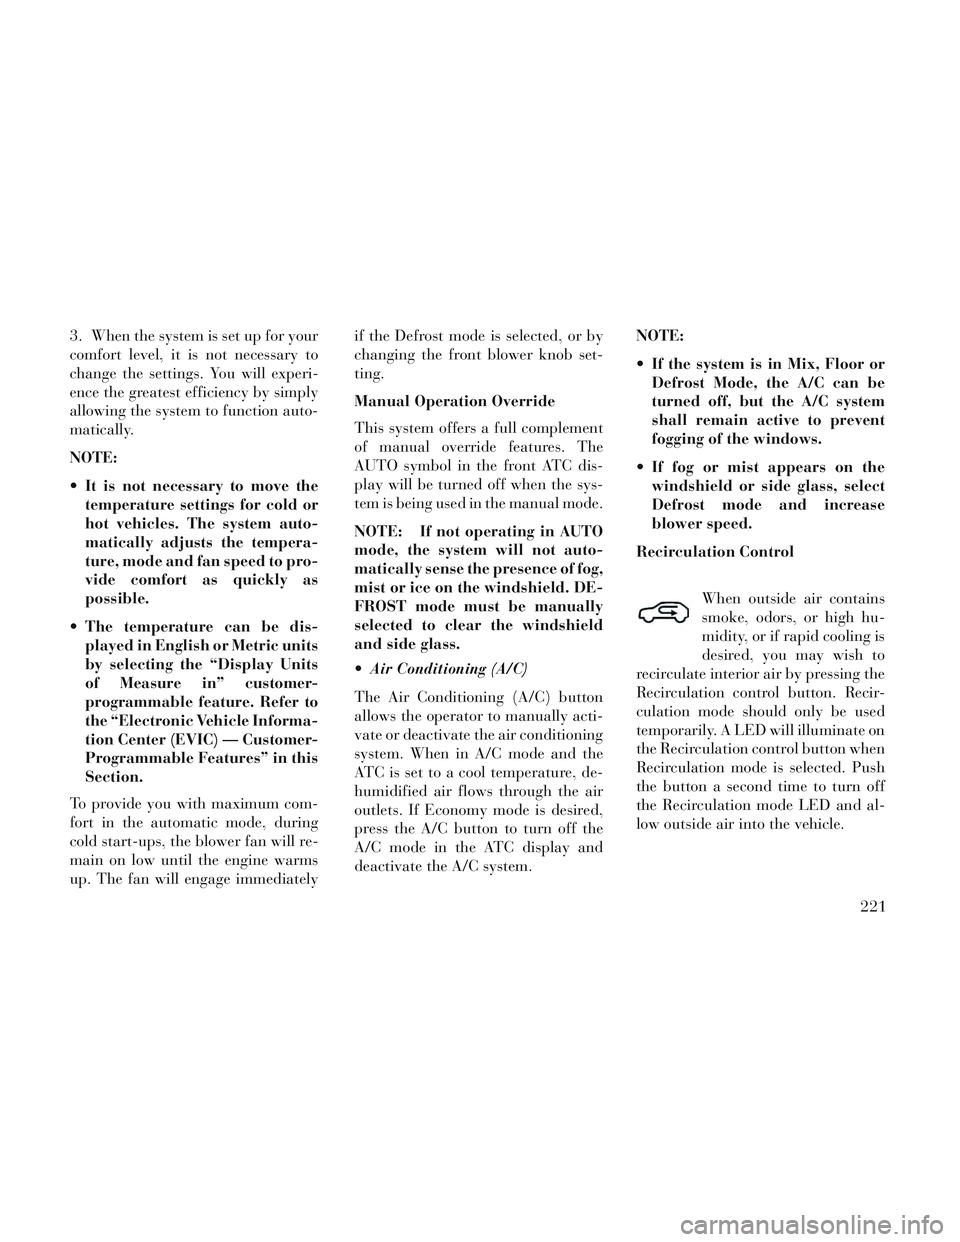
Recirculation Control
When outside air contains
smoke, odors, or high hu-
midity, or if rapid cooling is
desired, you may wish to
recirculate interior air by pressing the
Recirculation control button. Recir-
culation mode should only be used
temporarily. A LED will illuminate on
the Recirculation control button when
Recirculation mode is selected. Push
the button a second time to turn off
the Recirculation mode LED and al-
low outside air into the vehicle.
221
Page 228 of 364
Controlling The Rear Climate
Controls From The Front ATC
Panel
The Three-Zone ATC system allows
for adjustment of the rear climate
controls from the front ATC panel.
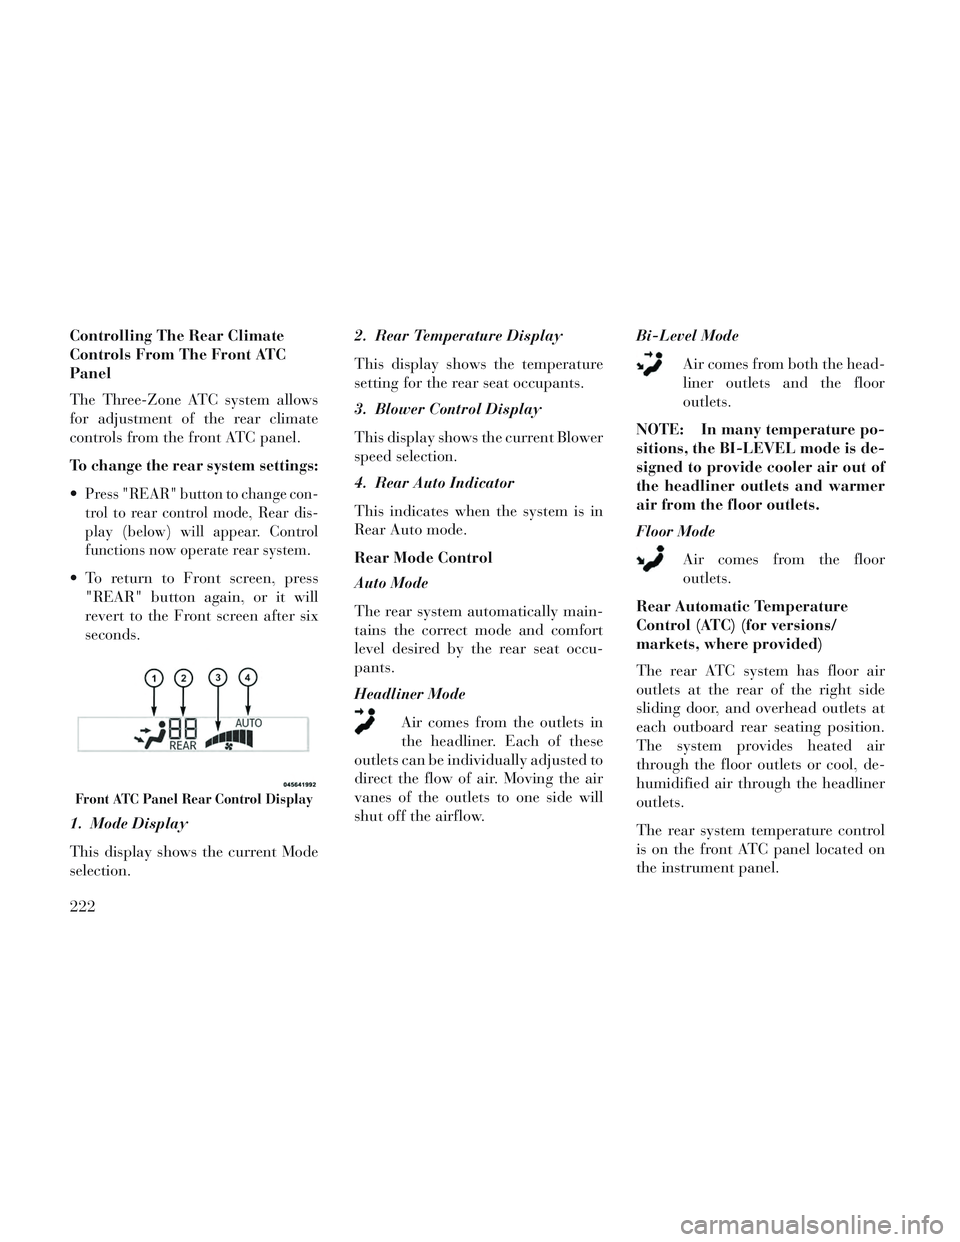
To change the rear system settings:
Press "REAR" button to change con-
trol to rear control mode, Rear dis-
play (below) will appear. Control
functions now operate rear system.
To return to Front screen, press"REAR" button again, or it will
revert to the Front screen after six
seconds.
1. Mode Display
This display shows the current Mode
selection. 2. Rear Temperature Display
This display shows the temperature
setting for the rear seat occupants.
3. Blower Control Display
This display shows the current Blower
speed selection.
4. Rear Auto Indicator
This indicates when the system is in
Rear Auto mode.
Rear Mode Control
Auto Mode
The rear system automatically main-
tains the correct mode and comfort
level desired by the rear seat occu-
pants.
Headliner Mode
Air comes from the outlets in
the headliner. Each of these
outlets can be individually adjusted to
direct the flow of air. Moving the air
vanes of the outlets to one side will
shut off the airflow. Bi-Level Mode
Air comes from both the head-
liner outlets and the floor
outlets.
NOTE: In many temperature po-
sitions, the BI-LEVEL mode is de-
signed to provide cooler air out of
the headliner outlets and warmer
air from the floor outlets.
Floor Mode Air comes from the floor
outlets.
Rear Automatic Temperature
Control (ATC) (for versions/
markets, where provided)
The rear ATC system has floor air
outlets at the rear of the right side
sliding door, and overhead outlets at
each outboard rear seating position.
The system provides heated air
through the floor outlets or cool, de-
humidified air through the headliner
outlets.
The rear system temperature control
is on the front ATC panel located on
the instrument panel.
Front ATC Panel Rear Control Display
222
Page 229 of 364
Pressing the Rear Temperature Lock
button on the front ATC panel, illumi-
nates a lock symbol in the rear dis-
play. The rear temperature and air
source are controlled from the front
ATC panel.
Rear second row occupants can only
adjust the rear ATC control when the
Rear Temperature Lock button is
turned off.
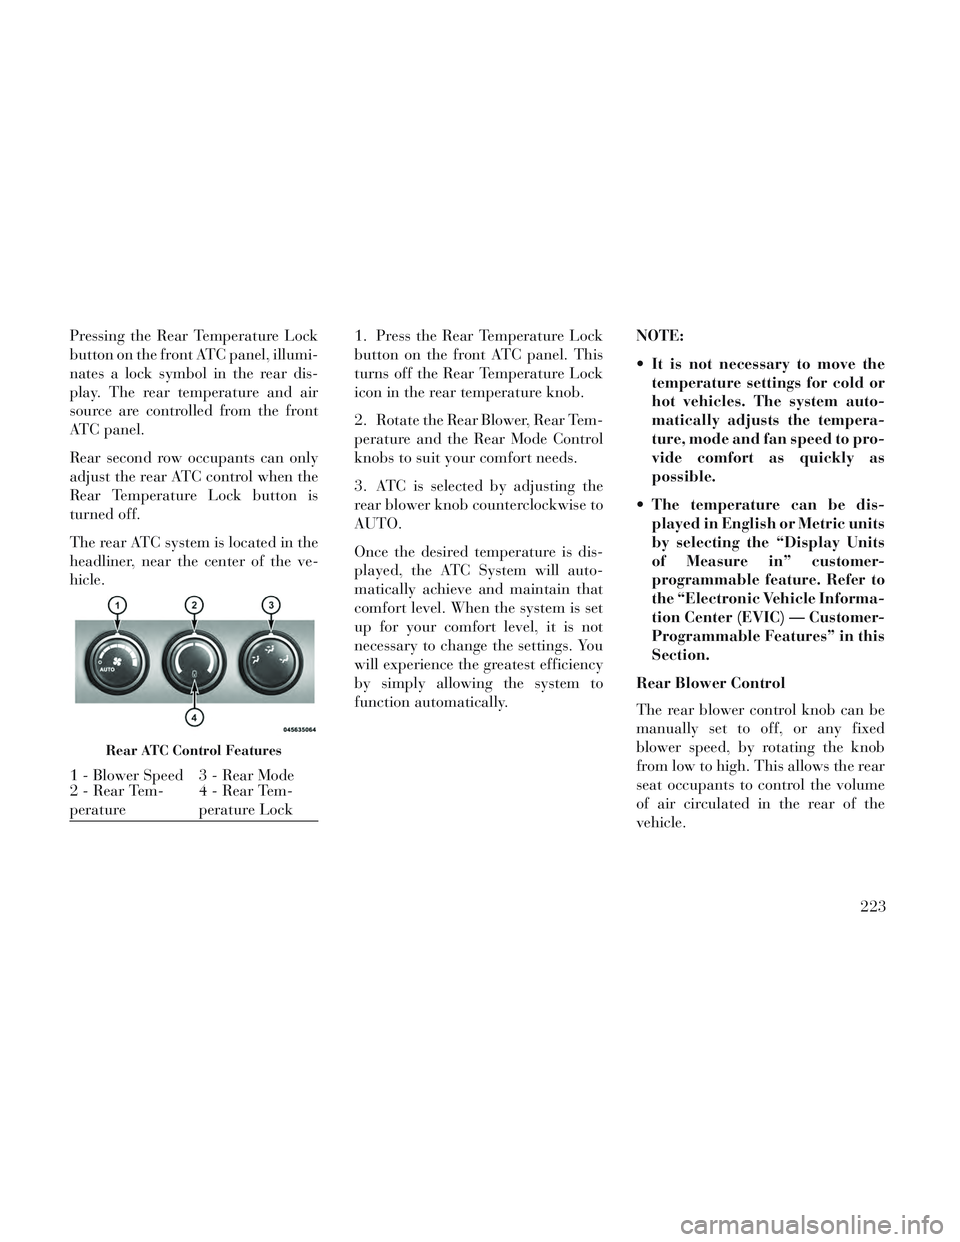
The rear ATC system is located in the
headliner, near the center of the ve-
hicle.1. Press the Rear Temperature Lock
button on the front ATC panel. This
turns off the Rear Temperature Lock
icon in the rear temperature knob.
2. Rotate the Rear Blower, Rear Tem-
perature and the Rear Mode Control
knobs to suit your comfort needs.
3. ATC is selected by adjusting the
rear blower knob counterclockwise to
AUTO.
Once the desired temperature is dis-
played, the ATC System will auto-
matically achieve and maintain that
comfort level. When the system is set
up for your comfort level, it is not
necessary to change the settings. You
will experience the greatest efficiency
by simply allowing the system to
function automatically.NOTE:
It is not necessary to move the
temperature settings for cold or
hot vehicles. The system auto-
matically adjusts the tempera-
ture, mode and fan speed to pro-
vide comfort as quickly as
possible.
The temperature can be dis- played in English or Metric units
by selecting the “Display Units
of Measure in” customer-
programmable feature. Refer to
the “Electronic Vehicle Informa-
tion Center (EVIC) — Customer-
Programmable Features” in this
Section.
Rear Blower Control
The rear blower control knob can be
manually set to off, or any fixed
blower speed, by rotating the knob
from low to high. This allows the rear
seat occupants to control the volume
of air circulated in the rear of the
vehicle.
Rear ATC Control Features
1 - Blower Speed 3 - Rear Mode
2 - Rear Tem-
perature 4 - Rear Tem-
perature Lock
223
Page 230 of 364
CAUTION!
Interior air enters the Rear Auto-
matic Temperature Control System
through an intake grille, located in
the right side trim panel behind the
third row seats. The rear outlets are
located in the right side trim panel
of the 3rd Row seat. Do not block or
place objects directly in front of the
inlet grille or heater outlets. The
electrical system could overload
causing damage to the blower mo-
tor.
Rear Temperature Control
To change the temperature in the rear
of the vehicle, rotate the temperature
knob counterclockwise to lower the
temperature, and clockwise to in-
crease the temperature. The rear tem-
perature settings are displayed in the
front ATC panel.
When rear controls are locked by the
front system, the Rear Temperature
Lock symbol on the temperature
knob is illuminated and any rear over-
head adjustments are ignored. Rear Mode Control
Auto Mode
The rear system automatically main-
tains the correct mode and comfort
level desired by the rear seat occu-
pants.
Headliner Mode
Air comes from the outlets in
the headliner. Each of these
outlets can be individually adjusted to
direct the flow of air. Moving the air
vanes of the outlets to one side will
shut off the airflow.
Bi-Level Mode
Air comes from both the head-
liner outlets and the floor out-
lets.
NOTE: In many temperature po-
sitions, the Bi-Level mode is de-
signed to provide cooler air out of
the headliner outlets and warmer
air from the floor outlets.
Floor Mode Air comes from the floor out-
lets. Recirculation Control
When outside air contains
smoke, odors, or high hu-
midity, or if rapid cooling is
desired, you may wish to
recirculate interior air by pressing the
Recirculation control button. Recir-
culation mode should only be used
temporarily. The recirculation LED
will illuminate when this button is
selected. Push the button a second
time to turn off the Recirculation
mode LED and allow outside air into
the vehicle.
NOTE: In cold weather, use of the
Recirculation mode may lead to
excessive window fogging. The Re-
circulation mode is not allowed in
Defrost mode to improve window
clearing operation. Recirculation
will be disabled automatically if
this mode is selected.
SUMMER OPERATION
The engine cooling system in air con-
ditioned vehicles must be protected
with a high-quality antifreeze coolant
to provide proper corrosion protection
224