climate control Lancia Ypsilon 2001 Owner handbook (in English)
[x] Cancel search | Manufacturer: LANCIA, Model Year: 2001, Model line: Ypsilon, Model: Lancia Ypsilon 2001Pages: 191, PDF Size: 2.45 MB
Page 10 of 191
G
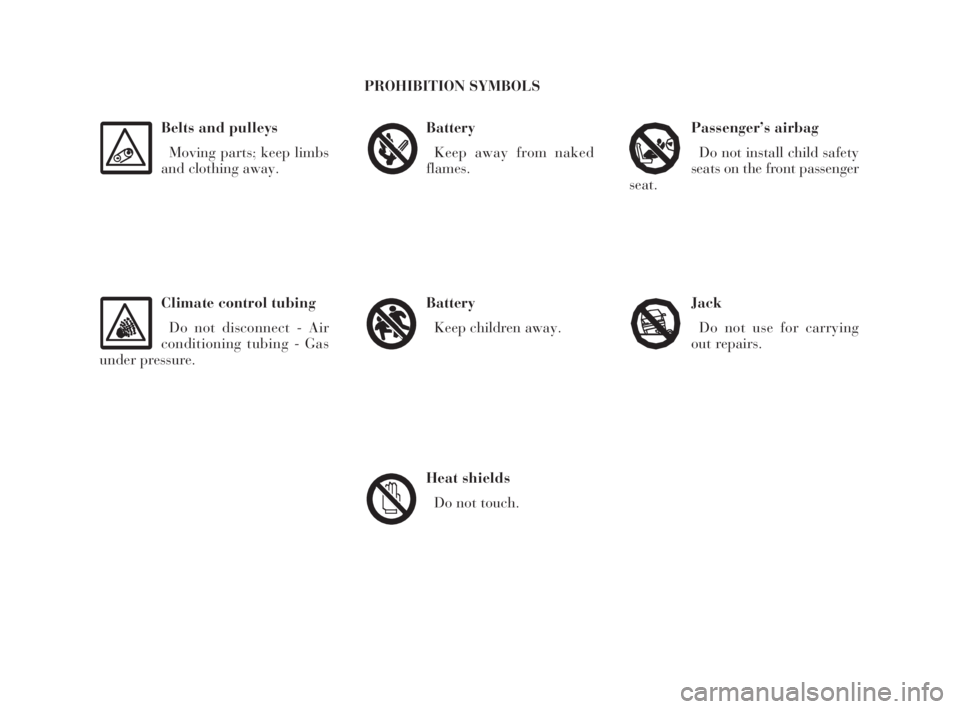
Belts and pulleys
Moving parts; keep limbs
and clothing away.
Climate control tubing
Do not disconnect - Air
conditioning tubing - Gas
under pressure.
Battery
Keep away from naked
flames.
Battery
Keep children away.
Heat shields
Do not touch.
Passenger’s airbag
Do not install child safety
seats on the front passenger
seat.
Jack
Do not use for carrying
out repairs.
PROHIBITION SYMBOLS
4C001-067 ING 11-03-2008 11:57 Pagina 7
Page 13 of 191
You are recommended to read this chapter sit-
ting comfortably in your new Lancia Y. In this
way you will be able to identify the parts de-
scribed immediate and see for yourself what you
have just read.
In short, you will increase your knowledge of your
Lancia Y with its controls and other devices. Later,
when you start the engine and join the traffic you
will make a host of other pleasant discoveries.
DASHBOARD................................................. 11
THE LANCIA CODE SYSTEM....................... 13
IGNITION SWITCH ........................................ 16
INDIVIDUAL SETTINGS ............................... 17
SEAT BELTS .................................................. 21
TRANSPORTING CHILDREN SAFELY .......... 26
INSTRUMENT PANEL ................................... 29
INSTRUMENTS............................................. 31
WARNING LIGHTS ........................................ 34HEATING AND VENTILATION ..................... 37
CLIMATE CONTROL SYSTEM....................... 40
STEERING COLUMN STALKS ...................... 41
CONTROLS.................................................... 43
INTERIOR EQUIPMENT ................................ 45
SUNROOF...................................................... 48
DOORS........................................................... 49
BOOT ............................................................. 51
BONNET........................................................ 53
SKI AND ROOF RACKS................................. 55
HEADLIGHTS............................................... 55
ABS ................................................................ 56
FRONT AND SIDE AIRBAGS.......................... 58
EOBD SYSTEM............................................... 63
SOUND SYSTEM ........................................... 64
RADIO-NAVIGATION SYSTEM..................... 65
CELLULAR PHONE SETUP........................... 66
FUEL TANK CAP ............................................ 67
10
G
GETTING TO KNOW YOUR CAR
4C001-067 ING 11-03-2008 11:57 Pagina 10
Page 14 of 191
11
G
DASHBOARD
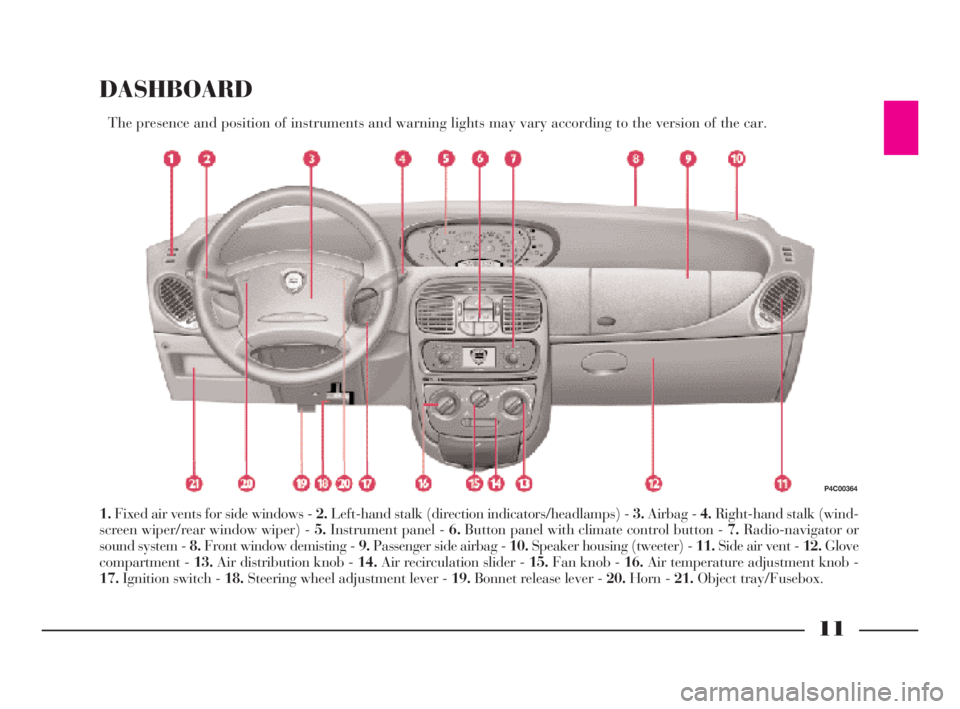
The presence and position of instruments and warning lights may vary according to the version of the car.
1.Fixed air vents for side windows - 2.Left-hand stalk (direction indicators/headlamps) - 3.Airbag - 4.Right-hand stalk (wind-
screen wiper/rear window wiper) - 5.Instrument panel - 6.Button panel with climate control button - 7.Radio-navigator or
sound system - 8.Front window demisting - 9.Passenger side airbag - 10.Speaker housing (tweeter) - 11.Side air vent - 12.Glove
compartment - 13.Air distribution knob - 14.Air recirculation slider - 15.Fan knob - 16.Air temperature adjustment knob -
17.Ignition switch - 18.Steering wheel adjustment lever - 19.Bonnet release lever - 20.Horn - 21.Object tray/Fusebox.
P4C00364
4C001-067 ING 11-03-2008 11:57 Pagina 11
Page 42 of 191
39
G
DEMISTING AND/OR
DEFROSTING OF
THE WINDSCREEN
AND FRONT SIDE WINDOWS
1)Air temperature knob: pointer in
the red sector -.
2)Fan knob: pointer at the maxi-
mum speed -.
3)Air distribution knob: pointer at
-.
4)Air recirculation slider at H,
means that air is taken in from the
outside.
When the windscreen and windows
have been demisted, adjust the con-
trols to keep the windows as clear as
possible.
IMPORTANTIf fitted, the climate
control is very useful for speeding up
demisting because it dries the air.
Simply adjust the controls for the
demisting function and turn on the
climate control by pressing button
√.DEMISTING AND/OR
DEFROSTING OF THE REAR
WINDOW
Press button (. The electric mirror
demisting device also comes on.
As soon as the rear window is clear,
you should release the button.
VENTILATION
1)Centre and side vents: fully open.
2)Air temperature knob: pointer in
the blue zone.
3)Air recirculation slider: pointer at
H, which means that air is taken in
from outside.
4)Fan knob: pointer at the speed re-
quired.
5)Air distribution knob: pointer
at¥.AIR RECIRCULATION
When the slider is in position T
only the inside air is circulated.
IMPORTANTThis function is par-
ticularly useful when the outside air
is heavily polluted (in a traffic jam,
tunnel, etc.). You are advised against
using this function for long periods,
however, especially if there are a lot
of people in the car or on cold and
raining days, since this considerably
increases the possibility of the win-
dows misting up and will reduce vis-
ibility effecting driving conditions.
4C001-067 ING 11-03-2008 11:57 Pagina 39
Page 43 of 191

40
G
CLIMATE CONTROL
SYSTEM
The climate control system is ad-
justed manually.
CONTROLS (fig. 45)
A- Air temperature knob (mixture
of warm and cold air).
B- Fan knob.
C- Air distribution knob.
D- Air recirculation slider, to elim-
inate external air.IMPORTANTThe recirculation
function allows to cool the air faster.
It is particularly useful when the out-
side air is heavily polluted (in a traf-
fic jam, tunnel, etc.). You are advised
against using this function for long
periods, however, especially if there
are a lot of people in the car or on
cold and raining days, since this con-
siderably increases the possibility of
the windows misting up and will re-
duce visibility effecting driving con-
ditions.
E- Climate control on/off switch.
When the climate control system is
on, the fan will automatically come on
at the first speed.COOLING
1)Air temperature knob: pointer in
the blue sector.
2)Climate control system: press
switch
√and move the air recircula-
tion slider to T.
3)Fan knob: pointer at required
speed.
4)Air distribution knob: pointer at
¥.
To reduce the cooling effect: move
the air recirculation slider to H, in-
crease the temperature and decrease
the fan speed.
fig. 45
P4C00326
The system uses R134a
refrigerating liquid. If it
accidentally leaks it will
not damage the environment.
Never use R12 fluid as it is incom-
patible with the system’s compo-
nents and also contains CFC.
4C001-067 ING 11-03-2008 11:57 Pagina 40
Page 44 of 191
41
G
IMPORTANTThe climate control
is very useful for speeding up demist-
ing because it dries the air. Simply
adjust the controls for the demisting
function and turn on the climate con-
trol by pressing button
√.
IMPORTANTThe versions with cli-
mate control have a factory-fitted
pollen filter.
IMPORTANTThe climate control
compressor will be temporarily ex-
cluded when accelerating sharply, and
reengaged after an established period
of time.STEERING
COLUMN STALKS
LEFT-HAND STALK
This stalk controls the following out-
side lights:
– side/taillights;
– dipped beam headlights;
– main beam headlights;
– direction indicators.
The outside lights can only be lit up
with the control stalk when the igni-
tion key is at MAR.
When the outside lights are turned
on, the instrument panel and the var-
ious controls located in the dashboard
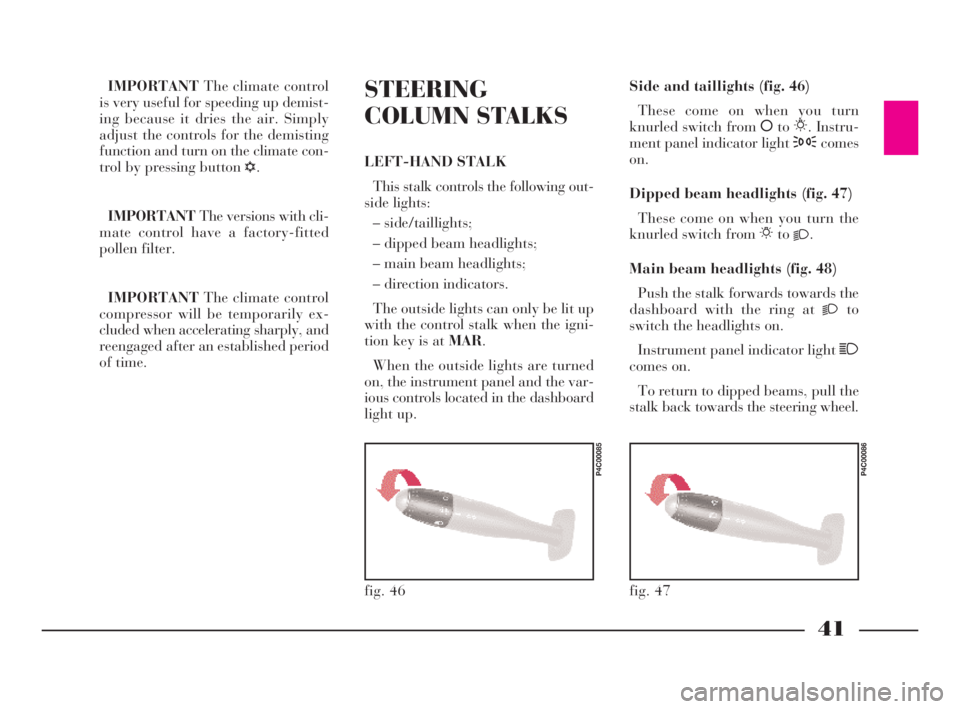
light up.Side and taillights (fig. 46)
These come on when you turn
knurled switch from åto6. Instru-
ment panel indicator light 3comes
on.
Dipped beam headlights (fig. 47)
These come on when you turn the
knurled switch from 6to
2.
Main beam headlights (fig. 48)
Push the stalk forwards towards the
dashboard with the ring at
2to
switch the headlights on.
Instrument panel indicator light 1
comes on.
To return to dipped beams, pull the
stalk back towards the steering wheel.
fig. 46
P4C00085
fig. 47
P4C00086
4C001-067 ING 11-03-2008 11:57 Pagina 41
Page 47 of 191
44
G
C- To switch the heated rear win-
dow on/off. It will switch on the door
mirrors demisting device at the same
time, if this feature is included.
D- To switch the climate control
system on and off.
FUEL CUT-OFF SWITCH
This is a safety cut-out which comes
into play in the case of an accident
and blocks the fuel supply, thereby
stopping the engine.
After an accident, turn the igni-
tion key to STOP to prevent the
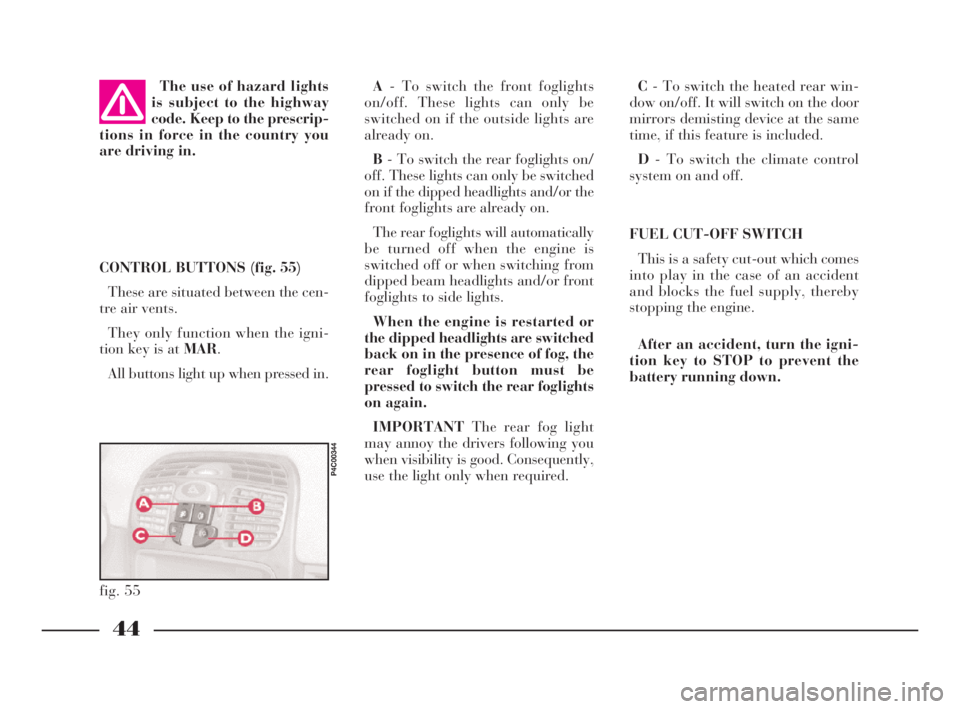
battery running down. CONTROL BUTTONS (fig. 55)
These are situated between the cen-
tre air vents.
They only function when the igni-
tion key is at MAR.
All buttons light up when pressed in. The use of hazard lights
is subject to the highway
code. Keep to the prescrip-
tions in force in the country you
are driving in.
fig. 55
P4C00344
A- To switch the front foglights
on/off. These lights can only be
switched on if the outside lights are
already on.
B- To switch the rear foglights on/
off. These lights can only be switched
on if the dipped headlights and/or the
front foglights are already on.
The rear foglights will automatically
be turned off when the engine is
switched off or when switching from
dipped beam headlights and/or front
foglights to side lights.
When the engine is restarted or
the dipped headlights are switched
back on in the presence of fog, the
rear foglight button must be
pressed to switch the rear foglights
on again.
IMPORTANTThe rear fog light
may annoy the drivers following you
when visibility is good. Consequently,
use the light only when required.
4C001-067 ING 11-03-2008 11:57 Pagina 44
Page 82 of 191
79
G
DRIVING IN THE MOUNTAINS
– When driving downhill use the en-
gine braking effect by engaging a low
gear so as not to overheat the brakes.
– Under no circumstances should
you drive downhill with the engine off
or with the car in neutral, let alone
with the ignition key out.
– Drive at a moderate speed without
cutting corners.
– Remember that overtaking while
going uphill is slower and therefore re-
quires more free road. If you are being
overtaken while driving uphill, make
it easier for the other vehicle to pass.DRIVING ON SNOW OR ICE
Here are some tips for driving in
these conditions.
– Before starting off, check that the
windscreen wiper blades are not stuck
to the windscreen.
– Remove any snow from the climate
control system air intake.
– Keep your speed down.
– Use chains or snow tyres if the
roads are covered in snow, see the re-
spective paragraphs in this chapter.
– Do not keep the engine running for
long periods in deep snow as the snow
could push exhaust gases into the pas-
senger compartment.– Mainly use the braking effect of
the engine and under all circum-
stances avoid braking sharply.
– When braking in a car not fitted
with ABS, avoid the wheels locking by
varying the pressure you exert on the
brake pedal.
– Do not accelerate suddenly and
avoid swerving.
– In the winter, even apparently dry
roads may have icy patches. Be care-
ful therefore when driving over
stretches that do not get much expo-
sure to the sun or that are lined by
trees and rocks, where ice might not
have melted.
– Keep a good distance from the ve-
hicles in front.
4C068-089 ING 11-03-2008 11:59 Pagina 79
Page 113 of 191
110
fG
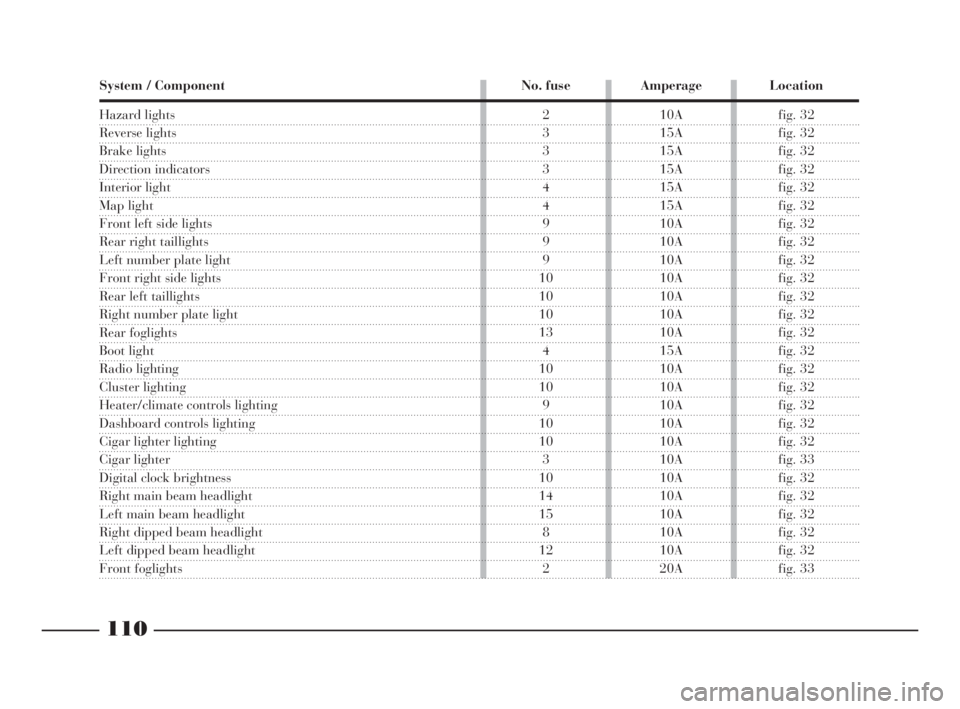
System / Component No. fuse Amperage Location
Hazard lights
Reverse lights
Brake lights
Direction indicators
Interior light
Map light
Front left side lights
Rear right taillights
Left number plate light
Front right side lights
Rear left taillights
Right number plate light
Rear foglights
Boot light
Radio lighting
Cluster lighting
Heater/climate controls lighting
Dashboard controls lighting
Cigar lighter lighting
Cigar lighter
Digital clock brightness
Right main beam headlight
Left main beam headlight
Right dipped beam headlight
Left dipped beam headlight
Front foglights
2 10A fig. 32
3 15A fig. 32
3 15A fig. 32
3 15A fig. 32
4 15A fig. 32
4 15A fig. 32
9 10A fig. 32
9 10A fig. 32
9 10A fig. 32
10 10A fig. 32
10 10A fig. 32
10 10A fig. 32
13 10A fig. 32
4 15A fig. 32
10 10A fig. 32
10 10A fig. 32
9 10A fig. 32
10 10A fig. 32
10 10A fig. 32
3 10A fig. 33
10 10A fig. 32
14 10A fig. 32
15 10A fig. 32
8 10A fig. 32
12 10A fig. 32
2 20A fig. 33
4C090-119 ING 13-03-2008 12:51 Pagina 110
Page 114 of 191
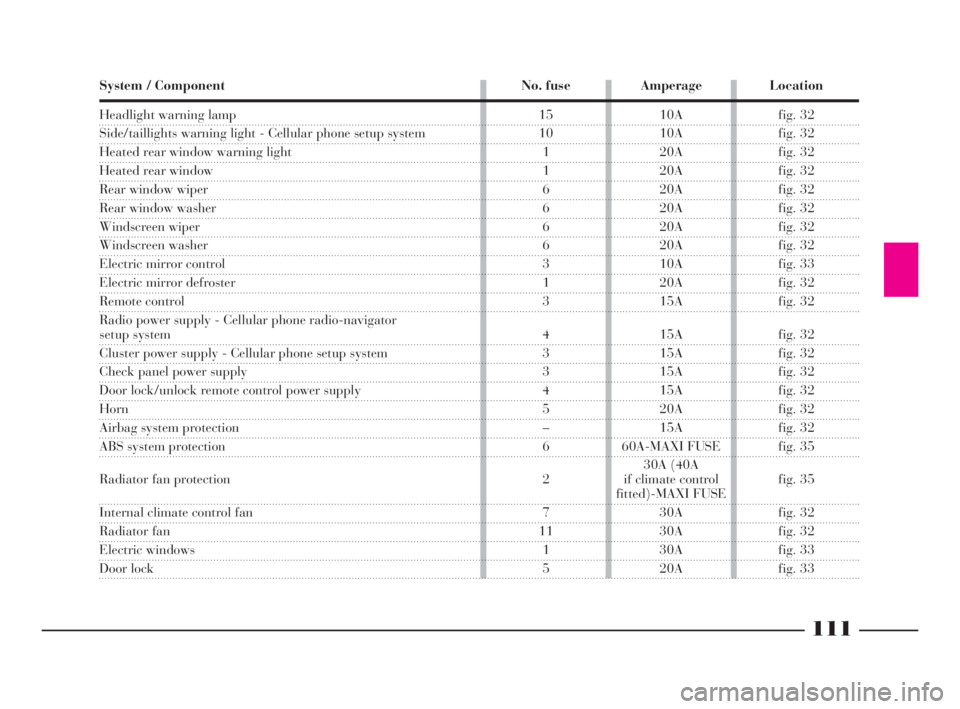
111
fG
Headlight warning lamp
Side/taillights warning light - Cellular phone setup system
Heated rear window warning light
Heated rear window
Rear window wiper
Rear window washer
Windscreen wiper
Windscreen washer
Electric mirror control
Electric mirror defroster
Remote control
Radio power supply - Cellular phone radio-navigator
setup system
Cluster power supply - Cellular phone setup system
Check panel power supply
Door lock/unlock remote control power supply
Horn
Airbag system protection
ABS system protection
Radiator fan protection
Internal climate control fan
Radiator fan
Electric windows
Door lock System / Component No. fuse Amperage Location
15 10A fig. 32
10 10A fig. 32
1 20A fig. 32
1 20A fig. 32
6 20A fig. 32
6 20A fig. 32
6 20A fig. 32
6 20A fig. 32
3 10A fig. 33
1 20A fig. 32
3 15A fig. 32
4 15A fig. 32
3 15A fig. 32
3 15A fig. 32
4 15A fig. 32
5 20A fig. 32
– 15A fig. 32
6 60A-MAXI FUSE fig. 35
30A (40A
2 if climate control fig. 35
fitted)-MAXI FUSE
7 30A fig. 32
11 30A fig. 32
1 30A fig. 33
5 20A fig. 33
4C090-119 ING 13-03-2008 12:51 Pagina 111