bulb Lancia Ypsilon 2002 Owner handbook (in English)
[x] Cancel search | Manufacturer: LANCIA, Model Year: 2002, Model line: Ypsilon, Model: Lancia Ypsilon 2002Pages: 191, PDF Size: 2.45 MB
Page 39 of 191

36
G
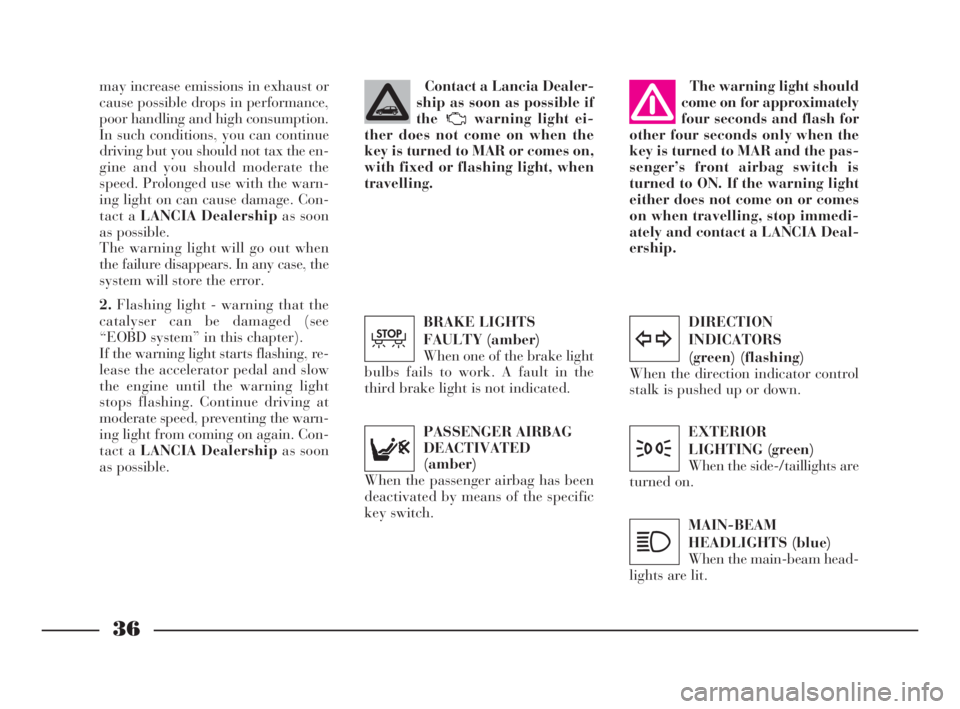
DIRECTION
INDICATORS
(green) (flashing)
When the direction indicator control
stalk is pushed up or down.
y
EXTERIOR
LIGHTING (green)
When the side-/taillights are
turned on.
3
MAIN-BEAM
HEADLIGHTS (blue)
When the main-beam head-
lights are lit.
1
may increase emissions in exhaust or
cause possible drops in performance,
poor handling and high consumption.
In such conditions, you can continue
driving but you should not tax the en-
gine and you should moderate the
speed. Prolonged use with the warn-
ing light on can cause damage. Con-
tact a LANCIA Dealershipas soon
as possible.
The warning light will go out when
the failure disappears. In any case, the
system will store the error.
2.Flashing light - warning that the
catalyser can be damaged (see
“EOBD system” in this chapter).
If the warning light starts flashing, re-
lease the accelerator pedal and slow
the engine until the warning light
stops flashing. Continue driving at
moderate speed, preventing the warn-
ing light from coming on again. Con-
tact a LANCIA Dealershipas soon
as possible.PASSENGER AIRBAG
DEACTIVATED
(amber)
When the passenger airbag has been
deactivated by means of the specific
key switch.The warning light should
come on for approximately
four seconds and flash for
other four seconds only when the
key is turned to MAR and the pas-
senger’s front airbag switch is
turned to ON. If the warning light
either does not come on or comes
on when travelling, stop immedi-
ately and contact a LANCIA Deal-
ership.Contact a Lancia Dealer-
ship as soon as possible if
the warning light ei-
ther does not come on when the
key is turned to MAR or comes on,
with fixed or flashing light, when
travelling.
BRAKE LIGHTS
FAULTY (amber)
When one of the brake light
bulbs fails to work. A fault in the
third brake light is not indicated.
T
4C001-067 ING 11-03-2008 11:57 Pagina 36
Page 77 of 191

LIGHT BULBS
Dipped beam headlights: 12V-55W.
Main beam headlights: 12V-55W.
Side and taillights: 12V-5W.
Front foglights: 12V-55W.
Front direction indicators: 12V-21W.
Rear direction indicators: 12V-21W.
Side direction indicators: 12V-5W.
Stop/taillights: 12V-21/5W.Reversing lights: 12V-21W.
Rear foglights: 12V-21W.
Number plate lights: 12V-5W.
Ceiling lights: 12V-10W.
Map reading light: 12V-6W
(LX version).
Boot light: 12V-10W.
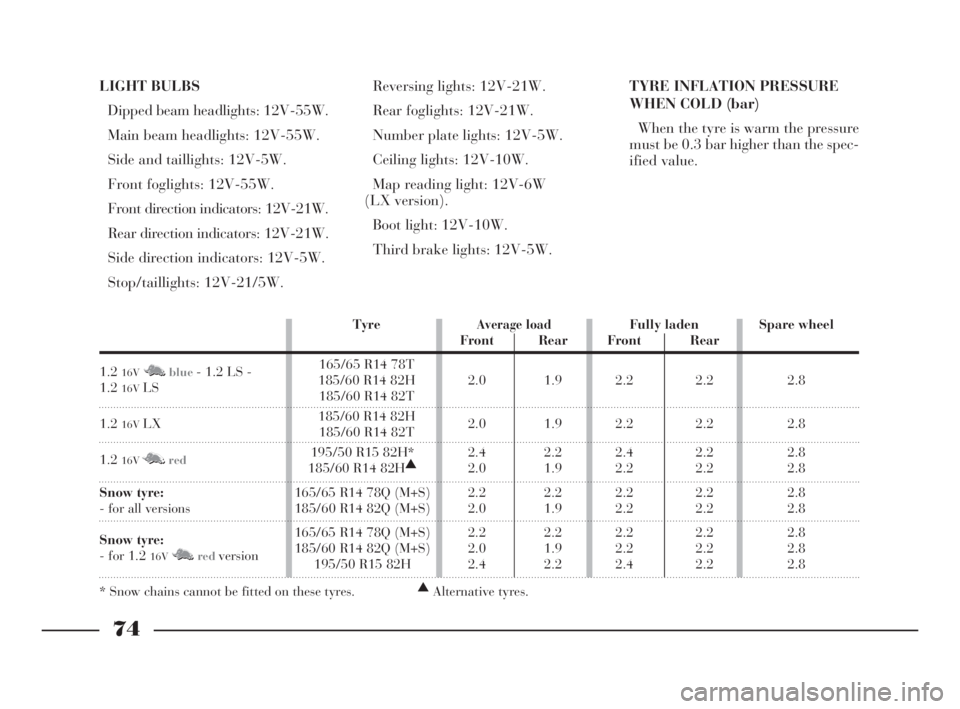
Third brake lights: 12V-5W.TYRE INFLATION PRESSURE
WHEN COLD (bar)
When the tyre is warm the pressure
must be 0.3 bar higher than the spec-
ified value.
74
G
TyreAverage loadFully laden Spare wheel
Front Rear Front Rear
1.2
16VM Nblue- 1.2 LS - 165/65 R14 78T
1.2
16VLS185/60 R14 82H 2.0 1.9 2.2 2.2 2.8185/60 R14 82T
1.2
16VLX185/60 R14 82H
2.0 1.9 2.2 2.2 2.8185/60 R14 82T
1.2
16VM Nred195/50 R15 82H* 2.4 2.2 2.4 2.2 2.8
185/60 R14 82H▲
2.0 1.9 2.2 2.2 2.8
Snow tyre:165/65 R14 78Q (M+S) 2.2 2.2 2.2 2.2 2.8
- for all versions 185/60 R14 82Q (M+S) 2.0 1.9 2.2 2.2 2.8
Snow tyre:165/65 R14 78Q (M+S) 2.2 2.2 2.2 2.2 2.8
- for 1.2
16VM Nredversion185/60 R14 82Q (M+S) 2.0 1.9 2.2 2.2 2.8195/50 R15 82H 2.4 2.2 2.4 2.2 2.8
* Snow chains cannot be fitted on these tyres.▲
Alternative tyres.
4C068-089 ING 11-03-2008 11:59 Pagina 74
Page 93 of 191

IN AN EMERGENCY
People who find themselves in an emergency
situation need immediate and concrete help.
The following pages have been written to help
you if the need arises.
As you will see, a host of little snags have been
taken into account and, for each of them, the
measures you yourself can take are suggested. If
the problems are more serious however, you
should have the car seen to at a LANCIA Dealer-
ship.
With regard to this, we would like to remind you
that, in addition to the Owner handbook, you
have also been provided with the WARRANTY
BOOKLET where you will find details of all the
services Lancia can provide should you find your-
self in difficulty.
We nevertheless recommend you read these
pages. If in need you will be able to find the in-
formation you require much more quickly.EMERGENCY STARTUP ............................... 91
JUMP STARTING ........................................... 92
BUMP STARTING .......................................... 93
IF A TYRE IS PUNCTURED.......................... 94
IF A BULB NEEDS REPLACING................... 99
IF AN EXTERIOR LIGHT BURNS OUT ......... 102
IF AN INTERIOR LIGHT BURNS OUT .......... 106
IF A FUSE BLOWS........................................ 107
IF THE BATTERY IS FLAT ............................ 113
IF THE CAR NEEDS TO BE RAISED ............ 114
IF THE CAR NEEDS TO BE TOWED ............ 116
IF AN ACCIDENT OCCURS........................... 117
90
G
4C090-119 ING 11-03-2008 12:00 Pagina 90
Page 104 of 191

101
fG
C Tubular bulbs
Release these bulbs from rela-
tive contacts to remove them.
D Halogen bulbs
Release the securing spring
from its seat to remove the
bulb.BULB Fig. 9 TYPE POWER
Main beam headlights
Dipped beam headlights
Front side lights
Front direction indicators
Side direction indicators
Rear direction indicators
Foglights
Reverse lights
Rear brake and side lights
Rear side lights
Rear fog lights
Third brake light
Number plate
Ceiling light (1.2 16VM Nblue- LS versions)
Ceiling light:
– with courtesy light
– with map light
BootD H3 12V-55W
D H7 12V-55W
A W5W 12V-5W
B PY21W 12V-21W
A W5W 12V-5W
B PY21W 12V-21W
D H1 12V-55W
B P21W 12V-21W
B R5W 12V-21/5W
B R5W 12V-21W
B P21W 12V-21W
A W5W 12V-5W
C C5W 12V-5W
C – 12V-10W
C – 12V-10W
A – 12V-6W
C C5W 12V-5W
4C090-119 ING 13-03-2008 12:51 Pagina 101
Page 105 of 191

102
fG
FRONT SIDE LIGHTS
To replace the 12V-5W bulb (type
W5W):
1)Remove the cover B (fig.10)by
turning partially in an anti-clockwise
direction.
2)Slide out bulb holder C (fig. 12)
by turning it slightly to make it easier
to release.
3)Remove the bulb.
4)Replace the press-fit bulb and re-
fit the bulb holder and cover.
fig. 12
P4C00025
HEADLIGHTS
To replace the halogen lights (12V-
55W):
1)Remove covers AandB (fig. 10)
by turning them partially in an anti-
clockwise direction.
2)Release the clips C-E (fig. 11)
and remove the burnt-out bulb D
(mainbeam headlight of type H3 with
printed wire already attached) or F
(dippedbeam headlight, type H7).
3)Insert the new bulb, making sure
it is positioned properly.
4)Reattach the securing clips and
close the covers.IF AN EXTERIOR
LIGHT BURNS OUT
fig. 10
P4C00027
fig. 11
P4C00026
Modifications or repairs
to the electrical system
carried out incorrectly and
without bearing the features of the
system in mind can cause mal-
functions with the risk of fire.
4C090-119 ING 13-03-2008 12:51 Pagina 102
Page 106 of 191

103
fG
FRONT DIRECTION
INDICATORS
To replace the 12V-21W bulb (type
PY21W):
1)Release spring clip A (fig. 13)
from support Bby turning in the di-
rection of the arrow.
2)Pull out the lens unit from the
front.
3)The bulb holder Cis connected to
the lens unit. To remove it, turn it
slightly.4)Remove bulbE (fig. 14), by push-
ing it gently and turning it in an an-
ticlockwise direction.
5)Replace the bulb, then refit the
bulb holder to the lens unit.
6)Reposition the lens unit, by intro-
ducing the two tabs Dinto the guides
at the side of the headlamp.
7)Reattach spring clip A.DIRECTION INDICATOR
REPEATERS
To replace the 12V-5W bulb (type
W5W):
1)Push the lens A (fig. 15)in the di-
rection of the arrow to release the fas-
tening tab. Be careful not to damage
the bodywork.
2)Take the unit out.
fig. 13
P4C00029
fig. 14
P4C00405
fig. 15
P4C00382
4C090-119 ING 13-03-2008 12:51 Pagina 103
Page 107 of 191

REAR LIGHT CLUSTER
1)From inside the car boot, lift the
carpeting and undo screw A (fig. 19)
securing the light cluster.
2)Remove the light cluster B.
3)Replace the burnt-out bulb by
pushing it slightly and turning anti-
clockwise.
Bulbs in (fig. 20):
C - 12V-21W (orange) (type PY21W)
for the direction indicators.
D - 12-21W (type P21W) for the re-
versing lights.
104
fG
3)Remove the bulb holder B
(fig. 16)fromCin the lens.
4)Remove press-fit bulb Dand re-
place it.
5)Refit the bulb holder into Cand
then fit the lens.
FRONT FOGLIGHTS
To replace the halogen bulb 12V-
55W (type H1):
1)Turn the wheels to the right to get
at the left light, and to the left to get
at the right light.
2)Unscrew screw A (fig. 17)in the
cover on the wheelarch.3)Turn cover Bin an anticlockwise
direction.
4)Release clip D (fig. 18)and re-
move bulbC.
5)Release the clip Dand screw
coverBback in.
fig. 16
P4C00383
fig. 17
P4C00152
fig. 18
P4C00406
fig. 19
P4C00038
4C090-119 ING 13-03-2008 12:51 Pagina 104
Page 108 of 191

105
fG
E- 12V-21/5W (type R5W) for the
brake and taillights.
F- 12V-5W (type R5W) for the tail-
lights.
G- 12V-21W (type P21W) for the
rear foglights.
5)Refit the lighting cluster, and
tighten screw A (fig. 19), without
forcing it.THIRD BRAKE LIGHT
To change one or more 12V-5W
(type W5W) bulbs:
1)Unscrew the two screws A (fig. 21)
and remove trim B.
2)Loosen the two screws C (fig. 22),
disconnect the connector Dand sep-
arate the lens from the cover B.
3)Loosen the tab E (fig. 23)and
separate the bulbs from the lens.4)Replace the burnt-out bulb F
(fig. 23).
5)Refit the unit by reversing the
various operations.
fig. 20
P4C00039
fig. 21
P4C00407
fig. 22
P4C00408
fig. 23
P4C00409
4C090-119 ING 13-03-2008 12:51 Pagina 105
Page 109 of 191

106
fG
IF AN INTERIOR
LIGHT BURNS OUTrounding it, by inserting the tip of a
screwdriver between the cover frame
and the second frame as illustrated in
(fig. 25).
CEILING LIGHT
(all other versions)
To replace a bulb:
1)Remove the 2 plastic caps Aand
release cover B (fig. 26).
2)Unscrew the 4 screws securing the
ceiling light unit that can be seen.
3)Press tab A (fig. 27)to open the
bulb holder.
4)Replace the burnt-out bulb.
B- 12V-10W bulb for courtesy light.
C- 12V-6W bulb for map-reading
light. NUMBER PLATE LIGHTS
To replace the 12V-5W (type C5W)
bulb, unscrew the securing screws A
(fig. 24)and remove the lens.
CEILING LIGHT (1.2
16VM Nblue
- LS)
To replace the 12V-10W bulb in the
ceiling lamp, remove the transparent
cover, together with the frame sur-Modifications or repairs
to the electrical system
carried out incorrectly and
without bearing the features of the
system in mind can cause mal-
functions with the risk of fire.
fig. 24
P4C00147
fig. 25
P4C00164
fig. 26
P4C00064
4C090-119 ING 13-03-2008 12:51 Pagina 106
Page 110 of 191

Before replacing a fuse,
make sure the key has
been taken out from the ig-
nition and that all users are
switched off or deactivated.
107
fG
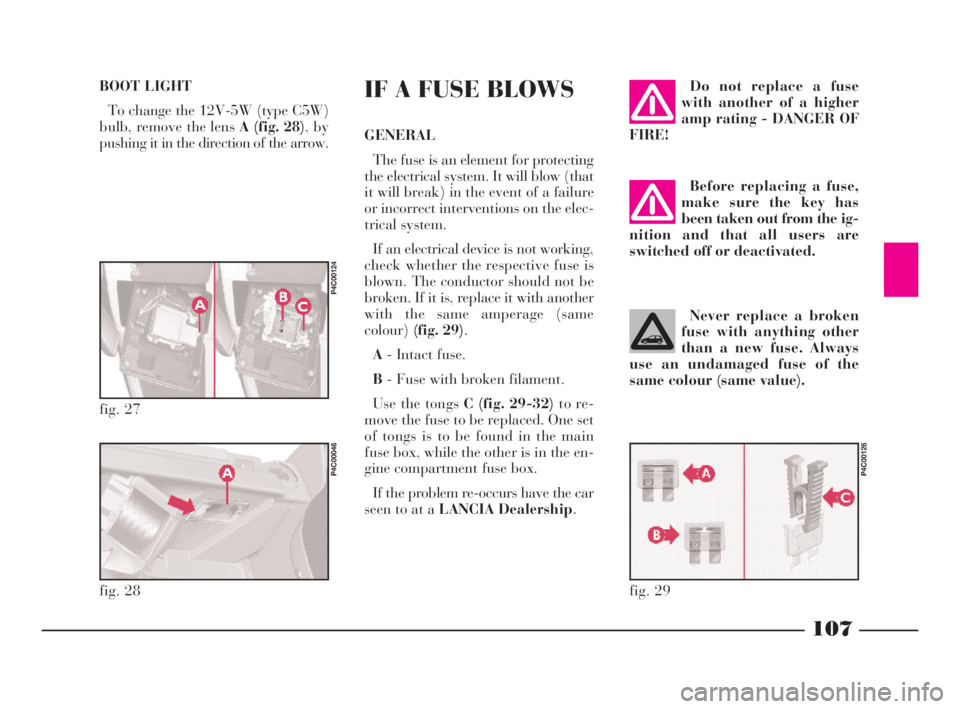
BOOT LIGHT
To change the 12V-5W (type C5W)
bulb, remove the lens A (fig. 28), by
pushing it in the direction of the arrow.IF A FUSE BLOWS
GENERAL
The fuse is an element for protecting
the electrical system. It will blow (that
it will break) in the event of a failure
or incorrect interventions on the elec-
trical system.
If an electrical device is not working,
check whether the respective fuse is
blown. The conductor should not be
broken. If it is, replace it with another
with the same amperage (same
colour)(fig. 29).
A- Intact fuse.
B- Fuse with broken filament.
Use the tongs C (fig. 29-32)to re-
move the fuse to be replaced. One set
of tongs is to be found in the main
fuse box, while the other is in the en-
gine compartment fuse box.
If the problem re-occurs have the car
seen to at a LANCIA Dealership.
Do not replace a fuse
with another of a higher
amp rating - DANGER OF
FIRE!
Never replace a broken
fuse with anything other
than a new fuse. Always
use an undamaged fuse of the
same colour (same value).
fig. 27
P4C00124
fig. 28
P4C00046
fig. 29
P4C00126
4C090-119 ING 13-03-2008 12:51 Pagina 107