headlights Lancia Ypsilon 2002 Owner handbook (in English)
[x] Cancel search | Manufacturer: LANCIA, Model Year: 2002, Model line: Ypsilon, Model: Lancia Ypsilon 2002Pages: 191, PDF Size: 2.45 MB
Page 13 of 191
You are recommended to read this chapter sit-
ting comfortably in your new Lancia Y. In this
way you will be able to identify the parts de-
scribed immediate and see for yourself what you
have just read.
In short, you will increase your knowledge of your
Lancia Y with its controls and other devices. Later,
when you start the engine and join the traffic you
will make a host of other pleasant discoveries.
DASHBOARD................................................. 11
THE LANCIA CODE SYSTEM....................... 13
IGNITION SWITCH ........................................ 16
INDIVIDUAL SETTINGS ............................... 17
SEAT BELTS .................................................. 21
TRANSPORTING CHILDREN SAFELY .......... 26
INSTRUMENT PANEL ................................... 29
INSTRUMENTS............................................. 31
WARNING LIGHTS ........................................ 34HEATING AND VENTILATION ..................... 37
CLIMATE CONTROL SYSTEM....................... 40
STEERING COLUMN STALKS ...................... 41
CONTROLS.................................................... 43
INTERIOR EQUIPMENT ................................ 45
SUNROOF...................................................... 48
DOORS........................................................... 49
BOOT ............................................................. 51
BONNET........................................................ 53
SKI AND ROOF RACKS................................. 55
HEADLIGHTS............................................... 55
ABS ................................................................ 56
FRONT AND SIDE AIRBAGS.......................... 58
EOBD SYSTEM............................................... 63
SOUND SYSTEM ........................................... 64
RADIO-NAVIGATION SYSTEM..................... 65
CELLULAR PHONE SETUP........................... 66
FUEL TANK CAP ............................................ 67
10
G
GETTING TO KNOW YOUR CAR
4C001-067 ING 11-03-2008 11:57 Pagina 10
Page 39 of 191
36
G
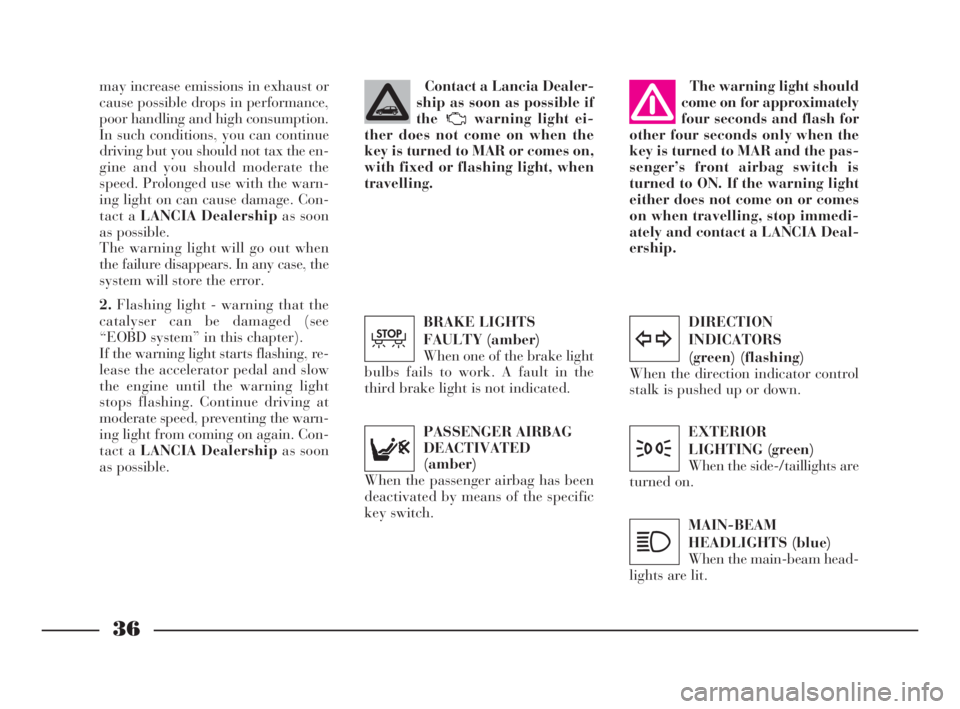
DIRECTION
INDICATORS
(green) (flashing)
When the direction indicator control
stalk is pushed up or down.
y
EXTERIOR
LIGHTING (green)
When the side-/taillights are
turned on.
3
MAIN-BEAM
HEADLIGHTS (blue)
When the main-beam head-
lights are lit.
1
may increase emissions in exhaust or
cause possible drops in performance,
poor handling and high consumption.
In such conditions, you can continue
driving but you should not tax the en-
gine and you should moderate the
speed. Prolonged use with the warn-
ing light on can cause damage. Con-
tact a LANCIA Dealershipas soon
as possible.
The warning light will go out when
the failure disappears. In any case, the
system will store the error.
2.Flashing light - warning that the
catalyser can be damaged (see
“EOBD system” in this chapter).
If the warning light starts flashing, re-
lease the accelerator pedal and slow
the engine until the warning light
stops flashing. Continue driving at
moderate speed, preventing the warn-
ing light from coming on again. Con-
tact a LANCIA Dealershipas soon
as possible.PASSENGER AIRBAG
DEACTIVATED
(amber)
When the passenger airbag has been
deactivated by means of the specific
key switch.The warning light should
come on for approximately
four seconds and flash for
other four seconds only when the
key is turned to MAR and the pas-
senger’s front airbag switch is
turned to ON. If the warning light
either does not come on or comes
on when travelling, stop immedi-
ately and contact a LANCIA Deal-
ership.Contact a Lancia Dealer-
ship as soon as possible if
the warning light ei-
ther does not come on when the
key is turned to MAR or comes on,
with fixed or flashing light, when
travelling.
BRAKE LIGHTS
FAULTY (amber)
When one of the brake light
bulbs fails to work. A fault in the
third brake light is not indicated.
T
4C001-067 ING 11-03-2008 11:57 Pagina 36
Page 44 of 191
41
G
IMPORTANTThe climate control
is very useful for speeding up demist-
ing because it dries the air. Simply
adjust the controls for the demisting
function and turn on the climate con-
trol by pressing button
√.
IMPORTANTThe versions with cli-
mate control have a factory-fitted
pollen filter.
IMPORTANTThe climate control
compressor will be temporarily ex-
cluded when accelerating sharply, and
reengaged after an established period
of time.STEERING
COLUMN STALKS
LEFT-HAND STALK
This stalk controls the following out-
side lights:
– side/taillights;
– dipped beam headlights;
– main beam headlights;
– direction indicators.
The outside lights can only be lit up
with the control stalk when the igni-
tion key is at MAR.
When the outside lights are turned
on, the instrument panel and the var-
ious controls located in the dashboard
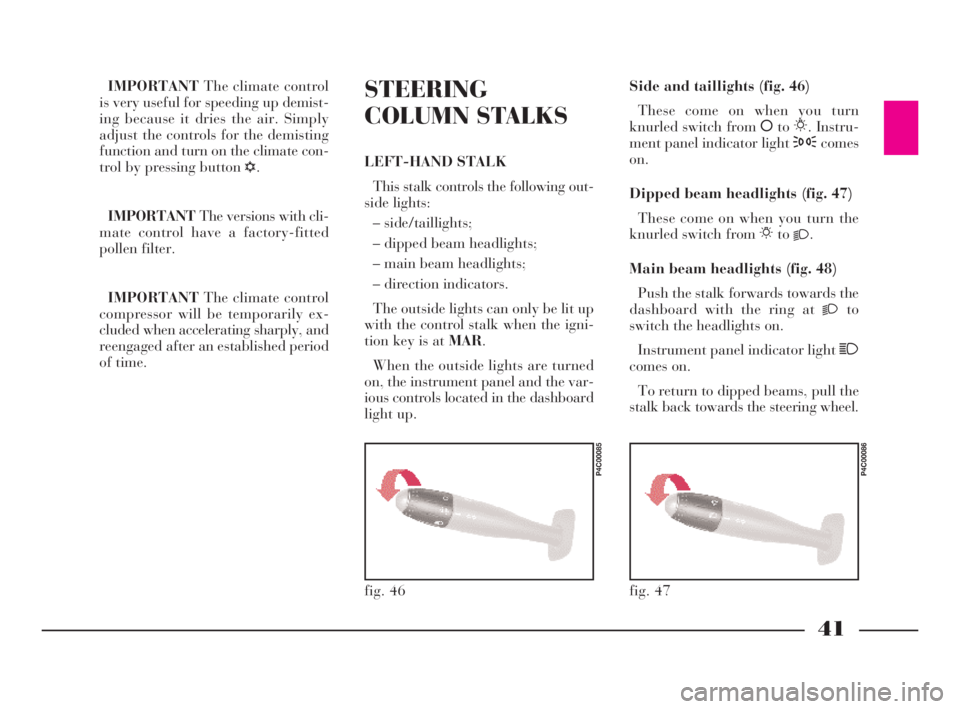
light up.Side and taillights (fig. 46)
These come on when you turn
knurled switch from åto6. Instru-
ment panel indicator light 3comes
on.
Dipped beam headlights (fig. 47)
These come on when you turn the
knurled switch from 6to
2.
Main beam headlights (fig. 48)
Push the stalk forwards towards the
dashboard with the ring at
2to
switch the headlights on.
Instrument panel indicator light 1
comes on.
To return to dipped beams, pull the
stalk back towards the steering wheel.
fig. 46
P4C00085
fig. 47
P4C00086
4C001-067 ING 11-03-2008 11:57 Pagina 41
Page 47 of 191
44
G
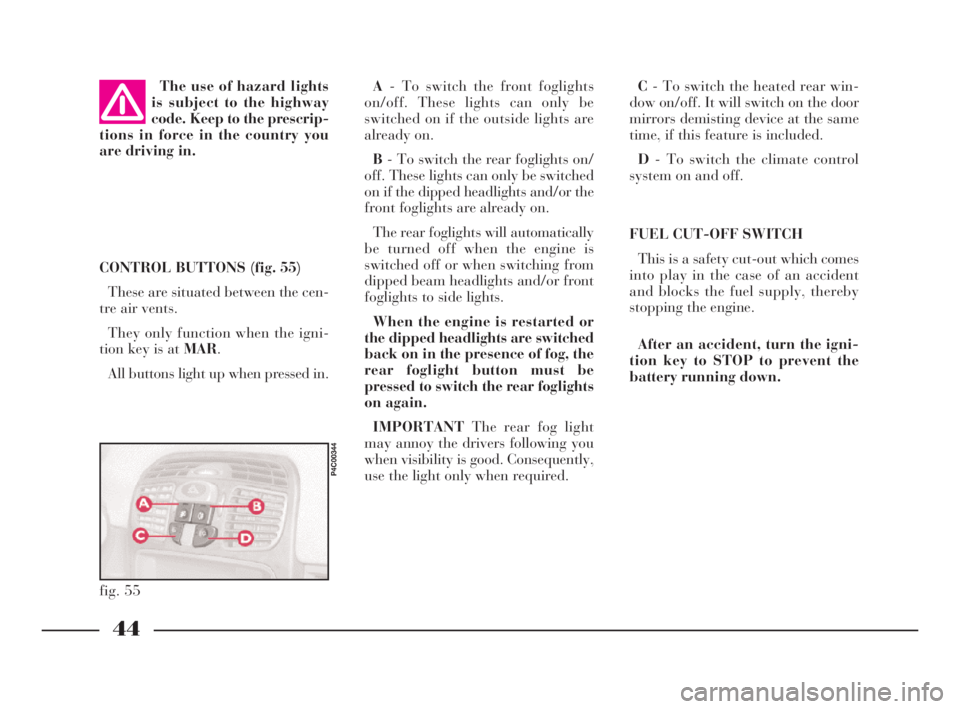
C- To switch the heated rear win-
dow on/off. It will switch on the door
mirrors demisting device at the same
time, if this feature is included.
D- To switch the climate control
system on and off.
FUEL CUT-OFF SWITCH
This is a safety cut-out which comes
into play in the case of an accident
and blocks the fuel supply, thereby
stopping the engine.
After an accident, turn the igni-
tion key to STOP to prevent the
battery running down. CONTROL BUTTONS (fig. 55)
These are situated between the cen-
tre air vents.
They only function when the igni-
tion key is at MAR.
All buttons light up when pressed in. The use of hazard lights
is subject to the highway
code. Keep to the prescrip-
tions in force in the country you
are driving in.
fig. 55
P4C00344
A- To switch the front foglights
on/off. These lights can only be
switched on if the outside lights are
already on.
B- To switch the rear foglights on/
off. These lights can only be switched
on if the dipped headlights and/or the
front foglights are already on.
The rear foglights will automatically
be turned off when the engine is
switched off or when switching from
dipped beam headlights and/or front
foglights to side lights.
When the engine is restarted or
the dipped headlights are switched
back on in the presence of fog, the
rear foglight button must be
pressed to switch the rear foglights
on again.
IMPORTANTThe rear fog light
may annoy the drivers following you
when visibility is good. Consequently,
use the light only when required.
4C001-067 ING 11-03-2008 11:57 Pagina 44
Page 56 of 191
53
G
2)Tip back the cushion while hold-
ing up the ends of the seat belts
(tongues and buckles) and passing
them between cushion and seat back.
In this way, the seat belts will be im-
mediately ready to be used.
Some versions fit a split rear seat. In
this case, the left-hand side and the
right-hand side of the seat can be
tipped separately.IMPORTANTWhen driving at
night with a load in the boot, adjust
the height of the dipped headlight
beam as shown in “Headlights” in
this chapter.
For correct adjustment, make sure
the load does not exceed the values in-
dicated in the relevant section.
fig. 78
P4C00160
fig. 79
P4C00051
If the backrest is not fas-
tened properly, heavy
loose luggage behind it
could cause serious harm to pas-
sengers in the event of an accident.If you wish to carry a re-
serve can of petrol, it is
important to comply to the
laws in force. Use only a homolo-
gated can and fasten it securely.
Even so, there is a greater fire risk
in the event of an accident.
BONNET
To open the bonnet:
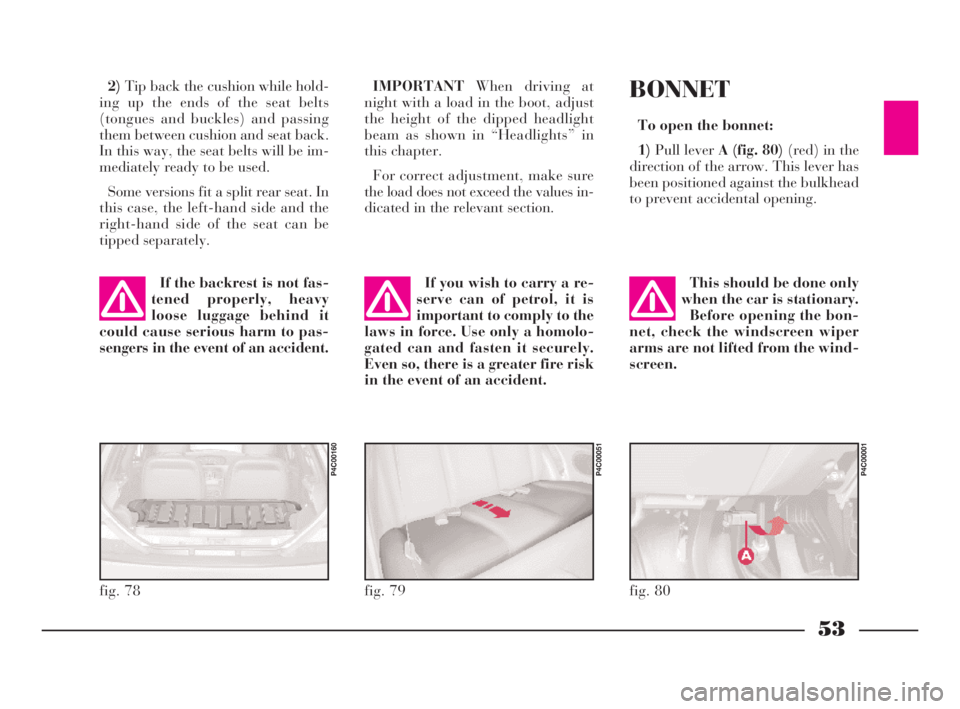
1)Pull lever A (fig. 80)(red) in the
direction of the arrow. This lever has
been positioned against the bulkhead
to prevent accidental opening.
fig. 80
P4C00001
This should be done only
when the car is stationary.
Before opening the bon-
net, check the windscreen wiper
arms are not lifted from the wind-
screen.
4C001-067 ING 11-03-2008 11:57 Pagina 53
Page 58 of 191
55
G
SKI AND
ROOF RACKS
ANCHORAGE HOOKS
POSITIONING
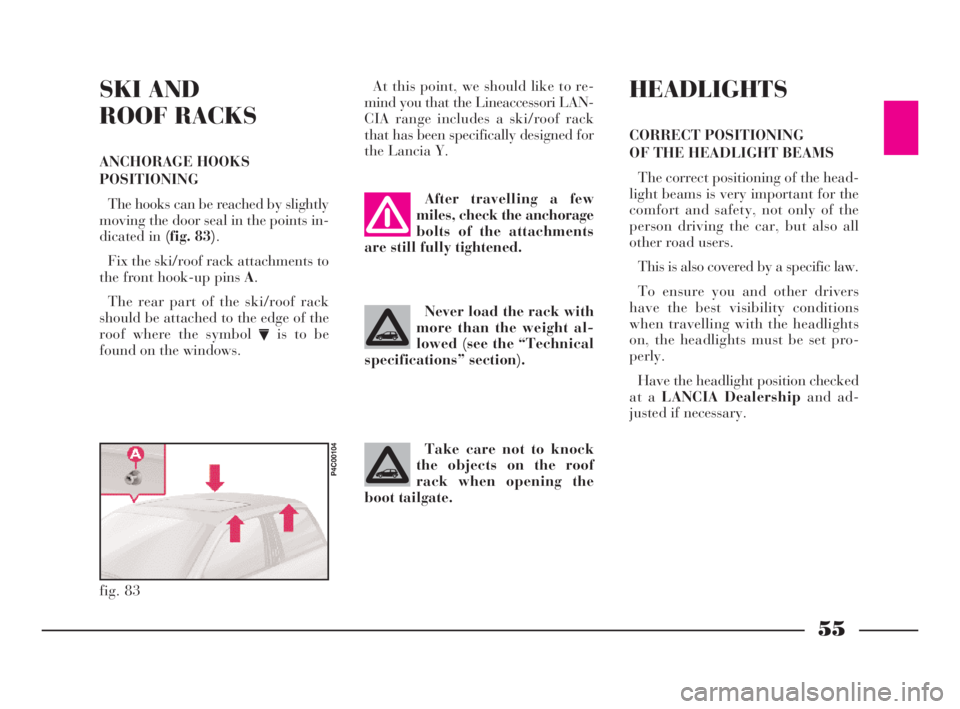
The hooks can be reached by slightly
moving the door seal in the points in-
dicated in (fig. 83).
Fix the ski/roof rack attachments to
the front hook-up pins A.
The rear part of the ski/roof rack
should be attached to the edge of the
roof where the symbol
Vis to be
found on the windows.At this point, we should like to re-
mind you that the Lineaccessori LAN-
CIA range includes a ski/roof rack
that has been specifically designed for
the Lancia Y.
fig. 83
P4C00104
After travelling a few
miles, check the anchorage
bolts of the attachments
are still fully tightened.
Never load the rack with
more than the weight al-
lowed (see the “Technical
specifications” section).
Take care not to knock
the objects on the roof
rack when opening the
boot tailgate.
HEADLIGHTS
CORRECT POSITIONING
OF THE HEADLIGHT BEAMS
The correct positioning of the head-
light beams is very important for the
comfort and safety, not only of the
person driving the car, but also all
other road users.
This is also covered by a specific law.
To ensure you and other drivers
have the best visibility conditions
when travelling with the headlights
on, the headlights must be set pro-
perly.
Have the headlight position checked
at a LANCIA Dealershipand ad-
justed if necessary.
4C001-067 ING 11-03-2008 11:57 Pagina 55
Page 77 of 191
LIGHT BULBS
Dipped beam headlights: 12V-55W.
Main beam headlights: 12V-55W.
Side and taillights: 12V-5W.
Front foglights: 12V-55W.
Front direction indicators: 12V-21W.
Rear direction indicators: 12V-21W.
Side direction indicators: 12V-5W.
Stop/taillights: 12V-21/5W.Reversing lights: 12V-21W.
Rear foglights: 12V-21W.
Number plate lights: 12V-5W.
Ceiling lights: 12V-10W.
Map reading light: 12V-6W
(LX version).
Boot light: 12V-10W.
Third brake lights: 12V-5W.TYRE INFLATION PRESSURE
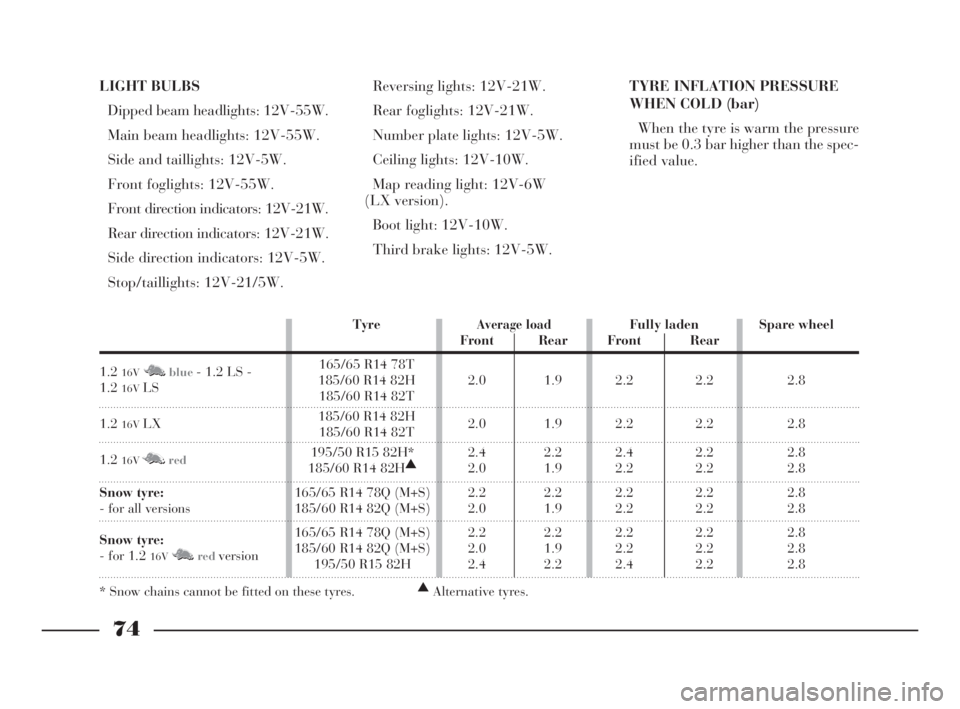
WHEN COLD (bar)
When the tyre is warm the pressure
must be 0.3 bar higher than the spec-
ified value.
74
G
TyreAverage loadFully laden Spare wheel
Front Rear Front Rear
1.2
16VM Nblue- 1.2 LS - 165/65 R14 78T
1.2
16VLS185/60 R14 82H 2.0 1.9 2.2 2.2 2.8185/60 R14 82T
1.2
16VLX185/60 R14 82H
2.0 1.9 2.2 2.2 2.8185/60 R14 82T
1.2
16VM Nred195/50 R15 82H* 2.4 2.2 2.4 2.2 2.8
185/60 R14 82H▲
2.0 1.9 2.2 2.2 2.8
Snow tyre:165/65 R14 78Q (M+S) 2.2 2.2 2.2 2.2 2.8
- for all versions 185/60 R14 82Q (M+S) 2.0 1.9 2.2 2.2 2.8
Snow tyre:165/65 R14 78Q (M+S) 2.2 2.2 2.2 2.2 2.8
- for 1.2
16VM Nredversion185/60 R14 82Q (M+S) 2.0 1.9 2.2 2.2 2.8195/50 R15 82H 2.4 2.2 2.4 2.2 2.8
* Snow chains cannot be fitted on these tyres.▲
Alternative tyres.
4C068-089 ING 11-03-2008 11:59 Pagina 74
Page 78 of 191
75
G
SAFE DRIVING
In designing the Lancia Y, we made
every effort to come up with a car
able to provide driver and passengers
with top-class levels of safety. Never-
theless it is always the behaviour of
the person at the wheel that deter-
mines road safety.
Below you will find some simple tips
to help you travel in safety under dif-
ferent conditions. You will no doubt
be familiar with many of them al-
ready but it will be useful to read
them all carefully.BEFORE GETTING BEHIND
THE WHEEL
– Make sure all lights including the
headlights are working properly.
– Adjust the position of the seats,
steering wheel, driving and door mir-
rors properly for the best driving po-
sition.
– On long journeys, it is a good idea
to slightly alter the lumber support
and/or seat inclination to vary the
weight on the spine and therefore re-
duce tiredness and strain.
– Carefully adjust the head restraints
so the back of the head and not the
nape of the neck is supported.
– Carefully adjust the height of the
seat belts to suit the wearer’s stature
(see the instructions given in the sec-
tion “Getting to know your car - seat
belts”).
– Make sure that nothing (mats etc.)
get in the way of the pedals.– Make sure that any child restraint
systems (child seats, carriers, etc.) are
properly fixed to the rear seat. Follow
the indications given in “Transport-
ing children safely” in the section
“Getting to know your car”.
– Make sure that objects are care-
fully arranged in the boot so they will
not fly forward if you have to brake
sharply.
– Avord placing light-coloured arti-
cles or papers on the object tray which
may be reflected on the windscreen.
– Do not eat a heavy meal before
travelling. Light eating will help keep
your reflexes prompt. Above all, do
not have anything alcoholic to drink.
The use of some drugs may affect
your driving, read the relevant in-
structions sheet carefully.
Remember to periodically check
what is specified in the “Repeated
checks and checks before long trips”
paragraph given in this section.
4C068-089 ING 11-03-2008 11:59 Pagina 75
Page 80 of 191
77
G
– Only use main-beam headlights
when you are driving outside town
and when you are sure they do not
annoy other drivers.
– Dip your headlights (if on) as soon
as you see cars coming in the other di-
rection and pass them with the head-
lights dipped.
– Keep all lights clean.
– Be careful of animals crossing the
road when driving in the country.
DRIVING IN THE RAIN
Rain and wet road surfaces spell
danger.
All manoeuvres are more difficult on
a wet road because the grip of the
wheels on the tarmac is greatly re-
duced. This is why braking distances
are much longer and roadholding is
lower. DRIVING AT NIGHT
If you are driving at night these are
the main rules to follow:
– Drive especially carefully: it is
harder to drive at night.
– Slow down especially if the road is
not lit.
– At the first signs of sleepiness, stop:
continuing would be a risk for your-
self and everybody else. Only start
driving again when you have had
enough rest.
– Keep a greater safety distance
from the cars in front of you than
during daylight hours: it is hard to
judge how fast other cars are going
when all you can see are their lights.
– Make sure the headlight beams are
properly positioned: if they are too
low, they reduce visibility and strain
your eyes. If they are too high they
can dazzle other drivers. – Do not drive too many hours at a
time but stop at intervals to stretch
your legs and recover your energies.
– Make sure the air in the car is be-
ing changed continuously.
– Never coast downhill (i.e. with the
engine off): if you do, you lose the aid
of engine brake, power brakes and
power steering so that braking and
steering require greater effort.
– Never coast downhill (i.e. with the
engine off): if you do, you lose the aid
of engine braking and power.
4C068-089 ING 11-03-2008 11:59 Pagina 77
Page 81 of 191
78
G
Here is some advice for driving in
the rain:
– Reduce speed and maintain a
greater safety distance from the cars
in front.
– If it is raining particularly heavily,
visibility is also reduced. In these
cases, switch on the dipped headlights
even if it is still daylight so you can be
seen more easily.
– Do not drive through puddles at
speed and hold on tightly to the
wheel: a puddle taken at high speed
might cause you to lose control of the
car (“aquaplaning”).
– Move the ventilation controls to
the position for demisting the win-
dows (see the section “Getting to
know your car”), to avoid visibility
problems.
– Periodically check the condition of
the windscreen wiper blades.DRIVING IN FOG
– If the fog is thick, do not start out
on a journey unless you absolutely
have to.
If driving in mist, blanket fog or
when there is the danger of fog
patches:
– Keep your speed down.
– Turn on the dipped headlights,
rear foglights and front foglights, if
fitted, even during the day. Do not
drive with your headlights at full-
beam.
– Remember that fog also means the
tarmac is wet and therefore manoeu-
vres of all kinds are more difficult and
stopping distances are longer.
– Keep a good distance from the cars
in front of you.
– As far as possible, avoid spurts of
speed or sudden deceleration.
– Do not overtake other vehicles if
you can help it.– If you are forced to stop your car
(breakdown, limited visibility etc.)
try to stop off the road. Turn on the
hazard lights and, if possible, the
dipped headlights. Rhythmically
sound the horn if you realise another
car is coming.
IMPORTANTOn stretches of road
with good visibility, switch off your
rear foglights; the brightness of these
lights could annoy the people travel-
ling in the cars behind.
4C068-089 ING 11-03-2008 11:59 Pagina 78