light Lancia Ypsilon 2003 Owner handbook (in English)
[x] Cancel search | Manufacturer: LANCIA, Model Year: 2003, Model line: Ypsilon, Model: Lancia Ypsilon 2003Pages: 191, PDF Size: 2.45 MB
Page 87 of 191

84
G
For emergency starts use only an
auxiliary battery.
If the engine begins to “loose its
smoothness” when travelling, con-
tinue your journey but reduce the de-
mands you are making on the engine
and have the car seen to at a LANCIA
Dealershipas soon as you can.
When the instrument panel fuel re-
serve warning light comes on, fill up
as soon as possible. A low level of fuel
can cause an uneven supply of fuel to
the engine with the inevitable increase
in the temperature of the exhaust gas
and serious damage to the catalytic
converter.
Never run the engine with one or
more spark plugs disconnected, even
for testing purposes.
Do not warm up the engine by let-
ting it idle for a while before moving
off unless the outside temperature is
very low and, even in this case, only
do so for less than thirty seconds.When functioning nor-
mally the catalytic con-
verter reaches high tem-
peratures. For this reason do not
park the car over inflammable
material (grass, dry leaves, pine
needles etc.): fire hazard.
Failure to heed these pre-
cautions could cause a
fire.
Do not install other heat shields and
do not remove those already fitted to
the catalytic converter and exhaust
pipe.
Do not allow anything to be sprayed
onto the catalytic converter, Lambda
sensor and exhaust pipe.TOWING A TRAILER
IMPORTANTThe car must be fit-
ted with a homologated tow hitch and
suitable electrical system for towing a
caravan or trailer.
Have the tow hitch fitted by an ex-
pert who will issue specific documen-
tation for use on roads.
Fit special and/or additional
rearview mirrors in accordance with
the highway code.
Remember that towing a trailer
makes it harder for the car to climb
the maximum gradients specified.
Engage a low gear when driving
downhill rather than constantly brak-
ing.
4C068-089 ING 11-03-2008 11:59 Pagina 84
Page 91 of 191

88
G
REPEATED CHECKS
AND CHECKS
BEFORE LONG
TRIPS
Periodically, remember to check:
– tyre pressure and condition
– engine oil level
– coolant level and condition of the
system
– brake fluid level
– windscreen washer liquid level
– power steering fluid level.
ACCESSORIES
PURCHASED
BY THE OWNER
RADIO TRANSMITTERS
AND CELL PHONES
Cell phones and other ra-
dio transmitters (e.g. CB radios) can-
not be used inside the car, unless you
use a separate aerial mounted outside
the car.
– Clean and protect the shiny metal
parts using special compounds avail-
able on the market.
– Sprinkle talcum powder on the
rubber windscreen and rear window
wiper blades and lift them off the
glass.
– Slightly open the windows.
– Cover the car with a cloth or per-
forated plastic sheet. Do not use
sheets of imperforated plastic as they
do not allow moisture on the car body
to evaporate.
– Inflate the tyres to 0.5 bar above
the normal specified pressure and
check it at intervals.
– Do not drain the engine cooling
system.
4C068-089 ING 11-03-2008 11:59 Pagina 88
Page 93 of 191

IN AN EMERGENCY
People who find themselves in an emergency
situation need immediate and concrete help.
The following pages have been written to help
you if the need arises.
As you will see, a host of little snags have been
taken into account and, for each of them, the
measures you yourself can take are suggested. If
the problems are more serious however, you
should have the car seen to at a LANCIA Dealer-
ship.
With regard to this, we would like to remind you
that, in addition to the Owner handbook, you
have also been provided with the WARRANTY
BOOKLET where you will find details of all the
services Lancia can provide should you find your-
self in difficulty.
We nevertheless recommend you read these
pages. If in need you will be able to find the in-
formation you require much more quickly.EMERGENCY STARTUP ............................... 91
JUMP STARTING ........................................... 92
BUMP STARTING .......................................... 93
IF A TYRE IS PUNCTURED.......................... 94
IF A BULB NEEDS REPLACING................... 99
IF AN EXTERIOR LIGHT BURNS OUT ......... 102
IF AN INTERIOR LIGHT BURNS OUT .......... 106
IF A FUSE BLOWS........................................ 107
IF THE BATTERY IS FLAT ............................ 113
IF THE CAR NEEDS TO BE RAISED ............ 114
IF THE CAR NEEDS TO BE TOWED ............ 116
IF AN ACCIDENT OCCURS........................... 117
90
G
4C090-119 ING 11-03-2008 12:00 Pagina 90
Page 94 of 191

91
G
EMERGENCY
STARTUP
If the ignition key fails to deactivate
the engine immobiliser, the warning
light¢will remain lit and the engine
will not start. In this case, you should
contact your LANCIA Dealership
and get them to carry out the emer-
gency startup using the code given on
the CODE card. Alternatively, you
can perform the emergency startup
procedure yourself by following the
procedure given below.
Read the whole procedure care-
fully before trying to carry it out.If
you make a mistake in the emergency
procedure you must turn the ignition
key back to STOPand repeat the
whole operation from the beginning
step1.
1)Read the 5-figure electronic code
given on the CODE card.
2)Turn the ignition key to MAR.
3)Press the accelerator pedal to the
floor and keep it there. The warning
lamp will light up for about 8
seconds, and then go out. At this point
release the accelerator pedal and pre-
pare to count the number of flashes of
the warning lamp .
4)The warning lamp starts
flashing: when it has
flashed the number of times that cor-
responds to the first figure of the code
on the CODE card, press the acceler-
ator pedal and keep it there until the
warning lamp lights up for four
seconds and then
goes out again. Release the accelera-
tor pedal.
5)The warning lamp will start
flashing again: when
the lamp has flashed the number of
times that corresponds to the second
figure on the CODE card, press the
accelerator pedal to the floor and keep
it there.
6)Do the same for the remaining
figures on the CODE card.
7)Once the final figure has been en-
tered, keep the accelerator pedal
pressed. The warning lamp will
light up for 4 seconds andthen go out. Release the accelerator
pedal.
4C090-119 ING 11-03-2008 12:00 Pagina 91
Page 95 of 191

92
G
8)The warning lamp will flash
rapidly for about 4 seconds to indicate
that the operation has been completed
correctly.
9)Start the engine by turning the ig-
nition key from MARtoAVV(with-
out turning it to STOP).
If, however, the warning lamp
remains lit, turn the ignition key
toSTOPand repeat the procedure
from step 1.
IMPORTANTAfter an emergency
start, you should contact a LANCIA
Dealershipimmediately, otherwise
you will have to repeat the procedure
described each time you want to start
the engine.JUMP STARTING
If the battery is flat, you can use an-
other battery to start the engine. Its
capacity must be the same or slightly
greater than the flat battery (see the
section “Technical Specifications”).
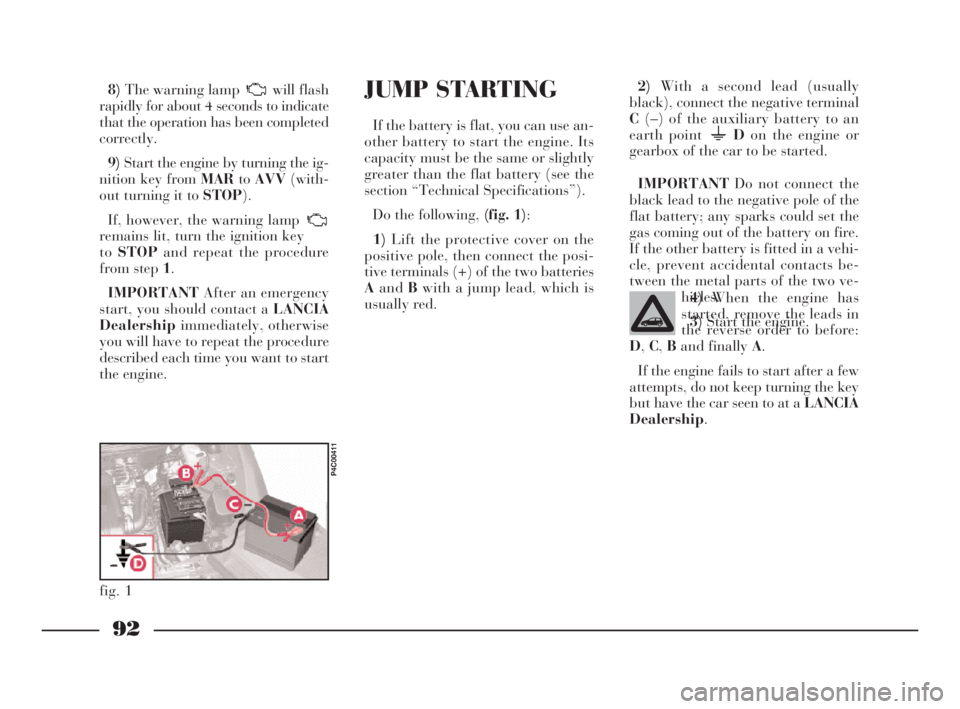
Do the following, (fig. 1):
1)Lift the protective cover on the
positive pole, then connect the posi-
tive terminals (+) of the two batteries
AandBwith a jump lead, which is
usually red.2)With a second lead (usually
black), connect the negative terminal
C(–) of the auxiliary battery to an
earth point Don the engine or
gearbox of the car to be started.
IMPORTANTDo not connect the
black lead to the negative pole of the
flat battery; any sparks could set the
gas coming out of the battery on fire.
If the other battery is fitted in a vehi-
cle, prevent accidental contacts be-
tween the metal parts of the two ve-
hicles.
3)Start the engine.
4)When the engine has
started, remove the leads in
the reverse order to before:
D,C,Band finally A.
If the engine fails to start after a few
attempts, do not keep turning the key
but have the car seen to at a LANCIA
Dealership.
fig. 1
P4C00411
4C090-119 ING 11-03-2008 12:00 Pagina 92
Page 96 of 191

93
G
Under no circumstances
should a battery charger
be used to start the engine:
it could damage the electronic sys-
tems and in particular the control
units governing ignition and fuel
feed.Do not carry out this pro-
cedure if you lack experi-
ence; if it is not done cor-
rectly it can cause very intense
electrical discharges and the bat-
tery might even explode. In addi-
tion, the fluid contained in the bat-
tery is poisonous and corrosive.
Avoid contact with skin and eyes.
You are also advised not to putnaked flames or lighted cigarettes
near the battery and not to cause
sparks: risk of fire and explosion.
To avoid damage to the
electrical system, scrupu-
lously follow the cable
manufacturer’s instructions. Make
sure the cables have an adequate
cross section and are long enough
to avoid the two car touching.
4C090-119 ING 11-03-2008 12:00 Pagina 93
Page 98 of 191

95
G
Signal that the car is sta-
tionary as per the highway
code: hazard lights, warn-
ing triangle, etc.
Any passengers must get out of
the car, especially if it is heavily
laden, and keep out of the way of
traffic while the wheel is being
changed.
If the ground is sloping or
bumpy, place wedges or other suit-
able material under the wheels to
stop the car from moving.The space-saver spare
wheel is specific to the ve-
hicle; do not use it on other
models and do not use spare
wheels designed for other models
on your car.
If you change the type of wheels
fitted (alloy rims instead of steel
ones), you must also change the se-
curing bolts for others of suitable
dimensions.
The space-saver spare wheel
must only be used in the event of
an emergency, and then only for as
little as possible and at no more
than 80 km/h. Driving will feel dif-
ferent with the space-saver spare
wheel fitted. Avoid sharp braking
and acceleration, sudden swerving
and fast cornering.The space-saver spare wheel has
a life-span of about 3000 km after
which the tyre should be replaced
with another of the same type.
4C090-119 ING 11-03-2008 12:00 Pagina 95
Page 100 of 191

97
G
1. STOP THE CAR
– Stop the car so it is not a danger
for on-coming traffic and in such a
position that the tyre can be changed
in safety. The ground must be flat and
adequately firm. During the night,
chose a lit area, if possible.
– Turn engine off and engage the
handbrake.
– Engage first or reverse gear.
– Signal that the car is stopped ac-
cording to traffic regulations: hazard
lights, warning triangle, etc.
Any passengers must leave the car
and watch out for traffic while the
tyre is being changed.
If the ground is sloping or bumpy,
place wedges or other suitable mate-
rial for stopping the car under the
wheels.2. TAKE OUT THE TOOLS,
JACK AND SPARE WHEEL
(space-saver wheel)
They are in the boot.
– Lift the carpeting.
– Unscrew the fastener A (fig. 2)
and take out the tool holder.
The tool holder contains:
B- vehicle tow ring;
C- jack handle;
D- wheel bolt wrench;
E- screwdriver;F- extension for screwing wheel
bolts and inflation valve cap;
G- jack.
fig. 4
P4C00402
fig. 5
P4C00045
4C090-119 ING 11-03-2008 12:00 Pagina 97
Page 104 of 191

101
fG
C Tubular bulbs
Release these bulbs from rela-
tive contacts to remove them.
D Halogen bulbs
Release the securing spring
from its seat to remove the
bulb.BULB Fig. 9 TYPE POWER
Main beam headlights
Dipped beam headlights
Front side lights
Front direction indicators
Side direction indicators
Rear direction indicators
Foglights
Reverse lights
Rear brake and side lights
Rear side lights
Rear fog lights
Third brake light
Number plate
Ceiling light (1.2 16VM Nblue- LS versions)
Ceiling light:
– with courtesy light
– with map light
BootD H3 12V-55W
D H7 12V-55W
A W5W 12V-5W
B PY21W 12V-21W
A W5W 12V-5W
B PY21W 12V-21W
D H1 12V-55W
B P21W 12V-21W
B R5W 12V-21/5W
B R5W 12V-21W
B P21W 12V-21W
A W5W 12V-5W
C C5W 12V-5W
C – 12V-10W
C – 12V-10W
A – 12V-6W
C C5W 12V-5W
4C090-119 ING 13-03-2008 12:51 Pagina 101
Page 105 of 191

102
fG
FRONT SIDE LIGHTS
To replace the 12V-5W bulb (type
W5W):
1)Remove the cover B (fig.10)by
turning partially in an anti-clockwise
direction.
2)Slide out bulb holder C (fig. 12)
by turning it slightly to make it easier
to release.
3)Remove the bulb.
4)Replace the press-fit bulb and re-
fit the bulb holder and cover.
fig. 12
P4C00025
HEADLIGHTS
To replace the halogen lights (12V-
55W):
1)Remove covers AandB (fig. 10)
by turning them partially in an anti-
clockwise direction.
2)Release the clips C-E (fig. 11)
and remove the burnt-out bulb D
(mainbeam headlight of type H3 with
printed wire already attached) or F
(dippedbeam headlight, type H7).
3)Insert the new bulb, making sure
it is positioned properly.
4)Reattach the securing clips and
close the covers.IF AN EXTERIOR
LIGHT BURNS OUT
fig. 10
P4C00027
fig. 11
P4C00026
Modifications or repairs
to the electrical system
carried out incorrectly and
without bearing the features of the
system in mind can cause mal-
functions with the risk of fire.
4C090-119 ING 13-03-2008 12:51 Pagina 102