lock Lancia Ypsilon 2012 Owner handbook (in English)
[x] Cancel search | Manufacturer: LANCIA, Model Year: 2012, Model line: Ypsilon, Model: Lancia Ypsilon 2012Pages: 307, PDF Size: 13.3 MB
Page 90 of 307
ADJUSTING THE HEADLIGHTS WHEN
ABROAD
Dipped headlights are adjusted to drive in the
country where the vehicle was originally
purchased. When travelling in countries with
opposite driving direction, to avoid dazzling the
drivers on the other side of the road, you need
to cover areas of the headlight according to the
Highway code of the country you are travelling in.
ABS SYSTEMABS is an integral part of the braking system
which prevents, whatever the road conditions and
force applied to the brake pedal, the wheels from
locking and consequently sliding under braking,
thus ensuring that the car remains under control
even during emergency braking.
The EBD system (Electronic Braking Force
Distribution) completes the system allowing the
brake force to be distributed between the front
and rear wheels.
IMPORTANT To obtain the maximum efficiency
of the braking system, a bedding-in period of
about 500 km is needed: during this period it is
better to avoid sharp, repeated and prolonged
braking.
WARNING
The ABS gets the most from the
available grip, but it cannot improve
it; you should therefore take every care when
driving on slippery surfaces and not take
unnecessary risks.
88GETTING TO
KNOW YOUR CAR
SAFETY
STARTING AND
DRIVING
WARNING LIGHTS
AND MESSAGES
IN AN EMERGENCY
SERVICING AND
MAINTENANCE
TECHNICAL
SPECIFICATIONS
INDEX
Page 101 of 307
WARNING
Before starting any servicing
operation, stop the engine and
remove the key from the ignition switch to
operate the steering lock, particularly when
the wheels do not touch the ground. If this
is not possible (for example if the key needs
to be turned to MAR-ON or the engine must
be running), remove the main fuse that
protects the electric power steering.
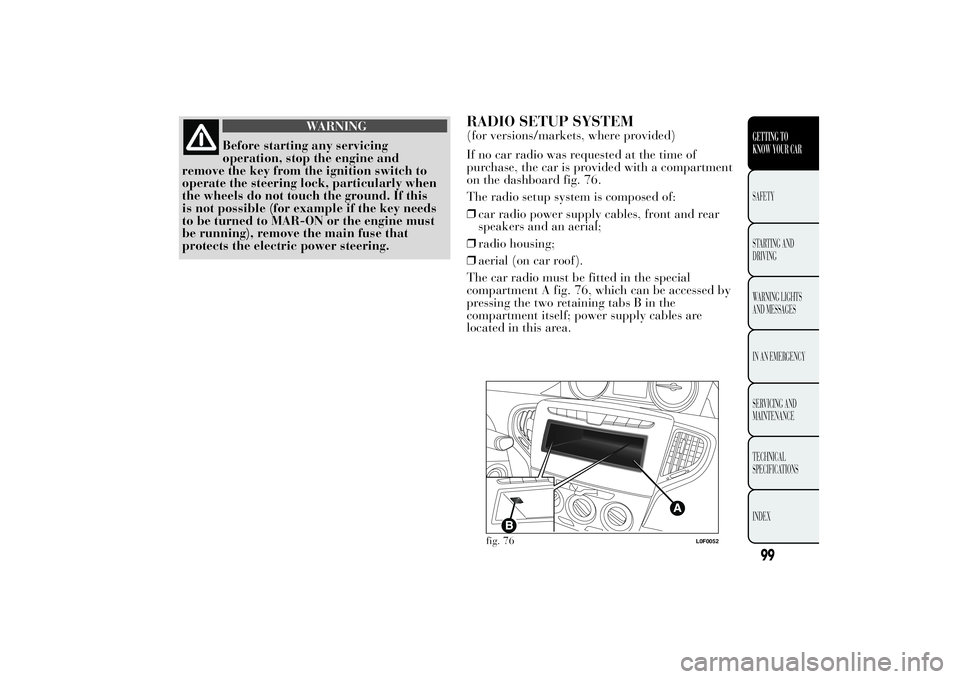
RADIO SETUP SYSTEM(for versions/markets, where provided)
If no car radio was requested at the time of
purchase, the car is provided with a compartment
on the dashboard fig. 76.
The radio setup system is composed of:
❒car radio power supply cables, front and rear
speakers and an aerial;
❒radio housing;
❒aerial (on car roof).
The car radio must be fitted in the special
compartment A fig. 76, which can be accessed by
pressing the two retaining tabs B in the
compartment itself; power supply cables are
located in this area.
fig. 76
L0F0052
99GETTING TO
KNOW YOUR CARSAFETY
STARTING AND
DRIVING
WARNING LIGHTS
AND MESSAGES
IN AN EMERGENCY
SERVICING AND
MAINTENANCE
TECHNICAL
SPECIFICATIONS
INDEX
Page 119 of 307
For diesel engines, use only diesel fuel
for motor vehicles in accordance with
EN590 European specifications. The
use of other products or mixtures may damage
the engine beyond repair and consequently
invalidate the warranty, depending on the
damage caused. If you accidentally refuel with
another type of fuel, do not start the engine,
and drain the fuel tank. If the engine has been
run, even for only a very short time, you will
need to have the entire fuel system emptied in
addition to the tank.
REFUELLING CAPACITY
To fill the tank completely, top up twice after the
pump switches off. Further top-ups could cause
faults in the fuel feeding system.
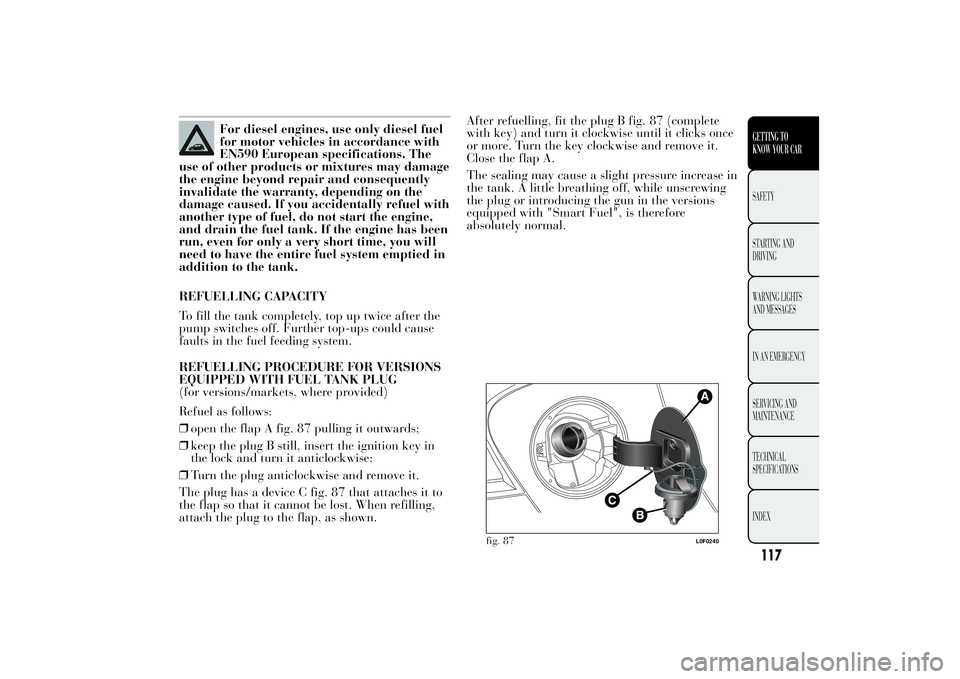
REFUELLING PROCEDURE FOR VERSIONS
EQUIPPED WITH FUEL TANK PLUG
(for versions/markets, where provided)
Refuel as follows:
❒open the flap A fig. 87 pulling it outwards;
❒keep the plug B still, insert the ignition key in
the lock and turn it anticlockwise;
❒Turn the plug anticlockwise and remove it.
The plug has a device C fig. 87 that attaches it to
the flap so that it cannot be lost. When refilling,
attach the plug to the flap, as shown.After refuelling, fit the plug B fig. 87 (complete
with key) and turn it clockwise until it clicks once
or more. Turn the key clockwise and remove it.
Close the flap A.
The sealing may cause a slight pressure increase in
the tank. A little breathing off, while unscrewing
the plug or introducing the gun in the versions
equipped with "Smart Fuel", is therefore
absolutely normal.
fig. 87
L0F0240
117GETTING TO
KNOW YOUR CARSAFETY
STARTING AND
DRIVING
WARNING LIGHTS
AND MESSAGES
IN AN EMERGENCY
SERVICING AND
MAINTENANCE
TECHNICAL
SPECIFICATIONS
INDEX
Page 123 of 307

SAFETY
SEAT BELTSUSING THE SEAT BELTS
The belt should be worn keeping the torso straight
and rested against the backrest.
To fasten the seat belts, hold the tongue A fig. 92
and insert it into the buckle B, until the locking
click is heard. On removal, if it jams, let it rewind
for a short stretch, then pull it out again without
jerking.To unfasten the seat belts, press button C. Guide
the seat belt with your hand while it is rewinding,
to prevent it from twisting. Through the reel,
the belt automatically adapts to the body of the
passenger wearing it, allowing freedom of
movement.
WARNING
Never press button C fig. 92 when
travelling.
The reel may lock when the car is parked on a
steep slope: this is perfectly normal. Furthermore,
the reel mechanism locks the belt if it is pulled
sharply or in the event of sudden braking,
collisions and high-speed bends.
The rear seat is fitted with inertia seat belts with
three anchor points and a reel. Fasten the rear seat
belts as shown in fig. 93 (4-seater versions) or
(5-seater versions) fig. 94.
fig. 92
L0F0059
121GETTING TO KNOW
YOUR CARSAFETYSTARTING AND
DRIVING
WARNING LIGHTS
AND MESSAGES
IN AN EMERGENCY
SERVICING AND
MAINTENANCE
TECHNICAL
SPECIFICATIONS
INDEX
Page 144 of 307

WARNING
Do not travel carrying objects in your
lap, in front of your chest or between
your lips (pipe, pencils, etc.). They could
cause severe injury if the airbag is deployed.
WARNING
The expiry dates of the explosive
charge and the clock spring are
shown on a specific label contained in the
glove box. Contact a Lancia Dealership
to have them replaced when the expiry date
approaches.
WARNING
If your car has been subject to theft,
attempted theft, vandalism, or
flooding, contact a Lancia Dealership to
have the airbag system checked.
WARNING
The airbags may also be deployed
when the car is not moving, if the key
is in the ignition and turned to MAR or when
the engine is off, if the car is hit by another
moving vehicle. For this reason, children
must never occupy the front seat, even if the
car is not moving. On the other hand, if
the key is inserted in STOP position, none of
the safety devices (airbags or pretensioners)
will be deployed in the event of impact.
Non-deployment of these devices does not
indicate a system malfunction.
WARNING
When the ignition key is turned to
MAR, the warning light
(with
passenger side front airbag active) switches
on for a few seconds to remind you that
the passenger airbag will be deployed in an
impact, after which it should switch off.
WARNING
The
warning light flashes to
indicate
warning light failure. In
this case, for versions/markets where
provided, the explosive charges of the
passenger airbag are deactivated.
142
GETTING TO KNOW
YOUR CAR
SAFETY
STARTING AND
DRIVING
WARNING LIGHTS
AND MESSAGES
IN AN EMERGENCY
SERVICING AND
MAINTENANCE
TECHNICAL
SPECIFICATIONS
INDEX
Page 148 of 307

STOPPING THE ENGINE
Turn the ignition key to STOP while the engine is
idling.
IMPORTANT After a taxing drive, before turning
the engine off you should allow it to idle to allow
the temperature in the engine compartment to fall.
A quick burst on the accelerator before
turning off the engine serves absolutely
no practical purpose, it wastes fuel
and is damaging especially to turbocharged
engines.
PARKINGSwitch off the engine and engage the handbrake.
Engage a gear (first gear if parked uphill or
reverse if facing downhill) and leave the wheels
turned. If the car is parked on a steep slope block
the wheels with a wedge or stone. Always remove
the ignition key when leaving the car.
HANDBRAKE
To engage the handbrake pull lever A fig. 112
upwards until the car is secured. To release the
handbrake, raise the lever A slightly, press and
hold the button B and lower the lever.
If the car is parked on a steep slope, it is also
advisable to block the wheels with a wedge or
stone.
fig. 112
L0F0074
146
GETTING TO KNOW
YOUR CAR
SAFETY
STARTING AND
DRIVINGWARNING LIGHTS
AND MESSAGES
IN AN EMERGENCY
SERVICING AND
MAINTENANCE
TECHNICAL
SPECIFICATIONS
INDEX
Page 157 of 307

The warning light (or symbol on the display)
switches on when the handbrake is engaged. If the
car is moving the buzzer will also sound.
IMPORTANT If the warning light comes on when
the car is in motion, check that the handbrake
is not on.
EBD FAILURE (red)
(amber)
The simultaneous switching on of the
(red),
(amber) andESCwarning lights with the
engine on, indicates either a failure of the EBD
system or that the system is not available. In this
case, the rear wheels may suddenly lock and
the vehicle may swerve when braking sharply.
Drive very carefully to the nearest Lancia
Dealership to have the system inspected
immediately. On some versions the display shows
the dedicated message.
ABS SYSTEM FAILURE (amber)
Turning the key to the MAR position switches on
the warning light, but it should switch off after
a few seconds. The warning light switches on (on
some versions, with a message on the display
and a symbol on the display) when the system is
not efficient. In this case the braking system
maintains its own efficiency unaltered but without
the advantage of the ABS system.
Drive carefully and contact a Lancia Dealership as
soon as possible.AIRBAG FAILURE (red)
Turning the key to the MAR-ON position
illuminates the warning light, but it should switch
off after a few seconds.
The warning light switches on constantly (on some
versions, with a message on the display and a
symbol on the display) to indicate an airbag
system fault.
155GETTING TO KNOW
YOUR CAR
SAFETY
STARTING AND
DRIVINGWARNING LIGHTS
AND MESSAGESIN AN EMERGENCY
SERVICING AND
MAINTENANCE
TECHNICAL
SPECIFICATIONS
INDEX
HANDBRAKE ENGAGED
When the key is turned to MAR position, the
warning light switches on but should switch off
after a few seconds.
Page 172 of 307
WARNING
If you change the type of wheel (alloy
rims instead of steel rims and vice
versa) you will have to change the entire set
of fastening bolts with another set of suitably
sized bolts.
WARNING
Alert other drivers that the car is
stationary in compliance with local
regulations: hazard warning lights, warning
triangle, etc. Any passengers on board
should leave the car, especially if it is
heavily laden. Passengers should stay away
from on-coming traffic while the wheel is
being changed. On hills or uneven roads, use
chocks or appropriate objects to block the
wheels of the car.
WARNING
The car's driving characteristics will
be modified with the space-saver
wheel fitted. Avoid sudden starting or
stopping, sharp or fast turns. The total life of
a space-saver wheel is approximately 3000
km, after which it must be replaced by
another wheel of the same type. Never install
a standard tyre on a rim that is designed
for use with a space-saver wheel. Have the
tyre repaired and refitted as soon as
possible. Using two or more space-saver
wheels at the same time is forbidden. Do not
grease the threads of bolts before fitting
them: they might slip out.
170
GETTING TO KNOW
YOUR CAR
SAFETY
STARTING AND
DRIVING
WARNING LIGHTS
AND MESSAGESIN AN EMERGENCYSERVICING AND
MAINTENANCE
TECHNICAL
SPECIFICATIONS
INDEX
Page 173 of 307
WARNING
The jack provided is only intended to
be used for replacing tyres on the
car with which it is supplied, or on
same-model vehicles. Never use the jack for
other purposes, such as lifting other car
models. Never use it for repair operations
under the car. Incorrectly positioning the
jack may cause the car to fall. Do not use the
jack for loads higher than the one shown
on its label. Never install snow chains on the
space-saver wheel; if a front tyre (driving
wheel) is punctured and you need to use
snow chains, use a standard wheel from the
rear axle and install the space-saver wheel
on the rear axle. In this way, with two
normal drive wheels, it is possible to use
snow chains.
WARNING
Fit the wheel cap correctly to prevent
it from coming free in motion. Never
tamper with the inflating valve. Never
introduce tools of any kind between rim and
tyre. Check tyre and space-saver wheel
pressures regularly, referring to the values
shown in the "Technical specifications"
section.JACK
Important notes:
❒the jack weight is 1,76 kg;
❒the jack requires no adjustment;
❒the jack cannot be repaired and in the event of a
fault it must be replaced by another original
one;
❒no tool other than its cranking device may be
fitted on the jack.
To change a wheel proceed as follows:
❒Stop the car in a position that is not dangerous
for oncoming traffic where you can change the
wheel safely. The ground must be flat and
sufficiently compact;
❒switch off the engine, pull up the handbrake
and engage the 1
stgear or the reverse gear.
Wear the reflective safety jacket (compulsory by
law in certain countries) before getting out of
the car;
❒open the luggage compartment, pull tab A fig.
115 and lift up the mat;
❒using the wrench A fig. 116 located in the tool
box, loosen the locking device, take the tool
box B and place it close to the wheel to be
replaced. Then take the space-saver wheel C;
❒take the wrench A fig. 117 and loosen the fixing
bolts by about one turn. For versions with alloy
rims, shake the car to facilitate detachment of
the rim from the wheel hub.
171GETTING TO KNOW
YOUR CAR
SAFETY
STARTING AND
DRIVING
WARNING LIGHTS
AND MESSAGESIN AN EMERGENCYSERVICING AND
MAINTENANCE
TECHNICAL
SPECIFICATIONS
INDEX
Page 181 of 307

❒if a pressure value of at least 1.8 bar is detected,
restore the correct pressure (with the engine
running and the handbrake engaged), resume
driving and drive with care to nearest Lancia
Dealership.
WARNING
Inform the dealership that the tyre
has been repaired using the tyre
quick repair kit. Give the instruction booklet
to the personnel charged with handling the
treated tyre.
CHECKING AND RESTORING TYRE
PRESSURE
The compressor can also be used to check and, if
necessary, adjust the tyre pressure. Release quick
connector A fig. 127 and connect it directly to
the valve of the tyre to be inflated.
REPLACING THE BOTTLE
Proceed as follows:
❒disconnect connection A fig. 128;
❒turn the cylinder to be replaced anticlockwise
and raise it;❒fit the new cylinder and turn it clockwise;
❒connect connection A to the cylinder and insert
the transparent pipe B into its housing.
fig. 127
L0F0180
fig. 128
L0F0008
179GETTING TO KNOW
YOUR CAR
SAFETY
STARTING AND
DRIVING
WARNING LIGHTS
AND MESSAGESIN AN EMERGENCYSERVICING AND
MAINTENANCE
TECHNICAL
SPECIFICATIONS
INDEX