ECO mode Lancia Ypsilon 2012 Owner handbook (in English)
[x] Cancel search | Manufacturer: LANCIA, Model Year: 2012, Model line: Ypsilon, Model: Lancia Ypsilon 2012Pages: 307, PDF Size: 13.3 MB
Page 5 of 307

Dear Customer,
We would like to congratulate and thank you for choosing LANCIA.
We have written this handbook to help you get to know all the features of your car and use it in the best possible
way.
You are recommended to read it right through before taking to the road for the first time.
It contains important information, advice and instructions for the use of the car which will help you get the very
best out of your LANCIA. This booklet also provides a description of special features, essential information for the
correct care and maintenance of your LANCIA as well as safe driving tips.
Carefully read the warnings and indications marked with the following symbols:
personal safety;car safety;environmental protection.
The enclosed Warranty Booklet lists the services that LANCIA offers to its Customers:
❒the Warranty Certificate with terms and conditions for maintaining its validity;
❒the range of additional services available to LANCIA Customers.
We are sure that these will help you get in touch with your new car and further appreciate it and the care provided
by the people at LANCIA.
Enjoy reading. Happy motoring!This Owner Handbook describes all the versions of the LANCIA Ypsilon. As a
consequence, you should only consider the information which is related to the trim
level, engine and version that you have purchased. All data contained in this
publication are purely indicative. Fiat Group Automobiles can modify the
specifications of the vehicle model described in this publication at any time, for
technical or marketing purposes. For further information, contact a Lancia
Dealership.
Page 11 of 307

DISPLAYThe car may be provided with a multifunction/
reconfigurable multifunction display that shows
useful information, according to the previous
settings, when driving.
With the ignition key removed, the display
activates and shows the time and total milometer
reading (in km or miles) for a few seconds when
a door is opened/closed.
NOTE With a low outside temperature (below
0°C) it may take longer than normal for
information to appear on the display.
MULTIFUNCTION DISPLAY "STANDARD"
SCREEN
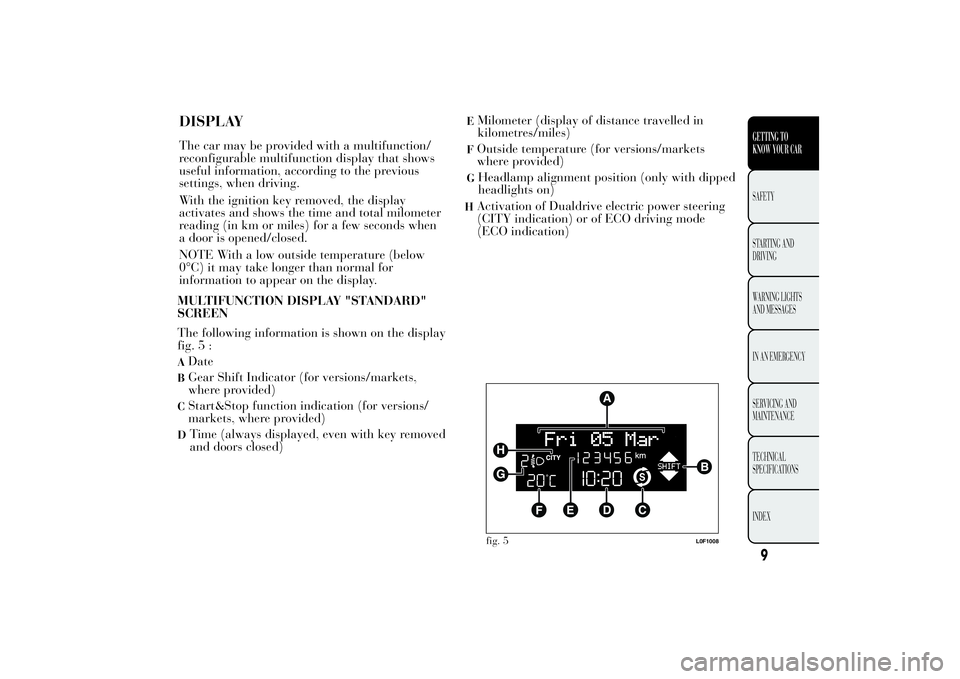
The following information is shown on the display
fig. 5 :ADateBGear Shift Indicator (for versions/markets,
where provided)CStart&Stop function indication (for versions/
markets, where provided)D
Time (always displayed, even with key removed
and doors closed)
EMilometer (display of distance travelled in
kilometres/miles)FOutside temperature (for versions/markets
where provided)G
Headlamp alignment position (only with dipped
headlights on)fig. 5
L0F1008
9GETTING TO
KNOW YOUR CARSAFETY
STARTING AND
DRIVING
WARNING LIGHTS
AND MESSAGES
IN AN EMERGENCY
SERVICING AND
MAINTENANCE
TECHNICAL
SPECIFICATIONS
INDEX
H
Activation of Dualdrive electric power steering
(CITY indication) or of ECO driving mode
(ECO indication)
Page 57 of 307

When the lights are turned on by the sensor, the fog lights (for versions/markets, where provided)and the rear fog lights may be turned on. Whenthe lights are automatically switched off, the frontand rear fog lights (if activated) are also switchedoff. The next time the lights are switched onautomatically, the fog lights must be reactivatedmanually (if required). With the sensor active, it is possible to flash the headlights but the main beam headlights cannotbe switched on. To activate these lights, turnthe ring nut A to
and activate the fixed dipped
beam headlights. When the lights have been activated automatically and are then switched off by the sensor, thedipped beam headlights are switched off first,followed by the side lights a few seconds later. Ifthe sensor is activated but is malfunctioning,the side lights and dipped beam headlights areswitched on irrespective of the outside light leveland the sensor failure is indicated on theinstrument panel display. It is also possible todeactivate the sensor and switch on the side lightsand dipped beam headlights. IMPORTANT The sensor is unable to detect the presence of fog. Under these circumstances, theselights are therefore turned on manually.
MAIN BEAM HEADLIGHTS It is not possible to switch on the main beam headlights in fixed mode if the automatic lightingcontrol system is active. FLASHING You can flash the headlights by pulling the stalk towards the wheel (unstable position). The
warning light will come on in the instrument
panel. DIRECTION INDICATORS Bring the stalk to the (stable) position: upwards:
right-hand direction indicator
activation; downwards:
left-hand direction indicator
activation. Warning light
or
should flash in the
instrument panel. The indicators switch offautomatically when the steering wheel isstraightened.
55GETTING TOKNOW YOUR CARSAFETY STARTING AND DRIVING WARNING LIGHTS AND MESSAGES IN AN EMERGENCYSERVICING AND MAINTENANCE TECHNICAL SPECIFICATIONS INDEX To activate the main beam headlights, with ring nut at
, pull the stalk towards the steering
wheel. The warning light
switches on in the
instrument panel. When the stalk is pulled towards the steering wheel again, the lights deactivate, the dippedheadlights reactivate and the
warning light
switches off.
Page 61 of 307

Deactivation
If the engine is stopped with ring nut A in
"automatic" position (AUTO), no wiping cycle is
performed when it is next started even if rain is
present. This prevents accidental activation of the
rain sensor when the engine is started (e.g. when
the windscreen is being washed by hand or the
wipers are stuck to the windscreen by ice).
To restore automatic operation of the rain sensor,
turn ring nut A from "automatic" position
(AUTO) toOposition and then turn the ring nut
back to the AUTO position.
When the rain sensor is reactivated using any of
the manoeuvres described above, reactivation
is indicated by a single stroke of the windscreen
wipers, regardless of the condition of the
windscreen. If the sensitivity is changed whilst the
rain sensor is operating, a windscreen wiper stroke
is carried out to confirm the change.
In the event of malfunction of the rain sensor
whilst it is active, the windscreen wiper operates
intermittently at a speed consistent with the
sensitivity setting of the rain sensor, regardless of
whether there is rain on the glass (on some
versions sensor failure is indicated on the display).
The sensor continues to operate and it is possible
to set the windscreen wiper to continuous mode
(1
stor 2
nd
speed). The failure indication remains
for as long as the sensor is active.
The rain sensor is able to recognise, and
automatically adjust itself in the presence of the
following conditions:❒presence of dirt on the controlled surface (salt,
dirt, etc.);
❒presence of streaks of water caused by the worn
window wiper blades;
❒difference between day and night.
Do not activate the rain sensor when
washing the car in an automatic car
wash.Make sure the device is switched off if
there is ice on the windscreen.
WARNING
Make sure the device is switched off
whenever the windscreen must be
cleaned.
59GETTING TO
KNOW YOUR CARSAFETY
STARTING AND
DRIVING
WARNING LIGHTS
AND MESSAGES
IN AN EMERGENCY
SERVICING AND
MAINTENANCE
TECHNICAL
SPECIFICATIONS
INDEX
Page 62 of 307

REAR WINDOW WASHER/ WIPER
It can be operated only with the ignition key
turned to MAR.
Activation
Turn the ring nut B fig. 3 5 from
to
to operate
the rear window wiper as follows:
❒in intermittent mode when the windscreen wiper
is not operating;
❒in synchronous mode (at half the speed of the
windscreen wiper) when the windscreen wiper
is operating;
❒in continuous mode with reverse gear engaged
and the control active.
With the windscreen wiper on and reverse gear
engaged, rear window wiping will be continuous.
Pushing the stalk towards the dashboard
(unstable position) the rear window washer jet
will activate. Keep the stalk pushed for more than
half a second to activate the rear window wiper
as well. Releasing the stalk will activate the smart
washing function, as described for the windscreen
wiper.
Deactivation
The function stops when the stalk is released.
Do not use the rear window wiper to
remove layers of snow or ice. In these
conditions, the windscreen wipers may
be submitted to excessive effort resulting in
the motor protection cutting in and wiper
operation being inhibited for a few seconds. If
operation is not restored, contact a Lancia
Dealership.
60GETTING TO
KNOW YOUR CAR
SAFETY
STARTING AND
DRIVING
WARNING LIGHTS
AND MESSAGES
IN AN EMERGENCY
SERVICING AND
MAINTENANCE
TECHNICAL
SPECIFICATIONS
INDEX
Page 66 of 307

❒pressed to the left (position 0): light C switches
on;
❒pressed to the right (position 2): light D
switches on.
IMPORTANT Before getting out of the car, make
sure that both switches are in the central position:
when the doors are closed the lights will switch
off to avoid draining the battery. In any case,
if the switch is left in the on position, the courtesy
light switches off automatically about 15 minutes
after the engine has been switched off.
Diffused light on dashboard
The diffused light on the dashboard switches on in
the same way as the front roof light.
ROOF LIGHT TIMING
On certain versions, to facilitate getting into/out of
the car, especially at night or in poorly-lit areas,
two timed modes have been provided.
Timing when getting into the car
The roof lights switch on according to the
following modes:
❒for about 10 seconds when the doors are
unlocked;
❒for about 3 minutes when one of the doors is
opened;
❒for about 10 seconds when the doors are closed.
The timed period is interrupted when the ignition
key is turned to MAR-ON.The lights switch off in three ways:
❒when all doors are closed, the 3-minute timer
will stop and a 10-second one will start. This
timer will stop when the key is turned to
MAR-ON;
❒when doors are locked (either with remote
control or with key on driver side door), the roof
light switches off.
❒the courtesy lights are switched off in any case
after 15 minutes to preserve battery charge
Timing when getting out of the car
After removing the key from the ignition switch,
the roof lights switch on as follows:
❒if the ignition key is removed within 3 minutes
from the engine stopping, the roof lights switch
on for 10 seconds;
❒for about 3 minutes when one of the doors is
opened;
❒for about 10 seconds when one of the doors is
closed.
The timing stops automatically when the doors are
locked.
64GETTING TO
KNOW YOUR CAR
SAFETY
STARTING AND
DRIVING
WARNING LIGHTS
AND MESSAGES
IN AN EMERGENCY
SERVICING AND
MAINTENANCE
TECHNICAL
SPECIFICATIONS
INDEX
Page 95 of 307

START&STOP SYSTEMINTRODUCTION
The Start&Stop system automatically stops the
engine each time the car is stationary and starts it
again when the driver wants to move off. In this
way, the car efficiency is increased, by reducing
consumption, dangerous gas emissions and noise
pollution.
The system activates every time the car is started.
OPERATING MODES
Engine stopping mode
With the car stopped, the engine stops with
gearbox in neutral and clutch pedal released.
NoteThe engine can only be stopped
automatically after driving at a speed of more
than about 10 km/h, to prevent the engine from
being repeatedly stopped when driving at walking
pace.
The
symbol appears on the display when the
engine stops.
Restarting the engine
Press the clutch pedal to restart the engine.MANUAL SYSTEM ACTIVATION/
DEACTIVATION
To activate/deactivate the system manually, press
the button
fig. 71 on the dashboard control
trim.
Start&Stop system activation
Start&Stop system activation is signalled by a
message on the display. In this condition, the LED
on the button
is off.
Start&Stop system deactivation
Versions with multifunction display: a message
appears on the display when the Start&Stop
system is deactivated.
Versions with reconfigurable multifunction
display: thesymbol and a message appear on
the display when the Start&Stop system is
deactivated.
fig. 71
L0F0044
93GETTING TO
KNOW YOUR CARSAFETY
STARTING AND
DRIVING
WARNING LIGHTS
AND MESSAGES
IN AN EMERGENCY
SERVICING AND
MAINTENANCE
TECHNICAL
SPECIFICATIONS
INDEX
Page 162 of 307

If the warning light remains on or switches on
whilst driving, the injection system is not working
properly; in particular, if the warning light
switches on constantly, this indicates a
malfunction in the supply/ignition system that
could cause excessive exhaust emissions, a possible
loss of performance, poor driveability and high
fuel consumption.
Under these conditions, you may continue
travelling at moderate speed without demanding
excessive effort from the engine. Prolonged use
of the car with the warning light on may cause
damage. Contact a Lancia Dealership as soon as
possible.
The warning light goes out after the fault
disappears, but the notification is stored in the
system.
NOTE (valid only for petrol engines)
If the warning light is flashing, the catalytic
converter could be damaged.
In this case, it is necessary to release the
accelerator pedal to lower the speed of the engine
until the warning light stops flashing; continue the
journey at moderate speed, trying to avoid
driving conditions that may cause further flashing
and contact a Lancia Dealership as soon as
possible.
Go to a Lancia Dealership as soon as
possible if
warning light either does
not light up when the key is turned to
MAR or if while travelling the warning light
comes on either constantly or flashing (along
with a message and a symbol on the display
on some versions). The operation of warning
light
may be checked by the traffic police
using specific devices. Comply with the laws
and regulations of the country where you
are driving.ESC SYSTEM FAILURE (amber)
(for versions/markets, where provided)
Turning the key to the MAR-ON position
illuminates the warning light, but it should switch
off after a few seconds.
If the warning light does not switch off or remains
on (along with a message and a symbol on the
display on some versions) whilst driving, contact a
Lancia Dealership. Flashing of the warning light
while driving indicates the intervention of the ESC
system.
160
GETTING TO KNOW
YOUR CAR
SAFETY
STARTING AND
DRIVINGWARNING LIGHTS
AND MESSAGESIN AN EMERGENCY
SERVICING AND
MAINTENANCE
TECHNICAL
SPECIFICATIONS
INDEX
Hill Holder failure
This warning light switches on, on some versions
together with the
symbol and a message in
the display, in the event of a Hill Holder system
failure. In this case, go to a Lancia Dealership.
Page 287 of 307

After entering the fourth digit (within 20 seconds),
the car radio will start to work.
If an incorrect code is entered, the radio will emit
a sound and the display shows the text "Radio
blocked/wait" to notify the user of the need to
enter the correct code.
Each time the user enters an incorrect code, the
waiting time will gradually increase (1 min, 2 min,
4 min, 8 min, 16 min, 30 min, 1 h, 2 h, 4 h, 8 h,
16 h, 24 h) up to a maximum of 24 hours.
The waiting time will be shown on the display
with the text "Radio blocked/wait". After the text
has disappeared it is possible to start the code
entering procedure again.Code Card
This document certifies ownership of the car radio.
The Code Card shows the radio model, serial
number and secret code.
Note
Keep this Code Card in a safe place so that you
can give the information to the relevant authorities
if the car radio is stolen.
285
SOUND-SYSTEM
Page 292 of 307

CD PLAYERINTRODUCTION
This chapter describes the variants regarding the
operation of the CD player: as far as the operation
of the radio is concerned, refer to the description
in the "Functions and Adjustments" chapter.
SELECTING THE CD PLAYER
To activate the CD player built-into the
equipment, proceed as follows:
❒load a CD with the equipment switched on: the
first track will start to play;
or
❒if a CD has already been loaded, turn on the car
radio and then briefly press the CD button to
select the “CD” operating mode: the last track
listened to will start to play.
It is advisable to use original CDs to ensure
optimum playback. If CD-R/RWs are used, we
recommend using good quality media that are
burnt at the slowest speed possible.LOADING/EJECTING A CD
To load the CD, insert it gently into the slot to
activate the motorised loading system, which will
position it correctly.
The CD can be loaded with radio off and the
ignition key turned to MAR-ON: in this case the
radio will remain off. When the radio is turned on,
the last source listened to before being switched off
will be activated.
When a CD is inserted the display will show the
symbol "CD-IN" and the text "CD Reading". They
will remain displayed for the entire time required
for the radio to read the CD tracks. When this
time has elapsed the radio automatically starts
playing the first track.
Press the
button (EJECT) with the radio on to
activate the motorised ejection of the CD. After
ejection, the last audio source listened to before
playing the CD will be heard.
If the CD is not removed from the radio, it will
automatically be reloaded about 20 seconds later
and the Tuner mode will be tuned into (Radio).
The CD cannot be ejected if the car radio is off.
If the ejected CD is reloaded without having
removed it completely from the slot, the radio will
not switch to the CD source.
290
SOUND-SYSTEM