change time Lancia Ypsilon 2012 Owner handbook (in English)
[x] Cancel search | Manufacturer: LANCIA, Model Year: 2012, Model line: Ypsilon, Model: Lancia Ypsilon 2012Pages: 307, PDF Size: 13.3 MB
Page 2 of 307

We really know your car because we invented, designed and built it: we really know every single detail.
At Lancia Service authorised workshopsyou can find technicians directly trained by us, offering quality
and professionalism for all service operations.
Lancia workshops are always close to you for the regular servicing operations, season checks
and practical recommendations by our experts.
With Lancia Genuine Parts you keep the reliability, comfort and performance features
of your new car unchanged in time: that's why you bought it for.
Always ask for Genuine Parts for the components used on our cars; we recommend them because
they come from our steady commitment in research and development of highly innovative technologies.
For all these reasons: rely on Genuine Parts, because they are the only ones designed
by Lancia for your car.
SAFETY:
BRAKING SYSTEMENVIRONMENT: PARTICULATE FILTERS,
CLIMATE CONTROL MAINTENANCECOMFORT: SUSPENSION
AND WINDSCREEN WIPERS PERFORMANCE: SPARK PLUGS,
INJECTORS AND BATTERIESLINEACCESSORI
ROOF RACK BARS, WHEEL RIMS
WHY CHOOSING
GENUINE PARTS
Cop nuova Ypsilon Lum GB.qxd 5-04-2011 14:47 Pagina 2
Page 20 of 307

Time adjustment (Clock adjustment)
This function enables the clock to be set through
two submenus: “Time” and “Format”.
To carry out the adjustment, proceed as follows:
❒briefly press the button
: the display will show
the two submenus "Time" and "Format";
❒press the button
or
to switch between
the two submenus;
❒once you have selected the submenu to be
changed, press the buttonbriefly;
❒when you select “Time”, pressing
briefly
makes the "hours" flash on the display; press
the
or
button to make the adjustment;
❒briefly press the
button, which makes the
display flash the "minutes"; press the
or
button to make the adjustment;
❒if you select the "Format" submenu, pressing
thebutton briefly makes the display mode
flash on the display. Press the
or
button
to select "12h" or "24h" mode. When you
have carried out the required settings, briefly
press the
button to go back to the submenu
screen or hold the button down to go back
to the main menu screen without storing the
new settings.
Hold down the
button again to return to the
standard screen or to the main menu according to
where you are in the menu.IMPORTANT The setting will increase or decrease
by one unit each time the button
or
is
pressed. Keeping the button pressed causes an
automatic rapid speed increase/decrease.
Complete the setting by briefly pressing the button
when you approach the required value.
Set date (Setting the date)
Using this function it is possible to update the date
(year - month - day).
To carry out the adjustment, proceed as follows:
❒briefly press the
button: the year will flash on
the display;
❒press the
or
button to make the
adjustment;
❒briefly press
: the “month” will flash on the
display;
❒press theor
button to make the
adjustment;
❒briefly press thebutton: the day will flash on
the display;
❒press the
or
button to make the
adjustment;
❒press the
button briefly to return to the menu
screen or give the button a long press to return
to the standard screen without storing.
18GETTING TO
KNOW YOUR CAR
SAFETY
STARTING AND
DRIVING
WARNING LIGHTS
AND MESSAGES
IN AN EMERGENCY
SERVICING AND
MAINTENANCE
TECHNICAL
SPECIFICATIONS
INDEX
Page 58 of 307

Lane change function
If you wish to signal a lane change, put the left
stalk in the unstable position for less than half a
second. The direction indicator on the selected
side flashes three times and then switches off
automatically.
“FOLLOW ME HOME” DEVICE
This allows the space in front of the car to be lit
up for a certain period of time.
Activation:with the ignition key on STOP or
removed, pull the stalk towards the steering wheel
within 2 minutes from when the engine is turned
off.
At each single movement of the stalk, the lights
will remain on for an extra 30 seconds up to a
maximum of 210 seconds; then the lights are
switched off automatically.
Each time the stalk is operated, the
warning
light on the instrument panel switches on and the
display also shows a message and how long the
function will remain active.
The
warning light switches on when the stalk
is first moved and stays on until the function is
automatically deactivated. Each time the stalk is
activated it increases the time that the lights
remain on.
Deactivation:keep the stalk pulled towards the
steering wheel for more than two seconds.EXTERNAL COURTESY LIGHTS
This function lights up the car and the space
around it when the doors are unlocked.
Activation:when the car is parked and the doors
are unlocked by pressing the
button on the
remote control (or the luggage compartment is
unlocked by pressing
), the dipped beam
headlights, side lights and number plate lights are
activated.
The lights remain lit for approximately 25 seconds
unless the doors and boot are locked again with
the remote control or the doors or boot are opened
and reclosed. In these cases they go out after 5
seconds.
The exterior courtesy lights can be enabled/
disabled using the Setup Menu (see the paragraph
“Menu Items” in this chapter).
56GETTING TO
KNOW YOUR CAR
SAFETY
STARTING AND
DRIVING
WARNING LIGHTS
AND MESSAGES
IN AN EMERGENCY
SERVICING AND
MAINTENANCE
TECHNICAL
SPECIFICATIONS
INDEX
Page 89 of 307

HEADLIGHTSLIGHT BEAM DIRECTION
The correct alignment of the headlights is
important for the comfort and safety of not only
the driver but all other road users. This is also
covered by a specific rule of the highway code.
The headlights must be correctly aimed to
guarantee the best visibility conditions for all
drivers while travelling with headlights on.
Contact a Lancia Dealership to have the
headlights properly adjusted.
Check beam alignment every time the load or its
distribution changes.
IMPORTANT When the gas discharge (Xenon)
headlamps (for versions/markets, where provided)
are switched on, normally parabolas and light
beam move vertically for about 2 seconds until
headlamp alignment has stabilised.
HEADLAMP ALIGNMENT CORRECTOR
This device works with the ignition key in the
MAR position and the dipped headlights on.
Headlight alignment adjustment
Press the
or
buttons to adjust fig. 69. The
instrument panel display shows the position in
relation to the adjustment set.
Position 0 - one or two persons on the front seats
Position1-4personsPosition2-4persons + load in the luggage
compartment
Position 3 - driver + maximum admissible load all
stored in the luggage compartment.
IMPORTANT Check alignment every time the
load carried changes.
IMPORTANT If the car is equipped with (Xenon)
gas discharge headlights, the headlight alignment
is controlled electronically, as a consequence the
and
buttons are not present.
FOG LIGHT ALIGNMENT
(for versions/markets, where provided)
Contact a Lancia Dealership to have the
headlights properly adjusted.
fig. 69
L0F0224
87GETTING TO
KNOW YOUR CARSAFETY
STARTING AND
DRIVING
WARNING LIGHTS
AND MESSAGES
IN AN EMERGENCY
SERVICING AND
MAINTENANCE
TECHNICAL
SPECIFICATIONS
INDEX
Page 112 of 307
❒Sensors may detect a non-existent obstacle
(echo noise) due to mechanical noises, for
example while washing the car, in the case of
rain, strong wind, hail.
❒The sensors might not detect objects of a
particular shape or made from particular
materials (very thin poles, trailer beams, panels,
nets, bushes, parking deterrents, rubbish bins,
motor vehicles, etc.). Always take great care
to check that the car and its path are actually
compatible with the parking area identified
by the system.
❒The use of (one or more) tyres or wheels of a
different size to those at the time the car was
purchased could affect the operation of the
system.
❒If the battery is disconnected or is nearly flat,
the Magic Parking system will not be available
until the vehicle is driven for a few hundred
metres on a curved path to initialise the system.
❒If a trailer is fitted (with the plug correctly
inserted) the Magic Parking system will
automatically be disabled.
❒If the Magic Parking system is in "search in
progress" mode, the system could incorrectly
identify a parking space and carry out the
manoeuvre (e.g. by a junction, carriage track,
roads crossing the direction of travel, etc.)
❒In the case of parking manoeuvres on roads on a
gradient, the performance of the system could
be inferior and it may deactivate.❒If a parking manoeuvre is being carried out
between two parked vehicles alongside the
pavement, the Magic Parking system may cause
the car to mount the pavement.
❒Some manoeuvres at very tight bends may not
be carried out.
❒Take great care to ensure that conditions do not
change during the parking manoeuvre (e.g. if
there are persons and/or animals in the parking
area, moving cars, etc.) and intervene
immediately if necessary.
❒During parking manoeuvres, pay attention to
cars approaching from the opposite direction.
Always follow the Highway Code.
IMPORTANT Correct system operation is not
guaranteed if snow chains or emergency wheels
are fitted.
IMPORTANT The correct positioning of the car
inside the parking space detected by the system
depends on various factors, in particular the
circumference of the wheels. For example,
if wheels with a 14" diameter are fitted, the
position of the car inside the parking area could
be slightly different.
110GETTING TO
KNOW YOUR CAR
SAFETY
STARTING AND
DRIVING
WARNING LIGHTS
AND MESSAGES
IN AN EMERGENCY
SERVICING AND
MAINTENANCE
TECHNICAL
SPECIFICATIONS
INDEX
Page 128 of 307
PRETENSIONERSThe car is equipped with front seat belt
pretensioners, which draw back the seat belts by
several centimetres in the event of a strong frontal
impact. This guarantees the perfect adherence of
the seat belts to the occupants' bodies before
the restraining action begins.
It is evident that the pretensioners have been
activated when the belt withdraws towards the
reel. This car is also equipped with a second
pretensioner (in the kick plate area). Its activation
is signalled by the shortening of the metal cable.
A slight discharge of smoke may be produced
during the activation of the pretensioner which is
not harmful and does not involve any fire hazard.
IMPORTANT To obtain the highest degree of
protection from the action of the pretensioning
device, wear the seat belt tight to the chest and
pelvis.
The pretensioner does not require any
maintenance or lubrication: any changes to its
original conditions will invalidate its efficiency. If,
due to unusual natural events (floods, sea storms,
etc.), the device has been affected by water and
mud, it must be replaced.
WARNING
The pretensioner may be used only
once. Go to a Lancia Dealership
to have it replaced after it has been
deployed. Pretensioner validity is indicated
on the label located on the door contour
sheet metal. Pretensioners should be
replaced at a Lancia Dealership as this date
approaches.Operations which lead to knocks,
vibrations or localised heating (over
100°C for a maximum of 6 hours) in the
area around the pretensioners may cause
damage or trigger them. These devices are not
affected by vibrations caused by irregularities
of the road surface or low obstacles such as
kerbs, etc. Contact a Lancia Dealership for
any assistance.
LOAD LIMITERS
To increase passenger safety, the front seat belt
reels contain a load limiter which allows
controlled sag in such a way as to dose the force
acting on the chest and shoulders during the
belt restraining action in the case of frontal
collisions.
126
GETTING TO KNOW
YOUR CAR
SAFETY
STARTING AND
DRIVING
WARNING LIGHTS
AND MESSAGES
IN AN EMERGENCY
SERVICING AND
MAINTENANCE
TECHNICAL
SPECIFICATIONS
INDEX
Page 150 of 307
WARNING
Depress the clutch pedal fully to
change gear correctly. It is therefore
essential that there is nothing under the
pedals: make sure the mats are lying flat and
do not get in the way of the pedals.Do not drive with your hand resting on
the gear lever as the force exerted,
even if slight, could lead over time to
premature wear of the gearbox internal
components.
SAVING FUELHere are some suggestions which can help you to
save fuel and lower harmful emissions.
GENERAL CONSIDERATIONS
Car maintenance
Have checks and adjustments carried out in
accordance with the “Scheduled Servicing Plan”.
Tyres
Check the tyre pressure at least once every 4
weeks: if the pressure is too low, consumption
levels increase as resistance to rolling is higher.
Unnecessary loads
Do not travel with an overloaded boot. The weight
of the car and its arrangement greatly affect fuel
consumption and stability.
Roof rack/ski rack
Remove the roof rack or the ski rack from the roof
after use. These accessories lower aerodynamic
penetration and adversely affect consumption
levels. When transporting particularly large
objects, use a trailer if possible.
148
GETTING TO KNOW
YOUR CAR
SAFETY
STARTING AND
DRIVINGWARNING LIGHTS
AND MESSAGES
IN AN EMERGENCY
SERVICING AND
MAINTENANCE
TECHNICAL
SPECIFICATIONS
INDEX
Page 160 of 307

2. Engine oil deteriorated
(only Diesel versions with DPF)
The warning light will flash and a specific
message will appear on the display (in versions/
markets, where provided). The warning light may
flash in the following ways, depending on the
version:
❒1 minute every two hours;
❒cycles of 3 minutes with intervals with the
warning light off for 5 seconds until the oil
is changed.
After the first indication, at each engine start up
the warning light will continue flashing as
described above until the oil is changed. For
(versions/markets where provided), the display
shows a dedicated message together with the
warning light.
The flashing of the warning light should not be
considered as a fault, it simply informs the
customer that the oil needs to be changed
following normal car use.Remember that the deterioration of the engine oil
is accelerated by:
❒mainly town use of the car which makes the
DPF regeneration process more frequent;
❒use of the car for short drives, in which the
engine does not have time to reach its regular
operating temperature;
❒repeated interruption of the regeneration
process, signalled by the DPF warning light
coming on.
WARNING
If the warning light comes on, the
exhausted engine oil should be
changed as soon as possible; never drive
more than 500 km from the first
switching-on of this warning light. Failure to
observe the above may result in severe
damage to the engine and invalidate the
warranty. Remember that when the warning
light comes on, it does not mean that the
level of engine oil is low, so if the light
flashes you do not need to top up the engine
oil.
158
GETTING TO KNOW
YOUR CAR
SAFETY
STARTING AND
DRIVINGWARNING LIGHTS
AND MESSAGESIN AN EMERGENCY
SERVICING AND
MAINTENANCE
TECHNICAL
SPECIFICATIONS
INDEX
Page 172 of 307
WARNING
If you change the type of wheel (alloy
rims instead of steel rims and vice
versa) you will have to change the entire set
of fastening bolts with another set of suitably
sized bolts.
WARNING
Alert other drivers that the car is
stationary in compliance with local
regulations: hazard warning lights, warning
triangle, etc. Any passengers on board
should leave the car, especially if it is
heavily laden. Passengers should stay away
from on-coming traffic while the wheel is
being changed. On hills or uneven roads, use
chocks or appropriate objects to block the
wheels of the car.
WARNING
The car's driving characteristics will
be modified with the space-saver
wheel fitted. Avoid sudden starting or
stopping, sharp or fast turns. The total life of
a space-saver wheel is approximately 3000
km, after which it must be replaced by
another wheel of the same type. Never install
a standard tyre on a rim that is designed
for use with a space-saver wheel. Have the
tyre repaired and refitted as soon as
possible. Using two or more space-saver
wheels at the same time is forbidden. Do not
grease the threads of bolts before fitting
them: they might slip out.
170
GETTING TO KNOW
YOUR CAR
SAFETY
STARTING AND
DRIVING
WARNING LIGHTS
AND MESSAGESIN AN EMERGENCYSERVICING AND
MAINTENANCE
TECHNICAL
SPECIFICATIONS
INDEX
Page 174 of 307
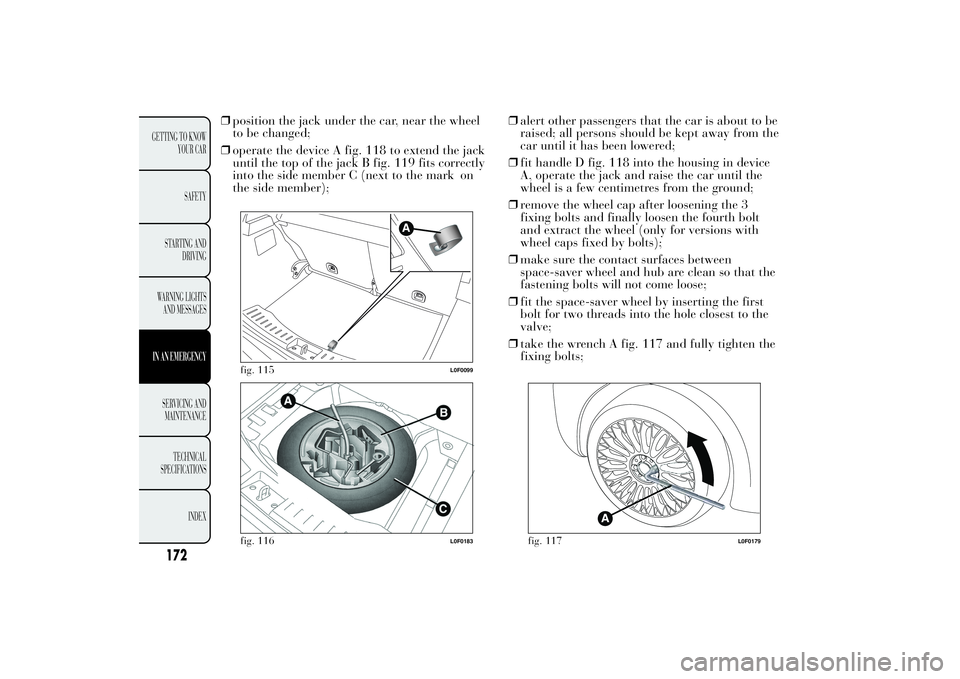
❒position the jack under the car, near the wheel
to be changed;
❒operate the device A fig. 118 to extend the jack
until the top of the jack B fig. 119 fits correctly
into the side member C (next to the mark on
the side member);❒alert other passengers that the car is about to be
raised; all persons should be kept away from the
car until it has been lowered;
❒fit handle D fig. 118 into the housing in device
A, operate the jack and raise the car until the
wheel is a few centimetres from the ground;
❒remove the wheel cap after loosening the 3
fixing bolts and finally loosen the fourth bolt
and extract the wheel (only for versions with
wheel caps fixed by bolts);
❒make sure the contact surfaces between
space-saver wheel and hub are clean so that the
fastening bolts will not come loose;
❒fit the space-saver wheel by inserting the first
bolt for two threads into the hole closest to the
valve;
❒take the wrench A fig. 117 and fully tighten the
fixing bolts;
fig. 115
L0F0099
fig. 116
L0F0183
fig. 117
L0F0179
172
GETTING TO KNOW
YOUR CAR
SAFETY
STARTING AND
DRIVING
WARNING LIGHTS
AND MESSAGESIN AN EMERGENCYSERVICING AND
MAINTENANCE
TECHNICAL
SPECIFICATIONS
INDEX